by Michael Cropper | Feb 25, 2021 | Client Friendly, Developer, Software Development, Technical |
In this guide we’re going to look at how to setup Selenium using Java and Apache NetBeans as an end to end guide so you can be up and running in no time. If you’ve not set this up before, there are a few nuances throughout the end to end process and other areas where the official documentation isn’t the best at times. So hopefully this guide can clear up some of the questions you likely have so you can start working on using Selenium to run automated browser based testing for your web applications.
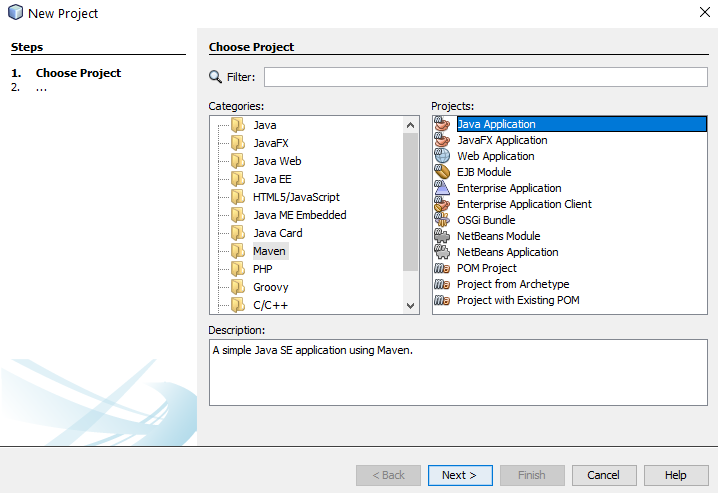
Create a New Maven Java Application Project
Firstly we’re going to use Maven to simplify the installation process. If you aren’t familiar with Maven, it is essentially a package manager that allows you to easily import your project dependencies without having to manually download JAR files and add them to your libraries. You can manually install the JAR files if you like, it’s just a bit more time consuming to find all of the dependencies that you are going to need.
To create a new Maven project, click File > New Project and select Maven then Java Application;
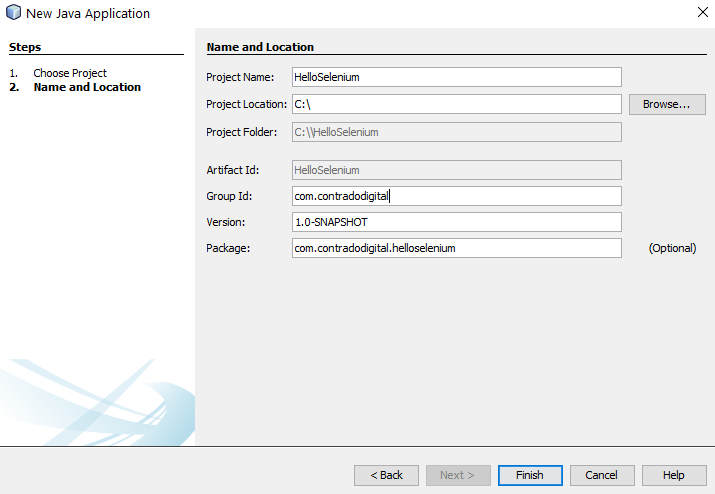
Configure Maven Project and Location
Next you need to configure some details for your project. For the purpose of simplicity we’re going to call this project HelloSelenium. And you’ll notice that when you enter the Group ID field, set this to the canonical name of your package which you generally want to set to your primary domain name in reverse, i.e. com.contradodigital, which will then automatically populate the Package name at the bottom to be com.contradodigital.helloselenium. This is industry best practice for naming your packages so that they have a unique reference.
Open Your Pom.xml File
Next we need to configure your pom.xml file which is used for Maven projects to manage your dependencies. Out of the box within NetBeans, when you create a Maven project, a very basic pom.xml file is created for you. Which sounds like it would be handy, but it doesn’t contain a great deal of information so can be more confusing than helpful for those less familiar with Maven.
When you open up the default pom.xml file, it will look similar to the following;
<?xml version="1.0" encoding="UTF-8"?>
<project xmlns="http://maven.apache.org/POM/4.0.0" xmlns:xsi="http://www.w3.org/2001/XMLSchema-instance" xsi:schemaLocation="http://maven.apache.org/POM/4.0.0 http://maven.apache.org/xsd/maven-4.0.0.xsd">
    <modelVersion>4.0.0</modelVersion>
    <groupId>com.contradodigital</groupId>
    <artifactId>HelloSelenium</artifactId>
    <version>1.0-SNAPSHOT</version>
    <packaging>jar</packaging>
    <properties>
        <project.build.sourceEncoding>UTF-8</project.build.sourceEncoding>
        <maven.compiler.source>1.8</maven.compiler.source>
        <maven.compiler.target>1.8</maven.compiler.target>
    </properties>
    <name>HelloSelenium</name>
</project>
Which looks like a good starting point, but is a long way for you to be able to simply add in the relevant dependencies and get this working. So let’s look next at what your pom.xml file needs to look like to get you up and running with Maven.
Configure Your Pom.xml File
Before we jump into what your pom.xml file needs to look like, let’s first take a look to see what the required primary libraries are that we need to get Selenium up and running. There are a fairly small number, but behind the scenes there are quite a few dependencies too which aren’t always obvious.
Just don’t ask me why you need all these and what the differences are. The Selenium documentation isn’t that great and it just seems that these are needed to get things working. If you fancy having a play with the combinations of the above to see what the absolute minimum set of libraries are, then please do comment below with your findings.
So now we know this, there are a few bits that we need to configure in your pom.xml file which include;
- Plugin Repositories – By default there are none configured. So we need to get the Maven Central Repository added in
- Repositories – As above
- Dependencies – We need to add the 6x project dependencies so that they can be imported directly into your NetBeans environment
So to do all the above, your pom.xml file needs to look like the following;
    <?xml version="1.0" encoding="UTF-8"?>
<project xmlns="https://maven.apache.org/POM/4.0.0" xmlns:xsi="http://www.w3.org/2001/XMLSchema-instance" xsi:schemaLocation="https://maven.apache.org/POM/4.0.0 http://maven.apache.org/xsd/maven-4.0.0.xsd">
    <modelVersion>4.0.0</modelVersion>
    <groupId>com.contradodigital</groupId>
    <artifactId>HelloSelenium</artifactId>
    <version>1.0-SNAPSHOT</version>
    <packaging>jar</packaging>
    <properties>
        <project.build.sourceEncoding>UTF-8</project.build.sourceEncoding>
        <maven.compiler.source>1.8</maven.compiler.source>
        <maven.compiler.target>1.8</maven.compiler.target>
    </properties>
    <pluginRepositories>
        <pluginRepository>
            <id>central</id>
            <name>Central Repository</name>
            <url>https://repo.maven.apache.org/maven2</url>
            <layout>default</layout>
            <snapshots>
                <enabled>false</enabled>
            </snapshots>
            <releases>
                <updatePolicy>never</updatePolicy>
            </releases>
        </pluginRepository>
    </pluginRepositories>
    <repositories>
        <repository>
            <id>central</id>
            <name>Central Repository</name>
            <url>https://repo.maven.apache.org/maven2</url>
            <layout>default</layout>
            <snapshots>
                <enabled>false</enabled>
            </snapshots>
        </repository>
    </repositories>
    <dependencies>
        <!-- https://mvnrepository.com/artifact/org.seleniumhq.selenium/selenium-java -->
        <dependency>
            <groupId>org.seleniumhq.selenium</groupId>
            <artifactId>selenium-java</artifactId>
            <version>3.141.59</version>
        </dependency>
        <!-- https://mvnrepository.com/artifact/org.seleniumhq.selenium/selenium-api -->
        <dependency>
            <groupId>org.seleniumhq.selenium</groupId>
            <artifactId>selenium-api</artifactId>
            <version>3.141.59</version>
        </dependency>
        <!-- https://mvnrepository.com/artifact/org.seleniumhq.selenium/selenium-server -->
        <dependency>
            <groupId>org.seleniumhq.selenium</groupId>
            <artifactId>selenium-server</artifactId>
            <version>3.141.59</version>
        </dependency>
        <!-- https://mvnrepository.com/artifact/org.seleniumhq.selenium/selenium-chrome-driver -->
        <dependency>
            <groupId>org.seleniumhq.selenium</groupId>
            <artifactId>selenium-chrome-driver</artifactId>
            <version>3.141.59</version>
        </dependency>
        <!-- https://mvnrepository.com/artifact/org.seleniumhq.selenium/selenium-remote-driver -->
        <dependency>
            <groupId>org.seleniumhq.selenium</groupId>
            <artifactId>selenium-remote-driver</artifactId>
            <version>3.141.59</version>
        </dependency>
        <!-- https://mvnrepository.com/artifact/junit/junit -->
        <dependency>
            <groupId>junit</groupId>
            <artifactId>junit</artifactId>
            <version>4.13.2</version>
            <scope>test</scope>
        </dependency>
    </dependencies>
</project>
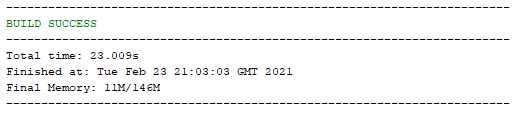
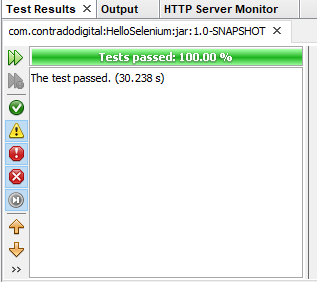
Once you’ve done this, save. Then Right Click on your project name and select ‘Build with Dependencies’ which will pull all of the dependencies into your NetBeans project. You should see a successful build message here;
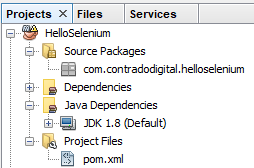
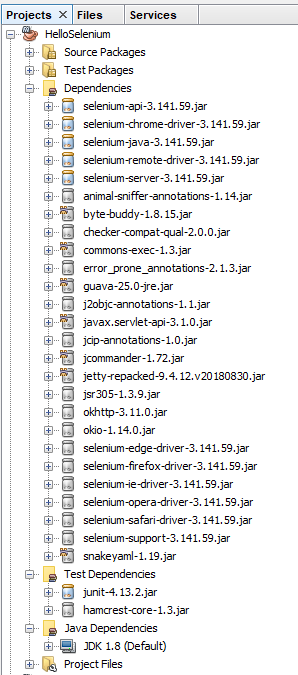
And you should also notice that within your NetBeans Project the total number of Dependencies and Test Dependencies that have now been imported have grown to significantly more than 6 JAR files that have been imported. This is one of the huge benefits of using a package dependency management system such as Maven as it just helps you get things working with ease. Can you imagine having to find all of the different libraries that have now been imported manually and keeping everything in sync? Here is what has now been imported for you automatically;
Note, if this is the first time you are getting Maven set up on your machine, you may find a few issues along the way. One of the common issues relates to an error that NetBeans throws which states;
“Cannot run program “cmd”, Malformed argument has embedded quote”
Thankfully to fix this you simply need to edit the file, C:\Program Files\NetBeans 8.2\etc\netbeans.conf and append some text to the line that contains netbeans_default_options;
-J-Djdk.lang.Process.allowAmbiguousCommands=true
So that the full line now reads;
netbeans_default_options=”-J-client -J-Xss2m -J-Xms32m -J-Dapple.laf.useScreenMenuBar=true -J-Dapple.awt.graphics.UseQuartz=true -J-Dsun.java2d.noddraw=true -J-Dsun.java2d.dpiaware=true -J-Dsun.zip.disableMemoryMapping=true -J-Djdk.lang.Process.allowAmbiguousCommands=true”
If you’re interested in why this is required, this release note outlines the issue in more detail.
You will find there will be the odd nuance like this depending on the version of NetBeans / Java / JDK / Maven etc. that you are running. Rarely do things seamlessly line up. So if you encounter any slightly different issues within your setup, then please do leave a comment below once you’ve found a solution to help others in the future.
Install Selenium IDE
Ok, so now we’ve got our NetBeans environment up and running. It’s time to make life as easy as possible. I’m assuming you don’t want to be writing everything manually for your web browser test scripts? I mean, if you do, enjoy yourself, but personally I prefer to make life as easy as possible by using the available tools at hand. This is where the Selenium IDE comes into play.
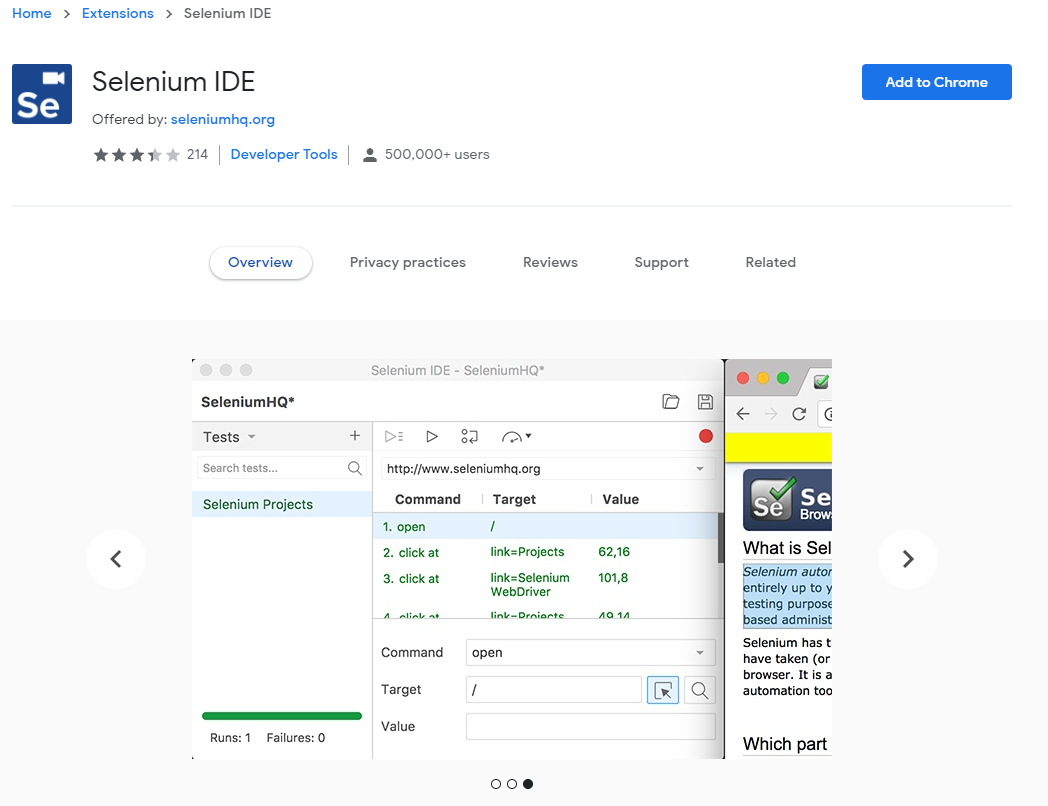
The Selenium IDE is a Google Chrome Extension that you can easily download and install at the click of a button;
Once you’ve done this you will notice that the Extension has added a button at the top right of your Chrome browser that you can click on to open the Selenium IDE. If you’re from a tech heavy software development background, you’re probably expecting an installed desktop application whenever you hear the word IDE mentioned, but in this case it is nothing more than a Chrome Extension.
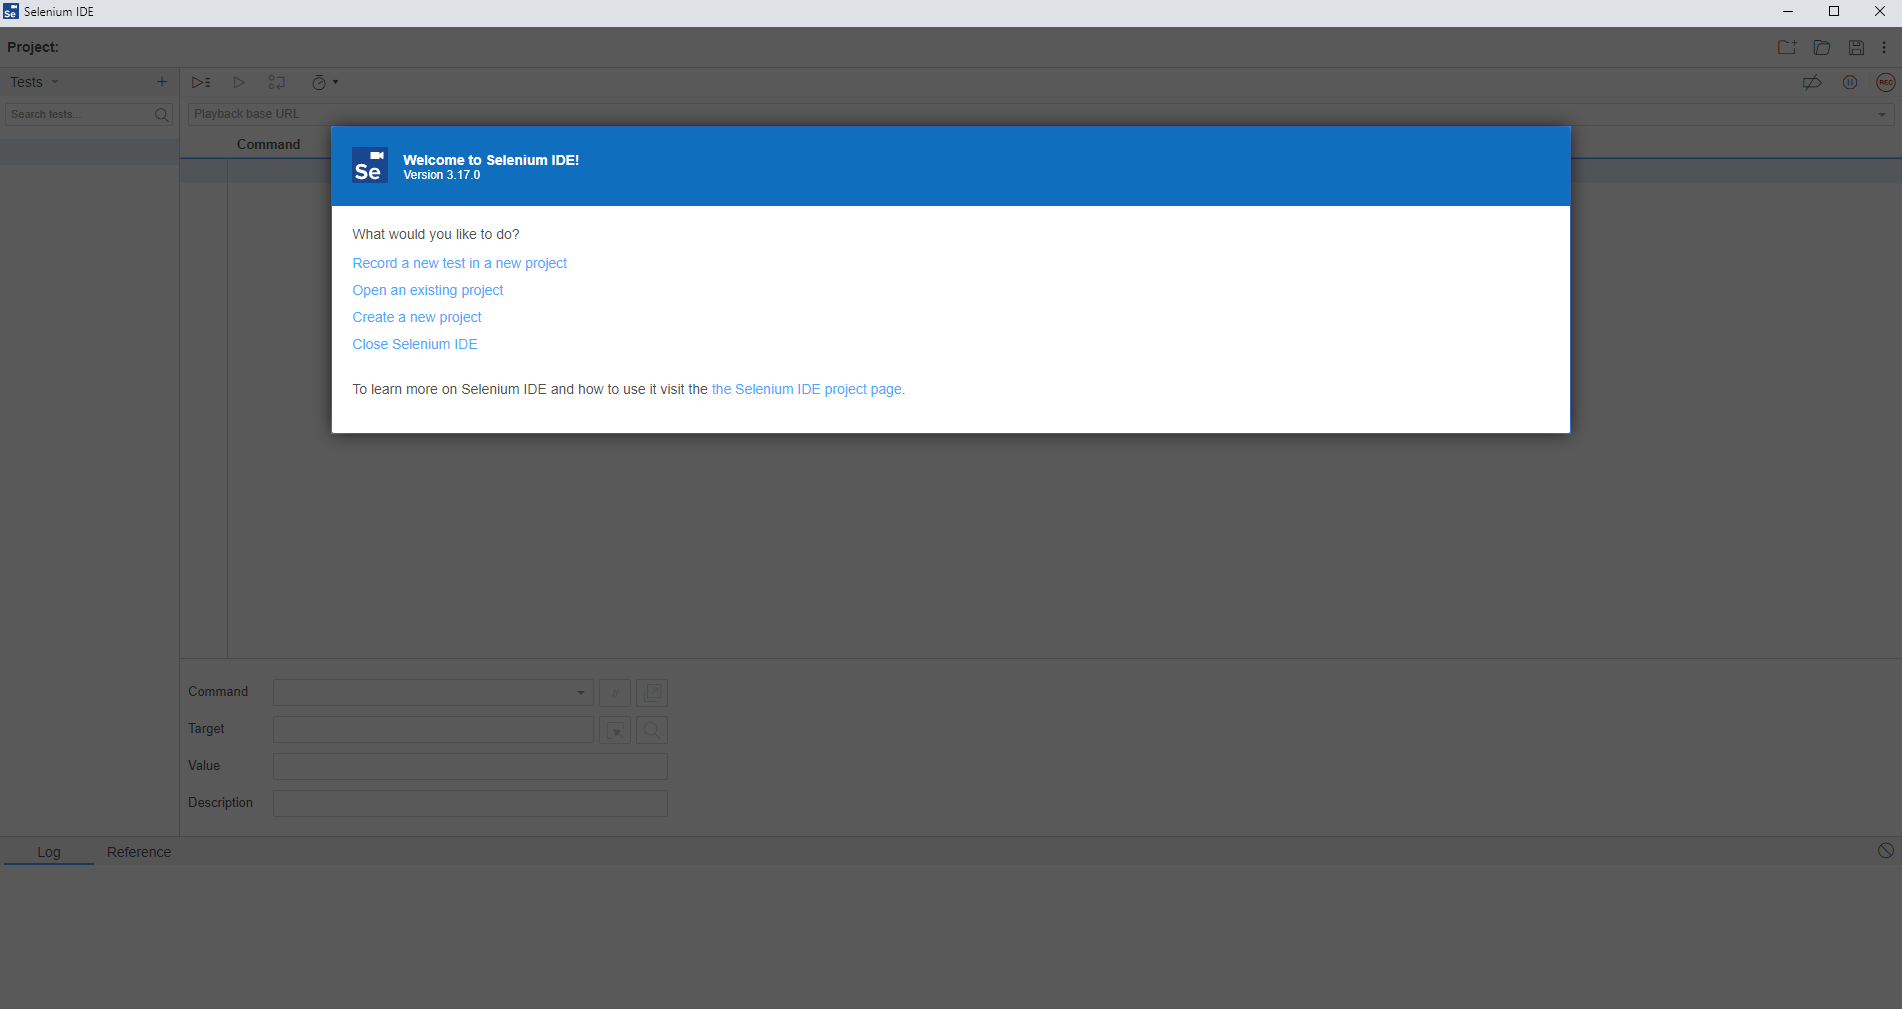
Click the Selenium IDE icon in Chrome to open it up. Once it is open for the first time you will notice a basic welcome screen;
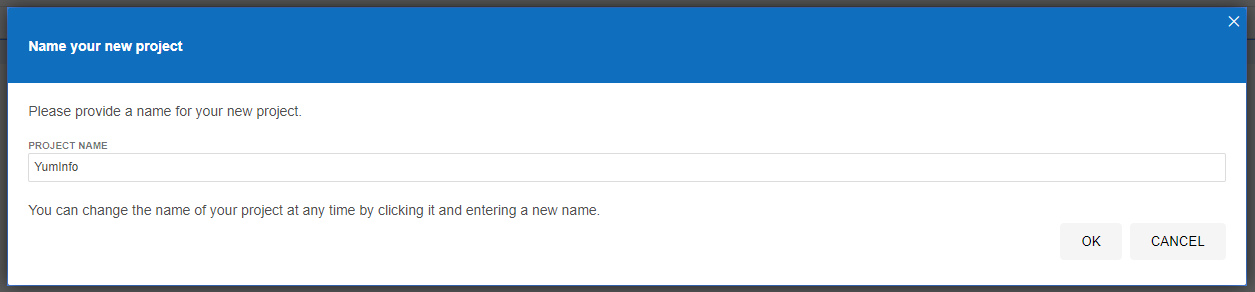
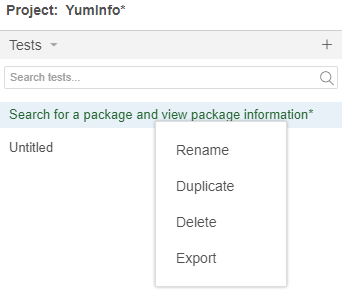
Click on Create a New Project to get started. Give your project a name so it’s clear what you are testing. In this example we’re going to be doing some testing on YumInfo which is an application we created to help software developers and infrastructure engineers easily search through the 20,000 packages that are contained within common Yum Repositories. Exactly like we have the Maven Central Repository for installing Java packages, it’s the same thing, just focused on Linux level software packages instead.
Create Your First Automated Web Browser Test in Selenium IDE
Ok, so now we’ve got Selenium installed and a new project created, let’s get onto creating your first automated browser test so you can get a feel for how all this works. It’s extremely simple to do so.
Firstly click on the + button to add a new test;
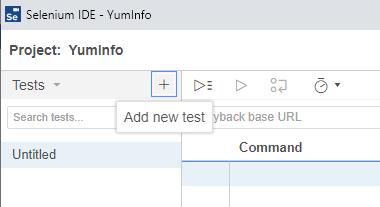
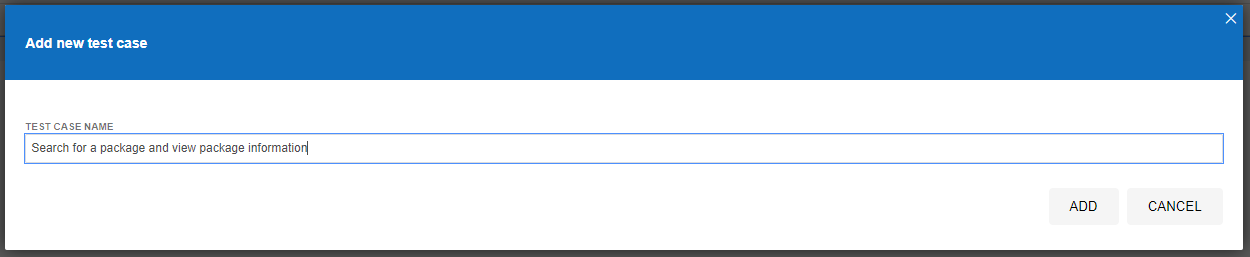
This will then open up the popup which allows you to give your new test a name. In this example, we’re going to test if we can use the search functionality on the YumInfo site to easily find a useful package.
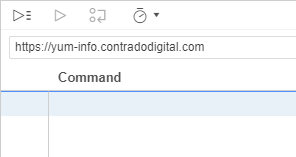
Once you’ve done this, you’ll notice that a new Test Case has been created for you which is in the left section of the screenshot below, but you’ll notice there are no steps that have been created yet which is why the section on the right of the screenshot below is still all blank.

What you will notice in the above screenshot is there are two core sections that we are going to look at next;
- Playback base URL – This is the landing page that you are going to start your tests from. Generally speaking this is so you can test in the same way that your users would use the website.
- Record Button – This is in the top right coloured in red. This allows you to start the process running for recording your automated test scripts within Selenium IDE.
To get started, enter the base URL you want to work with. In our case we’re going to enter https://yum-info.contradodigital.com as that is the website we are doing the automated browser based testing on.
Then once you’ve done that. Click the red Record Button at the top right.
This step will open a brand new Chrome window and it will inform you that recording has started. It’s a very similar concept as you can record Macros in Excel if you have ever used those before.
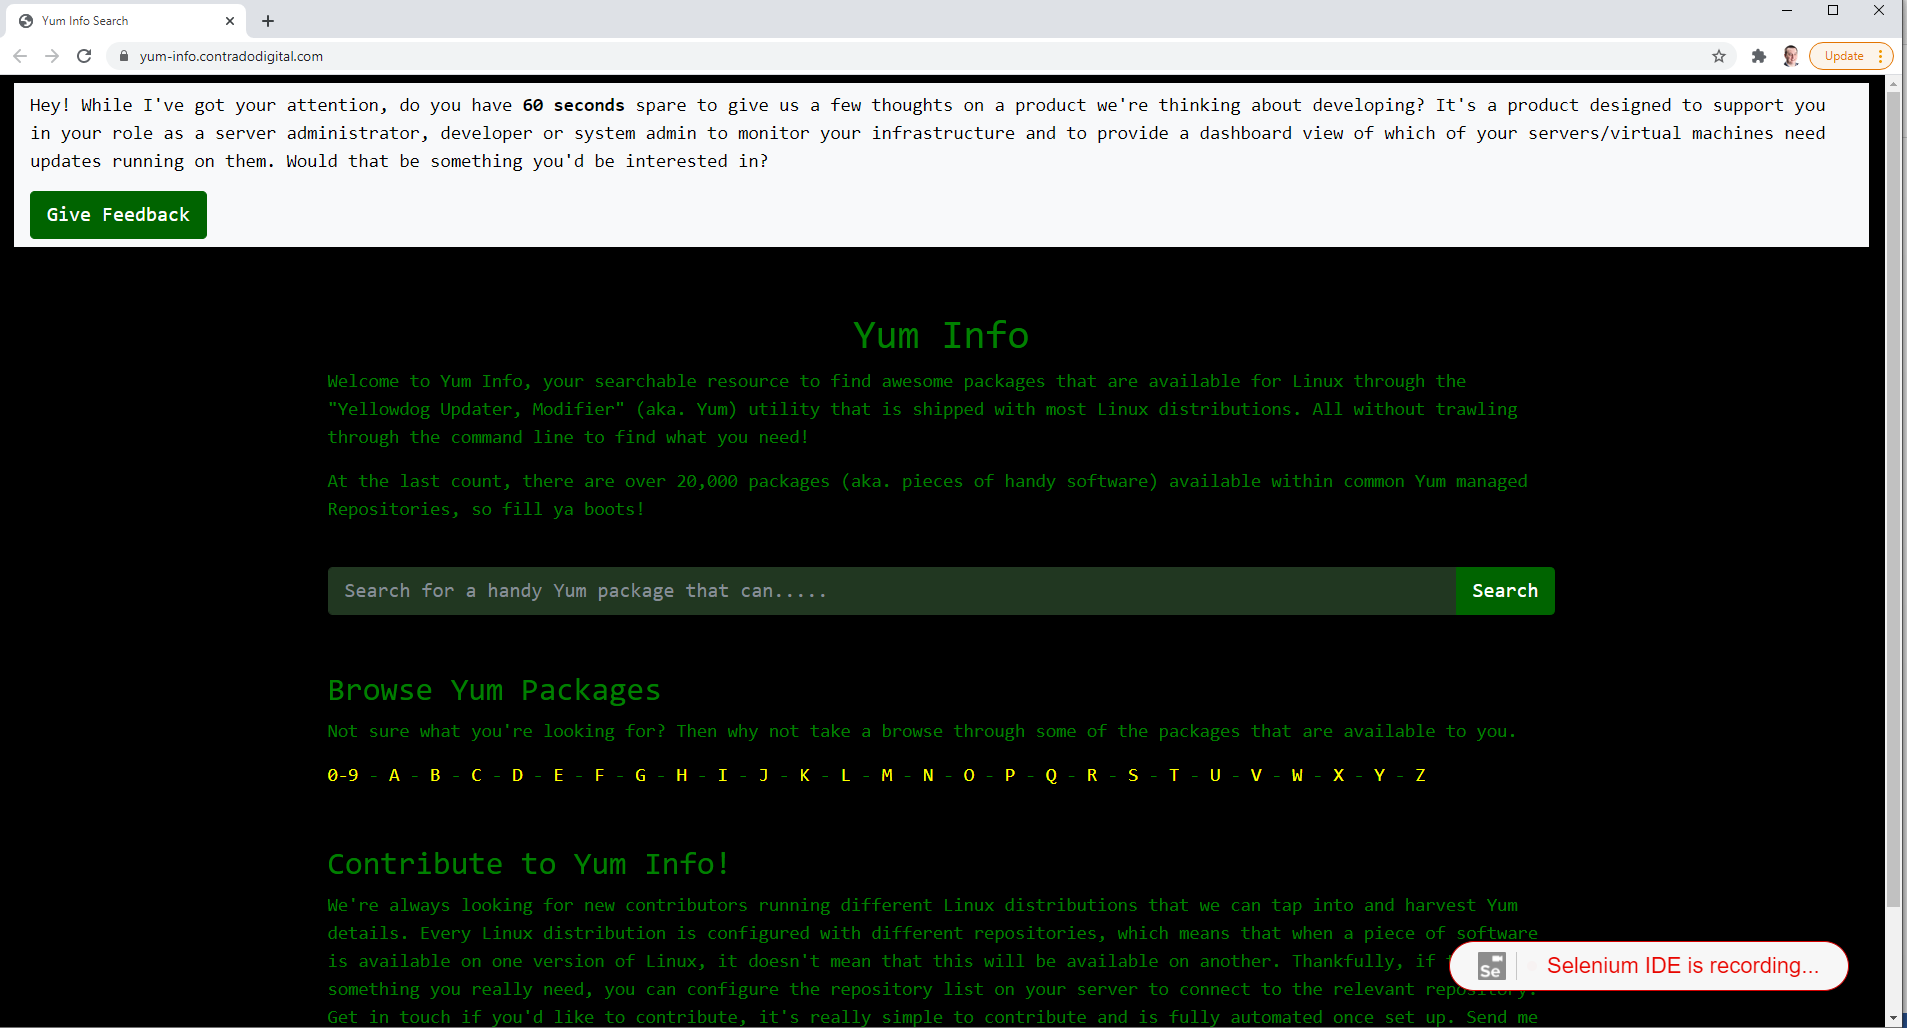
Now all you need to do is to click around your website and use it like a user would. In this case, as this specific Test Case we are looking to search for a package and then view the package information we’re going to do just that.
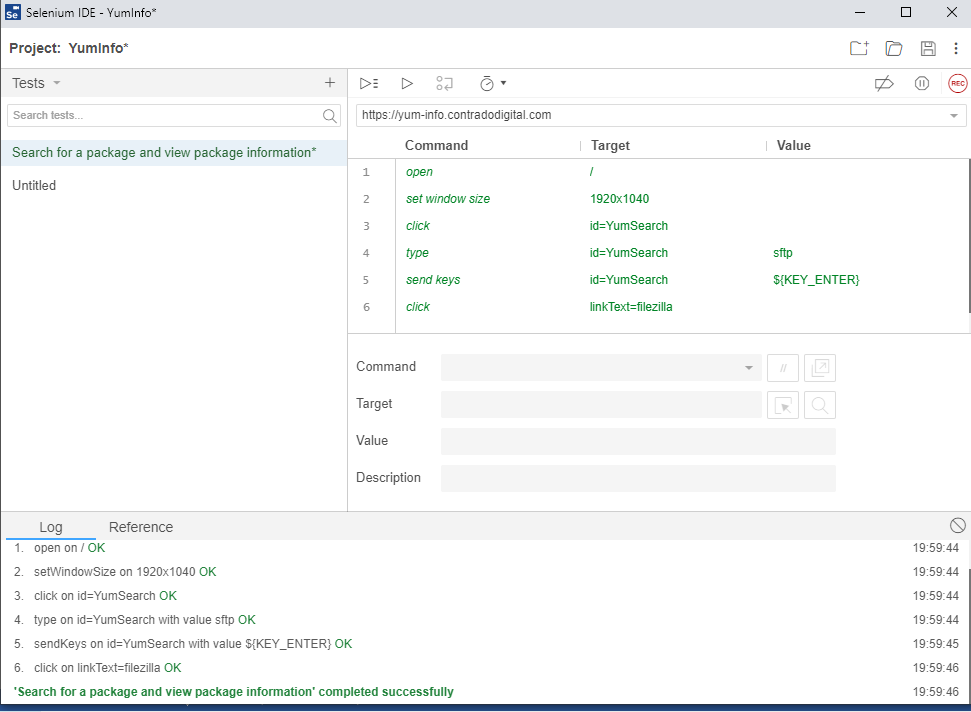
Once you are done clicking around, simply navigate back to your Selenium IDE that is open and click on Stop Recording. Once you have done that you will notice that the specific steps that you have just taken within the web browser have been recorded within Selenium IDE. Awesome!
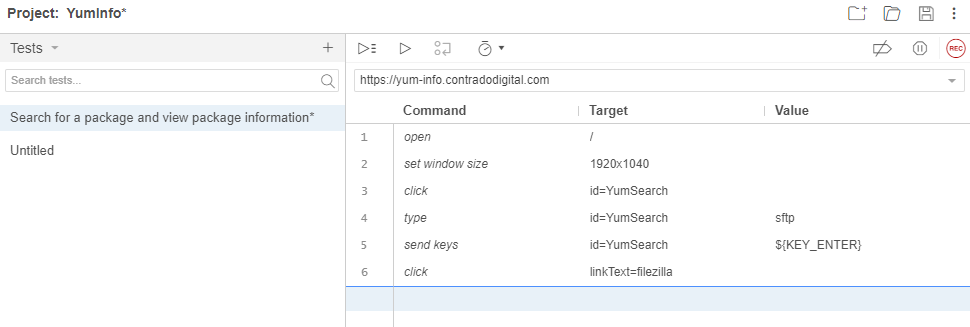
What the above steps are saying is that I followed these actions;
- Open the Base URL https://yum-info.contradodigital.com
- Set the browser window size to the default of your computer setup
- Click on the HTML Element that has an ID of ‘YumSearch’, which in this case is the search box that allows users to search for packages
- Type into the search box “sftp” without the quotes
- Then click Enter to trigger the search
- And finally, click on the link titled FileZilla which is a relevant package that can handle SFTP based communications
What all this has shown us is that as a user doing these steps, this all works as expected on the website. Hopefully this isn’t an unexpected result that basic functionality on your website is working. But this is just a simple example we are using to get you up and running.
Save this Test Case so you can reference back to it later down the line.
Re-Run Your First Automated Web Browser Test Case
Now that you have recorded your first test, you want to replay it so that you are confident that it has been recorded accurately. For traditionally built websites that use a single Request/Response you’ll find that these test generally record perfectly first time around. Whereas for websites build using more Single Page Applications / Front End Frameworks that load content dynamically into the page past the initial page load, you’ll find you will likely have a few issues with the default recordings and that the automated recording will need some manual intervention to get them to work properly.
To re-run the test you have just created, simply click on the Play button;
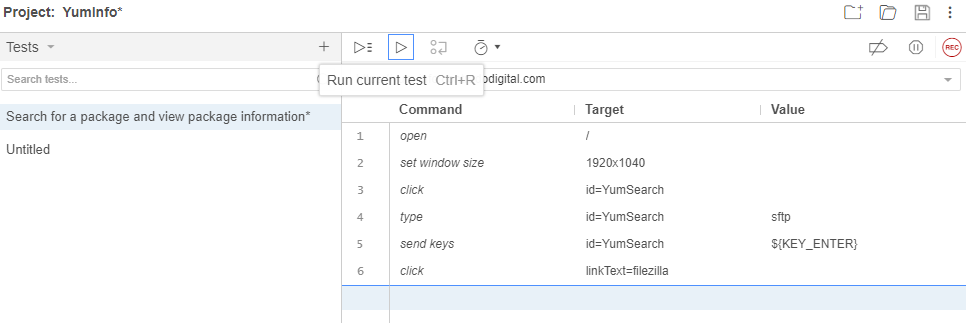
Once you click that button, you will notice that magic starts to happen. Your web browser will open and the exact steps that you just took will be replicated in real time right in front of your eyes. Most importantly, once it is complete, you will see that it has completed successfully.
By doing this you have just proved that the Test Case has been recorded successfully and can run through to the end to confirm this end to end process works correctly. This is important as you build up your Test Cases as you will find many larger websites can have 1000s and even 10,000s of Test Cases created over time that ensure the stability of the platform.
Why Build a Library of Test Cases in Selenium IDE for Automated Web Browser Testing?
Just stepping back a little though, why are we even bothering to do this? Well quite frankly, that is a very good question – and one that you should genuinely be asking for any project that you are working on. Yes, many people say this is best practice to build automated web browser testing for web applications, and there is a very solid argument to this. Then on the other hand, if you are working with solid web application development principles, and you have awesome developers, and you have an extremely slick development process to fix forward, then you may find that Selenium automated web browser testing is just an added burden that adds very little value.
The reality is that most organisations, this isn’t the reality, so Selenium comes in extremely handy to mitigate any risk of pushing bad code through to the live environment and streamlines regression testing. Meaning that you can run a significant amount of automated tests without ever having to worry about getting users to manually test features and functionality every time you want to do a release.
Download Chrome Web Driver
Now we’ve utilised the power of the Selenium IDE to create our automated web browser for us, it’s time to take that and move it into a proper software development environment, aka. NetBeans. Before we jump into the details we’re going to need to download the Chrome Web Driver. This will allow you to make NetBeans, more specifically the Selenium and JUnit dependencies, interact with your Chrome web browser.
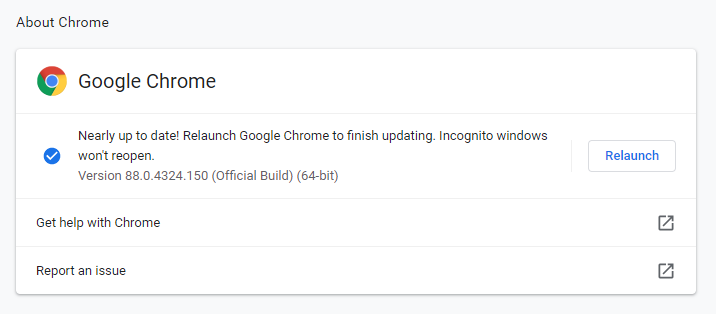
As with anything, versioning is important. So the first thing you need to do is understand what version of Google Chrome you are running. To do this, go into Google Chrome > Settings > About Chrome and you will see your version number there;
Now you know what version of Google Chrome you are using. Next you need to download the specific Google Chrome Driver that applies to your version of Google Chrome. Head over to the Chromium Chrome Driver Downloads page and find the version that applies to you.

Once you’ve downloaded the ChromeDriver and you have unzipped it, you have this on your system which we’ll reference a little later as we move your Selenium IDE generated Test Case into NetBeans.
You want to put this file into a location that you aren’t going to change next week as your code will break. You need this in a handy reference location that suits how you personally organise your development environments.
Export Test Case from Selenium IDE to JUnit Format
Next we need to export the Test Case that we created in Selenium IDE so that we can then import that into NetBeans. To do this go back to Selenium IDE and right click the Test Case you created then click on Export;
Then select the language we want to export the file to. The beauty of the Selenium IDE is that it is cross language compatible which means that you can import the Test Case into any number of your preferred automated web browser testing setups you use, in this case we’re using JUnit in Java, but you could quite easily use either NUnit or xUnit for C#, or Mocha for JavaScipt or pytest for Python or RSpec for Ruby. The choice is yours.

Once this has been exported, this will save a .java file in our example to your local file system which will look as follows;
// Generated by Selenium IDE
import org.junit.Test;
import org.junit.Before;
import org.junit.After;
import static org.junit.Assert.*;
import static org.hamcrest.CoreMatchers.is;
import static org.hamcrest.core.IsNot.not;
import org.openqa.selenium.By;
import org.openqa.selenium.WebDriver;
import org.openqa.selenium.firefox.FirefoxDriver;
import org.openqa.selenium.chrome.ChromeDriver;
import org.openqa.selenium.remote.RemoteWebDriver;
import org.openqa.selenium.remote.DesiredCapabilities;
import org.openqa.selenium.Dimension;
import org.openqa.selenium.WebElement;
import org.openqa.selenium.interactions.Actions;
import org.openqa.selenium.support.ui.ExpectedConditions;
import org.openqa.selenium.support.ui.WebDriverWait;
import org.openqa.selenium.JavascriptExecutor;
import org.openqa.selenium.Alert;
import org.openqa.selenium.Keys;
import java.util.*;
import java.net.MalformedURLException;
import java.net.URL;
public class SearchforapackageandviewpackageinformationTest {
  private WebDriver driver;
  private Map<String, Object> vars;
  JavascriptExecutor js;
  @Before
  public void setUp() {
    driver = new ChromeDriver();
    js = (JavascriptExecutor) driver;
    vars = new HashMap<String, Object>();
  }
  @After
  public void tearDown() {
    driver.quit();
  }
  @Test
  public void searchforapackageandviewpackageinformation() {
    // Test name: Search for a package and view package information
    // Step # | name | target | value
    // 1 | open | / |
    driver.get("https://yum-info.contradodigital.com/");
    // 2 | setWindowSize | 1920x1040 |
    driver.manage().window().setSize(new Dimension(1920, 1040));
    // 3 | click | id=YumSearch |
    driver.findElement(By.id("YumSearch")).click();
    // 4 | type | id=YumSearch | sftp
    driver.findElement(By.id("YumSearch")).sendKeys("sftp");
    // 5 | sendKeys | id=YumSearch | ${KEY_ENTER}
    driver.findElement(By.id("YumSearch")).sendKeys(Keys.ENTER);
    // 6 | click | linkText=filezilla |
    driver.findElement(By.linkText("filezilla")).click();
  }
}
The core bits of information that are relevant for this are the following;
  @Test
  public void searchforapackageandviewpackageinformation() {
    // Test name: Search for a package and view package information
    // Step # | name | target | value
    // 1 | open | / |
    driver.get("https://yum-info.contradodigital.com/");
    // 2 | setWindowSize | 1920x1040 |
    driver.manage().window().setSize(new Dimension(1920, 1040));
    // 3 | click | id=YumSearch |
    driver.findElement(By.id("YumSearch")).click();
    // 4 | type | id=YumSearch | sftp
    driver.findElement(By.id("YumSearch")).sendKeys("sftp");
    // 5 | sendKeys | id=YumSearch | ${KEY_ENTER}
    driver.findElement(By.id("YumSearch")).sendKeys(Keys.ENTER);
    // 6 | click | linkText=filezilla |
    driver.findElement(By.linkText("filezilla")).click();
  }
Here you can see the 6 steps that were in the original Selenium IDE which are visualised as code. This is extremely handy as this now gives you full control over every aspect of Selenium by using the power of the library to do what you need to do and more by using the power of JUnit too. Selenium by itself will only take you so far, you need to integrate Selenium with a proper testing framework such as JUnit to get the most from the technology. By exporting this code, this is the first step of the process to enhancing your automated web browser testing setup.
Create a New JUnit Test File in NetBeans
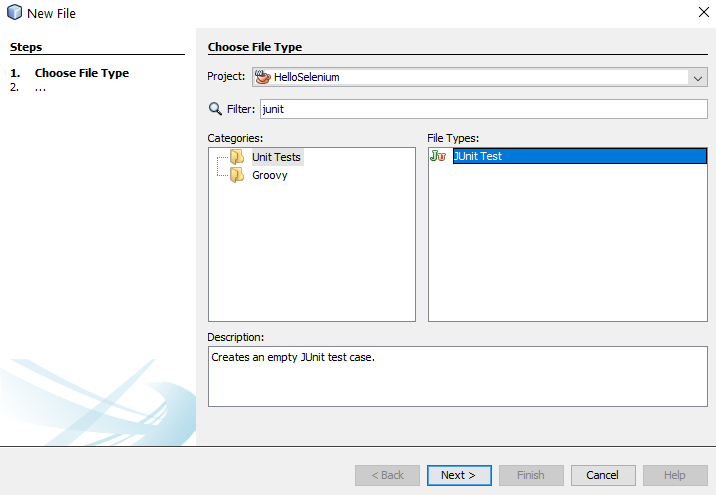
Ok, so back over to NetBeans. We want to import the Exported JUnit file from Selenium IDE into NetBeans so that we can manage the lifecycle of this Test Case better and work collaboratively with our colleagues. We’ll jump into more around the team collaboration elements of Selenium a little later. For now, let’s first jump in and get the JUnit Test added to NetBeans. To do this, right click on a folder in your project in NetBeans and select New File, then search for JUnit, then select JUnit Test and click Next.
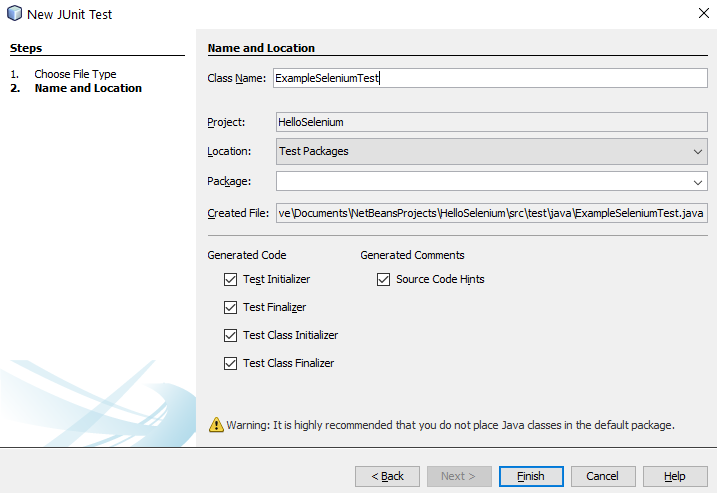
Once you’ve done that, give your new JUnit Test a Class Name and click Finish.
You will notice that this has generated a bunch of code for your automatically which is quite handy. This is great, but what you will also notice is that this doesn’t quite align 100% with the code that has been generated by the Selenium IDE. This is because here you have created a specific JUnit Test based on what NetBeans thinks a Test looks like, whereas the code that was generated in Selenium IDE was code that was a JUnit test that is specific to the test you created.
import org.junit.After;
import org.junit.AfterClass;
import org.junit.Before;
import org.junit.BeforeClass;
import org.junit.Test;
import static org.junit.Assert.*;
import org.openqa.selenium.By;
import org.openqa.selenium.WebDriver;
import org.openqa.selenium.WebElement;
import org.openqa.selenium.chrome.ChromeDriver;

/**
 *
 * @author Michael Cropper
 */
public class ExampleSeleniumTest {

    public ExampleSeleniumTest() {
    }

    @BeforeClass
    public static void setUpClass() {
    }

    @AfterClass
    public static void tearDownClass() {
    }

    @Before
    public void setUp() {
    }

    @After
    public void tearDown() {
    }

    // TODO add test methods here.
    // The methods must be annotated with annotation @Test. For example:
    //
    // @Test
    // public void hello() {}
}
Merge Your Exported Selenium IDE Test Case Into Your NetBeans JUnit Test Class
The next step is generally best to be done as a copy and paste to fit the automatically generated Selenium IDE Test Case code into the standardised approach you use for your JUnit Test Classes within NetBeans. Don’t just blindly copy and paste the code as while the automatically generated code is handy, you need to manage this code to fit with your specific needs and use cases.
In this example, here’s what the JUnit Test Class looks like now I’ve manually merged this code;
import org.junit.After;
import org.junit.AfterClass;
import org.junit.Before;
import org.junit.BeforeClass;
import org.junit.Test;
import static org.junit.Assert.*;
import org.openqa.selenium.By;
import org.openqa.selenium.Dimension;
import org.openqa.selenium.Keys;
import org.openqa.selenium.WebDriver;
import org.openqa.selenium.WebElement;
import org.openqa.selenium.chrome.ChromeDriver;

/**
 *
 * @author Michael Cropper
 */
public class ExampleSeleniumTest {

    public ExampleSeleniumTest() {
    }

    @BeforeClass
    public static void setUpClass() {
    }

    @AfterClass
    public static void tearDownClass() {
    }

    private WebDriver driver;

    @Before
    public void setUp() {
        System.setProperty("webdriver.chrome.driver", "C:/chromedriver_win32/chromedriver.exe");
        driver = new ChromeDriver();
    }

    @After
    public void tearDown() {
        driver.quit();
    }

    @Test
    public void searchforapackageandviewpackageinformation() {
        // Test name: Search for a package and view package information
        // Step # | name | target | value
        // 1 | open | / |
        driver.get("https://yum-info.contradodigital.com/");
        // 2 | setWindowSize | 1920x1040 |
        driver.manage().window().setSize(new Dimension(1920, 1040));
        // 3 | click | id=YumSearch |
        driver.findElement(By.id("YumSearch")).click();
        // 4 | type | id=YumSearch | sftp
        driver.findElement(By.id("YumSearch")).sendKeys("sftp");
        // 5 | sendKeys | id=YumSearch | ${KEY_ENTER}
        driver.findElement(By.id("YumSearch")).sendKeys(Keys.ENTER);
        // 6 | click | linkText=filezilla |
        driver.findElement(By.linkText("filezilla")).click();
    }
}
A couple of really important parts to be made aware of in the above code snippet are these;
private WebDriver driver;

    @Before
    public void setUp() {
        System.setProperty("webdriver.chrome.driver", "C:/chromedriver_win32/chromedriver.exe");
        driver = new ChromeDriver();
    }

    @After
    public void tearDown() {
        driver.quit();
    }
These are the following lines of code / methods;
- private WebDriver driver;
- This line of code is required to ensure you can easily open/close the WebDriver at the start and end of this Test Class. Over time you may have many Tests contained within a single Test Class, so by using this approach it is significantly more efficient and allows you to re-use the object without having to instantiate it every single time you run a Test within this Test Class.
- This then aligns with the contain within the setup() method and the teardown()
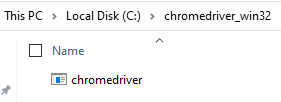
- setProperty(“webdriver.chrome.driver”, “C:/chromedriver_win32/chromedriver.exe”);
- This is what enables your JUnit code to communicate with your Google Chrome Web Browser and control it.
- public void searchforapackageandviewpackageinformation()
- Hopefully you recognise the contents of this method which is the automatically generated code produced by Selenium IDE that we have merged into this JUnit Test Class.
Run Your JUnit Test Class
Excellent, now we’re at a point that we can actually run our JUnit Test Class to confirm everything is still working as expected. To do this simply Right Click and select Test File within your JUnit Test Class. If everything has merged successfully you should see your Google Chrome Web Browser kick into action, run the test and the test should pass.
Collaborating with Colleagues
Finally we’re going to briefly touch on how you now collaborate with colleagues using Selenium and JUnit Test Classes. Everything we have done so far is excellent if you are working by yourself and just having a play around. But in any real world environment you are going to be working with a lot of colleagues that span different roles/responsibilities and even departments. This is where the collaboration element really kicks in. For the purpose of this blog post and to keep things fairly simplistic we’re going to highlight how this approach works when you are working between Developers and Quality Assurance (QA) or Test people.
One point to note is that this isn’t going to be a tutorial on how to use Git, so if you are unfamiliar with some of the concepts below then you are going to need to do a bit of background reading. To get up to speed with how to use Git and why it is important, then read the Git Book. Once you’ve read that about 10x from a standing start with zero knowledge you’ll probably understand it. We’ll do a write up on Git in a bit more detail at some point as it is a topic that is hugely misunderstood and often implemented incorrectly which can cause a lot of problems.
Below is a diagram of a generic process that can be handy to implement in organisations to show you how the different steps fit together along the Software Development Life Cycle, specifically focused around Selenium and team collaboration.

Summary
Hopefully this guide on how to setup Selenium using Java and Apache NetBeans has been helpful to get you up and running with Selenium in no time at all. This is very much the basics of automated web browser testing using a very specific set of technology, tooling and processes. There is an awful lot more that could be covered on this topic and that is perhaps one for another day. For now, this is just the very basics about getting up and running.
by Michael Cropper | Feb 19, 2021 | Client Friendly, IT, Technical |
One very common use case for using pfSense is to host a single website. So here we are going to show you how simple that is to do. As this is the very first step towards understanding how to host multiple websites behind your pfSense firewall, the reality is that the approach is very different to when you get to the point of hosting multiple websites behind your pfSense firewall. We’ll do a follow up blog post on that very shortly.
What is Port Forwarding?
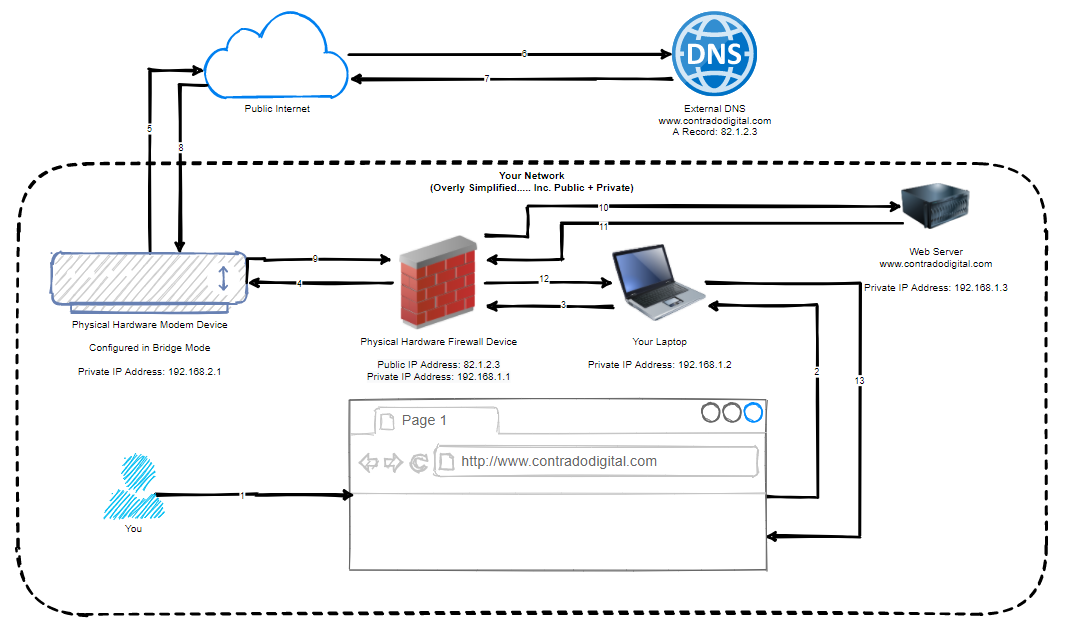
So the first step towards understanding how to host a single website behind your pfSense firewall is to understand the concept of Port Forwarding. Port Forwarding at the simplest level is to translate Port 1 Inbound on your WAN, to Port 2 on your LAN. To visualise what this means in an extremely basic setup, the diagram below looks at how Port Forwarding works.
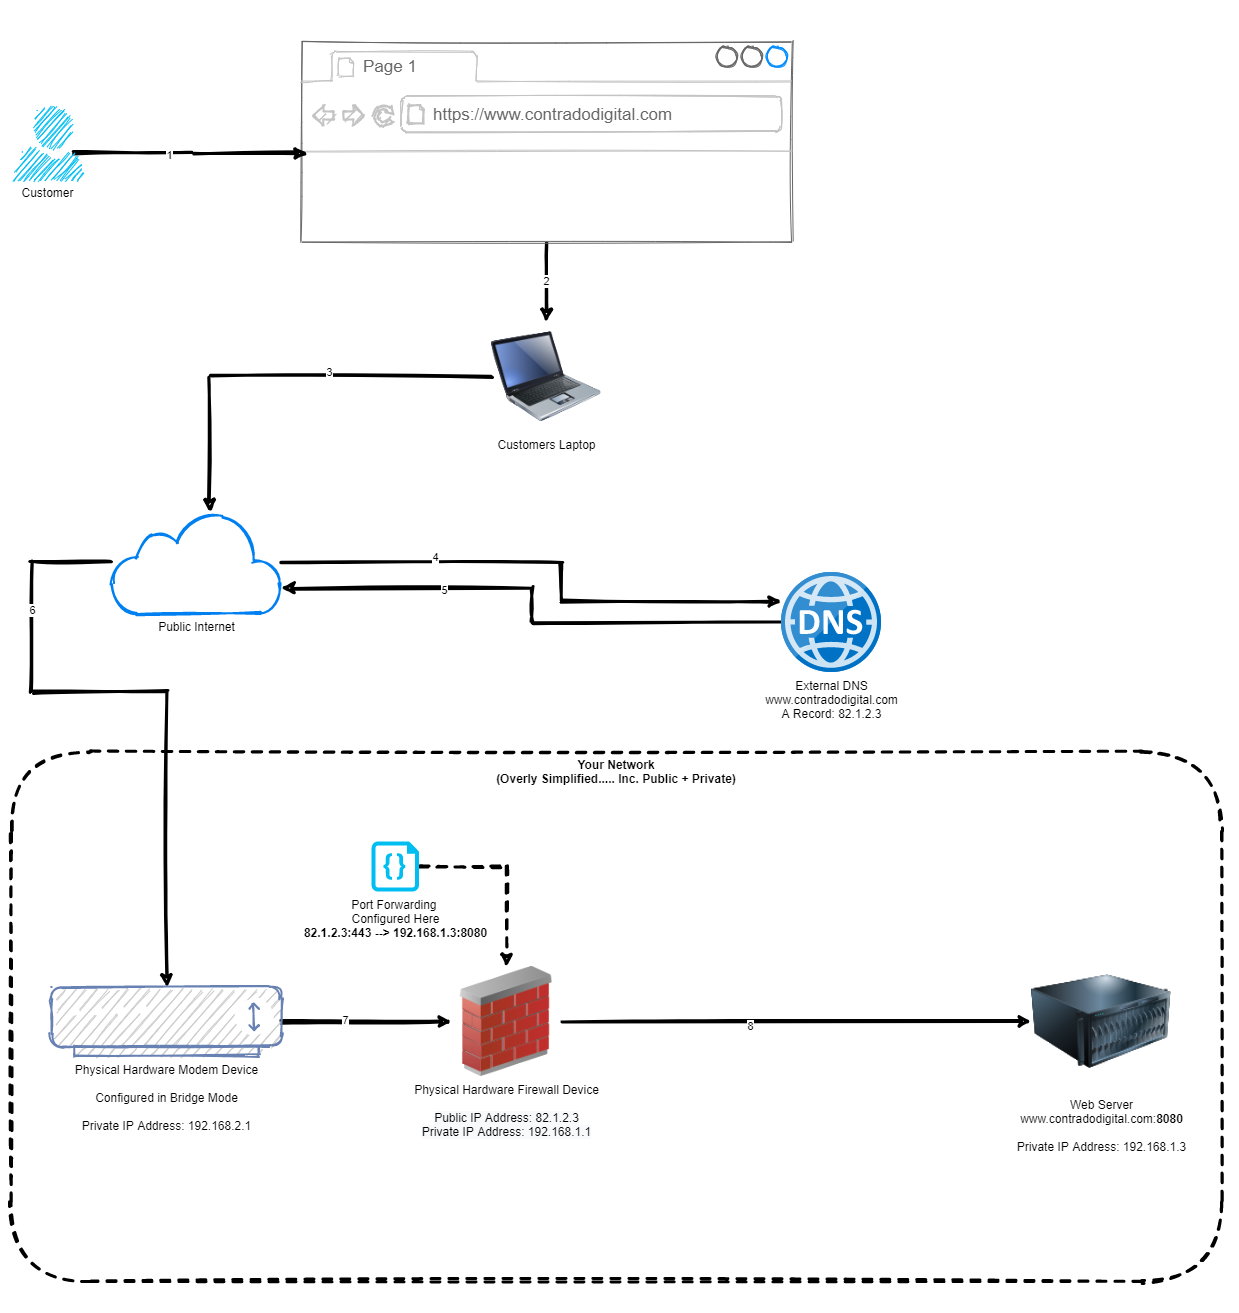
As you can see from the diagram above, this basically translates www.contradodigital.com into the IP address 82.1.2.3, which is being accessed over HTTPS (aka. Port 443). Then the firewall translates this inbound request onto your web server that is sitting behind your pfSense firewall which is hosting your website, which is on the internal IP address of 192.168.1.3 and the web server software (in this case Apache Tomcat) is running on Port 8080 to handle the request.
One point to note is that depending on what server software you are running, this will depend on which port you need to forward the request onto. Generally speaking, you only want to allow inbound traffic for your website on Port 443 as this ensures a secure connection for your customers. There are many nuances and reasons to open more secure ports, but for the purpose of simplicity, let’s say that you only want to access the website as a customer.
Now let’s look at how to configure all this within pfSense.
How to Configure pfSense to Host a Single Website
Now we’ve run through what we are looking to achieve, let’s get into the pfSense config so we can see what we need to do. For the purpose of simplicity, we’re going to assume your web server is up and running and when you are on your internal network or the server itself, you can access 192.168.1.3:8080 in the web browser and that loads the website successfully. Again, there are a lot of nuances between different web servers, configurations and web application setups so this isn’t always as straight forward as this, but hopefully this information allows you to adapt this to your own specific use case. Hence why we’ve used a basic index.html in our example behind the scenes which is acting as a Hello World example.
Configure: Firewall > NAT > Port Forward
Navigate to the page, Firewall > NAT > Port Forward, then click ‘Add’.
This will take you through to the page where you can configure your port forwarding rules. Enter the following information (tailored to your specific requirements);
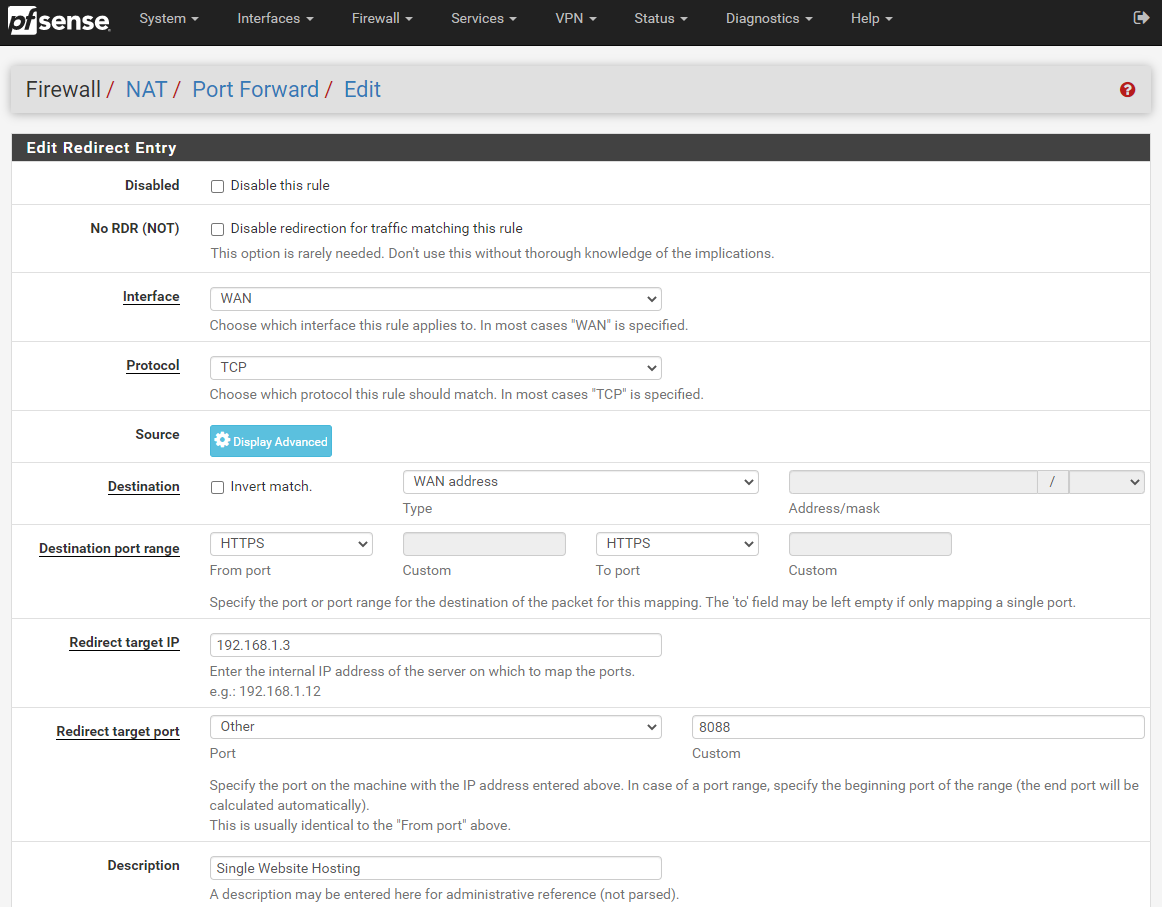
The core settings that you need to look at in the above screenshot are;
- Interface: WAN
- This is telling pfSense that it should listen on the physical port on your firewall that is being used for the WAN traffic. This is the port that is connected to your modem using an Ethernet RJ45 cable.
- Protocol: TCP
- This is fine to keep as it is. For the vast majority of configuration, TCP is the protocol you want to be using.
- Source: Ignore
- For the purpose of hosting a website, you can ignore configuring the source as you want as many potential customers around the world to access you website and buy something. On the other hand, if you are wanting to public a website that only certain IP addresses should be able to access, you are probably going to want to configure this so that you can whitelist their IP addresses in here. For now though, we’re going to keep things simple in this blog post.
- Destination: WAN Address
- This is a bit of an odd one when you first look at it, as you would assume that this should be set to LAN Address. Weirdly though, on the whole with a standard pfSense setup, this needs to be set to WAN Address. You tend to set this to LAN Address when you want to access something on localhost 127.0.0.1, which is actually the pfSense device itself. So technically when you think about this a little more, a WAN address from the pfSense software on the pfSense hardware is actually anything that is not on the pfSense hardware. Makes sense?
- Destination Port Range: HTTPS
- For the purpose of this blog post, we’re going to assume that you’ve got Let’s Encrypt setup on pfSense, if you haven’t, then here is a guide on how to setup Let’s Encrypt on pfSense. If you just want to test getting a single website hosted behind your pfSense firewall initially, then by all means set this to HTTP then you can set up Let’s Encrypt later and update your configuration accordingly. Generally speaking you probably want to keep things simple so that there is only one port used, rather than a range of ports – although you can configure the From Port and To Port as a range of ports if you want to try something more advanced.
- Redirect Target IP: 192.168.1.3
- Naturally enter the LAN IP address of your web server here.
- Redirect Target Port: Other – 8080
- In this specific example, this is set to 8080 as this is the default port for Apache Tomcat. If you are using Apache or Nginx then the default port will likely be 80 for standard out of the box. Or you may be getting a little smarter by using Nginx as an Application Level Reverse Proxy so you can then further redirect so you can host multiple websites behind the scenes. This can be an approach to take, but in my opinion there can be better and more secure ways of doing this. Security in general as you have probably noticed has been completely emitted from this blog post as this is a whole topic in itself. Suffice to say, in a production setting, you may not want to use the IP ranges that have been listed throughout this blog post.
- Description – Single Website Hosting
- Give this a friendly name so you know what rule this is when you come back to it later down the line. If you are just getting started and playing around then this isn’t much of an issue, but trust me, as your setup grows, your future self is going to thank you for spending that little extra time on making sure your naming conventions and descriptions are helpful.
Done. Save this and you’re good to go. Once you’ve saved this, make sure you click Apply Changes;
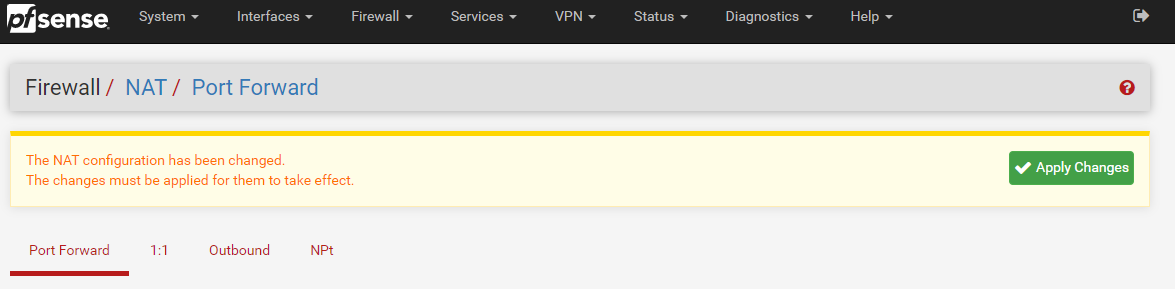
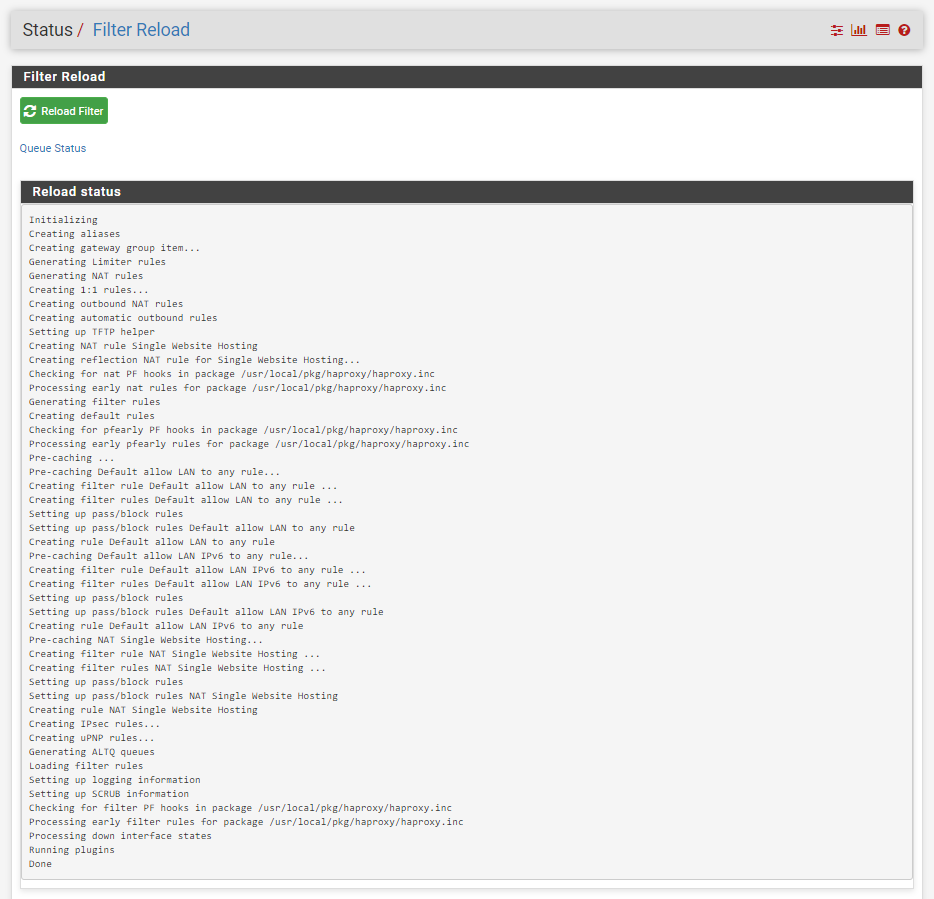
Once you have clicked Apply Changes, you will notice a message appear that asks you if you want to view the status of the firewall rules being reloaded (and hence working…) which can be handy to double check that this has loaded correctly;

When you click on the Monitor link in the above image, this shows you the reload process in real time so you can make sure that it completes successfully.
Once you have done this, you will notice that your Port Forwarding rules have now been applied;
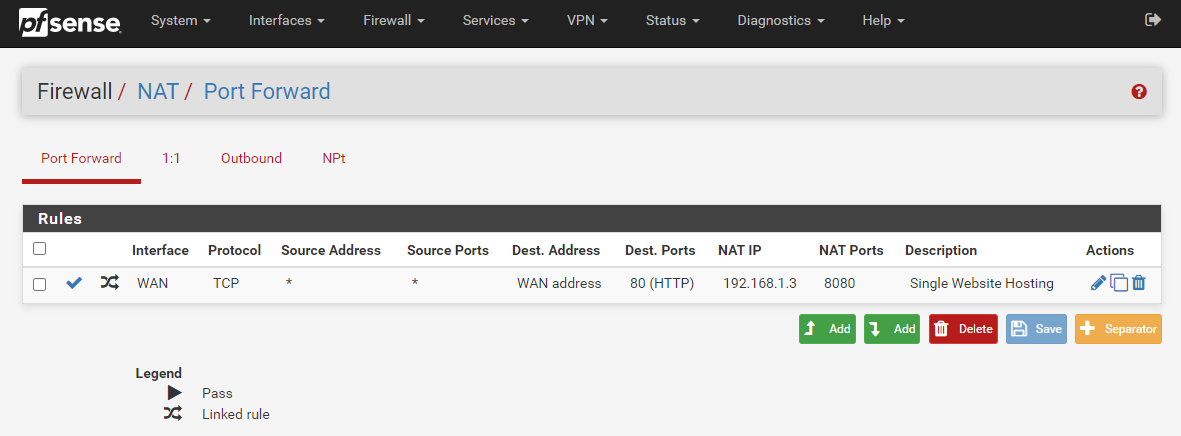
What is important to note here is that this action has actually done something automatically for you in the background. To see what this is, first, click back into that Port Forward rule you just created to edit it. You will notice towards the bottom of the page that this has automatically created a Filter Rule Association for you with the name “Rule NAT Single Website Hosting” which is the same name you used in your previous Description field.

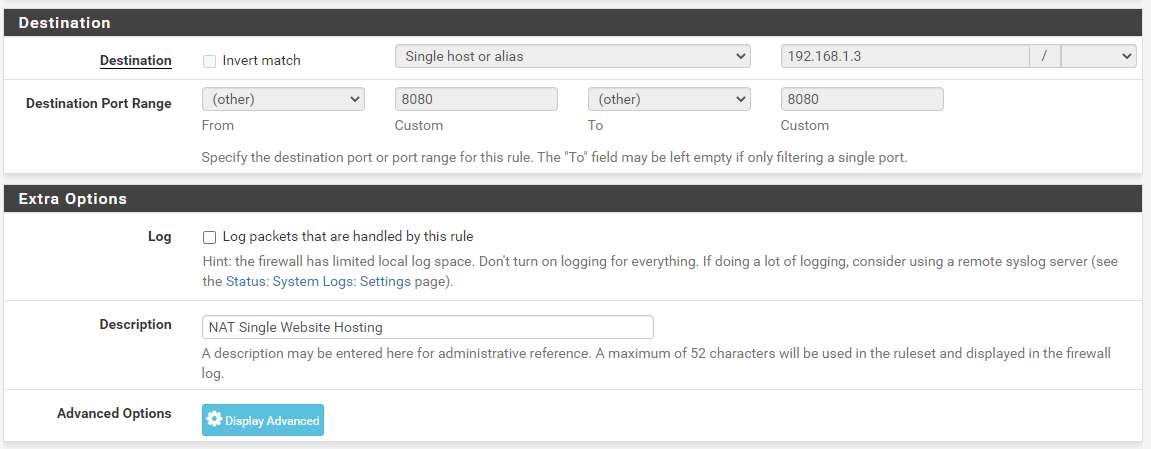
If you click through into that, you’ll notice that it takes you through to the Firewall > Rules > Edit screen for this specific rule. You’ll notice that some of the fields are greyed out so you can’t edit them. This is because the rules are linked so it prevents you from accidentally breaking things. Well, more minimises that risk really.
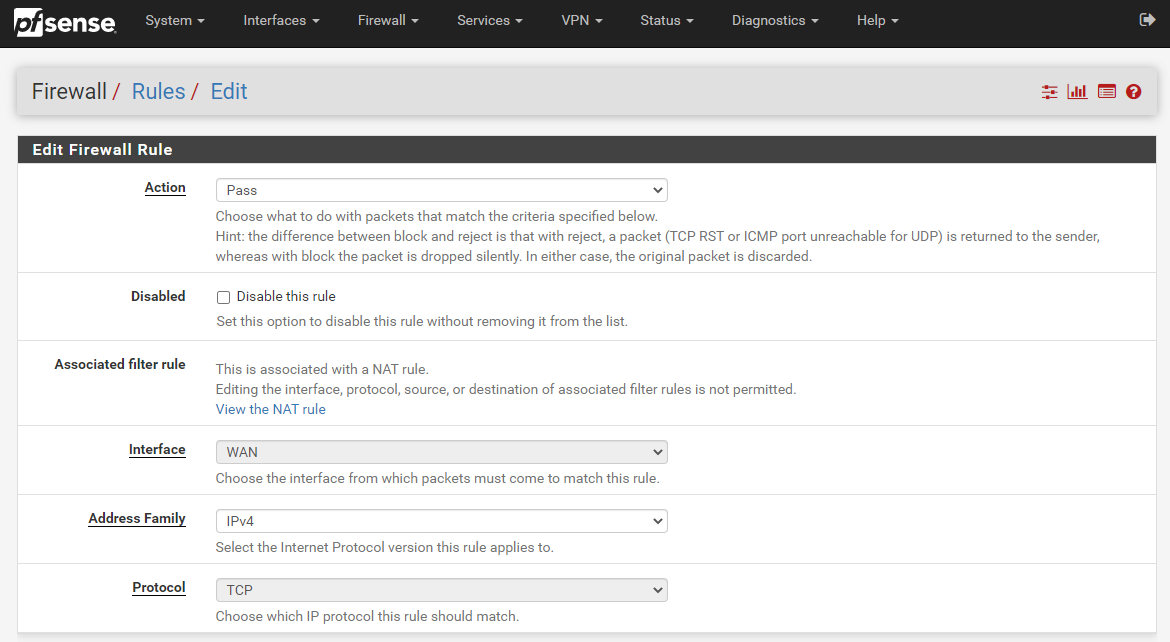
What you’ll notice is that the Firewall Rule has been automatically populated with the information you entered in the previous screen we were looking at on Firewall > NAT > Port Forward. pfSense has even automatically generated the same name for you to make your life as easy as possible which is a great little feature.
Test Your Website
Now we’ve gone through the process of setting up all of the pfSense configuration, you should now be able to access your website easily via several different mechanisms.
- Local IP: 192.168.1.3
- WAN IP: 82.1.2.3
- DNS Hostname: contradodigital.com (where the external DNS entry has the A Record pointed to 82.1.2.3)
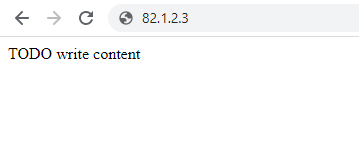
Here we can see that the website is loading successfully over the WAN IP address on Port 80;
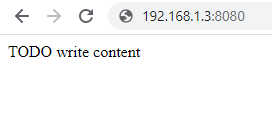
Next we can see the website loading successfully on the Local IP address on Port 8080;
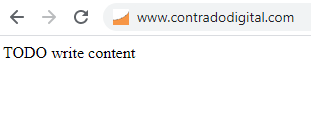
And finally we can see the website loading successfully on the DNS Hostname www.contradodigital.com over Port 80;
Something to note about the above examples. This is when I’m accessing the website from a computer that is outside of the core network, just as any customer would be accessing the website. And the above examples are just that, examples, so this isn’t the actual setup in the background – but it could be quite easily.
So all of this is working from an external user perspective. This is great, but what if you are also within your own network and are wanting to access the website with ease. Well, this is where things get a little more nuanced in relation to how networks work and how traffic routes around them.
Accessing via the Local IP + Port works absolutely fine. But the second you try to access the website via with the WAN IP Address (82.1.2.3) or the DNS Hostname (www.contradodigital.com) this is where things don’t quite work as expected.
Before we jump into that, let’s just visualise the difference between this approach and the original diagram. Here is what we are trying to access now;
You might be thinking now, but why would you need to do that, why wouldn’t you just access the web server using it’s IP address directly, why wouldn’t you be using things such as Split DNS etc. Well, ok, all those things are valid discussion points, but for the purpose of simplicity, I’m going to completely ignore those points within this blog post. We can look at those topics separately another time.
The point is, you ultimately want to be able to access a single DNS Hostname, i.e. www.contradodigital.com, and get to the destination server easily, regardless of the matter if you are what is classified as “On Network” or if you are “Off Network”. Either way, you want a seamless user experience and something that just works.
Currently with the above setup we have worked through, if you use the DNS Hostname to access your website when you are On Network, then you will simply be presented with your pfSense Firewall Admin Login Screen. Handy, but not quite what we were expecting as the end result.
This is where we need to do a bit of NAT magic, officially known as NAT Reflection / Local Loopback / Hairpin NAT / NAT Hairpinning – it’s all the same thing. In essence, you turn on a feature within pfSense to allow the firewall to loop back on itself to get to where it needs to be. This is quite a handy feature and is easier to implement than Split DNS which takes a bit more effort to do.
How to Turn on NAT Reflection on pfSense
So let’s look at how we turn on NAT Reflection in the pfSense admin. It’s actually very straight forward to turn on, simply navigate to System > Advanced > Firewall & NAT.
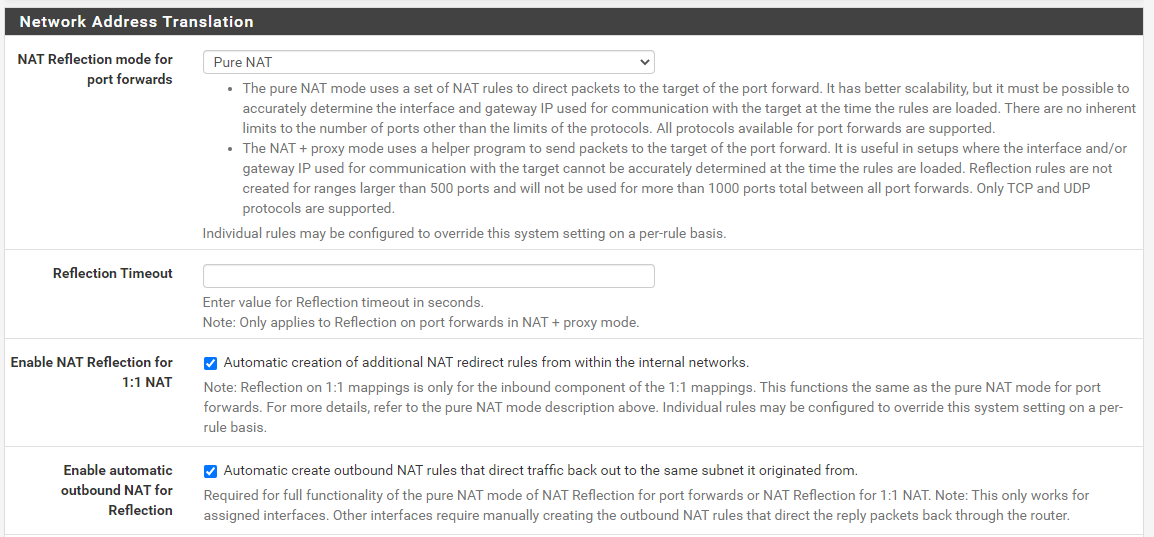
Configure;
- NAT Reflection Mode for Port Forwards: Pure NAT
- Enable NAT Reflection for 1:1 NAT: Checked
- Enable Automatic Outbound NAT for Reflection: Enabled
Save and you’re good to go. You’ll see your website loading correctly now.
So let’s have a look at NAT Reflection in a little more detail so we can understand what is actually happening under the hood and why you need this to get this setup working correctly. In summary, the main thing you need to understand in relation to NAT Reflection is this;
“NAT Reflection allows you to access local servers via your WAN Address, without leaving your LAN”
In a nutshell, if you compare an earlier diagram with the routing from your laptop on your LAN through to the web server also on your LAN, you can see the steps involved there. Compare this to what happens when you have NAT Reflection turned on (granted, the DNS is still external so this full end to end still has to happen periodically);
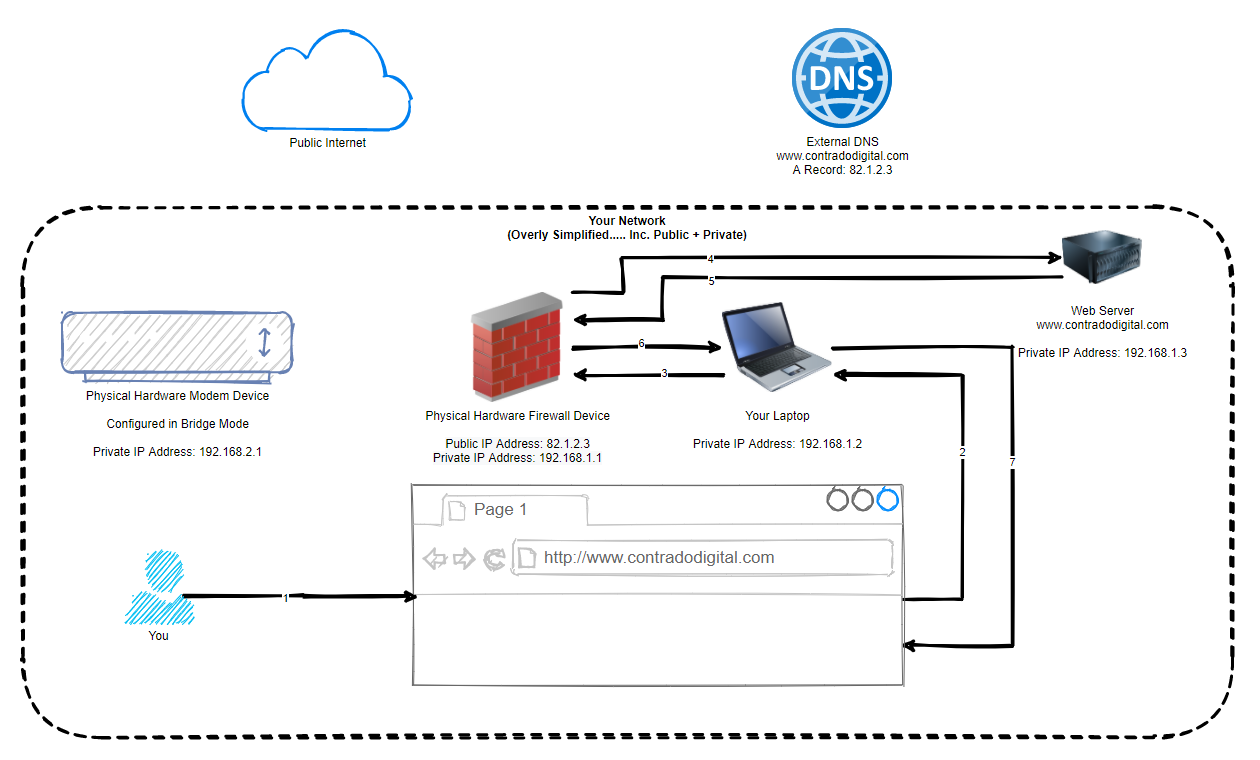
In the above image you can see that the traffic never leaves your local network, even though technically is should be doing. Awesome and this is all thanks to some smart routing within pfSense called NAT Reflection. Some people say this is a bit of a hack, I and most others say that it’s a very handy feature.
Re-Test Your Website
Ok so now we’ve got NAT Reflection turned on and we understand the basics of what it is doing. Reload your website and you should see it working correctly now;
Summary
Hopefully this guide has been a nice introduction on how to host a single website behind a pfSense firewall along with some of the nuances that come with doing so. As mentioned earlier, this only works for very simple setups as this approach here isn’t going to work without changes when you have two websites you are hosting, such as;
- contradodigital.com –>192.168.1.3
- contradodigital.com –>192.168.1.4
Since both websites are running on Port 80 or 443 so you can’t easily do this setup using purely pfSense. This is where other pieces of software come in handy such as HAProxy (a open source package that can be installed onto pfSense) which is one of the correct ways of allowing multiple websites to be hosted (along with multiple WAN IP addresses) or you can add an Nginx reverse proxy as the single destination where you can then control further redirection based on the hostname and port. This all comes down to your requirements.
And as a final note, we haven’t talked anything about security in this blog post really. So make sure you consider this so that you can achieve a secure setup with what you are looking to achieve.
by Michael Cropper | Apr 7, 2017 | Developer, Technical |
By default MySQL FULLTEXT search will not search for words that are less than 4 characters in length. For many things this can be great as many words less than 4 characters are generally stop words such and often aren’t valuable, for example words such as, the, and, if, on, etc. Although this isn’t always the case and in certain circumstances small words are actually really important. For example, let’s say you’re looking for a new developer job using any of the following technologies, ios, php, C#, .Net, ASP, etc. In these cases, the default MySQL FULLTEXT search default minimum characters actually prohibit results being found, which isn’t a great user experience. As such, you may want to update your MySQL FULLTEXT search functionality to enable smaller words to be searched for while quality results are being identified.
Edit My.cnf File
The my.cnf file on your web server generally sits under /etc/my.cnf and allows you to customise your MySQL configuration. You can edit this file by logging into your web server using SSH, navigate to the correct folder and run the command pico my.cnf which will allow you to edit the file.
Now you need to add the following line of code at the bottom of the fie which will allow MySQL FULLTEXT search to search for words with a minimum word length of 2 characters, ft_min_word_len=2
Once you have completed this, save the file.
Restart MySQL
Next you need to restart the MySQL service using the following command, service mysql restart which will ensure that the MySQL service will use the new configuration data once it has restarted. Should you experience a problem restarting MySQL, then remove the code you just added in the my.cnf file or comment out the code with a # at the start of the line. If you’re not aware, the following commands also exist which can come in handy should the MySQL service not restart smoothly, service mysql stop and service mysql start.
Rebuild All MySQL FULLTEXT Indexes
Finally you need to rebuild all your MySQL FULLTEXT indexes that you are using on your database. If you only need the smaller words to be searched on specific tables, then you clearly don’t need to rebuild the ones that aren’t relevant, although it can be handy as this could save you hours of debugging further down the line if different tables are using different minimum word lengths. Login to your phpMyAdmin if you’re running this on your web server to access the MySQL database then run the following command on which ever table you want to update, REPAIR TABLE <TableName> QUICK;
All done! Now your MySQL FULLTEXT Search will be able to search on smaller words than previously.
Some additional resources that can come in handy include official documentation about how to fine tune MySQL FULLTEXT searches.
by Michael Cropper | May 25, 2016 | Client Friendly, Digital Marketing, Digital Strategy, Security, Technical, Thoughts, WordPress |
As a business owner or marketing manager you are likely extremely swayed about website design and development based on how it looks. I am here to explain to you why this is no-where near as important as you think it is. This is not to say that this isn’t important, it is, but it isn’t the be-all and end-all. When making decisions around technology, what you really need to be asking the questions about is technology, frameworks, scalability and adaptability. All of the technical aspects you probably would prefer not to get too involved with as this is what you pay the web guys to take care of, right?
Unfortunately, the reality is that when you ignore these key aspects you end up with an all fur coat no knickers solution which is going to cause you tremendous pain in the long run. Trust me. It is often at this point where we pick up projects, when they have gone seriously wrong in the past when these aspects have been ignored, often because you asked for a pretty looking website or made a decision based purely on how something looks or made a cost-based decision. Here is when we pick things up and straighten things out which is a costly process.
Below we’re going to talk through many of the aspects you need to be asking questions about before you even start to think about the design of your website. When you get the below aspects right from the outset, you can make your website look any way you desire. And most importantly, you can chop and change the look of your website on a daily basis should you wish as you have the flexibility to do so without being restrained by poor technologies.
Platform and Content Management System
It is essential that your website is powered by a leading Content Management System. A platform which allows you to control most of the aspects of your website yourself, without requiring a developer to implement changes. For 99% of businesses out there you have two choices really, WordPress or Magento.
Web Hosting
Poor quality web hosting is going to harm the success of your business. It’s cheap for a reason, it’s restrictive and not that good. Leading web hosting has security built in, is regularly maintained and is backed up in a remote location should anything go wrong.
Website Security
I can promise you that if you don’t take cyber security seriously, your website will be hacked into at some point. A pretty looking website which can be hacked, deleted and changed by an unauthorised person trying to do your website harm is no good to anyone.
Back End Frameworks
A framework is essentially a set of rules for how things are implemented. A back end framework is all around how the server side code is implemented to ensure the code is easy to maintain, easy to extend and easy to work with in general. Think of a back end framework as a separation of concerns, read up about MVC if you’re really interested. Using the correct back end framework for your website ultimately determines how successful your website project will be or how many problems you will face in the future.
Front End Frameworks
Just like back end frameworks, front end frameworks deal specifically with how your website looks on the front end. Just as with all frameworks, you need to work within the limits of the framework which is why getting this part wrong can result in simple changes not actually being so simple in the end. Discuss this with your web developer about how things are built to understand the potential pitfalls further down the line.
Plugins, Themes & 3rd Party Solutions
When using any kind of 3rd party solutions as part of core functionality on your website, it is absolutely essential to make sure these are chosen with quality in mind. Cheap and free is like this for a reason, it’s likely absolutely awful and will cause you many problems down the line.
Website Speed
To a certain extent, the speed of your website is determined by how much you are paying for your web hosting. You cannot expect the speed that you experience on Google, Facebook and Twitter when paying budget web hosting. It’s just like buying a car, the more you pay, the faster it goes. Sure, there are optimisations and tweaks that can be made at the server level to further improve performance, although in the grand scheme of things these are a bit like spoilers and go-faster stripes on cars, they help, but aren’t going to do much on a Peugeot 205.
Control and Flexibility
You want to be able to edit as much as possible on the website, right? Well this hugely depends on the technology you’re using. Certain frameworks will give you more control for you to edit things yourself, others will restrict that control meaning that you have to pay a web developer every time you need to make a change. A costly process over time.
Responsive
You want your website to work seamlessly across all devices, right? Well this again doesn’t just happen by magic. This is a conscious decision and requires strategic planning to make sure that your website performs in the way that your customers expect.
User Experience
Only now do we start to think about the user experience on the website. Why are people using your website? What are they aiming to achieve? How easy is your website to navigate? What do people like about your website? What do people dislike about your website? How can things be improved on a regular basis to improve performance? It’s all of these questions you need to start asking about your website and business as a whole.
Content
Once you know what your website visitors are looking to achieve, how are you meeting their needs through the content that is available on your website? Are you still dealing with common queries for products and services over the phone? It is this type of content that at the very basic level could be handled by a more sophisticated setup on your website. Think differently about content. Content is not for Google and SEO, content is for your users.
Branding
Now we come onto the branding aspect. Once you have all of these aspects above in place, now it is time to start looking at how your website actually looks. At this point, once you have all of the above items in place, you can make the website look and feel any way you like. Get any of the above items wrong and you will extremely restricted based on what you can or can’t do at this point. You see, the branding aspect is the icing on the cake for website design. No matter how good your website looks, if your key ingredients are rotten, your website isn’t going to perform and your website visitors are going to be able to see straight through that.
Summary
There is a lot more to website design and development that you may first think. Never assume that your web development team is going to be doing everything right. If you ask for a pretty website, that’s what you’ll get, a pretty website that has been built poorly and doesn’t perform. When you ask a web development team for a website that achieves your business goals, you’ll get a well-built platform for you to work towards your goals much faster. The choice is yours, never skip over asking the difficult questions about website technologies.
by Michael Cropper | May 14, 2016 | Developer, Security, Technical, WordPress |
A web developer or digital agency has built our website, so surely they must have backed it up, right? Probably not. Well ok, we have a web hosting company, and surely they back things up, right? Probably not. Some of the many assumptions that business owners make about their website and backups. I can honestly say that for the average business, your backups are probably woefully inadequate for your needs and should anything go wrong, which again I can guarantee that it will do at some point, you will be left up ‘the’ creek without a paddle.
Going one step further there is no magic ‘backup’ solution, it’s not like buying a lemon from the supermarket. A lemon is a lemon, there is nothing else it can be. Instead, backups are a bit like Apples. You can have many different types of apples, all with their different purposes based on your requirements. You wouldn’t put a cooking apple in a lunch box unless is was baked into apple pie. Likewise you wouldn’t put a custard apple in an apple pie, seriously these things exist and have an interesting taste. I digress.
Back to backups. There are many different types of backup technologies which give you differing levels of security as a business and hence are either easier or harder to restore when something does go wrong. Again, it will go wrong at some point, trust me, it always does, this is technology we’re talking about. With unscrupulous cybercriminals targeting websites running certain technologies at scale, fully automated. Do not think that you are off someone’s radar.
So let’s take a look at a couple of the different website backup technologies and what they both mean. This is by no means a definitive list but hopefully this should get you thinking about what you need to be investing in as a business.
Server Level Backups
Surely my web host runs server level backups? Maybe, but are you paying them to do that? Backups use server resources, CPU, RAM, Hard Drive space and bandwidth on the network, which all cost money to run. Unless you are paying your web hosting company specifically for backups, it is unlikely that they will be running server level backups for you.
Server level backups are great and are essential to have in place for any business. If you are unsure if you have this in place, then contact your web hosting company to check or get in touch and we can have a quick check to see what you have or haven’t got and advise accordingly.
Your server level backups are designed for one thing, restoring the entire server should anything go wrong with the hardware or similar. They are often run daily and stored for a period of time with multiple restoration points for added levels of protection. This is great if you’re on your own dedicated web server with just your own website as this means that restoring a backup can be much faster than if you are on a shared web server of sorts.
If you are on any kind of shared web server, where there is multiple websites hosted on the server, then this is where things get tricky. The likelihood is that if you are on any kind of shared web server or similar, i.e. if you don’t have as a minimum your own Virtual Private Server (VPS), then this applies to you. What this means is that your website is on the same web server as other websites, then should anything go wrong with your individual website, then restoring just this part is much more time consuming and costly for you to do.
You see, the server level backups are designed to protect everything on the web server should anything go wrong at the web server level, they aren’t designed to protect against a single issue on a single website for example if your website was hacked into and deleted. This means that if this did happen, it is not easy to simply restore your individual website as the backups have to be combed through and reinstated which is a fiddly job for the technical team to do and hence costly.
Server level backups are designed for keeping backups of things like any server settings that have been implemented specific to the needs of the websites hosted along with any control panel settings which may be in place. They are designed to be used as a single setup which can then be restored as a whole, not parts of the whole.
So yes, server level backups are extremely important and if you don’t have these in place now, then you need to get these in place.
Website Level Backups
The next type of backup to make sure you have in place is a website level backup. This is where your website setup as a whole, which sits on your web server, is backed up in its entirety. Far too often, the website backup technologies that people have in place are woefully inadequate.
Your website level backups need to be fully automated, so if you have to manually set this running, then this is no good. Your website level backups need to include everything on your website, files and databases to ensure that the data can be easily restored. Your website backups also need to be stored in a remote location, so not on your web server. A backup sitting in the same place as the main system means that when the main system goes down, you have potentially lost your backup too.
WordPress makes the website level backups reasonably straight forward which means that when you invest in WordPress Security & Backups, the backups and security side of things are taken care of for you. This also means that when you have the right website level backups in place, when things do go wrong, as they always do, then restoring this backups is far faster and hence much cheaper for you. Make sure you have adequate levels of website level backups in place suitable for your needs. If you are in any doubt, then get in touch and we’ll happily review your current setup for free and advise accordingly.
Restoring a Backup and Responsibilities
Surely if anything happens it is the responsibility of your web developer, digital agency or web hosting company to restore any kinds of backups for free? No. Restoring any kind of backups takes time to implement, and depending on the level of backups you have chosen to invest in previously, this determines the ultimate cost involved for restoring any backups.
As explained previously, if you are on a shared web hosting environment of any kind, then this is going to cost you a lot more to restore the backups as they have to be unpicked form the whole server level backups and reinstated. Opposed to using website level backups alongside server level backups, these are far easier to restore and hence cheaper for you in the long run.
As a business owner you are responsible if your website is hacked, not the service provider, it will cost you either way. It’s your choice to pay a small amount every month or a large amount when things go pear shaped. We would always recommend regular maintenance, security updates and automated backup technologies being implemented as we have seen time and time again how this saves companies money in the long run.
If you are worried about the level of backups you have in place within your organisation for your website technologies, then get in touch and we’ll review your current setup and recommend relevant solutions that can be implemented.
by Michael Cropper | May 9, 2016 | Developer, Technical, WordPress |
Accelerated Mobile Pages, AMP for short, is an open source project designed to make the web faster. For people accessing web content on mobile devices, speed is a challenge for many users and with over 50% of content accessed on the web via mobile devices, this is more important now than ever.
The concept of Accelerated Mobile Pages is all about stripping out irrelevant styling and fancy JavaScript technologies to make the page load much faster, with the most important aspect, the content, loading virtually instantly.
If you’re interested in the finer details behind the project, have a read all about it here, https://www.ampproject.org/. The technical aspects behind the project are quite significant as are the underlying details about how your web browser loads content as standard.
Accelerated Mobile Pages AMP Speed Test
So we thought we’d put AMP to the test to see just how much faster it really is for WordPress in comparison to a rather bloated website which requires a bit of TLC, like most WordPress websites on the whole. The results below we repeated on the same website multiple times and cannot believe the performance increases we saw. The Accelerated Mobile Pages plugin for WordPress is available for download from the WordPress repository. A note on the plugin at the time of writing, it only supports Posts in WordPress, i.e. your blog posts. Pages and Ecommerce Products aren’t supported currently.
Blog Post Loaded As Normal

Blog Post Loaded with Accelerated Mobile Pages APM Technology
Awesome! Try loading this page you are viewing now as an Accelerated Mobile Page here to see how this looks: https://www.contradodigital.com/2016/05/09/wordpress-accelerated-mobile-pages-amp-speed-test/amp/
As a footnote. Yes, 30 seconds is darn slow for a website to fully load. Yes, tools like Pingdom are not perfect as many users are more interested in the time when the website appears to have completed to load opposed to when the last byte has arrived. And yes, this is only a single site as a comparison. Get involved and give this a go on your own website to see how this performs for you. Every website is significantly different and ever web server has been configured differently based on your individual needs.