You would have thought in 2023 that this would be a 2 second job to do. A well documented thing given Apache is one of the largest open source companies on the planet and Java being the most used language on the planet that powers over 1 billion devices (as their installers used to love reminding us every time 🙂 )
But weirdly, it’s not…
So I thought it would be handy to write a blog post about how to get going in 15 minutes so you can start to have a play. After all, we don’t want people to have 10 years experience in this stuff just to get a basic local development environment up and running.
What we’re going to cover…
Getting the Java Development Kit (JDK) installed
Getting Apache NetBeans IDE installed, which requires the Java Development Kit (JDK) to work
Getting Apache Tomcat installed, so your Apache NetBeans IDE can deploy your web application to the locally running web server so you can see your web application in your web browser
Configuring Apache NetBeans so that it knows about the Apache Tomcat server that is running on your local machine
Seeing everything in action!
So let’s get started.
Getting the Java Development Kit (JDK) Installed
First of all, just get to Google and search for “JDK Download”. I’m not going to give you the exact steps here as Oracle, the people who ‘own’ Java, seem to keep making life ever more difficult every day to download this and now even requires you to create an account with Oracle just to download the software. Rather annoying, but just jump through the latest hoops you have to at the time you are reading this, as anything I write down is going to have changed since the time this blog post was written.
The only thing to mention that you need to keep a record to when you are doing this is the Folder Path of where this is installed. You’ll need this in the next step if the installation of Apache NetBeans IDE doesn’t manage to automatically detect it.
Beginner Development
For greenfield projects, i.e. something brand new, then just download the latest version of the Java Development Kit (JDK). You may get issues when you get onto the next steps, so you may have to loop back on this step and install an older version that is compatible with the other software you are installing.
Unfortunately the different software providers throughout this blog post don’t make it simple to understand what versions are compatible with which other versions. It’s a tad annoying and is a wider problem with the software engineering in general so it’s something your going to have to get comfortable being annoyed about and regularly banging your head against the wall.
Usually there is some half-arsed documentation somewhere buried on the respective websites, but you’ll have the Google the shit out of it to find this basic info unfortunately. But hey, just giving you the heads up.
For now though, just download the latest version of the Java Development Kit (JDK) so you can give this a first attempt.
Working with Existing Projects
If you are working with existing projects, then this is a tad different as you are going to have to work within the constraints of that setup. So you are probably going to have to refer to the project documentation about what versions of what you need to get up and running with ease.
Remember when your Past-Self recommended that you document your development environment and your project technical dependencies so that your Future-Self would be thankful that you did…. Well, if your Present-Self is currently disgruntled with your Past-Self, then let that be a lesson. And document this properly this time round.
Or worse in a corporate setting where this was never documented and you simply have to talk to your software engineering colleagues to try and find the info you need through 1000 questions rather than a 1 page document that gives you everything you need. Well, yeah, good luck with that.
Getting Apache NetBeans IDE Installed
Next step is to get Apache NetBeans IDE installed. Again, just Google for the download link and run through the installation steps.
There is nothing specific to really mention on this step other than that you need to enter the Java Development Kit (JDK) installation folder path as part of the setup. Generally the Apache NetBeans IDE installer detects this automatically and puts that in for you. But you may need to enter this manually if it hasn’t been automatically detected.
Getting Apache Tomcat Installed
Right, this next step is where things get a tad tricky, or at least can do.
Again, just to get started, Google “Apache Tomcat Installation” and you’ll come across a Windows Installer .exe file that you can use to get up and running quickly.
It seems that the last time I installed this (hence the reason for writing this blog post…) this is installed in a bit of a quirky way which actually prevents Apache NetBeans IDE from deploying your application to your Apache Tomcat web server. A tad annoying, and not particularly well documented.
So during the installation process the only details you really need to make a note of are;
Port
Windows Service Name
Tomcat Admin Username
Tomcat Admin Password
Installation Folder Path
These will come in handy in the next section when we configure Apache NetBeans to allow it to talk to Apache Tomcat.
Anyhow, for now, as part of the installation process, it is recommended that you create a Username/Password combo for your local machine so that you can actually use it. It’s a bit of a pain if you have to do this post-installation, so for the purpose of this blog post, we’re going to assume you are doing this as part of your installation procedure.
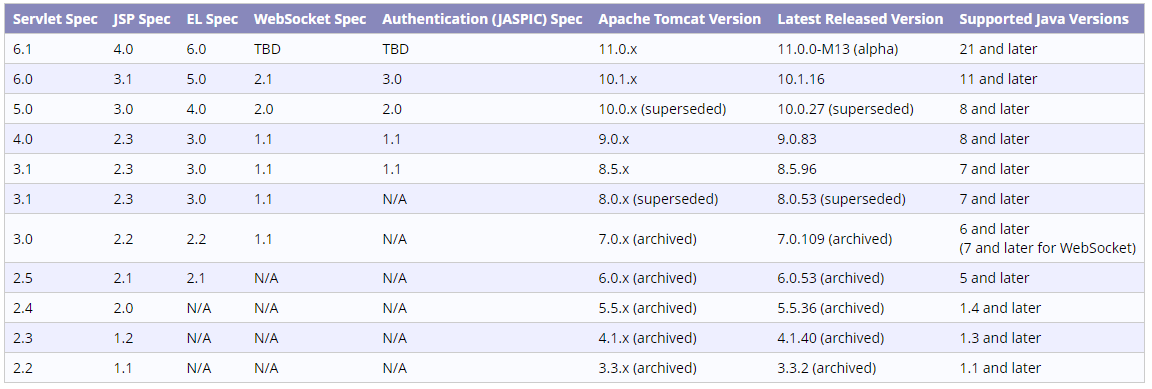
The reason I mentioned a moment ago that this step can get a little tricky is that each version of Apache Tomcat supports a LOT of different specifications and dependencies which can be tough to align – even on your local development environment. There is a “Which Apache Tomcat Version to Use” page which tries to help to simplify things, but honestly, just adds more complexity. Apache Tomcat doesn’t seem to care too much about backwards compatibility for some reason and expects software engineers to try and be a One Man Band just to figure out what they need. You’ll see what I mean with this snippet from that page;
Simple, right?!?!?
So basically you need to make sure that everything aligns with the different versions mentioned above;
Apache Tomcat Version
Java Development Kit (JDK) Version
Servlet Specification Version, required for developing Web Applications
Java Server Pages (JSP) Specification Version, required for developing Web Applications that are of monolith in nature – This is essentially the ‘front end’ part of your Web Application
Expression Language (EL) Version, required for developing Web Applications that want to handle data that is passed from the ‘back end’ (aka. the Java Servlet Specification) to the ‘front end’ (aka. the Java Server Pages JSP Specification) so that you can essentially loop through lists and such like to output the data that you need from variables, or much simpler outputting of data stored in variables
WebSocket Specification, if your web application is using cool tech like this (probably not on your first Hello World web application!)
So I’m going to assume you’ve studied all of these different specifications over the last 5 years and fully memorised 1000s of pages worth of documentation to be able to easily know this information. Right?
Of course not. No-one has. But hey, Java often likes to make things more difficult than they need to be. But don’t let that put you off, it brings so much value over scripting languages that are all the rage at the moment.
Anyhow, for now, just go with the most recent version to get started.
Configuring Apache NetBeans to Talk to Apache Tomcat
The next step is to configure Apache NetBeans IDE to talk to your Apache Tomcat service. To achieve this, there are two core steps involved;
Configuring Apache NetBeans by adding a Server as a Service to your IDE
Tweaking the way that the Apache Tomcat web server Windows Service runs
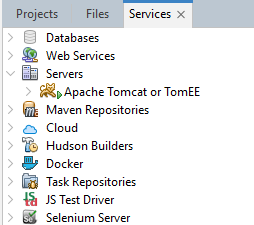
Add Apache Tomcat Web Server to Apache NetBeans IDE as a Service
So let’s look at the easy step first. Simply right click on the Servers section and follow the steps through to add your Apache Tomcat server. You’ll need those details you made a note of earlier to connect to the right one as you may have multiple of these running on your local development environment over time to support different projects.
You can see in the above screenshot that I have already added the Apache Tomcat web server which is why it is showing up in the list already.
Error You Will Receive If You Try to Build & Deploy a Web Application Right Now
So it’s important to explain what error you will receive if you try to build your first Hello World Web Application right now and deploy it by pressing the green play button. The error messages can be a tad cryptic and you’ll also need to check the catalina.log file for further insights, which can be a bit of an unknown unknown when getting started with Java software development.
Building war: C:\Users\Michael Cropper\NetBeans Projects\MyHelloWorldWebApp\target\MyHelloWorldWebApp-1.0-SNAPSHOT.war
------------------------------------------------------------------------
BUILD SUCCESS
------------------------------------------------------------------------
Total time:  1.232 s
Finished at: 2023-12-01T23:04:45Z
------------------------------------------------------------------------
Deploying on Apache Tomcat or TomEE
    profile mode: false
    debug mode: false
    force redeploy: true
Undeploying ...
undeploy?path=/MyHelloWorldWebApp
OK - Undeployed application at context path [/MyHelloWorldWebApp]
In-place deployment at C:\Users\Michael Cropper\NetBeans Projects\MyHelloWorldWebApp\target\MyHelloWorldWebApp-1.0-SNAPSHOT
deploy?config=file%3A%2FC%3A%2FUsers%2FMICHAE%7E1%2FAppData%2FLocal%2FTemp%2Fcontext9586713857740903372.xml&path=/MyHelloWorldWebApp
FAIL - The application [/MyHelloWorldWebApp] is already being serviced
I’m actually pretty sure the first time I did this, I got this error message instead. The above one sems to be ever so slightly different final line in the error message. But either way, it fails, which means that it hasn’t been deployed.
FAIL - Failed to deploy application at context path [/MyHelloWorldWebApp]
Which I’m sure you’ll agree isn’t actually that much of a helpful error message.
So to get to the bottom of what is really going on, you need to get into your Apache Tomcat logs, specifically the catalina.out file (or the one with today’s date on).
On a Windows machine, this is going to be located at: C:\Program Files\Apache Software Foundation\Tomcat 10.1\logs
Which is the location of where you installed Apache Tomcat earlier.
What was interesting when checking this is that this is the actual error that was reported when the error for “FAIL – Failed to deploy application at context path” came up;
“30-Nov-2023 21:32:39.679 SEVERE [http-nio-8080-exec-2] org.apache.catalina.startup.ExpandWar.copy Error copying [C:\Users\MICHAE~1\AppData\Local\Temp\context3064853893058586338.xml] to [C:\Program Files\Apache Software Foundation\Tomcat 10.1\conf\Catalina\localhost\MyHelloWorldWebApp.xml] java.io.FileNotFoundException: C:\Users\MICHAE~1\AppData\Local\Temp\context3064853893058586338.xml (Access is denied)”
Which made me think…. that’s odd. I installed Apache Tomcat via a Windows Installer using the exact same Windows logged in user, so I can only assume that one of the installers is doing a bit of crazy on Windows and being overly secure by segmenting which user is running the application – which would prevent User A from accessing anything in User B without relevant permissions. Something you’d really only know a lot about after dealing with a lot of Linux permissions issues historically, and if you’re a noob with this stuff is probably going to be something that would be a complete blocker for you to get past.
Which brings us onto the next step for how to solve this…
Tweaking the way that the Apache Tomcat web server Windows Service runs
So when you just installed Apache Tomcat via the Windows Installer you will notice that you have an Apache Tomcat service running in your Windows Task Bad as a background service. It doesn’t auto-start on reboot by default, so you may have to start the service if you have rebooted since you installed the software.
So you need to go into the Windows Task Bar and find the Apache Tomcat software that is running and click on the Configure option. From here, you need to go to the Log On tab and change this from the default “Local Service Account” over to “Local System Account”
Do that, click Apply and then Ok. Then finally restart the Apache Tomcat service if it is already running and you’ll be good to go.
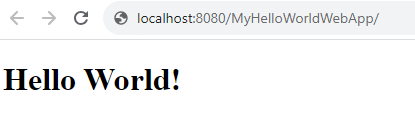
Seeing Everything in Action
Awesome. So now you’ve got all this up and running, you’ll be able to click the Play button in the Apache NetBeans IDE to run your project and it will deploy your web application successfully to your Apache Tomcat web server so you can interact with it in your web browser.
Summary
Hopefully this is a helpful guide for how to get an Java local development environment up and running in no time so that you can start to develop web applications using the power of Java.
Yes, it’s a bit of a pain as you get deeper into Java, but for getting started it’s mainly about making sure the different versions of the software you are running are aligned and designed to support each other. The documentation is often pretty awful so if things don’t quite go to plan, just lots of Google’ing will help you get to where you need to be.
So, where do I start with this topic. It’s complex…
I didn’t really know what to title this blog post as, since it’s complex.
Specifically my personal problem at hand was to look at how to prevent missing dates between two dates when needing to report on basic challenges such as Show Number Of X Between Two Dates. And since the basic queries such as SELECT COUNT(*) FROM table_x GROUP BY my_date_field; tends to work absolutely fine in scenarios where things are happening daily, it dramatically fails when things often happen over longer time frames. Instead, it’s important that the actual dates between two dates are the primary axis on reporting on this data.
Quite surprisingly, this seems to have been a fairly challenging thing to achieve prior to MySQL 8, so this blog post is purely going to look at MySQL 8 and beyond for how to achieve this.
MySQL isn’t really designed to work with while loops. But in every modern programming language while loops are simple.
i.e.
while(x = true){
	doSomething();
}
Etc.
Great, then let’s wrap the complex while loops in the code, and leave MySQL for the basics of data retrieval.
Yeah… but there is a thing called performance, and that doesn’t really work on large scale data sets with millions of records…
It’s imperative that the data access complexities are pushed as low into the tech stack as possible to improve efficiency, on so many levels. Aka. Don’t put things in the code layer that would be better handled at the data layer, aka. MySQL.
So, historically, if you wanted to perform a while loop in a MySQL query you would probably end up resorting to a Stored Procedure in one way or another. Sorry DABs (aka. Database Administrators) but when software requires the use of Sored Procedures then there is probably something fundamentally wrong under the hood.
Basic While Loop in MySQL using WITH RECURSIVE
So, let’s get back to basics. How do we do a basic loop in MySQL 8. How do I count from 1 to 10 using pure SQL?
Turns out, it’s “pretty simple” (as everything is when you know how) but the syntax is a bit of a challenge. So let’s dig into that next.
How to Count from 1 to 10 in MySQL 8 Using Recursive Queries
The simple solution to this is as follows;
WITH RECURSIVE myRecursiveExpressionName(iCanCount) as (
		SELECT 1
UNION ALL
		SELECT
			iCanCount + 1
		FROM
			myRecursiveExpressionName
		WHERE
			iCanCount < 10
)
SELECT
	*
FROM
	myRecursiveExpressionName
ORDER BY
	iCanCount ASC
;
Which will produce a nice output as follows when running the query;
1
2
3
4
5
6
7
8
9
10
Great. We can do some simple sequential “stuff”.
How to Use MySQL to Get the Dates Between Two Dates for Reporting
So, now it’s time to put this into practice. Let’s get a list of dates that we can use that are the definitive list of dates between two dates, such as the kind of thing that you would use in a situation that is measuring data and performance and trends between two date periods.
WITH RECURSIVE allDatesBetweenTwoDates(myRecursiveExpressionName) as (
		SELECT '2023-10-01'
UNION ALL
		SELECT
			myRecursiveExpressionName + INTERVAL 1 DAY
		FROM
			allDatesBetweenTwoDates
		WHERE
			myRecursiveExpressionName < '2023-10-12'
)
SELECT
	*
FROM
	allDatesBetweenTwoDates
ORDER BY
	myRecursiveExpressionName ASC
;
Query Syntax
OK, this is all well and good with the examples. But what does it mean above? It’s fairly new syntax with MySQL and it isn’t easy to understand what it is actually doing. And the official documentation can be a tad difficult to interpret.
So let’s dig into this in a little more detail for what this all means in practice, I’ve added a few comments to the iCanCount example which helps explain what is going on…
-- MySQL While Loop
-- Think about this whole section with the WITH RECURSIVE bit as kind of like an in-memory virtual table with one column, called ‘allDatesBetweenTwoDates
WITH RECURSIVE myRecursiveExpressionName(allDatesBetweenTwoDates) as (
    		-- Non-Recursive Select Part...
    		-- Return initial row set
    		-- aka. Start Date
    		SELECT '2023-10-01'
UNION ALL
    		-- Recursive Select Part...
    		-- Return additional row sets
    		-- aka. End Date, with a stop expression via the WHERE clause
    		SELECT
    			allDatesBetweenTwoDates + INTERVAL 1 DAY
    		FROM
    			myRecursiveExpressionName
    		WHERE
    			allDatesBetweenTwoDates < '2023-10-12'
)
SELECT
	allDatesBetweenTwoDates
FROM
	myRecursiveExpressionName
ORDER BY
	allDatesBetweenTwoDates ASC
;
Which then nicely produces the a row for every date between those two dates;
2023-10-01
2023-10-02
2023-10-03
2023-10-04
2023-10-05
2023-10-06
2023-10-07
2023-10-08
2023-10-09
2023-10-10
2023-10-11
2023-10-12
Brilliant. Next it’s just back to your good old easy MySQL stuff to the data you want on those dates to join to the table of your choice to get the additional data you need. i.e. as a simple example;
WITH RECURSIVE myRecursiveExpressionName(allDatesBetweenTwoDates) as (
    		SELECT '2023-09-06'
UNION ALL
SELECT
		allDatesBetweenTwoDates + INTERVAL 1 DAY
FROM
		myRecursiveExpressionName
WHERE
allDatesBetweenTwoDates < '2023-10-06'
)
SELECT
allDatesBetweenTwoDates
    	, IFNULL(SUM(my_table.my_summable_column), 0) -- Important to add the IFNULL check here to avoid NULLs returning as you can’t graph a NULL value
FROM
	myRecursiveExpressionName
    	LEFT JOIN my_table ON myRecursiveExpressionName.allDatesBetweenTwoDates = my_table.created_date
GROUP BY
	myRecursiveExpressionName.allDatesBetweenTwoDates
ORDER BY
	allDatesBetweenTwoDates ASC;
I have to mention though, while that last bit looks easy – this is going to be heavily dependent on your data, data quality and data relationships to get the exact data you need. This bit soon gets tricky when you have to include a WHERE statement, since the second you introduce a WHERE to filter data such as my_table.some_column_you_want_to_filter_on, then this will instantly get you back to the starting point as it removes all records where you just got a NULL/0 value, which is essentially the same problem at the start when trying to run;
SELECT my_date, COUNT(*) FROM my_table GROUP BY my_date;
Which fails miserably when there are missing records on certain dates. It’s surprising all of this is needed in this day and age. If only MySQL could create some kind of “WITH FILL MISSING DATES BETWEEN(fromDate, toDate)” kind of function/syntax to abstract all this kind of workings.
What are your thoughts reading this blog post, please leave a comment.
I’ve been a member of Stack Overflow for many many years in various guises. And over the years I’ve been ever more disengaged and disgruntled with the community on there. It’s such a shame, as it’s actually quite a handy platform if it weren’t for some members of the community. I don’t wish to tarnish the great people out there in the community who have genuinely helped me and others along the way. Hat’s off to you, the good people in the community provide real value.
I’m not going to listing all the problems about Stack Overflow in this blog post, simply do a quick Google search for “stack overflow community known problems” and you’ll soon see results including words such as “toxic”.
So I’m writing this blog post to ask Stack Overflow… Have you really changed?
What do you think as someone reading this blog post and is a user of Stack Overflow?
In a recent discussion with moderators on SO, I’ll post the full chat below for transparency, but the summary is that you have to only ask good questions (whatever that means…), and you can’t provide answers that the moderators disagree with, and content censorship is ripe.
Personally, I’d say the community is probably more toxic today than it has been in years. So I’m not seeing any positive change off the back of their acknowledgement 5 years ago of the problem.
Full transcript…..
Moderator Private Message from moderators sent yesterday to Michael Cropper’s user avatar Michael Cropper Hello,
We’re writing in reference to your Stack Overflow account:
Some of your recent interactions with other community members have violated our Code of Conduct. We get it; anyone who’s ever tried to engage with others online has probably been tempted to lash out at someone else. However, on our sites, we do require all participants to interact in a professional and civil manner. If another user has wronged you in some way, please do not respond in kind. Simply flag the content for moderator attention and move on.
In particular, we would like to call out the following interactions as being problematic and having contributed to sending this message:
“Not a gripe on your question as you clearly don’t know the basics (you will in time young Padawan…) but…. JavaScript Frameworks that aim to “simplify” things are just useless. You can’t skip the foundations.
Don’t take this personally, but if you don’t know this, you probably shouldn’t be using a JavaScript framework such as Express.js (or any other!). Using these kinds of frameworks is only going to hinder your growth and learning experience. Express.js (amongst many others) will probably be dead in the next few years and everyone is onto the next flavour of a JavaScript framework that has equally as many problems.”
“Given up with D3 JS. I’ve just been blocked from their community Q&A for asking questions similar to this (and other similar ones) for a basic working example. Only asking on StackOverflow because their official support channels are so bad.
Thanks for the people who have been trying to help on StackOverflow, much appreciated and some great ideas that have helped to try various solutions (Even though ultimately none of them worked, if only D3 could provide a pure JavaScript example without the reliance on JavaScript Template Literals, but they don’t have that…).
Not going to be exploring D3 further in any way at all based on the way I’ve been treated from their official support channels. Absolute bunch of clowns. If can’t get a basic HelloWorld example working, zero chance of a commercial conversation.”
You’ve left several of these “commentary answers”, and in the last instance, you made a screenshot of the answer that was deleted for not really being an answer. We expect answers to answer the question. If you want to comment, you have the commenting privilege. In addition, please don’t comment on how or little knowledge you think question posters have. Such assumptions never end well.
Please refrain from this behavior in the future. We take the Code of Conduct very seriously and we encourage you to take a moment now to review it. We’d like you to not only consider your intent, but also the impact your interactions are having on others. And while we hope it’s unnecessary, we want to make sure that you’re aware that future incidents of this type could result in your profile being suspended.
Regards, Stack Overflow Moderation Team
add a new private reply from Michael Cropper to Andy ♦; Baum mit Augen ♦; blackgreen ♦; Bohemian ♦; Brad Larson ♦; ChrisF ♦; Cody Gray ♦; deceze ♦; Dharman ♦; Flexo ♦; Henry Ecker ♦; Jean-François Fabre ♦; josliber ♦; Machavity ♦; Makyen ♦; Martijn Pieters ♦; Michael Myers ♦; Rob ♦; Russia Must Remove Putin ♦; Ry- ♦; Ryan M ♦; Samuel Liew ♦; sideshowbarker ♦; Stephen Rauch ♦; Undo ♦; user229044 ♦; Zoe stands with Ukraine ♦
==========
More fun from the SO community #FacePalm. Unfortunately this is why both I and many others disengage because it’s painful to engage. There are so many judgemental people in this community it’s such a shame as it actually isn’t helpful and this moderator message is a prime example of this in action.
Community downvoting things for no reason for a “bad question” – There is no such thing as a bad question. When did SO become a Q&A when someone asks “I want an apple” and someone gets downvoted for saying “Have you thought about having a banana as part of your 5 a day” These types of basic blindly asking and answering questions help no-one in the long run without context – copying and pasting code snippets as answers does not help the person asking the question for them to have a deeper understanding of why.
There are some really helpful people on SO, but it’s tainted by so many idiots unfortunately, and often in mod/senior positions controlling the content about what is acceptable and what isn’t. And the fact that this message is coming through is unfortunately part of the problem. Don’t take it personally, I don’t know any of you folk in the CC. I’m sure you’re all great folk, but honestly, this message just makes me disengage further from SO.
As for the question re. the JS Framework. I stand by that as a good solid answer that is going to help the person asking the question to move forward in their understanding. You may disagree, that’s your choice. I can’t even find that question any more on the site, probably because some other mod decided it was also a bad question to ask and has since removed it. Pretty awful behaviour to do this to a noob asking the question from memory (or the search function is awful and I can’t find the question again…). It’s best for the person asking the question to determine if the answer is good or not, not some mod hiding behind an alias and a keyboard.
As for the D3 JS question. That was MY question, and if it’s frowned upon to provide an honest answer to my own question, then there is no hope left in the world of SO. I don’t know how anyone other that me could accept an answer to my own question. You may not agree with my answer to my question, and that’s your choice. Doesn’t mean it’s a bad answer just because you don’t like it.
As for the SO mods censoring content… I mean… that also never really ends well with censorship.
Honestly though, this chat is just the final straw for me with SO. I will not be answering or commenting on anything for anyone else in the community to help them unless it directly helps me. It’s such a shame because I’ve always taken the mindset of pay it forward. If I get something from SO, then I try to take some time out of my day and provide a few insights and help others out along the way answering questions that I can help get them moving in the right direction – sorry if that’s not in the specific way you like but quite frankly if you are criticising someone for providing value then you’ve lost the plot as a platform. Unfortunately I won’t be doing that any more. Feels as though I’m wasting my time engaging with SO.
Good luck with the future. I’ll probably just engage with ChatGPT from this point forward, at least it doesn’t answer back and judge.
SO seriously needs to look deep and hard at the mods throughout this platform if it has any hope of surviving in the future.
Seems like nothing has really changed in 5 years….. https://stackoverflow.blog/2018/04/26/stack-overflow-isnt-very-welcoming-its-time-for-that-to-change/
Note: This blog post is entirely generated by AI with the prompt “Write a blog post titled “What is Docker” which is around 2000 words in length and include sub-headings to make the content easy to read. ” ….. Leave a comment on what you think…..
Docker is an open-source platform that automates the deployment, scaling, and management of applications inside containers. In simple terms, it provides a way for developers to package their applications and dependencies into a container, which can then run consistently on any system that has Docker installed.
Containers vs Virtual Machines
One of the key differences between Docker and traditional virtualization methods like Virtual Machines (VMs) is that containers share the host system’s operating system (OS) kernel, while VMs run on a full copy of the host’s OS. This makes containers much lighter and more efficient than VMs, as they don’t require the same amount of system resources or disk space.
Another important difference is that containers are isolated from one another, but share the host’s OS. This means that each container runs its own application and dependencies, but they are all running on the same underlying system. In contrast, VMs are completely isolated from one another and run their own OS, which can lead to compatibility issues between different systems.
Why use Docker?
Docker provides several benefits over traditional virtualization methods:
Portability: Docker containers can run on any system that has Docker installed, making it easy to move applications between development, testing, and production environments.
Scalability: Docker makes it easy to scale applications by adding or removing containers as needed, without having to reconfigure the underlying system.
Isolation: Each Docker container runs in its own isolated environment, which helps to ensure that applications don’t interfere with one another.
Consistency: Docker ensures that applications run consistently across different systems, as they are packaged with all of their dependencies.
Ease of use: Docker provides a simple and straightforward way to manage containers, making it easy for developers to focus on writing code instead of dealing with complex infrastructure.
Docker Architecture
Docker uses a client-server architecture, with the Docker client communicating with the Docker daemon, which is responsible for building, running, and managing containers.
The Docker client and daemon can run on the same system, or they can communicate over a network. The Docker client sends commands to the Docker daemon, which then performs the requested actions.
Docker Hub
Docker Hub is a public repository for Docker images, which are pre-built packages that include everything needed to run a specific application or service.
Developers can use images from Docker Hub to quickly get started with building and deploying their applications, or they can build their own images and upload them to Docker Hub for others to use.
Dockerfile
A Dockerfile is a script that contains instructions for building a Docker image. It specifies the base image to use, the application and dependencies to include, and any configuration information that the image needs.
Once the Dockerfile has been created, developers can use the Docker build command to build the image and create a container from it.
Getting Started with Docker
Getting started with Docker is straightforward, as it only requires a few basic steps:
Install Docker: To start using Docker, you’ll need to install it on your system. Docker is available for a wide range of platforms, including Windows, macOS, and various Linux distributions.
Download a Docker image: You can either download a pre-built image from Docker Hub or build your own image using a Dockerfile.
Run a container: Once you have an image, you can use the Docker run command to create a container from it and start it running.
Conclusion
Docker is a powerful platform that makes it easy to
Commentary on my opinion of the quality of the ChatGPT generated blog post
Honestly….. Not bad. Technically accurate too. But….. It’s only ~500 words in length, the content is very surface level and nothing really makes sense unless you know this stuff already which kind of makes it a bit pointless. The challenge here is that these topics are complex, the documentation is complex, there are lots of moving parts and actually the whole benefit to writing blog posts is not to write a high level overview of the topic, but to help readers truly understand so they can anchor their existing knowledge towards a new topic so they can get up to speed quickly.
Very gimmicky, entertaining but when it comes to something I would deem as high quality, it’s a long way off. I do like the headings it introduced though (formatted manually), but in reality, nothing that you can’t easily create the structure of a blog post with a tiny bit of research on the topic before jumping straight in.
There are many ways to skin this cat, so this blog post is going to look at some of the ways that you can help simplify Apache Virtual Host configuration on Linux by breaking things down into manageable self-contained chunks with bounded contexts, aka. all around a domain name which is what 99% of people will be aiming to do.
The difficulty with the official documentation for Apache Virtual Hosts is that it provides many different examples to follow, but gives very little contextual information around use case and instead goes very deep into the art of the possible without guiding you to where you should look. And I guess that’s fine to an extent for official documentation, but it’s also not very useful at the same time as different configurations require different levels of complexity.
So in this blog post we’re going to focus on the common setup for what the majority of use cases for Apache Virtual Hosts are and how you should probably set this up to make your life easy.
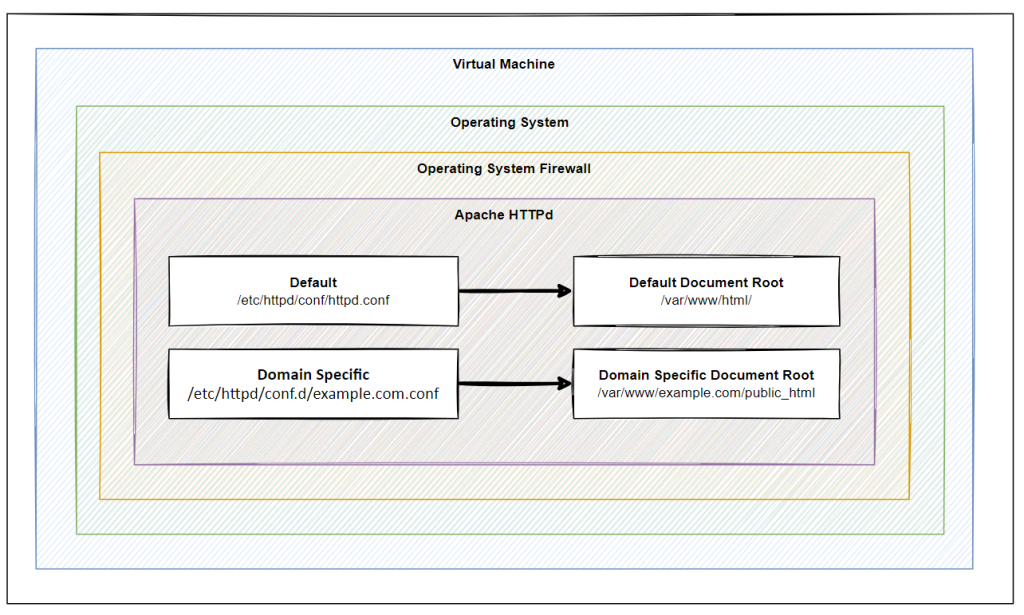
System Architecture
Firstly, it’s important to understand the situation we find ourselves in. Below is a basic hierarchy of layers where this sits. Naturally this is going to differ in reality for most situations, but conceptually in most cases, this tends to be the setup that is ultimately in place in one way or another with a few nuances along the way.
Virtual Machine
Operating
Firewall
Apache / HTTPd
Default
Default Document Root
Default httpd.conf
example.com
example.com Document Root
example.com httpd.conf
another-example.com
another-example.com Document Root
another-example.com httpd.conf
Operating System Firewall
Keep an eye on this, this is one of the steps that causes a lot of confusion. People often start working at the Apache HTTPd layer, yet haven’t opened the correct ports on the Operating System Firewall. By default many modern operating systems are out of the box configured as a deny-all setup so are likely to block traffic before it’s even reached your Apache HTTPd installation, usually the default open ports are only port 22 for SSH access.
Remember, the layers of your system are essential to understand in detail to make your life easier debugging problems.
The operating system firewall is beyond the scope of this blog post, so we’ll cover this off in a subsequent blog post, but always keep this in mind.
Apache HTTPd Installation
When we install Apache HTTPd via tools such as Yum it will create folders, files and scripts throughout the system. The important ones being;
/etc/httpd/ – For the configuration aspects of Apache HTTPd
/var/www/html – For the files that need to be served to users accessing web applications
This is the basics.
For single website hosting this can be more than fine to work with out of the box with zero additional configuration. In reality, most Apache HTTPd installations are hosting many websites, essentially acting as a mini-reverse proxy inside the virtual machine to host multiple websites on the same virtual machine and ultimately the same underlying infrastructure.
Document Roots
Ok, so getting back to basics here. What is a Document Root? In simple terms, this is the home directory for a specific configuration. To put this into context, most people run Windows computers for personal and corporate use. In this example, your “Document Root” is the equivalent of “My Documents”.
So when User 1 logs into a Windows computer they go to “My Documents” and see their own files.
When User 2 logs into a Windows computer they go to “My Documents” and see their own files.
The concept of a Document Root is essentially the under-the-hood configuration that makes this possible.
So in the same way when we are hosting multiple websites this essentially allows us to direct example-one.com to /example-one/index.html, and example-two.com to /example-two/index.html.
Conceptually this is what we’re working with, despite the terminology and underlying configurations being fairly complex using lots of terms that aren’t familiar to 99.9% of us and having to search the web to gather these pieces of information.
So, let’s dig deeper…
Default Document Root – /var/www/html
The default Document Root that is created on Apache HTTPd installation usually lives at /var/www/html. You can confirm this on first installation if you setup Apache HTTPd and then try to access the IP address of the virtual machine. If you have no advanced configuration sitting in the way, you’ll see a successful page that shows a message confirming that Apache HTTPd has been successfully installed. Awesome
Domain Specific Document Root – /var/www/example.com/public_html
But, what if you want to host multiple websites using Apache HTTPd, you need to segment this into a separate Document Root for ease of management. Essentially two separate folders for two different domains;
Create a basic “Hello World” index.html file for Example One and Example Two so you can easily identify the two and you’re good to go.
You’ll notice that if you check these locations after initial setup that they don’t exist. You need to create these folders and files using Linux commands such as mkdir and nano index.html if you’re not too familiar with these commands. These commands are the equivalent on Windows of right clicking and selecting the Create Folder menu item and the Create File item respectively.
Here we have now created two separate folders, aka. Document Roots, that we can then use to configure the Apache HTTPd Configuration.
Apache HTTPd Configuration Files
Now that we’ve covered off the Document Roots which is where your files live, the next step is to cover off how to configure Apache HTTPd Virtual Hosts properly to ensure your hostnames can root to the correct Document Root.
Default HTTPd.conf – /etc/httpd/conf/httpd.conf
The default configuration file that comes out of the box with Apache HTTPd is located at /etc/httpd/conf/httpd.conf. This is the global single file that rules them all. What is important though is that this file can be added to and also extended or overridden. This is where things get interesting.
There are many way to skin a cat, and this is one example. Fundamentally there are two ways to extend the Apache HTTPd configuration, one of them is by extending this main configuration file. The other is what we’re going to cover off next.
While is it possible to extend the main Apache httpd.conf file, it’s generally bad practice to do so when you are configuring virtual hosts. Mainly because it makes things significantly more difficult to manage and maintain.
If you do want to add Virtual Hosts configuration to the primary httpd.conf file then you simply add these details;
Ultimately though, whatever you do in your httpd.conf file, can be over ruled by a separate domain specific configuration file. This is what we’re going to cover next.
It’s not best practice to add Virtual Hosts to your httpd.conf file as it keeps every single configuration bound to a single file which can cause problems with dependencies over time.
Domain Specific HTTPd.conf – /etc/httpd/conf.d/example.com.conf
So we’ve talked previously about adding the specific configuration to a separate Apache HTTPd configuration file which is what we’re going to look at next. Apache is a well-established and advanced piece of software which understands parent/child relationships. And this is the case with .conf files.
As we’ve seen earlier around how the core httpd.conf file is located and how the override is configured, let’s look at this;
/etc/httpd/conf.d/example.com.conf – Domain specific Apache HTTPD configuration file
It’s not super complex in practice, while under the hood it clearly is. Ultimately it’s a simple scenario that if there is a domain specific configuration file then this takes priority over the general configuration file.
And all this is managed through the configuration of the Apache HTTPd Virtual Hosts syntax.
To manage this effectively, simply create a file using the command;
nano /etc/httpd/conf.d/example.com.conf
Then add in the exact same configuration details that we’ve outlined earlier;
What this essentially means is that Apache will take into account these additional configuration files and use them to override the default. This is all accomplished via the primary http.conf file mentioned earlier with the out of the box configuration of;
IncludeOptional conf.d/*.conf
There is nothing specific to configure to make sure this is working.
Virtual Machine or Apache Level SSL Configuration via Let’s Encrypt
There are many way to ‘do’ SSL. In most legacy on-prem setups, you’ll tend to find that SSL is offloaded at the primary on-prem firewall and traffic is unencrypted from that point forward as traffic travels to the correct virtual machine with Apache or Nginx is running etc.
I’m not saying this is bad practice per say, because it works, but yeah, it’s often a very error prone setup with all eggs in one basket and all and often causes significant bottle necks as the primary firewall tends to be heavily restricted and any change is virtually impossible to make without weeks of discussions, planning, forms and more – for what is ultimately a 5 minute job in most cases to implement.
So, for the purpose of this blog post and to provide a full end to end setup, we’re going to assume that you’re using modern Let’s Encrypt technologies to generate your SSL certificates on the fly for free every few months automatically, from the virtual machine where your application lives.
If you need more information about Let’s Encrypt then we have covered off several blog posts on this topic over the years so search around the site, some of the core ones being;
Why it’s important to mention this is because of the previous setups we’ve gone through.
Security Considerations
We’ve not really covered security considerations for any of the above in this blog post as this is a significantly more in-depth discussion which has many nuances based on every individual setup, governance and controls.
For the purpose of this blog post, this has been to look at how to host multiple websites behind a properly configured Apache HTTPd Virtual Host setup for applications that you own, control and can trust 100%.
Things get significantly more complex for other applications when there are multi-tenancy considerations which is ultimately where software such as cPanel and WHM come into play, but that’s a topic for another time.
Summary
Hopefully this blog post has provided you with some insight on how to configure Apache Virtual Hosts using Document Roots and HTTPd.conf files and separate domain specific HTTPd configuration files to help make your life easy to manage and keep configurations segmented.
As with everything Apache and HTTPd related, everything is going to be specific to your individual use case so please treat this blog post as guidance not a rule. Take a look at your own set up and assess how any of this information may or may not apply to your specific setup.
I’ve found that this topic is quite an undocumented one online and lots of assumptions tend to be made. The majority of content online under this topic that I’ve come across tends to direct you down the route of HA Proxy, which can be fine with very specific setups. But, the minute you want to start to do anything more complex than the basics, HA Proxy soon becomes limiting.
Many websites these days have multiple ports open for specific use cases. Take for example one of the most common web hosting platforms cPanel, this requires many open inbound ports at the firewall layer and in other scenarios we want to give the control to the virtual machine’s operating system the power to decide what ports to allow in without having to configure the firewall every time since they may not have access to the firewall.
We did a blog post recently for How to Setup HA Proxy on pfSense to Host Multiple Websites, which is worth a read to understand the differences for what we are going to cover off here. The core difference here is that with HA Proxy, you have to be explicit when configuring it which ties the settings against a single port, which often is too limiting for many applications.
To get the maximum flexibility you need multiple public IP addresses. This allows you to configure things in any way that you require. So this is what we’re going to cover off in this blog post.
System Architecture
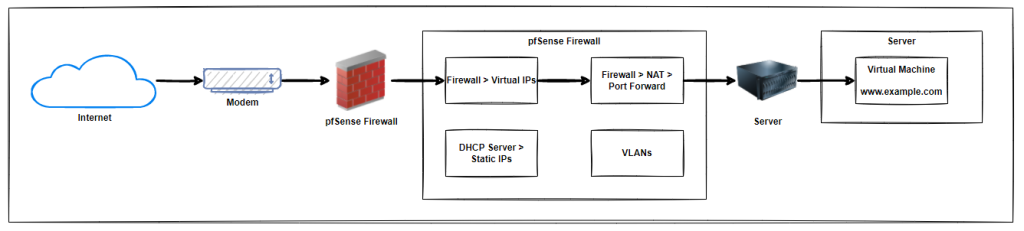
To get a high level view of a setup like this we have the basic components that are outlined below. With a modem, connected to a pfSense firewall which has virtual IP addresses, port forwarding, static IP addresses for virtual machines, VLANs for security configured, then connected to a server with a virtual machine running on it.
In reality, there are often a few bits more along the way and significantly more complex in real world environments, but fundamentally, this is the basic architecture for how all this plugs together.
Purchase Additional Public IP Addresses from your ISP
Firstly, you need to purchase a block of IP addresses from your internet provider. What happens when you do this is that any traffic from those public IP address ranges will ultimately route through to your pfSense firewall so you can then determine what happens to that traffic next.
We’ve covered off a blog post a while ago which helps you to Understand Network Private Address Ranges and looks at the difference between public IP address ranges and private IP address ranges. So take a look at that blog post if you aren’t sure of the difference.
Ok, so now you’ve got your additional public IP addresses.
pfSense Firewall Virtual IP Address Configuration
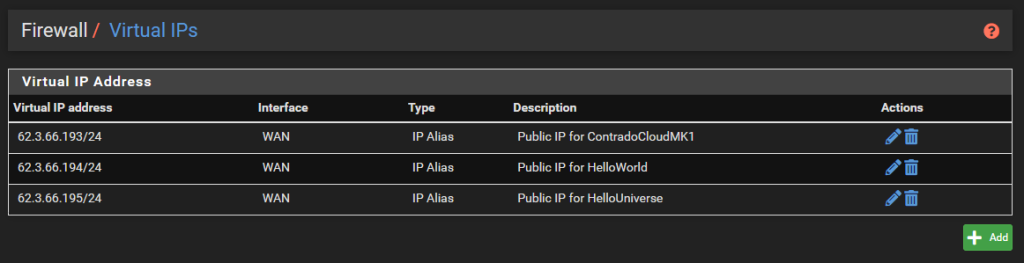
Now it’s time to tell your pfSense firewall about these IP addresses so it knows how to handle the traffic that is coming in. The first step is to setup Virtual IP addresses within pfSense. To do this, simple navigate to Firewall > Virtual IPs.
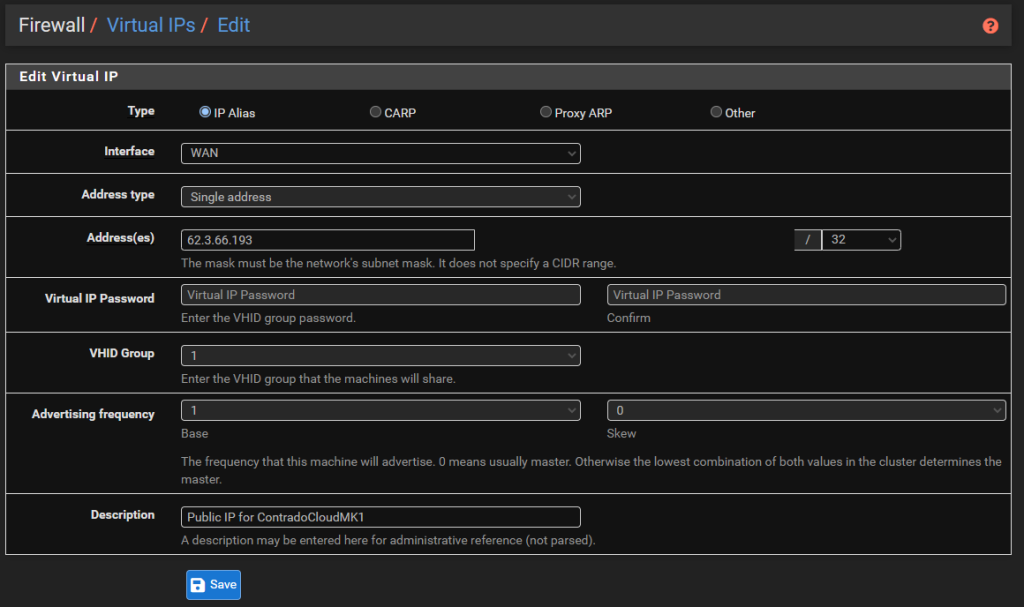
There is nothing particularly complex for settings these up. Simple setup the type as an IP Alias, the interface would be the WAN, the Addresses would be one of the IP addresses with the /32 CIDR range (aka. single IP address), then give it a friendly name and you’re done.
Configure NAT Port Forwarding Rules in pfSense
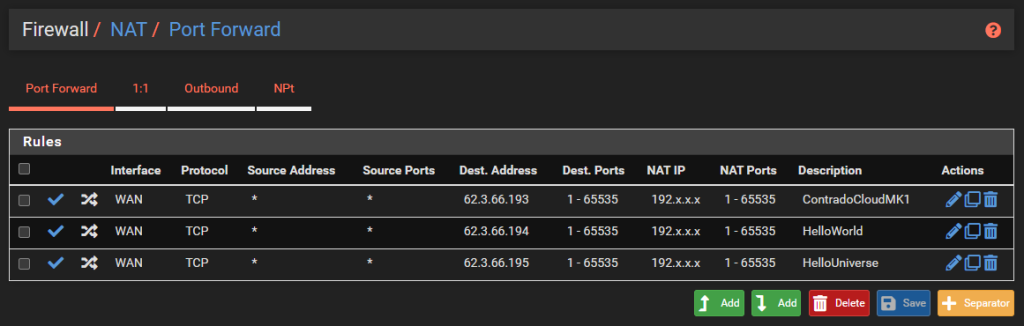
Now that we’ve got the Virtual IPs configured, it’s time to configure the port forwarding rules so the traffic gets to where it needs to for that public IP address. To get started with this, simply navigate to Firewall > NAT > Port Forward. Then add in some rules.
As you can see in the screenshot below, the settings are rather basic, with the rule being applied to the WAN interface, for the TCP protocol where the Destination Address is the Public IP Address that you added as a Virtual IP Address previously, then forwarding traffic to the static IP address of the virtual machine whenever traffic is received on any port.
When you do this, pfSense will automatically add a Firewall Rule on the WAN interface.
pfSense Static IPs and VLANs
We’re not going to cover this off within this blog post as this is a separate topic and one that is going to be dependent on your specific setup. The static IP addresses are important to ensure your Virtual Machines always get the same IP address every time they are rebooted so that the firewall rules are still accurate.
Likewise, the VLANs and IP ranges are extremely important from a security perspective to ensure that any inbound traffic is securely segmented from your sensitive internal systems and/or other separate public IP ranges that need to be kept separate from other ones.
Server and Virtual Machines
To keep this bit relatively short and simple, if you have configured all of the above correctly, the traffic that comes into your WAN from specific IP addresses then this will flow through to your virtual machine that you have setup.
So for example, if you have the DNS A Record setup for mk1.contrado.cloud as 62.3.66.193, then this traffic will reach the specific virtual machine where the operating system firewall will then control what traffic it will accept in and what traffic it will deny.
This setup gives you the complete control of the traffic without having to continually play with the pfSense firewall rules.
Summary
Hopefully the above is a handy guide for how to configure pfSense with multiple public IP addresses then use NAT so that you can host multiple websites using multiple ports with minimal configuration within the pfSense firewall.
This is a complex topic, and one that is going to be very different in every single use case. Hopefully this blog post had helped fill in a few gaps in knowledge to get you pointed in the right direction.