Today we’re going to look at how to setup Let’s Encrypt on pfSense so that you can install, manage and automatically renew your SSL certificates completely free of charge with ease. If you don’t know about Let’s Encrypt, you really should. Go read up on it on the main Let’s Encrypt website, it’s awesome, it supports over 225,000,000 SSL certificates on websites around the globe and is supported by the biggest companies powering the internet.
Let’s Encrypt is part of the global movement to secure the internet free of charge to prevent the people between you, and the web servers you are visiting as a user from reading the traffic – people like governments, Internet Service Providers (ISPs) and other people snooping around. We’ve done a few blog posts on Let’s Encrypt over recent years including, How to Configure Let’s Encrypt on CentOS6 with cPanel and WHM, How to Use AutoSSL on WHM and cPanel for SSL Certificates and Claim Your Free SSL Certificates for HTTPS.
OK, so back to the main point of this blog post, how to get Let’s Encrypt setup on your pfSense hardware. For the purpose of this blog post we’re going to assume you’re running pfSense directly on one of the Netgate hardware devices as there are too many nuances to running pfSense virtually that make the setup too problematic in any real world environment. A virtual pfSense environment is great for playing around, but beyond that, personally I’ve had too many issues for that setup to be taken seriously for a production ready setup. If you have managed to get that working, then please do comment on the setup that you’ve got working!
For reference, ACME stands for Automated Certificate Management Environment. It has no link to the Acme Corporation in the Road Runner/Wile E. Coyote animated series.
Why Use Let’s Encrypt on pfSense
This is a very good question, and one that doesn’t have a straight forward answer. This comes down to two basic use cases, one of which is to manage SSL certificates at the edge of the network (i.e. your pfSense device), the other of which is to manage SSL certificates at the destination server. And as usual in the world of IT, the answer is that “it depends…” and it does. There is no hard and fast answer for a solution as it all depends on what you want to do. Both approaches have merits and drawbacks.
Personally speaking, I tend to lean towards utilizing SSL connections using Let’s Encrypt or otherwise on the destination devices rather than the edge network firewall. The reason behind this is because this approach gives significantly more flexibility to the portability of services as there is a more decoupled approach, meaning that it’s more pain free.
In the scenario whereby you need to move a virtual machine from an on-premises network to the cloud and you have a tight coupling via the SSL certification process to your on-premises network, the migration process will be more difficult. Whereas if you had everything contained within the single box, you could easily take a snapshot and migrate that to the cloud without ever worrying about the network firewall and any SSL certificates installed on there. Granted, there are many other considerations and this is an over simplification, but you get the gist.
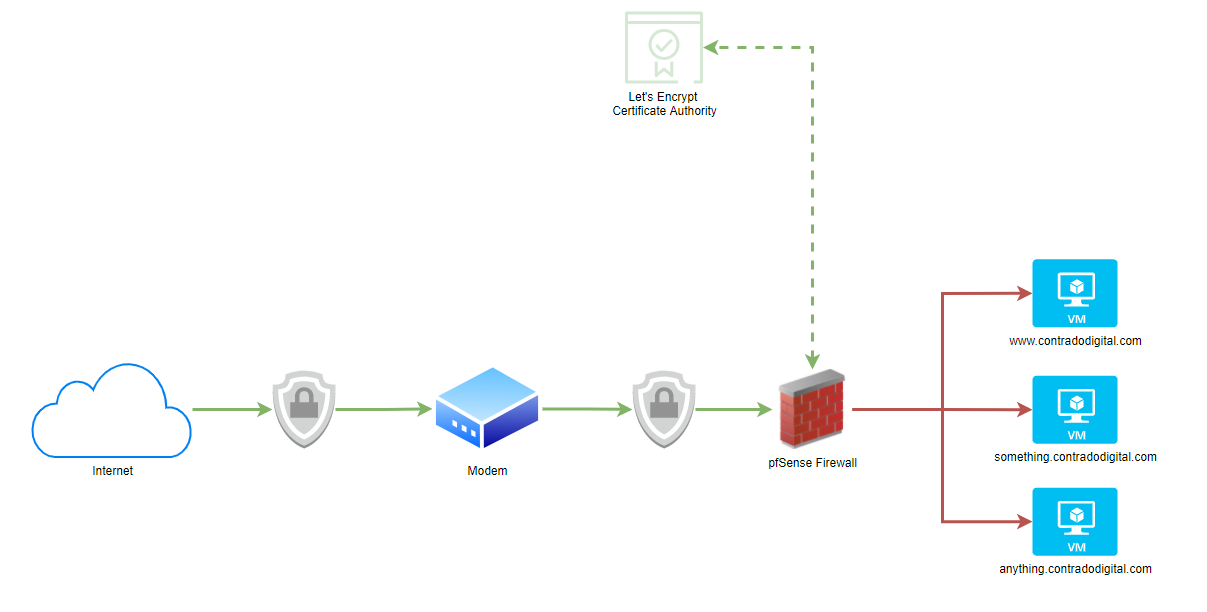
What this means pictorially. The whole point of setting up Let’s Encrypt on your pfSense hardware device fundamentally means that traffic from the Internet to your pfSense device is encrypted using SSL, which then means the traffic from your pfSense device to your destination computer/server/virtual machine is not encrypted.
As you can see in the image below, the lines highlighted in Green show where SSL encryption is present and the Red lines highlight where SSL encryption is not present. This is an overly simplified architecture as there are no notions of VLANs highlighted in this diagram to suggest if this is a safe or not safe space to be dealing with. Non the less, it highlights the main point around the approach for simplicity.
As mentioned previously, there are both pros and cons to this approach depending on your specific needs.
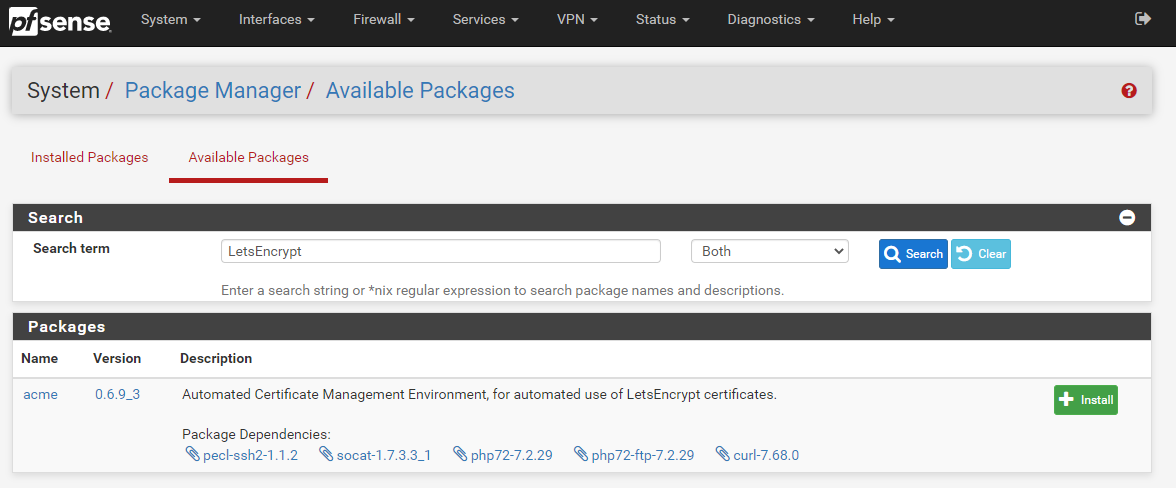
Step 1 – Install ACME Package
Thankfully pfSense comes with a list of available packages that you can install with ease. Very much in the same way to how Yum works for Linux, the only difference being that within pfSense you install the packages via a visual graphical user interface GUI to help you do this easily via the pfSense administrator console.
To install the Let’s Encrypt ACME Package onto your pfSense device it is actually extremely simple, simply navigate to, System > Package Manager > Available Packages;
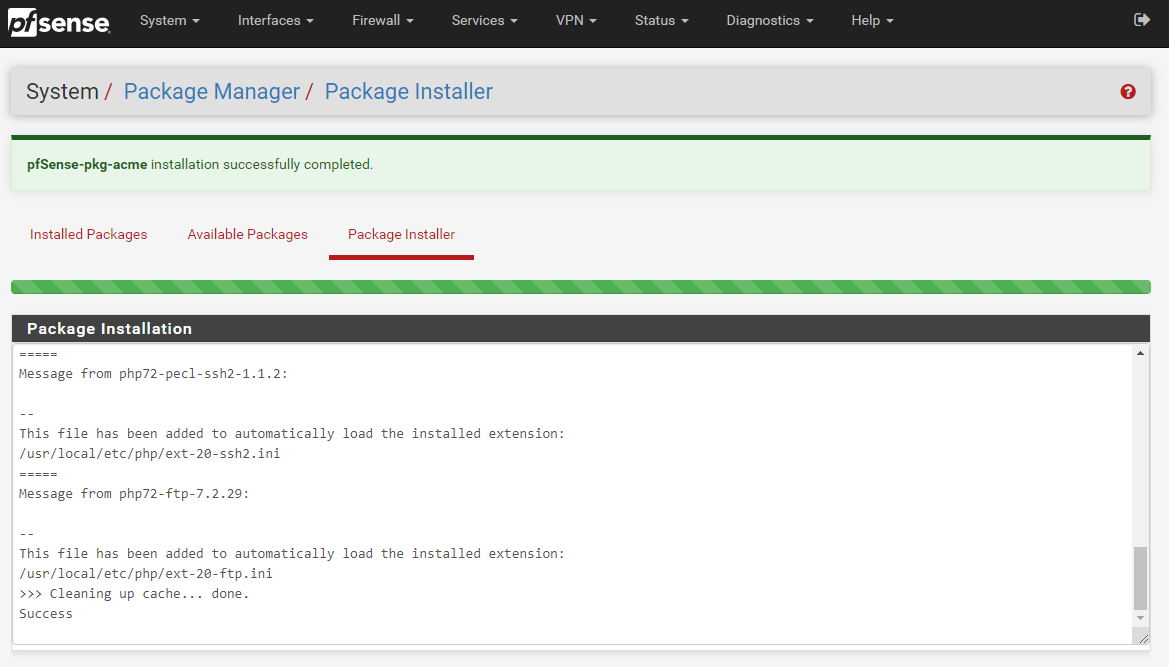
Once the installation process has complete for Let’s Encrypt on your pfSense device you’ll see a nice message stating that “pfSense-pkg-acme installation successfully completed”.
Excellent, now we’re onto configuring your Let’s Encrypt ACME package so that you can then install, manage and automatically renew your SSL certificates with ease.
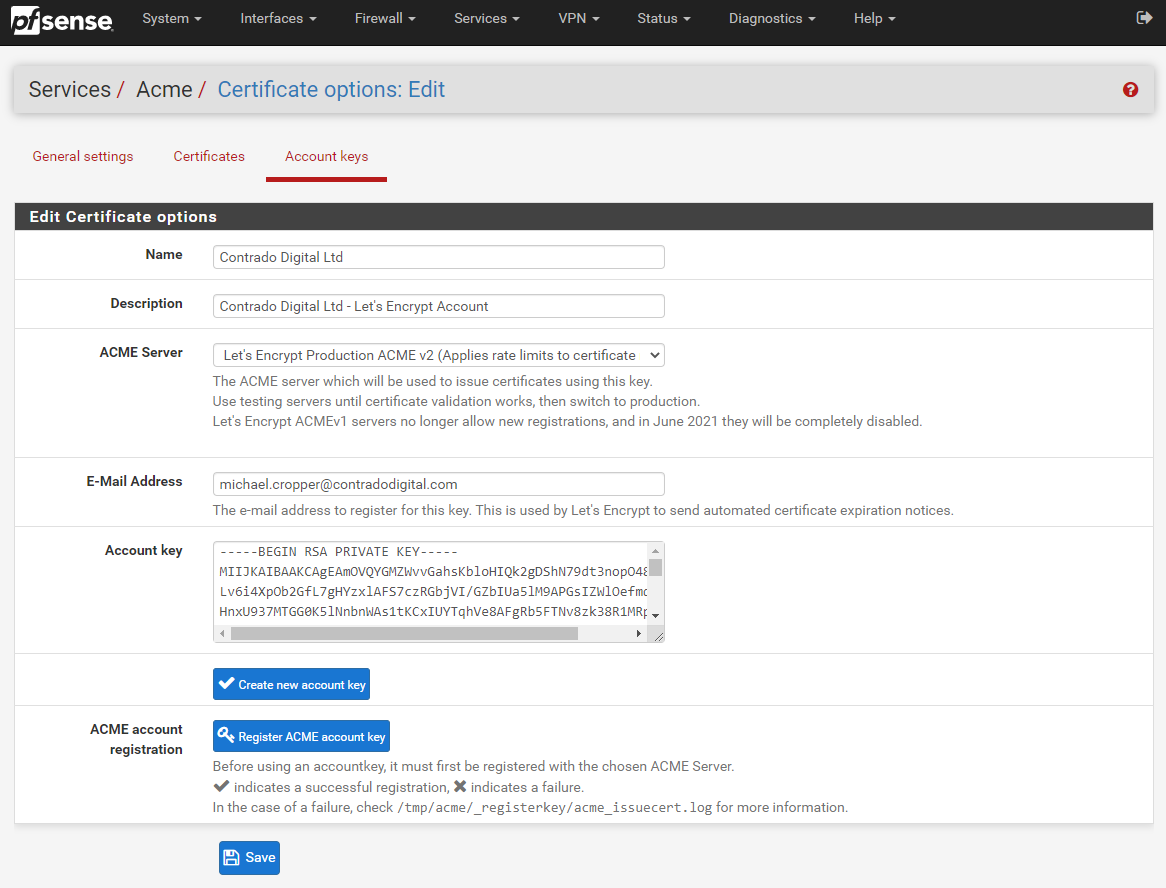
Step 2 – Register an ACME Account
So next we need to get your system registered as an official ACME provider. This step is important as Let’s Encrypt controls the use of their system through basic rate limiting, meaning that once you reach the rate limit you will be blocked for a period of time. This helps to maintain the ecosystem for everyone. By registering your account, not only is this a required step to get Let’s Encrypt up and running on your pfSense hardware device, this also allows you to work within the rate limits of certificate renewals so that you can plan accordingly for your SSL certificates.
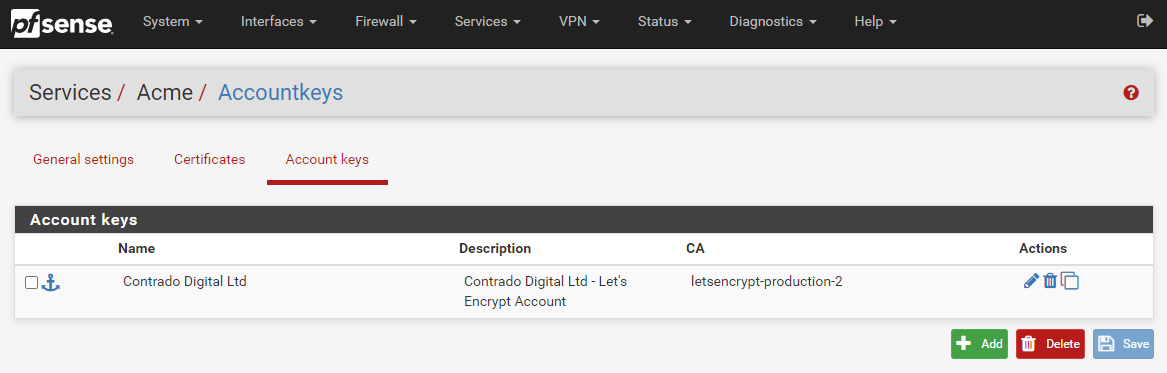
To get your Let’s Encrypt account registered first of all you need to create an Account Key by visiting, Services > ACME > Account Keys, then clicking ‘Create new account key’, which will generate the Account Key automatically.
Now click ‘Register ACME account key’ and you should see the process complete with a tick;
![]()
Now click ‘Save’ and you’re good to go. You will then see your Account Key registered within your pfSense settings;
Step 3 – Configure Automatic Renewal of SSL Certificates Using Let’s Encrypt ACME Plugin on pfSense
OK, so next we need to turn on the configuration settings so that your Let’s Encrypt SSL certificates are automatically renewed when they are due. Unlike commercial SSL certificates which are generally valid for a minimum of a 12 month period, Let’s Encrypt SSL certificates are valid for a 90 day (3 month) period, upon which you are required to regenerate the SSL certificate. Quite frankly, no-one is this dedicated to remember to do this every 90 days, which is where the automated renewal process comes in extremely handy.
To turn on the automatic SSL certificate renewal process, simple navigate to Services > ACME > General Settings and configure the CRON Entry as can be seen below;
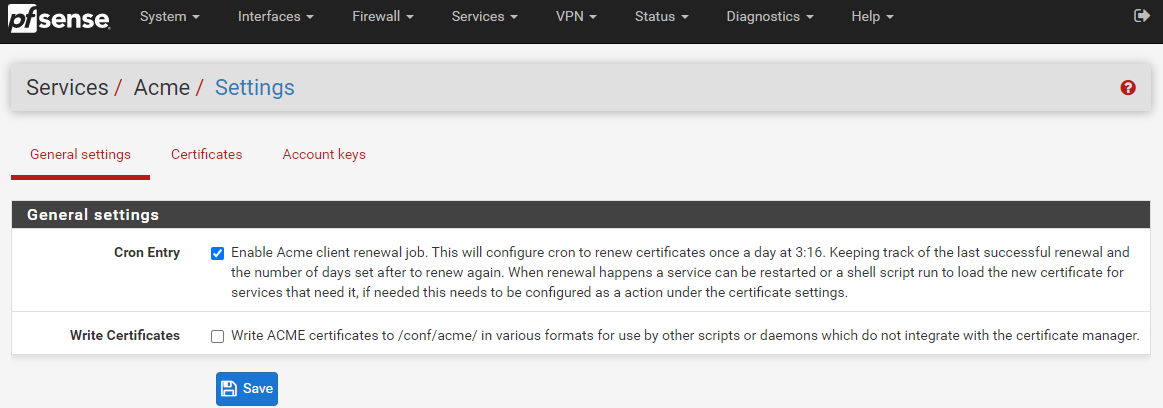
For reference, a CRON Entry is more commonly referred to as the CRON or a CRON Job. For which CRON is a geeky term for how the Greek God of time Chronos is able to control things. An interesting point, but completely irrelevant to what you are reading about.
Summary
And that’s it, you’re done. You can now use Let’s Encrypt to secure the encryption between the users accessing the systems/websites/applications behind your pfSense hardware over a secure network.
Michael Cropper
Latest posts by Michael Cropper (see all)
- How to fix “Error establishing a database connection” on WordPress - May 19, 2026
- General Scheme of the Regulation of Artificial Intelligence Bill 2026 - February 4, 2026
- WGET for Windows - April 10, 2025
“And that’s it, you’re done.”
Really?
ah?
So to summarize: 1/Install the ACME package, 2/ create an account and 3/ set up cron.
Where’s the certificate? The article is well written, it gives good information to non-tech folks, but it lacks THE important bit: Certificate creation and management 🙂
Thanks for the comment Alex, feel free to add in a few comments where you think additional information would be useful for the readers.
Regards,
Michael
Yeah, this is not even half of it and has clearly not even been tested
Still need to
1) Setup the certificate on the certificates tab.
2) Get the cert actually issued (including verifying domain access)
3) Assign it for a server via HAproxy or similar.