This is a fairly common issue that happens randomly on WordPress websites which has the catastrophic impact of bringing the entire website offline resulting in users seeing the error whenever they try and load a page on the website.
This can feel quite daunting when you first see this error, but don’t worry as there is a methodical process to solving this issue. As with many things with WordPress, there are many different root causes of these kinds of issues, so it’s simply a case of debugging things to identify what is causing the issue which will allow you to identify the next steps to solve the issue.
The common root causes of the “Error establishing a database connection” on WordPress can be;
Incorrect database connection details in your /wp-config.php file (unlikely if you haven’t actively changed this recently – more common for new manual installations of WordPress)
Corrupt Plugin files which can often occur after recent updates to Plugins
Corrupt database table(s) which need repairing
So let’s look at how to debug each of the common problems.
Check Database Connection Details
Simply open your /wp-config.php file and confirm that the details are correct for the following settings;
define(‘DB_NAME’, ‘your_database_name’);
define(‘DB_USER’, ‘your_database_username’);
define(‘DB_PASSWORD’, ‘your_database_password’);
define(‘DB_HOST’, ‘localhost’);
Unless you’ve recently changed these settings between the last time the website was working and the time you are seeing the “Error establishing a database connection” error appeared, then it is unlikely that this is the root cause of the issue.
Check for Corrupt Plugin Files
Whether you are manually updating your Plugins or you have these configured to automatically update (which is highly recommended) both failed or successful Plugin updates can result in this error showing. To quickly debug this, simply rename the /wp-content/plugins folder to /wp-content/plugins-disabled
When WordPress cannot find a Plugins folder it simply disables all plugins from running whenever you load a page on your website. So this is a quick test where you can simply rename the folder, then try refreshing the website again to see if the error has disappeared.
If that has solved the problem, then you simply need to rename the folder back to it’s original name, then methodically disable one plugin at a time by repeating that same process on the sub-folders for the individual Plugins to determine which plugin is causing the issue.
Repair Corrupt Database Tables
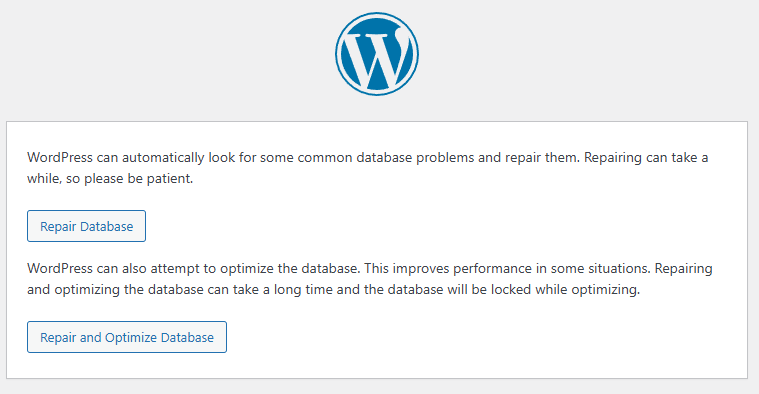
This one is a little more challenging to debug manually, but thankfully recent versions of WordPress have a handy tool to identify issues and try and automatically fix the problem.
Firstly, you need to edit your wp-config.php file and add the following line in;
define(‘WP_ALLOW_REPAIR’, true);
Once that setting is turned on, you can visit https://example.com/wp-admin/maint/repair.php (naturally replacing the domain name with the one you are working on)
You may see a page similar to the above or one full of errors and database tables – either way, you will see the options to either;
Repair Database
Repair and Optimize Database
So give those a go.
All being well, this will solve the issue and your website will be back online.
There are also a few other handy debugging steps related to this such as if you’re running phpMyAdmin then you will probably notice that the table appears locked and will often say that the table is “in use” which is a strong indicator that there is an issue.
It is possible to fix this issue via phpMyAdmin by selecting the table and selecting the option to Repair Table which effectively does the same thing the above automated process has done.
And if you’re running on cPanel, then it’s handy to view the cPanel error log for the specific cPanel account by running the command via SSH;
cd /home/cpanel-account-username/public_html
tail error_log
Which will output any errors that the site is having. It’s important to note that for this step to work, you must have your WordPress error logs turned on in your wp-config.php file and must have loaded the page again so the errors actually get written to the log.
AI Summary of the legislation first published earlier today in Ireland….. Because no-one has the time to read the 180 page legal document….. But it’s probably important to do so to validate this AI content when it comes to legislation.
Add your thoughts in the comments about what you think this is going to mean going forwards….. 🧐🧐🧐🧐🧐
The document outlines the General Scheme of the Regulation of Artificial Intelligence Bill 2026, detailing the establishment, functions, and governance of the AI Office of Ireland, along with provisions for market surveillance, supervision, enforcement, and administrative sanctions related to AI systems.
Long Title and Purpose of the Bill
The Bill aims to implement the EU AI Regulation (2024/1689) and establish the AI Office of Ireland.
It amends several existing acts to align with the new AI regulatory framework.
Short Title, Commencement, and Citation
The Act is titled the Regulation of Artificial Intelligence Act 2026.
It will commence on a date set by the Minister, allowing for phased implementation.
Definitions and Interpretations
Key terms such as “AI Act,” “Economic Operator,” and “Market Surveillance Authority” are defined.
The definitions ensure clarity and consistency in the application of the Act.
Establishment of the AI Office
The AI Office of Ireland will be established as a statutory body on a designated day.
It will serve as the central authority for AI regulation in Ireland.
Functions and Powers of the AI Office
The Office will facilitate enforcement of the AI Act, promote AI innovation, and provide technical expertise.
It is designated as a Market Surveillance Authority and a Single Point of Contact for the EU.
CEO Accountability and Delegation
The CEO is accountable to the Board for any delegated functions, ensuring clear responsibility and oversight.
The CEO can revoke delegations with Board consent, allowing flexibility in operational management.
Delegated functions do not include those with conditions prohibiting further delegation, preserving Board integrity.
Resignation and Removal of CEO
The CEO can resign by notifying the Minister, effective upon receipt.
The Minister can remove the CEO for incapacity, misbehavior, or necessity for effective Office performance.
A statement of reasons for removal must be provided to the CEO.
CEO Accountability to Committees
The CEO must provide evidence to the Public Accounts Committee on financial transactions and operational efficiency.
The CEO cannot question government policies during testimony.
This accountability framework supports the Office’s independence and financial control.
Board Membership and Governance
The Board consists of 7 members, including the CEO as an ex officio member.
Members are appointed by the Minister, ensuring relevant experience and gender balance.
Terms of office are limited to 5 years, with a maximum of 10 years for reappointments.
Disclosure of Interests and Confidentiality
Individuals involved with the Office must disclose any beneficial interests in matters under consideration.
Non-disclosure may lead to removal or contract termination.
Confidential information must not be disclosed without authorization, ensuring protection of sensitive data.
Market Surveillance Authorities and Their Powers
Market Surveillance Authorities (MSAs) are designated to ensure compliance with the EU AI Act 2024/1689.
They possess extensive powers under Article 14 of the Market Surveillance Regulation, including document requests, inspections, and penalties.
Designation of MSAs in Ireland
Six authorities in Ireland are automatically designated as MSAs for the AI Act, as per S.I. No. 366 of 2025.
Additional public bodies are also designated for specific sectors, ensuring comprehensive market surveillance.
Incident Reporting and Management
MSAs are responsible for receiving reports of serious incidents from providers of high-risk AI systems.
Procedures for managing these reports align with the Market Surveillance Regulation and require timely notifications to relevant authorities.
Temporary Authorisation for High-Risk AI Systems
MSAs can grant temporary authorisation for high-risk AI systems in exceptional circumstances, such as urgent public needs.
Authorisations are limited in scope and require ongoing monitoring by the provider.
Cooperation and Information Sharing
MSAs may enter cooperation agreements to facilitate information sharing and streamline enforcement.
They are also required to maintain confidentiality and cybersecurity measures in their operations.
Indemnity for Authorised Officers
Authorised officers are indemnified by the Market Surveillance Authority (MSA) for actions taken in good faith while performing their duties.
This indemnity protects against personal liability for actions such as inspections and issuing notices.
Powers of Authorised Officers
Authorised officers can enter premises, inspect products, and require information to ensure compliance with the AI Act.
They have the authority to secure premises, take samples, and detain products suspected of non-compliance.
Procedure for Risky AI Systems
MSAs must evaluate AI systems suspected of presenting risks, especially to vulnerable groups.
If non-compliance is found, operators must correct issues or withdraw systems within 15 working days.
Contravention and Prohibition Notices
Authorised officers can issue contravention notices for regulatory breaches, requiring corrective actions.
Prohibition notices can be served for serious risks, directing immediate compliance or withdrawal from the market.
Administrative Sanctions and Appeals
Economic operators can appeal contravention or prohibition notices to the District Court.
The MSA may impose penalties for non-compliance, ensuring enforcement of the AI Act.
Ministerial Rules for Adjudication Process
The Minister for Enterprise can create rules for referrals and adjudication applications.
This power is centralized to ensure consistency across market surveillance authorities.
Nomination and Appointment of Adjudicators
The AI Office of Ireland nominates adjudicators based on expertise.
The Minister appoints these nominees, ensuring independence and adherence to prescribed criteria.
Independence and Conduct of Adjudicators
Adjudicators must operate independently and recuse themselves in case of conflicts of interest.
The Minister will implement regulations to uphold this independence and ensure proper conduct.
Regulations for Adjudicator Procedures
The Minister must consult relevant Ministers when creating regulations for adjudicator conduct.
Regulations will cover appointment terms, remuneration, and procedures for revocation of appointments.
Evidence and Hearing Procedures
Adjudicators can summon witnesses and require evidence for oral hearings.
The rules of evidence apply, and hearings are generally public unless special circumstances arise.
Financial Penalties for Regulatory Breaches
Adjudicators determine financial penalties based on various factors, including breach severity and operator size.
Maximum penalties can reach up to €35 million or 7% of annual turnover for serious breaches.
Admissibility of Evidence in Proceedings
Documents admissible as evidence include oral statements, electronic messages, and recordings.
Chapter 3 of the Civil Law and Criminal Law (Miscellaneous Provisions) Act 2020 applies to proceedings under this Act.
Restrictions on Disclosure of Information
Statements made under compulsion are not admissible in criminal proceedings.
Confidential information obtained by authorities cannot be disclosed without reasonable excuse.
Violations of disclosure restrictions can result in a class A fine or imprisonment.
Appeals and Judicial Review Procedures
Appeals against adjudications must be made within 28 days.
The High Court’s decisions on appeals are final unless exceptional public importance is certified.
Judicial review applications must be made within 28 days of the decision being published.
Functions and Powers of Notifying Authorities
Notifying Authorities must monitor conformity assessment bodies and cooperate with other Member States.
They have powers to require information, conduct assessments, and enforce confidentiality.
Funding Mechanism for Competent Authorities
Competent Authorities can impose levies on regulated entities to fund their functions under the Act.
In simple terms, it’s a glorified Download button….. run at the Command Line.
What is WGET
In reality it’s a WGET Linux Package that is installed on your Linux Operating System of choice which enables you to GET (HTTP Methods) “stuff” over the HTTP/S and S/FTP/S protocols.
These commands are used at the Command Line.
And for those of your reading who have been casually using this on Linux for some time, when you come to trying this same functionality on Windows, you’ll soon realise that this doesn’t work out of the box.
Who knows why….. Let’s just blame Microsoft, who knows?
WGET is such an awesome tool, it’s a bit baffling why this isn’t included in Windows by default. But hey.
WGET for Windows
Thankfully, the world has come to rescue to make WGET for Windows!
So this enables you to use WGET on Windows rather than only on Linux!
The TLDR; is that you can Download WGET for Windows here.
Handy WGET Commands
The basics of WGET is as simple as follows;
“`
wget https://www.example.com
“`
Which will download the index.html page.
What you will often want to do though is download an entire website.
Thankfully there is a handy command for that too…..
“`
wget –page-requisites https://www.example.com
“`
(Note, the above is dash dash, it just looks weird)
And by using that additional flag you can download all of the things required to run that website locally.
You would have thought in 2023 that this would be a 2 second job to do. A well documented thing given Apache is one of the largest open source companies on the planet and Java being the most used language on the planet that powers over 1 billion devices (as their installers used to love reminding us every time 🙂 )
But weirdly, it’s not…
So I thought it would be handy to write a blog post about how to get going in 15 minutes so you can start to have a play. After all, we don’t want people to have 10 years experience in this stuff just to get a basic local development environment up and running.
What we’re going to cover…
Getting the Java Development Kit (JDK) installed
Getting Apache NetBeans IDE installed, which requires the Java Development Kit (JDK) to work
Getting Apache Tomcat installed, so your Apache NetBeans IDE can deploy your web application to the locally running web server so you can see your web application in your web browser
Configuring Apache NetBeans so that it knows about the Apache Tomcat server that is running on your local machine
Seeing everything in action!
So let’s get started.
Getting the Java Development Kit (JDK) Installed
First of all, just get to Google and search for “JDK Download”. I’m not going to give you the exact steps here as Oracle, the people who ‘own’ Java, seem to keep making life ever more difficult every day to download this and now even requires you to create an account with Oracle just to download the software. Rather annoying, but just jump through the latest hoops you have to at the time you are reading this, as anything I write down is going to have changed since the time this blog post was written.
The only thing to mention that you need to keep a record to when you are doing this is the Folder Path of where this is installed. You’ll need this in the next step if the installation of Apache NetBeans IDE doesn’t manage to automatically detect it.
Beginner Development
For greenfield projects, i.e. something brand new, then just download the latest version of the Java Development Kit (JDK). You may get issues when you get onto the next steps, so you may have to loop back on this step and install an older version that is compatible with the other software you are installing.
Unfortunately the different software providers throughout this blog post don’t make it simple to understand what versions are compatible with which other versions. It’s a tad annoying and is a wider problem with the software engineering in general so it’s something your going to have to get comfortable being annoyed about and regularly banging your head against the wall.
Usually there is some half-arsed documentation somewhere buried on the respective websites, but you’ll have the Google the shit out of it to find this basic info unfortunately. But hey, just giving you the heads up.
For now though, just download the latest version of the Java Development Kit (JDK) so you can give this a first attempt.
Working with Existing Projects
If you are working with existing projects, then this is a tad different as you are going to have to work within the constraints of that setup. So you are probably going to have to refer to the project documentation about what versions of what you need to get up and running with ease.
Remember when your Past-Self recommended that you document your development environment and your project technical dependencies so that your Future-Self would be thankful that you did…. Well, if your Present-Self is currently disgruntled with your Past-Self, then let that be a lesson. And document this properly this time round.
Or worse in a corporate setting where this was never documented and you simply have to talk to your software engineering colleagues to try and find the info you need through 1000 questions rather than a 1 page document that gives you everything you need. Well, yeah, good luck with that.
Getting Apache NetBeans IDE Installed
Next step is to get Apache NetBeans IDE installed. Again, just Google for the download link and run through the installation steps.
There is nothing specific to really mention on this step other than that you need to enter the Java Development Kit (JDK) installation folder path as part of the setup. Generally the Apache NetBeans IDE installer detects this automatically and puts that in for you. But you may need to enter this manually if it hasn’t been automatically detected.
Getting Apache Tomcat Installed
Right, this next step is where things get a tad tricky, or at least can do.
Again, just to get started, Google “Apache Tomcat Installation” and you’ll come across a Windows Installer .exe file that you can use to get up and running quickly.
It seems that the last time I installed this (hence the reason for writing this blog post…) this is installed in a bit of a quirky way which actually prevents Apache NetBeans IDE from deploying your application to your Apache Tomcat web server. A tad annoying, and not particularly well documented.
So during the installation process the only details you really need to make a note of are;
Port
Windows Service Name
Tomcat Admin Username
Tomcat Admin Password
Installation Folder Path
These will come in handy in the next section when we configure Apache NetBeans to allow it to talk to Apache Tomcat.
Anyhow, for now, as part of the installation process, it is recommended that you create a Username/Password combo for your local machine so that you can actually use it. It’s a bit of a pain if you have to do this post-installation, so for the purpose of this blog post, we’re going to assume you are doing this as part of your installation procedure.
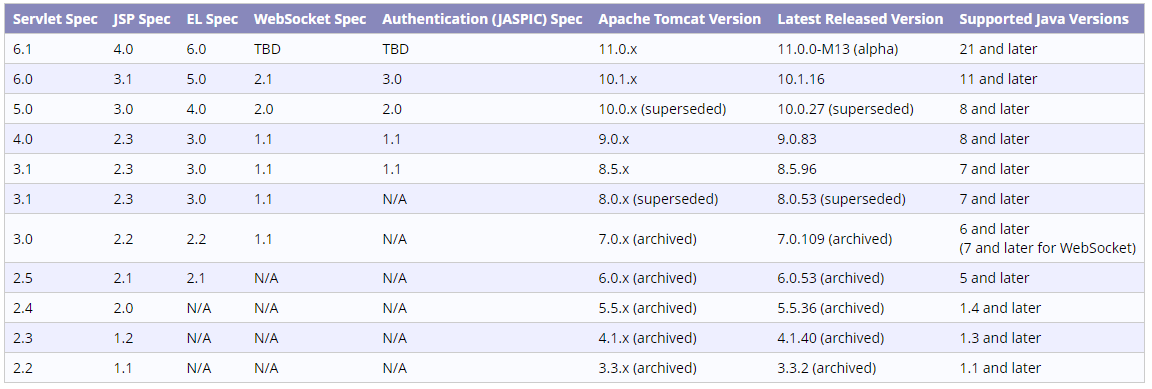
The reason I mentioned a moment ago that this step can get a little tricky is that each version of Apache Tomcat supports a LOT of different specifications and dependencies which can be tough to align – even on your local development environment. There is a “Which Apache Tomcat Version to Use” page which tries to help to simplify things, but honestly, just adds more complexity. Apache Tomcat doesn’t seem to care too much about backwards compatibility for some reason and expects software engineers to try and be a One Man Band just to figure out what they need. You’ll see what I mean with this snippet from that page;
Simple, right?!?!?
So basically you need to make sure that everything aligns with the different versions mentioned above;
Apache Tomcat Version
Java Development Kit (JDK) Version
Servlet Specification Version, required for developing Web Applications
Java Server Pages (JSP) Specification Version, required for developing Web Applications that are of monolith in nature – This is essentially the ‘front end’ part of your Web Application
Expression Language (EL) Version, required for developing Web Applications that want to handle data that is passed from the ‘back end’ (aka. the Java Servlet Specification) to the ‘front end’ (aka. the Java Server Pages JSP Specification) so that you can essentially loop through lists and such like to output the data that you need from variables, or much simpler outputting of data stored in variables
WebSocket Specification, if your web application is using cool tech like this (probably not on your first Hello World web application!)
So I’m going to assume you’ve studied all of these different specifications over the last 5 years and fully memorised 1000s of pages worth of documentation to be able to easily know this information. Right?
Of course not. No-one has. But hey, Java often likes to make things more difficult than they need to be. But don’t let that put you off, it brings so much value over scripting languages that are all the rage at the moment.
Anyhow, for now, just go with the most recent version to get started.
Configuring Apache NetBeans to Talk to Apache Tomcat
The next step is to configure Apache NetBeans IDE to talk to your Apache Tomcat service. To achieve this, there are two core steps involved;
Configuring Apache NetBeans by adding a Server as a Service to your IDE
Tweaking the way that the Apache Tomcat web server Windows Service runs
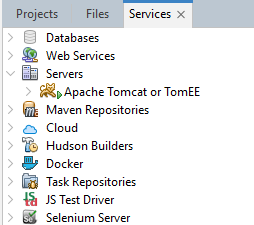
Add Apache Tomcat Web Server to Apache NetBeans IDE as a Service
So let’s look at the easy step first. Simply right click on the Servers section and follow the steps through to add your Apache Tomcat server. You’ll need those details you made a note of earlier to connect to the right one as you may have multiple of these running on your local development environment over time to support different projects.
You can see in the above screenshot that I have already added the Apache Tomcat web server which is why it is showing up in the list already.
Error You Will Receive If You Try to Build & Deploy a Web Application Right Now
So it’s important to explain what error you will receive if you try to build your first Hello World Web Application right now and deploy it by pressing the green play button. The error messages can be a tad cryptic and you’ll also need to check the catalina.log file for further insights, which can be a bit of an unknown unknown when getting started with Java software development.
Building war: C:\Users\Michael Cropper\NetBeans Projects\MyHelloWorldWebApp\target\MyHelloWorldWebApp-1.0-SNAPSHOT.war
------------------------------------------------------------------------
BUILD SUCCESS
------------------------------------------------------------------------
Total time:  1.232 s
Finished at: 2023-12-01T23:04:45Z
------------------------------------------------------------------------
Deploying on Apache Tomcat or TomEE
    profile mode: false
    debug mode: false
    force redeploy: true
Undeploying ...
undeploy?path=/MyHelloWorldWebApp
OK - Undeployed application at context path [/MyHelloWorldWebApp]
In-place deployment at C:\Users\Michael Cropper\NetBeans Projects\MyHelloWorldWebApp\target\MyHelloWorldWebApp-1.0-SNAPSHOT
deploy?config=file%3A%2FC%3A%2FUsers%2FMICHAE%7E1%2FAppData%2FLocal%2FTemp%2Fcontext9586713857740903372.xml&path=/MyHelloWorldWebApp
FAIL - The application [/MyHelloWorldWebApp] is already being serviced
I’m actually pretty sure the first time I did this, I got this error message instead. The above one sems to be ever so slightly different final line in the error message. But either way, it fails, which means that it hasn’t been deployed.
FAIL - Failed to deploy application at context path [/MyHelloWorldWebApp]
Which I’m sure you’ll agree isn’t actually that much of a helpful error message.
So to get to the bottom of what is really going on, you need to get into your Apache Tomcat logs, specifically the catalina.out file (or the one with today’s date on).
On a Windows machine, this is going to be located at: C:\Program Files\Apache Software Foundation\Tomcat 10.1\logs
Which is the location of where you installed Apache Tomcat earlier.
What was interesting when checking this is that this is the actual error that was reported when the error for “FAIL – Failed to deploy application at context path” came up;
“30-Nov-2023 21:32:39.679 SEVERE [http-nio-8080-exec-2] org.apache.catalina.startup.ExpandWar.copy Error copying [C:\Users\MICHAE~1\AppData\Local\Temp\context3064853893058586338.xml] to [C:\Program Files\Apache Software Foundation\Tomcat 10.1\conf\Catalina\localhost\MyHelloWorldWebApp.xml] java.io.FileNotFoundException: C:\Users\MICHAE~1\AppData\Local\Temp\context3064853893058586338.xml (Access is denied)”
Which made me think…. that’s odd. I installed Apache Tomcat via a Windows Installer using the exact same Windows logged in user, so I can only assume that one of the installers is doing a bit of crazy on Windows and being overly secure by segmenting which user is running the application – which would prevent User A from accessing anything in User B without relevant permissions. Something you’d really only know a lot about after dealing with a lot of Linux permissions issues historically, and if you’re a noob with this stuff is probably going to be something that would be a complete blocker for you to get past.
Which brings us onto the next step for how to solve this…
Tweaking the way that the Apache Tomcat web server Windows Service runs
So when you just installed Apache Tomcat via the Windows Installer you will notice that you have an Apache Tomcat service running in your Windows Task Bad as a background service. It doesn’t auto-start on reboot by default, so you may have to start the service if you have rebooted since you installed the software.
So you need to go into the Windows Task Bar and find the Apache Tomcat software that is running and click on the Configure option. From here, you need to go to the Log On tab and change this from the default “Local Service Account” over to “Local System Account”
Do that, click Apply and then Ok. Then finally restart the Apache Tomcat service if it is already running and you’ll be good to go.
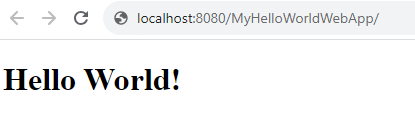
Seeing Everything in Action
Awesome. So now you’ve got all this up and running, you’ll be able to click the Play button in the Apache NetBeans IDE to run your project and it will deploy your web application successfully to your Apache Tomcat web server so you can interact with it in your web browser.
Summary
Hopefully this is a helpful guide for how to get an Java local development environment up and running in no time so that you can start to develop web applications using the power of Java.
Yes, it’s a bit of a pain as you get deeper into Java, but for getting started it’s mainly about making sure the different versions of the software you are running are aligned and designed to support each other. The documentation is often pretty awful so if things don’t quite go to plan, just lots of Google’ing will help you get to where you need to be.
So, where do I start with this topic. It’s complex…
I didn’t really know what to title this blog post as, since it’s complex.
Specifically my personal problem at hand was to look at how to prevent missing dates between two dates when needing to report on basic challenges such as Show Number Of X Between Two Dates. And since the basic queries such as SELECT COUNT(*) FROM table_x GROUP BY my_date_field; tends to work absolutely fine in scenarios where things are happening daily, it dramatically fails when things often happen over longer time frames. Instead, it’s important that the actual dates between two dates are the primary axis on reporting on this data.
Quite surprisingly, this seems to have been a fairly challenging thing to achieve prior to MySQL 8, so this blog post is purely going to look at MySQL 8 and beyond for how to achieve this.
MySQL isn’t really designed to work with while loops. But in every modern programming language while loops are simple.
i.e.
while(x = true){
	doSomething();
}
Etc.
Great, then let’s wrap the complex while loops in the code, and leave MySQL for the basics of data retrieval.
Yeah… but there is a thing called performance, and that doesn’t really work on large scale data sets with millions of records…
It’s imperative that the data access complexities are pushed as low into the tech stack as possible to improve efficiency, on so many levels. Aka. Don’t put things in the code layer that would be better handled at the data layer, aka. MySQL.
So, historically, if you wanted to perform a while loop in a MySQL query you would probably end up resorting to a Stored Procedure in one way or another. Sorry DABs (aka. Database Administrators) but when software requires the use of Sored Procedures then there is probably something fundamentally wrong under the hood.
Basic While Loop in MySQL using WITH RECURSIVE
So, let’s get back to basics. How do we do a basic loop in MySQL 8. How do I count from 1 to 10 using pure SQL?
Turns out, it’s “pretty simple” (as everything is when you know how) but the syntax is a bit of a challenge. So let’s dig into that next.
How to Count from 1 to 10 in MySQL 8 Using Recursive Queries
The simple solution to this is as follows;
WITH RECURSIVE myRecursiveExpressionName(iCanCount) as (
		SELECT 1
UNION ALL
		SELECT
			iCanCount + 1
		FROM
			myRecursiveExpressionName
		WHERE
			iCanCount < 10
)
SELECT
	*
FROM
	myRecursiveExpressionName
ORDER BY
	iCanCount ASC
;
Which will produce a nice output as follows when running the query;
1
2
3
4
5
6
7
8
9
10
Great. We can do some simple sequential “stuff”.
How to Use MySQL to Get the Dates Between Two Dates for Reporting
So, now it’s time to put this into practice. Let’s get a list of dates that we can use that are the definitive list of dates between two dates, such as the kind of thing that you would use in a situation that is measuring data and performance and trends between two date periods.
WITH RECURSIVE allDatesBetweenTwoDates(myRecursiveExpressionName) as (
		SELECT '2023-10-01'
UNION ALL
		SELECT
			myRecursiveExpressionName + INTERVAL 1 DAY
		FROM
			allDatesBetweenTwoDates
		WHERE
			myRecursiveExpressionName < '2023-10-12'
)
SELECT
	*
FROM
	allDatesBetweenTwoDates
ORDER BY
	myRecursiveExpressionName ASC
;
Query Syntax
OK, this is all well and good with the examples. But what does it mean above? It’s fairly new syntax with MySQL and it isn’t easy to understand what it is actually doing. And the official documentation can be a tad difficult to interpret.
So let’s dig into this in a little more detail for what this all means in practice, I’ve added a few comments to the iCanCount example which helps explain what is going on…
-- MySQL While Loop
-- Think about this whole section with the WITH RECURSIVE bit as kind of like an in-memory virtual table with one column, called ‘allDatesBetweenTwoDates
WITH RECURSIVE myRecursiveExpressionName(allDatesBetweenTwoDates) as (
    		-- Non-Recursive Select Part...
    		-- Return initial row set
    		-- aka. Start Date
    		SELECT '2023-10-01'
UNION ALL
    		-- Recursive Select Part...
    		-- Return additional row sets
    		-- aka. End Date, with a stop expression via the WHERE clause
    		SELECT
    			allDatesBetweenTwoDates + INTERVAL 1 DAY
    		FROM
    			myRecursiveExpressionName
    		WHERE
    			allDatesBetweenTwoDates < '2023-10-12'
)
SELECT
	allDatesBetweenTwoDates
FROM
	myRecursiveExpressionName
ORDER BY
	allDatesBetweenTwoDates ASC
;
Which then nicely produces the a row for every date between those two dates;
2023-10-01
2023-10-02
2023-10-03
2023-10-04
2023-10-05
2023-10-06
2023-10-07
2023-10-08
2023-10-09
2023-10-10
2023-10-11
2023-10-12
Brilliant. Next it’s just back to your good old easy MySQL stuff to the data you want on those dates to join to the table of your choice to get the additional data you need. i.e. as a simple example;
WITH RECURSIVE myRecursiveExpressionName(allDatesBetweenTwoDates) as (
    		SELECT '2023-09-06'
UNION ALL
SELECT
		allDatesBetweenTwoDates + INTERVAL 1 DAY
FROM
		myRecursiveExpressionName
WHERE
allDatesBetweenTwoDates < '2023-10-06'
)
SELECT
allDatesBetweenTwoDates
    	, IFNULL(SUM(my_table.my_summable_column), 0) -- Important to add the IFNULL check here to avoid NULLs returning as you can’t graph a NULL value
FROM
	myRecursiveExpressionName
    	LEFT JOIN my_table ON myRecursiveExpressionName.allDatesBetweenTwoDates = my_table.created_date
GROUP BY
	myRecursiveExpressionName.allDatesBetweenTwoDates
ORDER BY
	allDatesBetweenTwoDates ASC;
I have to mention though, while that last bit looks easy – this is going to be heavily dependent on your data, data quality and data relationships to get the exact data you need. This bit soon gets tricky when you have to include a WHERE statement, since the second you introduce a WHERE to filter data such as my_table.some_column_you_want_to_filter_on, then this will instantly get you back to the starting point as it removes all records where you just got a NULL/0 value, which is essentially the same problem at the start when trying to run;
SELECT my_date, COUNT(*) FROM my_table GROUP BY my_date;
Which fails miserably when there are missing records on certain dates. It’s surprising all of this is needed in this day and age. If only MySQL could create some kind of “WITH FILL MISSING DATES BETWEEN(fromDate, toDate)” kind of function/syntax to abstract all this kind of workings.