by Michael Cropper | Feb 4, 2026 | SEO |
AI Summary of the legislation first published earlier today in Ireland….. Because no-one has the time to read the 180 page legal document….. But it’s probably important to do so to validate this AI content when it comes to legislation.
Add your thoughts in the comments about what you think this is going to mean going forwards….. 🧐🧐🧐🧐🧐
The document outlines the General Scheme of the Regulation of Artificial Intelligence Bill 2026, detailing the establishment, functions, and governance of the AI Office of Ireland, along with provisions for market surveillance, supervision, enforcement, and administrative sanctions related to AI systems.
Long Title and Purpose of the Bill
The Bill aims to implement the EU AI Regulation (2024/1689) and establish the AI Office of Ireland.
It amends several existing acts to align with the new AI regulatory framework.
Short Title, Commencement, and Citation
The Act is titled the Regulation of Artificial Intelligence Act 2026.
It will commence on a date set by the Minister, allowing for phased implementation.
Definitions and Interpretations
Key terms such as “AI Act,” “Economic Operator,” and “Market Surveillance Authority” are defined.
The definitions ensure clarity and consistency in the application of the Act.
Establishment of the AI Office
The AI Office of Ireland will be established as a statutory body on a designated day.
It will serve as the central authority for AI regulation in Ireland.
Functions and Powers of the AI Office
The Office will facilitate enforcement of the AI Act, promote AI innovation, and provide technical expertise.
It is designated as a Market Surveillance Authority and a Single Point of Contact for the EU.
CEO Accountability and Delegation
The CEO is accountable to the Board for any delegated functions, ensuring clear responsibility and oversight.
The CEO can revoke delegations with Board consent, allowing flexibility in operational management.
Delegated functions do not include those with conditions prohibiting further delegation, preserving Board integrity.
Resignation and Removal of CEO
The CEO can resign by notifying the Minister, effective upon receipt.
The Minister can remove the CEO for incapacity, misbehavior, or necessity for effective Office performance.
A statement of reasons for removal must be provided to the CEO.
CEO Accountability to Committees
The CEO must provide evidence to the Public Accounts Committee on financial transactions and operational efficiency.
The CEO cannot question government policies during testimony.
This accountability framework supports the Office’s independence and financial control.
Board Membership and Governance
The Board consists of 7 members, including the CEO as an ex officio member.
Members are appointed by the Minister, ensuring relevant experience and gender balance.
Terms of office are limited to 5 years, with a maximum of 10 years for reappointments.
Disclosure of Interests and Confidentiality
Individuals involved with the Office must disclose any beneficial interests in matters under consideration.
Non-disclosure may lead to removal or contract termination.
Confidential information must not be disclosed without authorization, ensuring protection of sensitive data.
Market Surveillance Authorities and Their Powers
Market Surveillance Authorities (MSAs) are designated to ensure compliance with the EU AI Act 2024/1689.
They possess extensive powers under Article 14 of the Market Surveillance Regulation, including document requests, inspections, and penalties.
Designation of MSAs in Ireland
Six authorities in Ireland are automatically designated as MSAs for the AI Act, as per S.I. No. 366 of 2025.
Additional public bodies are also designated for specific sectors, ensuring comprehensive market surveillance.
Incident Reporting and Management
MSAs are responsible for receiving reports of serious incidents from providers of high-risk AI systems.
Procedures for managing these reports align with the Market Surveillance Regulation and require timely notifications to relevant authorities.
Temporary Authorisation for High-Risk AI Systems
MSAs can grant temporary authorisation for high-risk AI systems in exceptional circumstances, such as urgent public needs.
Authorisations are limited in scope and require ongoing monitoring by the provider.
Cooperation and Information Sharing
MSAs may enter cooperation agreements to facilitate information sharing and streamline enforcement.
They are also required to maintain confidentiality and cybersecurity measures in their operations.
Indemnity for Authorised Officers
Authorised officers are indemnified by the Market Surveillance Authority (MSA) for actions taken in good faith while performing their duties.
This indemnity protects against personal liability for actions such as inspections and issuing notices.
Powers of Authorised Officers
Authorised officers can enter premises, inspect products, and require information to ensure compliance with the AI Act.
They have the authority to secure premises, take samples, and detain products suspected of non-compliance.
Procedure for Risky AI Systems
MSAs must evaluate AI systems suspected of presenting risks, especially to vulnerable groups.
If non-compliance is found, operators must correct issues or withdraw systems within 15 working days.
Contravention and Prohibition Notices
Authorised officers can issue contravention notices for regulatory breaches, requiring corrective actions.
Prohibition notices can be served for serious risks, directing immediate compliance or withdrawal from the market.
Administrative Sanctions and Appeals
Economic operators can appeal contravention or prohibition notices to the District Court.
The MSA may impose penalties for non-compliance, ensuring enforcement of the AI Act.
Ministerial Rules for Adjudication Process
The Minister for Enterprise can create rules for referrals and adjudication applications.
This power is centralized to ensure consistency across market surveillance authorities.
Nomination and Appointment of Adjudicators
The AI Office of Ireland nominates adjudicators based on expertise.
The Minister appoints these nominees, ensuring independence and adherence to prescribed criteria.
Independence and Conduct of Adjudicators
Adjudicators must operate independently and recuse themselves in case of conflicts of interest.
The Minister will implement regulations to uphold this independence and ensure proper conduct.
Regulations for Adjudicator Procedures
The Minister must consult relevant Ministers when creating regulations for adjudicator conduct.
Regulations will cover appointment terms, remuneration, and procedures for revocation of appointments.
Evidence and Hearing Procedures
Adjudicators can summon witnesses and require evidence for oral hearings.
The rules of evidence apply, and hearings are generally public unless special circumstances arise.
Financial Penalties for Regulatory Breaches
Adjudicators determine financial penalties based on various factors, including breach severity and operator size.
Maximum penalties can reach up to €35 million or 7% of annual turnover for serious breaches.
Admissibility of Evidence in Proceedings
Documents admissible as evidence include oral statements, electronic messages, and recordings.
Chapter 3 of the Civil Law and Criminal Law (Miscellaneous Provisions) Act 2020 applies to proceedings under this Act.
Restrictions on Disclosure of Information
Statements made under compulsion are not admissible in criminal proceedings.
Confidential information obtained by authorities cannot be disclosed without reasonable excuse.
Violations of disclosure restrictions can result in a class A fine or imprisonment.
Appeals and Judicial Review Procedures
Appeals against adjudications must be made within 28 days.
The High Court’s decisions on appeals are final unless exceptional public importance is certified.
Judicial review applications must be made within 28 days of the decision being published.
Functions and Powers of Notifying Authorities
Notifying Authorities must monitor conformity assessment bodies and cooperate with other Member States.
They have powers to require information, conduct assessments, and enforce confidentiality.
Funding Mechanism for Competent Authorities
Competent Authorities can impose levies on regulated entities to fund their functions under the Act.
Have a read of the full legal document here.
by Michael Cropper | Apr 10, 2025 | SEO |
Firstly, let’s cover off what is WGET?
In simple terms, it’s a glorified Download button….. run at the Command Line.
What is WGET
In reality it’s a WGET Linux Package that is installed on your Linux Operating System of choice which enables you to GET (HTTP Methods) “stuff” over the HTTP/S and S/FTP/S protocols.
These commands are used at the Command Line.
And for those of your reading who have been casually using this on Linux for some time, when you come to trying this same functionality on Windows, you’ll soon realise that this doesn’t work out of the box.
Who knows why….. Let’s just blame Microsoft, who knows?
WGET is such an awesome tool, it’s a bit baffling why this isn’t included in Windows by default. But hey.
WGET for Windows
Thankfully, the world has come to rescue to make WGET for Windows!
So this enables you to use WGET on Windows rather than only on Linux!
The TLDR; is that you can Download WGET for Windows here.
Handy WGET Commands
The basics of WGET is as simple as follows;
“`
wget https://www.example.com
“`
Which will download the index.html page.
What you will often want to do though is download an entire website.
Thankfully there is a handy command for that too…..
“`
wget –page-requisites https://www.example.com
“`
(Note, the above is dash dash, it just looks weird)
And by using that additional flag you can download all of the things required to run that website locally.
by Michael Cropper | Jan 24, 2020 | Developer, SEO |
Ok. Back to basics. It’s rare these days that any developer working in the real world has to write a basic HelloWorld.java, compile the file with the core Java Compiler (javac, the Java Programming Language Compiler) and run the file using the command line ‘java’ command. But hey, sometimes things are just fiddly to debug and you need to get back to the real basics and say HelloWorld.
Honestly, I’m mainly writing this blog post for myself as I can never remember how to do this as it is something that I haven’t had to do in many years, because you know, we have things called IDEs, Web Applications, Automated Deployments and just modern technology in general which is the space I tend to work in.
Just a general note, the common reason why you’ll need to do things like this is because your Local à Dev à Test à Live Environments are slightly different. Different enough to cause issues that you’ll only notice while you migrate your applications through the development lifecycle.
How to Create a HelloWorld.java File with a Main Method
For the purpose of this blog post, let’s forget we’re in the 20th Century using a modern IDE, let’s get Notepad open.
For the purpose of this blog post, I’m going to use a real world example that I was debugging, specifically when trying to figure out why the ‘reasonably recent’ Java 8 functionality on one application wasn’t working on one application server, which had recently had Java 8 installed with Tomcat 7 which was installed via WHM > cPanel’s Easy Apache 3. The LocalDate.now() function is only available from Java 8, and a specific release of Java 8, just to add to the confusion. None of which is really relevant for this blog post, but it puts into context why you sometimes need to go back to real basics and to try and figure out where the problem ultimately lies.
Sometimes you just need to strip back the many layers of applications, get back to the core and build up from there to identify where the problem is. Anyhow, back to where we were.
Basically create this file and save the filename as HelloWorldMain.java;
package PlayGround;

import java.time.LocalDate;


public class HelloWorldMain {

public static void main(String[] args) {

System.out.println("LocalDate.now(): " + LocalDate.now());

}

}
Yes that’s right, pure, core, Java. No frameworks. No libraries. No helpers. Nothing. Welcome to the 80s.
The reason why we’re creating a Main method is to ensure that when we run the compiled code, as detailed later on, it will automatically run the Main method and print the information you require to the command line console.
How to Compile Your HelloWorld.java File to Create a HelloWorld.class File
Ok, now you’ve created your HelloWorldMain.java file as outlined in the previous step, it’s time to compile this into executable code. As you’ll know, you can’t run .java files as they are (unlikely say .html files), instead you need to compile your .java files into .class files using the Java Development Kit (aka. JDK) that is installed on your machine (local machine or server).
To compile your .java file, firstly you need to open the Command Prompt (on Windows) or SSH into your Linux server. Using your command line skills (simple right…?), navigate to the location of your file and compile your .java file by running the following command;
javac HelloWorldMain.java
Awesome, you should now have a HelloWorldMain.class file created in the same directory you are currently in.
But… things aren’t always quite as they seem. We’ve not gone into any of the details yet about where you’ve just run the Java compiler command. Windows? Linux? Now this is where things get interesting. Let’s say you’re developing on a Windows machine, and you’re deploying on a Linux server. Immediately you’ve got a discrepancy.
What version of Java are you running on your Windows machine?
What version of Java are you running on your Linux machine?
What other crazy-ass things have you got configured that may be getting in the way in either environment? Hopefully nothing, but keep that in mind. Often things are configured in the background that you may not be aware of, particularly whenever you’ve used handy installers and other software to manage the installation of your environments.
So, let’s get back to the basics and find out the environments we’re working in.
Check the Java Version
On the machines you’re working on, check what version of Java is currently the priority by running the command;
java -version
You can also view on Linux the Environment Variables which can help to identify what is setup by running the command;
printenv
(aka. the Print Environment Variables command)
And on Windows you can view your Environment Variables by opening the Command Prompt ( aka. Windows Start Menu > Run > Then type ‘cmd’ without the quotes and press go ) or ( Just press Windows Key + R ), then type;
set
Which will output your Environment Variables.
Check the Java Alternatives
On Linux machines you can configure multiple versions of Java to run via the ‘alternatives’ feature. This essentially allows you to install multiple Java versions alongside each other without having to worry about the specifics. This allows you to have multiple versions of Java installed, and still configure a default.
Which basically means that when you run any default java command that it will run against whatever alternative has been configured to point at the different versions of Java installed on your Linux box.
To check this, simply run the command;
sudo alternatives --config java
Which will allow you to configure which is the default Java version – according to the Linux environment.
This is an important point to note, since an application (for example Tomcat…) can actually still override this locally within the application configuration files and hence completely ignore what you set at the base server level. The joys and flexibility (aka. frustrations…) of dealing with Linux.
How to Run Your HelloWorld.class File From the Command Line
Ok, so now we’ve covered a fair amount of the ‘basics’, let’s take a look at actually running the file we’ve just created.
Basically just run this command (with tweaks) against the file that is hosted against your own Linux server;
java -cp /home/{Root Directory for User }/public_html/WEB-INF/classes/ PlayGround.HelloWorldMain
by Michael Cropper | Feb 15, 2019 | SEO |
When it comes to technology, technology should work for you, you should not be a slave to your technology. And oh-my-god, Windows have got things SOOOOOO wrong with their automatic update system in Windows 10. For the average home user, you’ll probably be thankful that things are simply taken care of for you, and that’s great. Security is hugely important and this is where the Windows 10 automatic updates come in very handy. But Microsoft seem to have forgot one key thing with these updates and that is that not everyone is an average user and Windows is used by businesses that require stability and control.
The amount of times I have gone to make a brew (that’s a ‘Cup of Tea’ for the Southerners reading…), or turned by back for only a few minutes to come back to my machine and find that bloody Windows 10 has turned itself off, in the middle of the flipping day, in the middle of when I was doing something!!! Thankfully, I have a good habit of saving every 2 seconds so I’ve never lost anything, touch wood, but by god is this annoying.
What’s more annoying is the fact that when Windows 10 built the feature as part of this update to helpfully re-open all the things you had open, they forgot one thing…. not everything you use is a bloody Microsoft product! The amount of things that people use in the working day, particularly myself with the amount of techie things I have open at any one point, that simple turning things off and back on again causes more problems than it solves (ironic for an IT product!). Even on powerful machines, for users who have things on the go, it’s going to take you a good 10, 15, 30 minutes to get everything back up and running that you were working on. It’s such a time wasting activity that I’ve decided to outline the steps required to just turn everything off for Windows 10 automatic security updates…
Just do this;
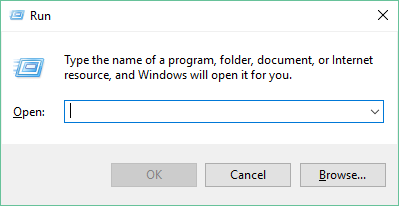
Open the Run Dialog
Press Windows Key + R – This will open the Windows Run window where you can type handy shortcuts to run programs
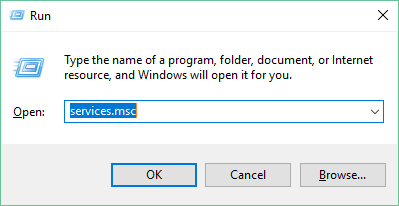
Open Windows Services
Type services.msc into the available field then click OK. This will open the Windows Services settings where you can control a lot of the background processes and tasks that run on your system.
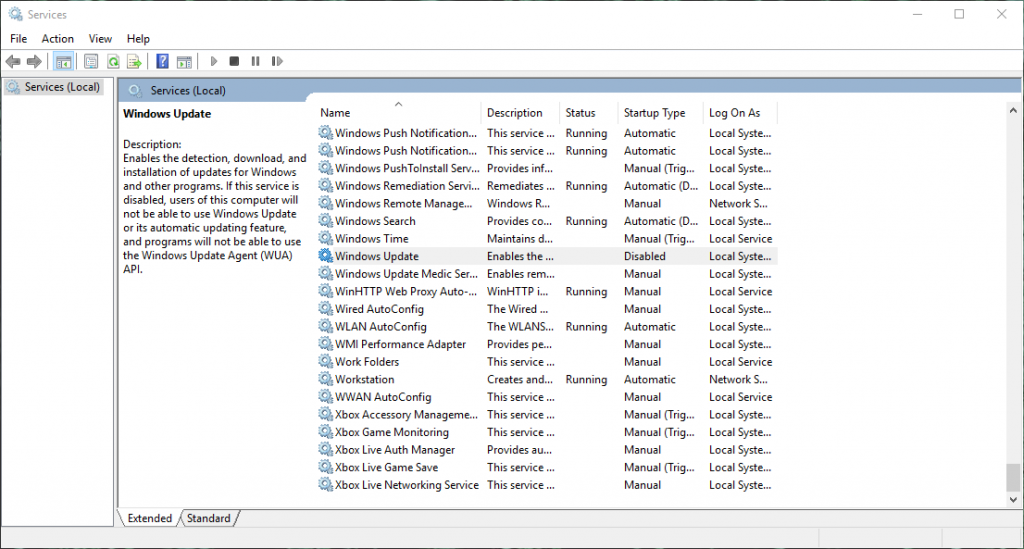
Find ‘Windows Update’
In the rather large list of services, find the ‘Name’ of ‘Windows Update’ and Select It. Then Right Click and select Properties
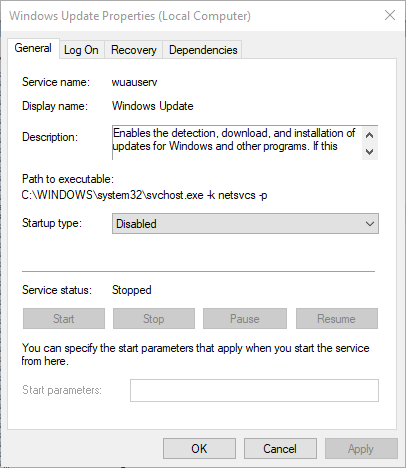
Stop the Service if it is Running and Disable it on Startup
Simple, job done. No more annoying, interrupting, ill-thought-out Windows 10 automatic updates at inconvenient times!
Word of Warning
Don’t do any of the above if you aren’t sure what you are doing. Changing things within your Services can really mess up things that you would want to work.
Clearly security and feature updates are important and you need to schedule time to do this. So don’t simply turn this off and never run security updates again, that would be bad. Schedule some time in, on a regular basis, at your convenience to run the security updates. Simple start the service and the rest will take care of itself.
Hope the above is some use to people going through the same pain…
by Michael Cropper | Apr 13, 2017 | Client Friendly, Sector - Travel, Hostpitality and OTAs, SEO |
Travel is a competitive market, so it is important that your brand stands out from your competitors when customers are searching on Google for queries such as “Holidays to Kefalonia” and similar review type queries. Rich snippets are a great way to highlight your brand amongst your competitors which can generate additional traffic to your website from Google, leading to increased sales and enquiries.
So what are Review Rich Snippets and when do they show?
Rich Snippets are a form of structured data that simply helps Google to understand what the content on your website is about. There are Rich Snippets for a variety of areas and the one we are going to cover today is specific to highlighting review information on Google. What this means in practice is that when customers are searching for queries such as “Holidays to Kefalonia” or “Holidays to Kefalonia Reviews” there is a greater chance that Google will highlight your website with stars next to your listing as can be seen in the image below;

As you can see here, your eyes are instantly drawn to the listing that stands out from the others with the star ratings. In essence Review Rich Snippets require each individual Review to be marked up along with aggregating this data into an overall review based on all the review data. This information can be from your previous customers who have been on one of your holiday packages, so it is essential to be collecting this data from your customers at the earliest available opportunity.
How to Mark Up Review Rich Snippets
There are many ways to marl up Review Rich Snippet content which gets rather technical, so we’re only going to skim over this information as we don’t want to bamboozle you with the finer technical details. For the purposes of this blog post we’ll use the Greeka.com website as an example and take a look at what they have done to implement Review Rich Snippets on their travel website.
Firstly what you’ll notice when you visit their website is a listing of review information as you would expect to see as a user;
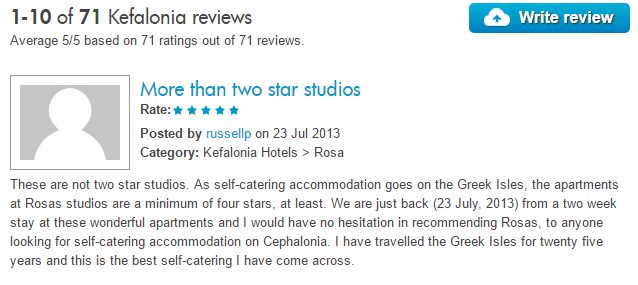
What’s important to note here is two pieces of information. Firstly, you will see the overall reviews listing at the very top which states that there are 71 reviews in total with the average being 5/5 for the reviews that have been left. Then beneath that you’ll notice an individual review that has been left by a customer. As a user, you’ll never notice Review Rich Snippets are there which is exactly why they exist. Review Rich Snippets for travel websites are in the code in the background which is telling Google that there are reviews associated with this specific item such as a holiday package, a resort, a restaurant or a specific hotel for example.
Here’s what this looks like in the background, the code below relates to the aggregate reviews which are what is showing on Google;

What you’ll notice is that there has been specific pieces of code wrapped around the content on the page which state that the destination has an average review of 5/5 from 71 people. When you read through the code you’ll notice there are specific pieces of information such as ‘best’ and ‘average’ and ‘votes’ etc. It is this information and more that Google is using to generate the visible star ratings on the Google search results that customers see when they are searching for travel companies.
Likewise you’ll also notice when reading through the code on the page that each individual review also has specific Review Rich Snippet data marked up around it too as you can see in the image below;
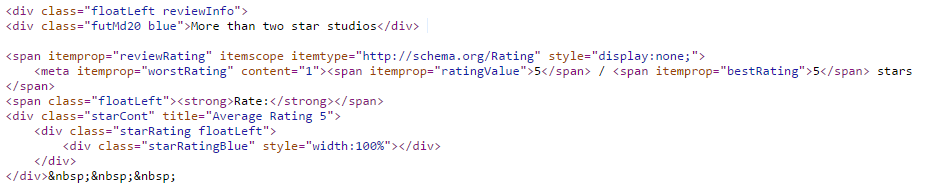
With information such as ‘reviewRating’ and ‘worstRating’ and ‘ratingValue’ for example being some of the key pieces of information Google requires to be able to see how the overall review ratings have been calculated.
Ok, that’s enough code for now. In essence, to get Review Rich Snippets and star ratings showing on Google it is important that you implement the code correctly which ties in closely with the technology that is powering your website. There is no one-size-fits-all approach here as every website is different.
If you’d like to implement Review Rich Snippets on your travel company website then get in touch and we’ll work closely with you to implement Review Rich Snippets so you can stand out from your competitors and boost website traffic and sales.