by Michael Cropper | May 6, 2021 | Client Friendly |
Imagine….. a situation where modern Agile Delivery Methodologies were applied to a very entrenched ‘way of working’ such as local elections that are happening right now throughout the UK. Well, let’s take a look at how this plays out so it’s easy to see how this can apply to your business and deliver value (aka. more efficiencies, sales, profitability etc. aka. £££) to your business faster. Who doesn’t want that, right?
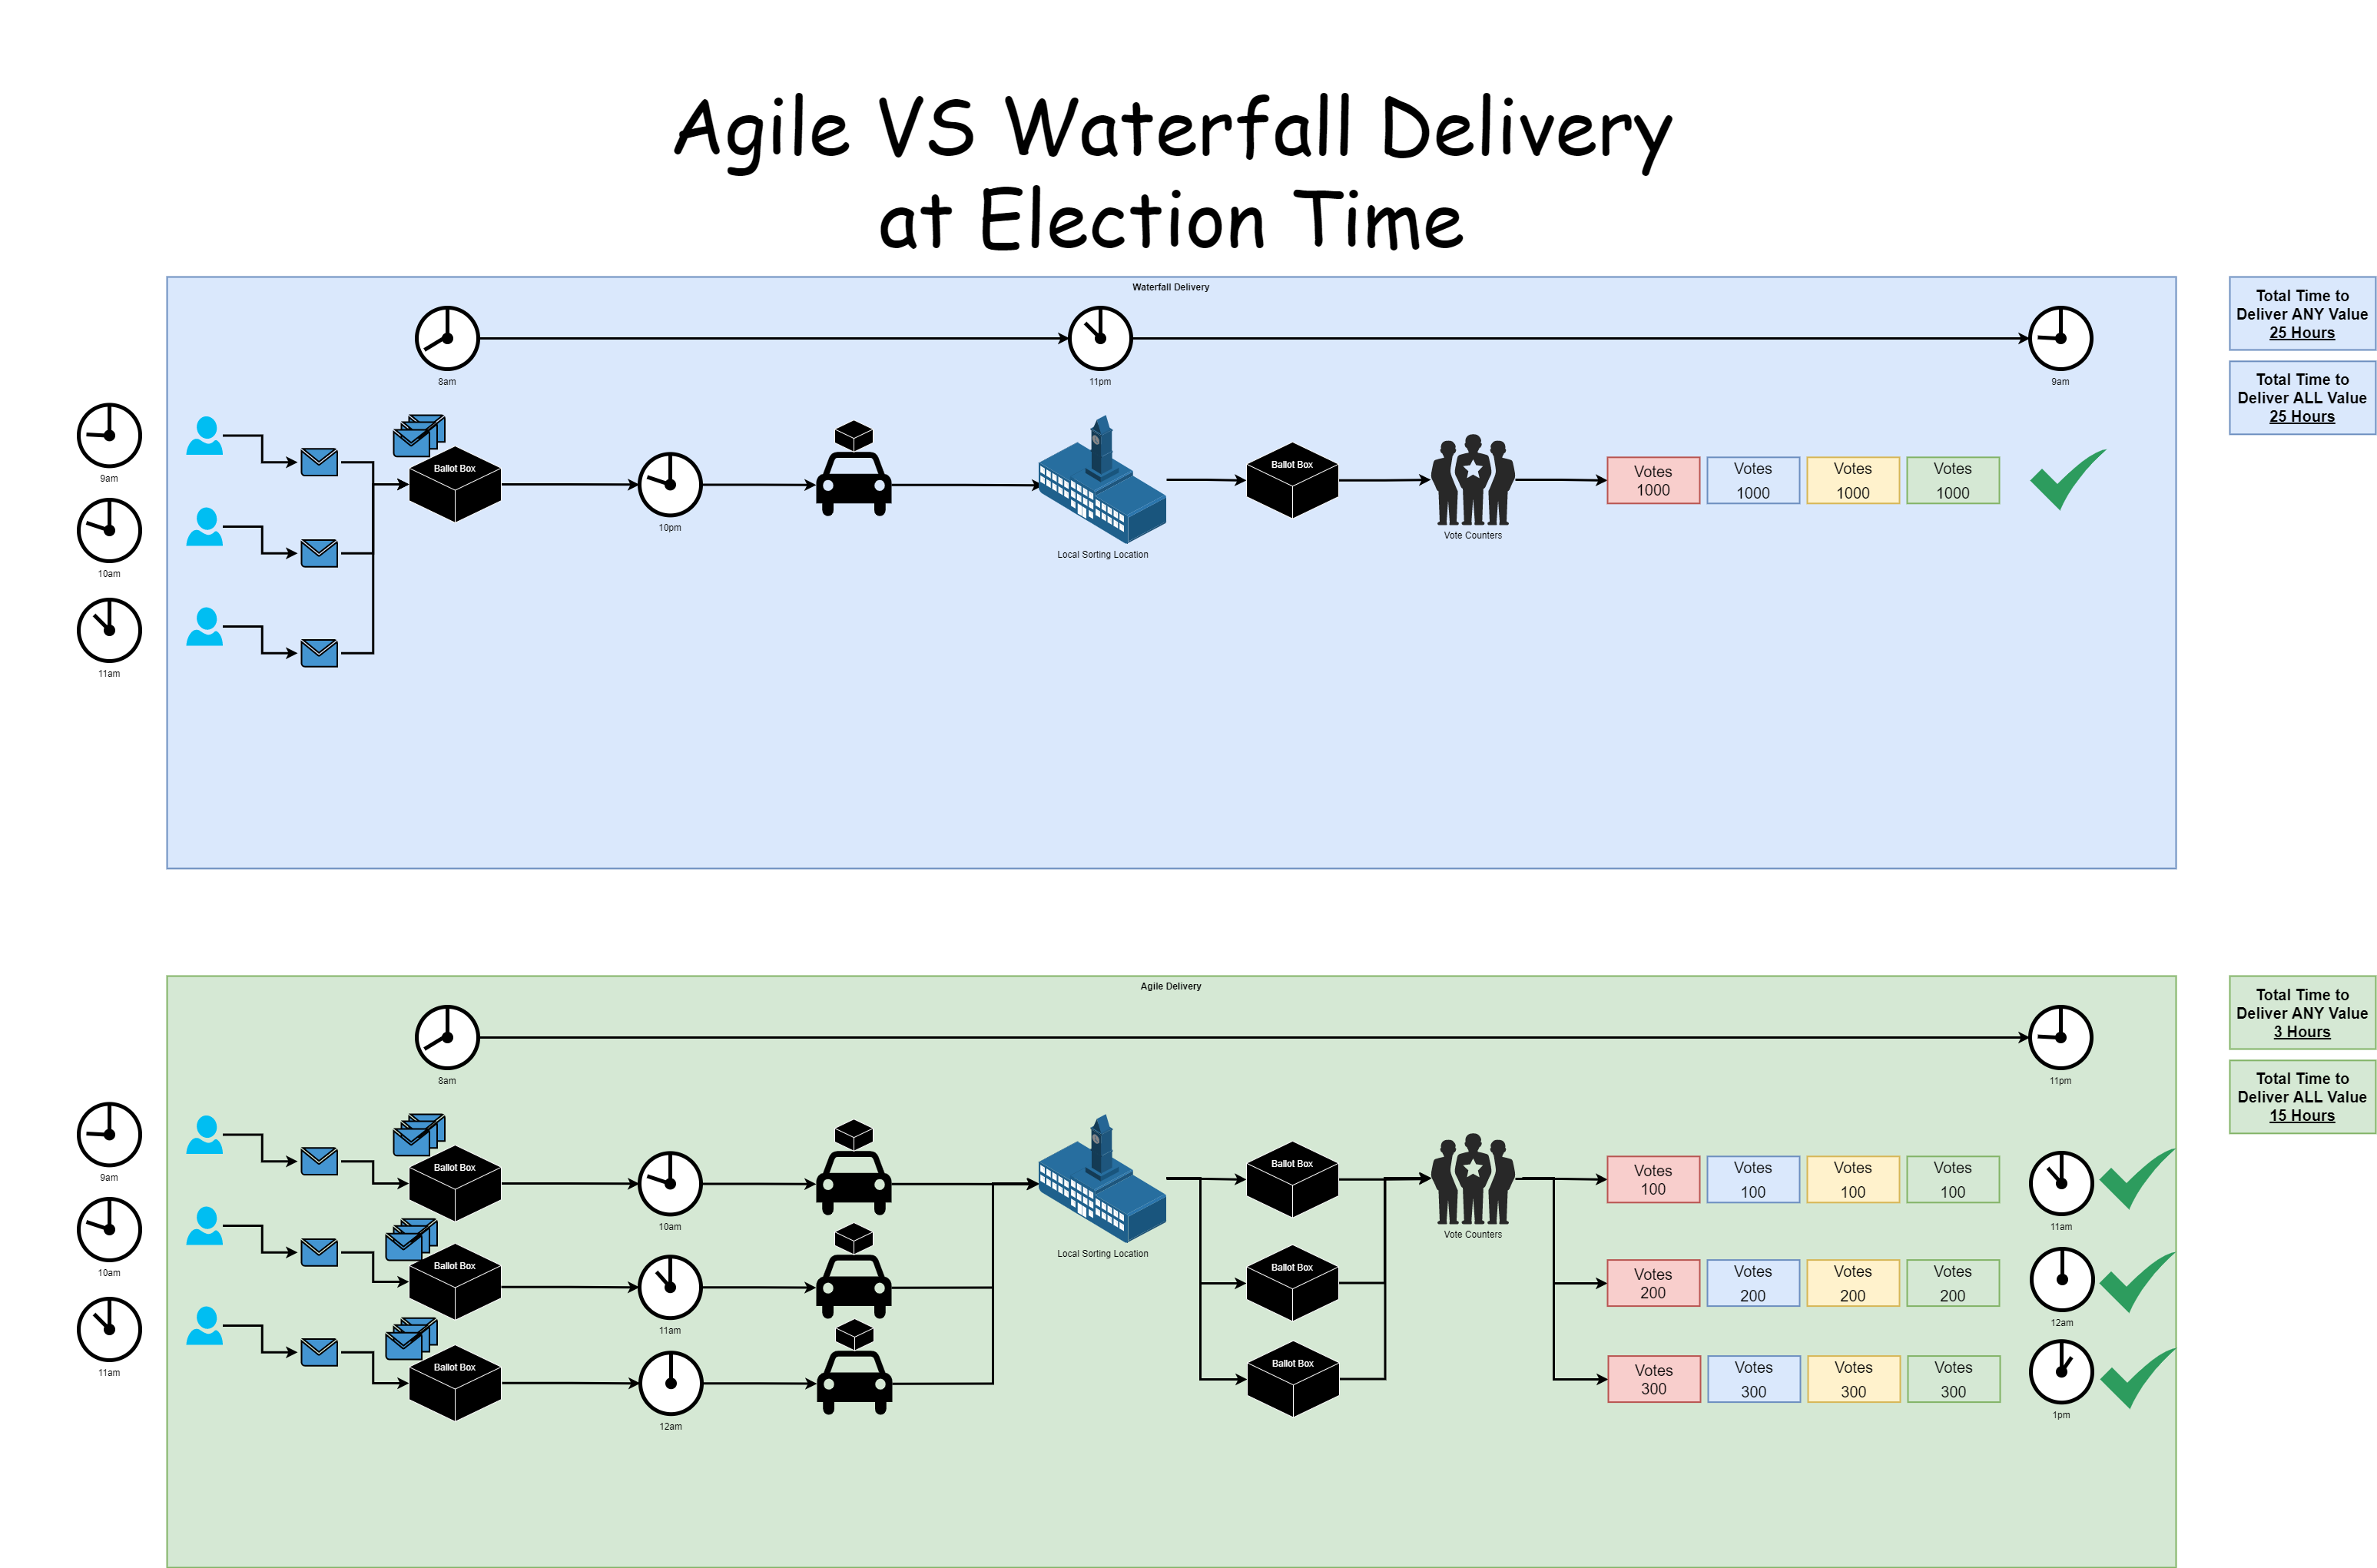
There isn’t going to be a lot of talking in this blog post, more studying the image. Note the word value used below, think £££ ultimately. The core things to point out;
- With Waterfall;
- You only get to deliver any value right at the end, almost double the amount of time than with the Agile Delivery Methodology
- The ‘Big Bang’ approach is heavily reliant on that single delivery method (aka. the car) working and not breaking down. If the car breaks down, the AA/RAC ( #ManyOtherProvidersAvailable 😉 ) have to be called out to save the day, wasting hours of time in the process
- The focus from the delivery team, aka. the car driver and the Vote Counters, is high pressure, high speed, high quality, which naturally results in many errors (aka. Trump and his x+ days of recount nonsense that happened in the US recently). Why put your team under such pressure when you can adjust the way of working to deliver continually?
- With Agile;
- You get to deliver value within as little as 3 hours, and complete value is delivered in only 15 hours, almost 50% more efficient than waterfall
- The ‘Phased Delivery’ approach is able to cope with issues with deliverability. Assuming different transport vehicles for the delivery of each ballot box, a break down in one doesn’t cause issues for the whole
- The focus from the delivery team, aka. the car driver and the Vote Counters, is a low pressure, moderate speed, high quality, which naturally results in low errors. A low pressure environment leads to a happy workforce.
The main benefit is that we don’t need to wait up all night (seriously…. who does that?) to get the election results. Or in the case of recent US election results, several days.
There are so many analogies that I could go into with this blog post. But seriously, while this is a bit of fun at election time, start to think how you can approach Agile Delivery Methodologies to your organisation. The more you can chop down deliverables into tiny tiny pieces, not even large phases, then you will start to see productivity exponentially rise within your organisation when it comes to delivering value to your customers. We did a blog post a while back titled IT Project Delivery Achieving More by Doing Less which goes into a lot more detail about this topic. If in doubt, get in touch to see how you could supercharge the delivery of your organisation from an IT perspective with no more ‘Go Live Dates’.
by Michael Cropper | May 2, 2021 | Amazon Web Services AWS, Client Friendly, Developer, Technical |
Amazon Linux (aka. Amazon Linux 1) was straight forward to get Let’s Encrypt setup, it was a breeze and the documentation wasn’t too bad. I don’t know why Let’s Encrypt support for Amazon Linux 2 just isn’t where it needs to be, given the size and scale of Amazon Linux 2 and the fact that Amazon Linux is now an unsupported operating system. It’s likely because Amazon would prefer you to use their AWS Certificate Manager instead, but what if you just want a Let’s Encrypt certificate setting up with ease. Let’s take a look at how you get Let’s Encrypt setup on an AWS EC2 instance that is running Amazon Linux 2 as the operating system/AMI.
Assumptions
We’re assuming you’ve got Apache / Apache2 installed and set up already with at least one domain name. If you are using Nginx or other as your Web Server software then you’ll need to tweak the commands slightly.
How to Install Let’s Encrypt on Amazon Linux 2
Firstly, we need to get the Let’s Encrypt software installed on your Amazon Linux 2 machine, this is called Certbot. For those of you looking for the quick answer, here’s how you install Let’s Encrypt on Amazon Linux 2 along with the dependences;
yum search certbot

sudo amazon-linux-extras install epel

sudo yum install python2-certbot-apache

sudo yum install certbot-apache

sudo yum install mod_ssl python-certbot-apache

sudo certbot --apache -d yum-info.contradodigital.com
For those of you looking for a bit more information. There are a few fairly undocumented dependencies to get this working. So to get started you’ll want to install the dependencies for Let’s Encrypt on Amazon Linux 2 including;
- Epel, aka. The Extra Packages for Enterprise Linux, from the Amazon Linux Extras repository
- Python2 Certbot Apache using Yum
- Certbot Apache using Yum
- Mod_SSL, Python Certbot Apache using Yum
As it was a bit of a pain to get this configured, I’m fairly sure one of the above isn’t required, I just can’t recall which one that was.
How to Configure Let’s Encrypt on Amazon Linux 2 for a Domain
So now you’ve got Let’s Encrypt installed on Amazon Linux 2, it’s time to generate an SSL certificate for your domain that is hosted. For the purpose of simplicity we’re going to assume you’re running very basic setup such as www.example.com/HelloWorld.html. There are other nuances you need to consider when you have a more complex setup that are outside of the scope of this blog post.
sudo certbot --apache -d yum-info.contradodigital.com
What you’ll notice in the above is that we’re using Certbot and telling it that we’ve got an Apache Web Server behind the scenes and that we want to generate an SSL certificate for the Domain (-d flag) yum-info.contradodigital.com.
Simply run that command and everything should magically work for you. Just follow the steps throughout.
Summary
The above steps should help you get setup using Let’s Encrypt on Amazon Linux 2 without much fuss. Amazon Linux 2 really does feel like it has taken a step back in places, Amazon Linux 1 had more up to date software in places, and easier to work with things like Let’s Encrypt. But hey. We can only work with the tools we’ve got on the AWS platform. Please leave any comments for how you’ve got along with installing Let’s Encrypt and getting it all set up on Amazon Linux 2, the good, the bad and the ugly.
by Michael Cropper | Apr 29, 2021 | Amazon Web Services AWS, Client Friendly, Developer, Technical |
AWS. With great power comes with great responsibility. AWS doesn’t make any assumptions about how you want to backup your resources for disaster recovery purposes. To the extent that they even make it easy for you to accidentally delete everything when you have zero backups in place if you haven’t configured your resources with termination protection. So, let’s think about backups and disaster recovery from the start and plan what is an acceptable level of risk for your own setup.
Risk Appetite Organisationally and Application-ally
OK, that’s a made up word, but you get the gist. You need to assess your appetite to risk when it comes to risk, and only you can do this. You have to ask yourself questions and play out roll plays from “What would happen if a single bit of important data got corrupted and couldn’t be recovered on the Live system?” all the way through to “What would happen if the infrastructure running the Live system got hit by a meteorite?”. Then add a twist into these scenarios, “What would happen if I noticed this issue within 10 minutes?” through to “What would happen if I only noticed this issue after 4 days?”.
All of these types of questions help you to assess what your risk appetite is and ultimately what this means for backing up your AWS infrastructure resources such as EC2 and RDS. We are talking specifically about backups and disaster recovery here, not highly available infrastructures to protect against failure. The two are important aspects, but not the same.
As you start to craft your backup strategy across the applications in your corporate environment and tailor the backup plans against different categories of applications and systems into categories such as Business Critical, Medium Risk, Low Risk etc. then you can determine what this looks like in numbers. Defaults for frequency of backups, backup retention policies and such like.
How to Backup EC2 and RDS Instances on AWS Using AWS Backup
To start with the more common services on AWS let’s take a look at how we back these up and what types of configurations we have available to align out backup strategy with the risk appetite for the organisation and the application itself. The specific service we’re interested in for backing up EC2 and RDS instances on AWS is creatively called….. AWS Backup.
AWS Backup allows you to create Backup Plans which enable you to configure the backup schedule, the backup retention rules and the lifecycle rules for your backups. In addition, AWS Backup also has a restore feature allowing you to create a new AWS resource from a backup so that you can get the data back that you need and/or re-point things to the newly restored instance. Pretty cool really.
The first thing you want to do to get started is to create a Backup Plan. Within the creation process of your Backup Plan, you can configure all the items mentioned previously. Usually we’d walk through the step by step to do this, but really you just need to walk through the settings and select the options that suit your specific needs and risk appetite.
Below is a basic Backup Plan that is designed to run daily backups with a retention policy of 35 days, meaning we have 35 restoration points. You’ll also notice that instead of doing this for specific named resources, this is backing up all resources that have been tagged with a specific name.
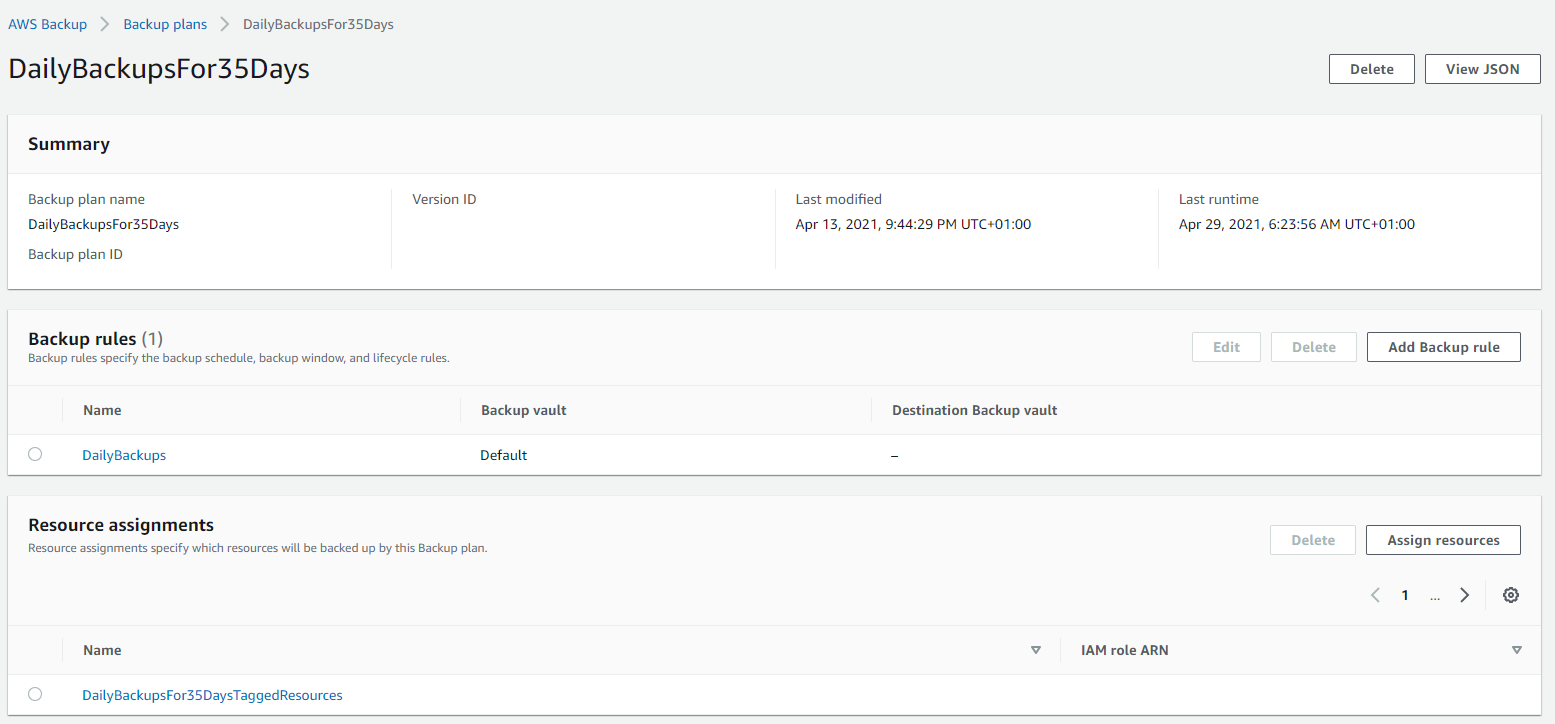
Tagged Resources;
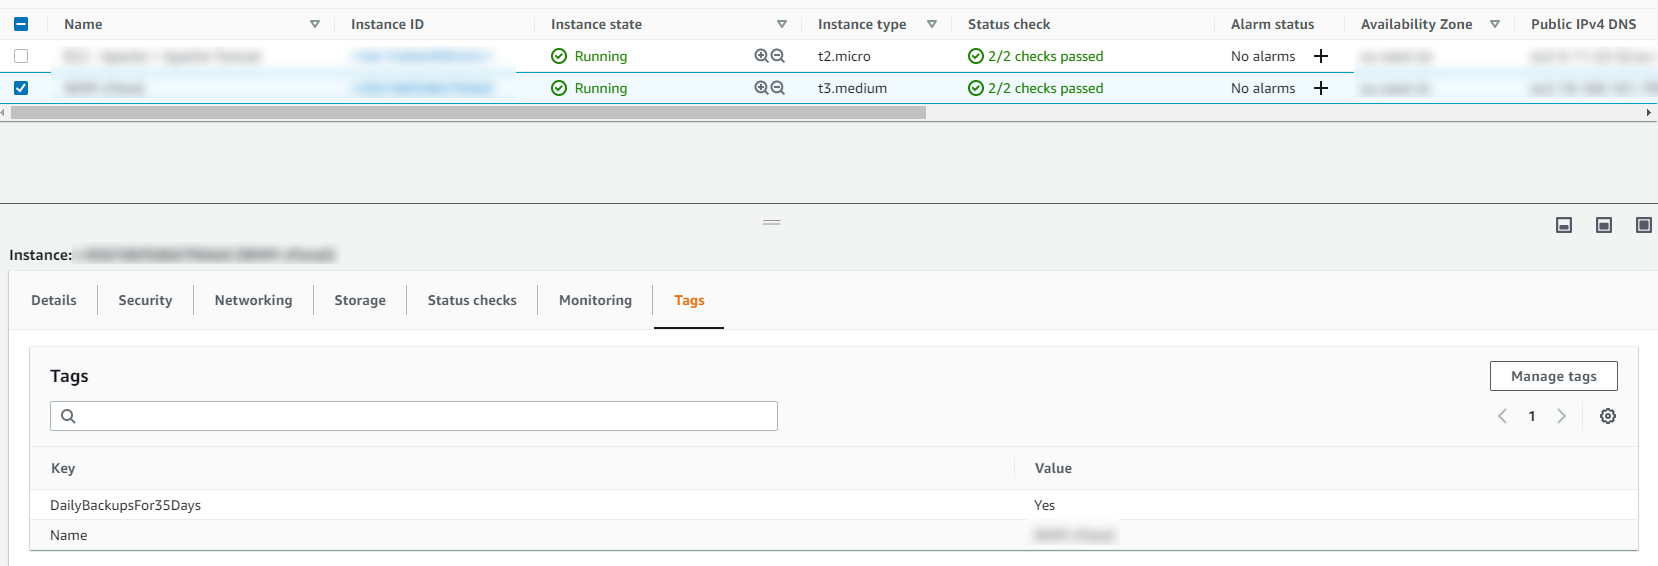
The tagged resource strategy using AWS Backup is an extremely handy way of managing backups as you can easily add and remove resources to a Backup Plan without ever touching the Backup Plan itself. Naturally you need a proper process in place to ensure things are being done in a standardised way so that you aren’t constantly hunting around trying to figure out what has been configured within AWS.
Running Backups
Once you have your Backup Plans in place, you can then start to see easily the backups that have been running, and most importantly if they have been successful or if they have failed.
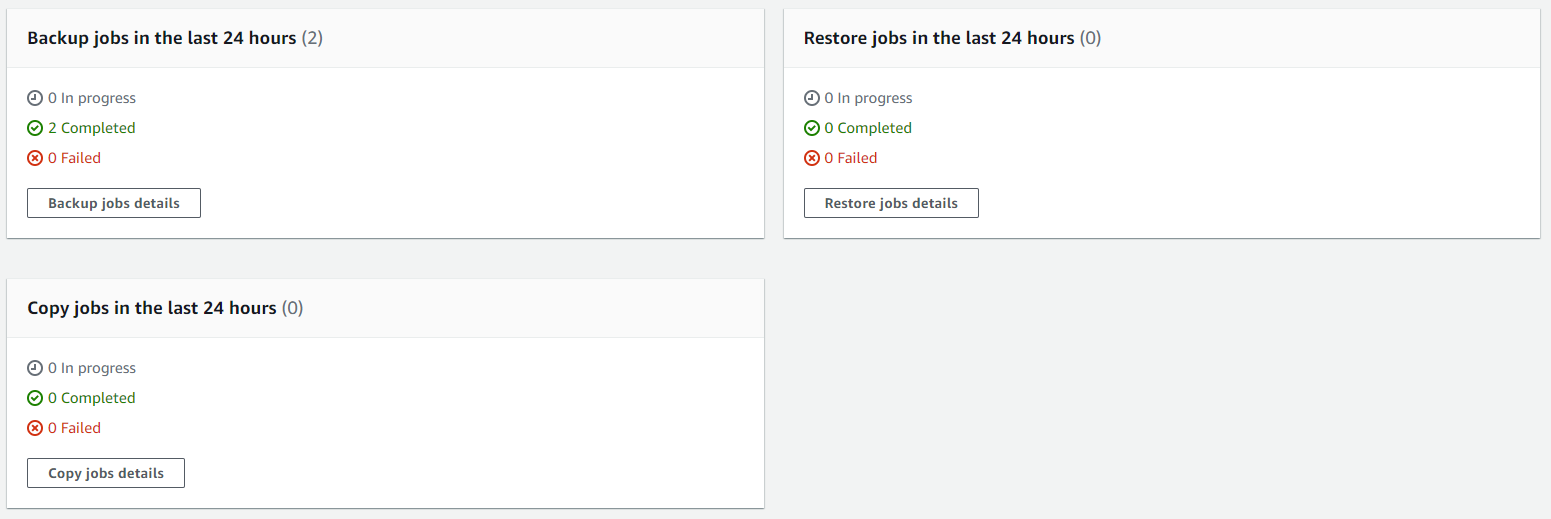
Then you can drill into the details and see all of your restoration points within your Backup Vault and ultimately this is where you would restore your backups from if you ever need to do that;
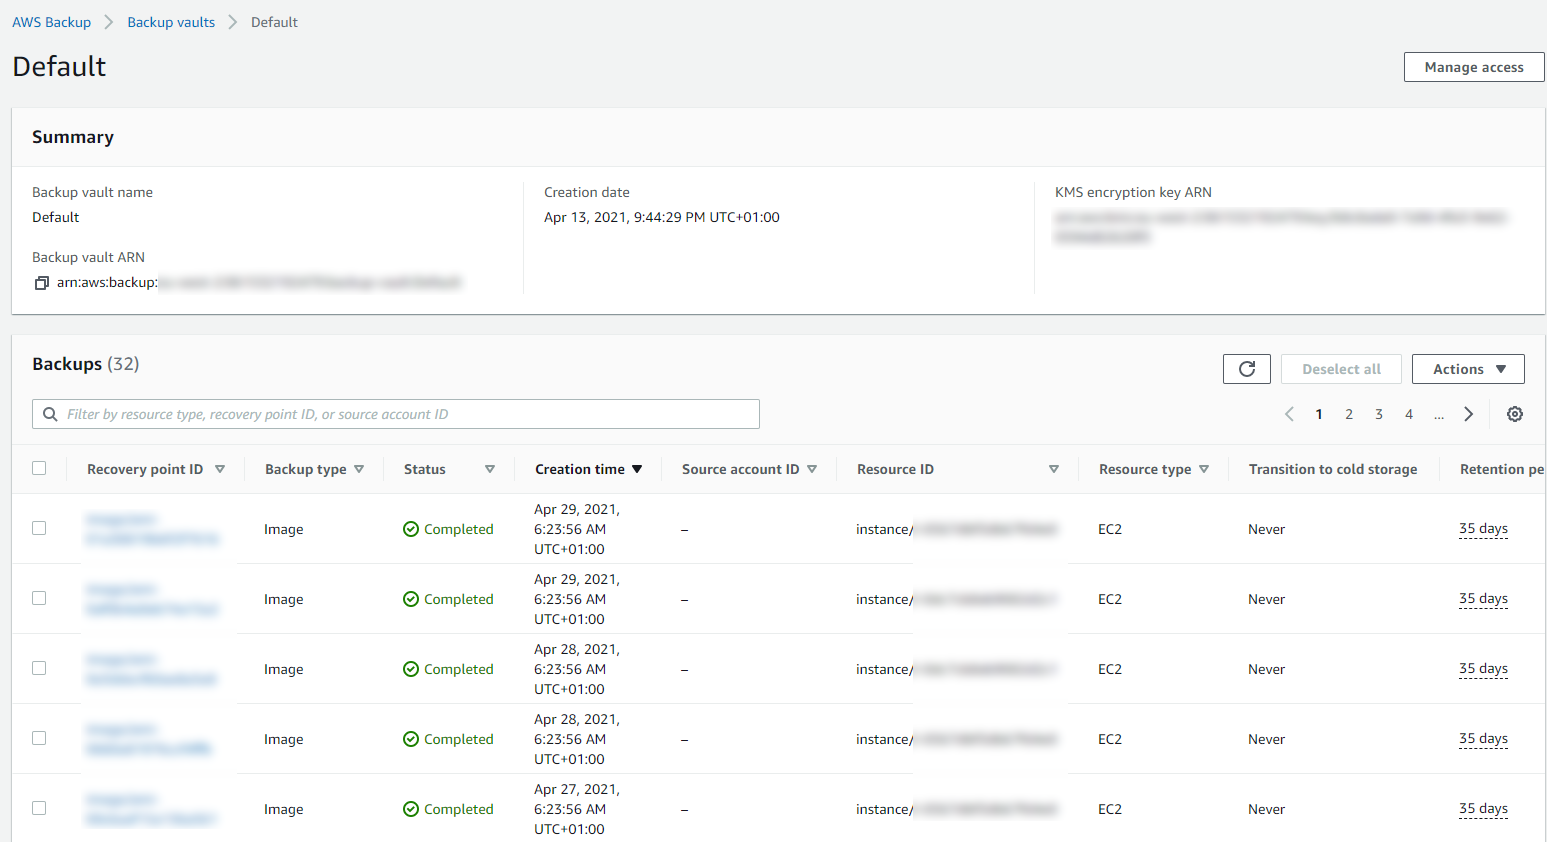
Summary
Hopefully that’s a whistle stop tour of how to backup your AWS infrastructure resources such as EC2 and RDS on AWS using AWS Backup. The best advice I can give when you are implementing this in the real world is that you need to truly understand your IT landscape and create a backup strategy that is going to work for your business. Once you have this understood, clicking the right buttons within AWS Backup becomes a breeze.
Don’t do it the other way round, just creating random backups that don’t align with the business goals and risk appetites. You will end up in a world of pain. No-one wants to go reporting to the CEO….. IT: “Oh we only have backups for 7 days.” ….. CEO: “What?!?!?! We are legally required to keep records for 6 years! WTF!”. You get the gist.
This can be quite an enormous topic to cover, so here’s some further reading if you want to know more;
by Michael Cropper | Apr 27, 2021 | Client Friendly, Developer, Technical |
So this isn’t quite as straight forward as it probably should be and the documentation from AWS is the usual, not great. So let’s cut through the nonsense and take a look at what you need to do so that you can quickly and easily get your DNS Zone Files and DNS Records migrated.
Assess Your Current DNS Provider, Zone Files, Domains and Nameserver Configurations
The first things you want to do before you start any kind of migration of your DNS over to AWS Route53 is the plan. Plan, plan and plan some more. Some of the nuances I came across with a recent DNS migration piece of work from DNS Provider X to AWS Route53 included some niggles such as vanity nameservers. The old DNS provider had things configured to ns1.example.com and ns2.example.com, then domain1.com and domain2.com pointed their nameservers to ns1.example.com and ns2.example.com which was quite a nice touch. This doesn’t quite work on AWS Route53 and I’ll explain that in a bit more detail in a moment. Another niggle that we came across that you need to plan properly and that is to make sure you have absolutely everything documented, and documented correctly. This needs to include for every domain at an absolute minimum things such as;
- Domain name
- Sub-Domains
- Registrar (inc. login details, and any Two Factor Authentication 2FA steps required)
- Accurate Zone File
The vast majority of people just have a Live version of their DNS Zone Files, which in itself is risky because if you had an issue with the DNS Provider X and you had no backup of the files, you could be in for a whole world of pain trying to re-build things manually in the event of a critical failure.
How AWS Route53 Manages Hosted Zones
So back to the point I mentioned earlier around vanity nameservers and why this doesn’t quite work in the way the old DNS Provider X worked. When you create a new Hosted Zone within AWS Route53, Amazon automatically assigns 4x random nameservers of which you can see an example below;
- ns-63.awsdns-07.com
- ns-1037.awsdns-01.org
- ns-1779.awsdns-30.co.uk
- ns-726.awsdns-26.net
What you will instantly notice here is that there are a lot of numbers in those URLs which should give you an idea of the complexity of the nameserver infrastructure behind the scenes on the Route53 service. What this also means is that because these nameservers are automatically generated you can’t configure two Hosted Zones to use the exact same nameservers to get the similar vanity nameserver setup explained earlier.
The reality is, this approach while is fairly common for complex setups, the majority of standard setups this isn’t an issue for. If you want to get vanity nameservers set up on AWS for a single domain, i.e. ns1.domain1.com and ns1.domain2.com etc. then you can do this if you wish.
Export Zone Files from your Old DNS Provider
The first step of this process is to export your Zone Files from your old DNS provider. What you will find from this process is that ever provider will export these slightly differently, and this highly likely won’t be in the format that Route53 needs when you import the Zone Files.
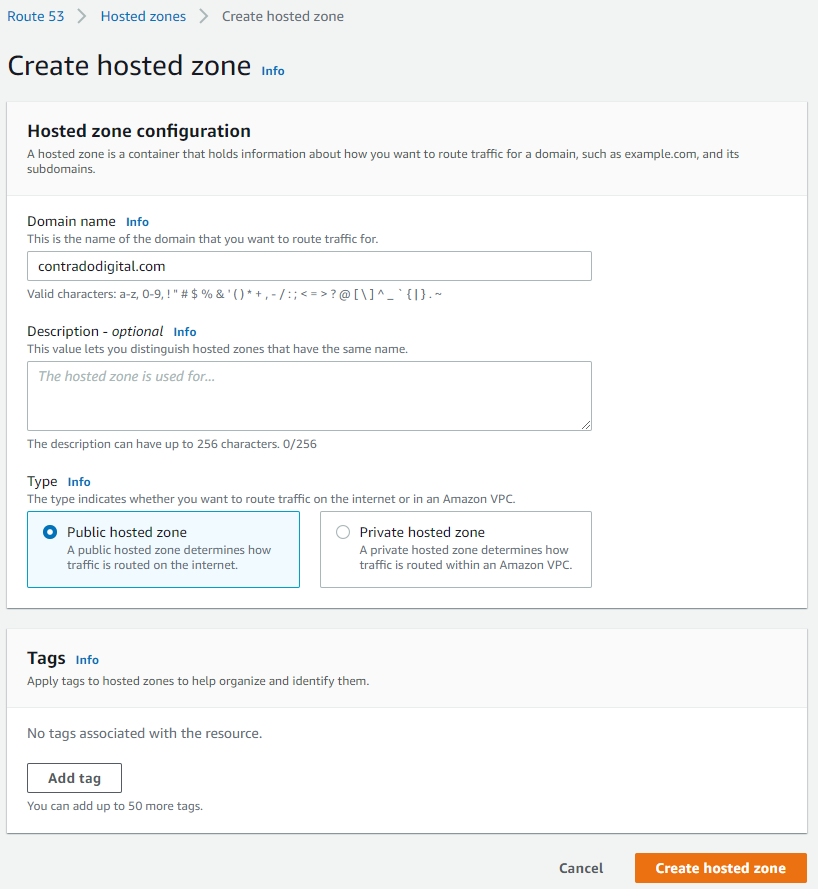
Create a Hosted Zone in Route53
This step is straight forward, just click the button.
Importing Zone Files to your Hosted Zone
As such, it’s time to prepare your Zone Files to be able to be imported into Route53 successfully. The format you need for your zone file import is as follows;
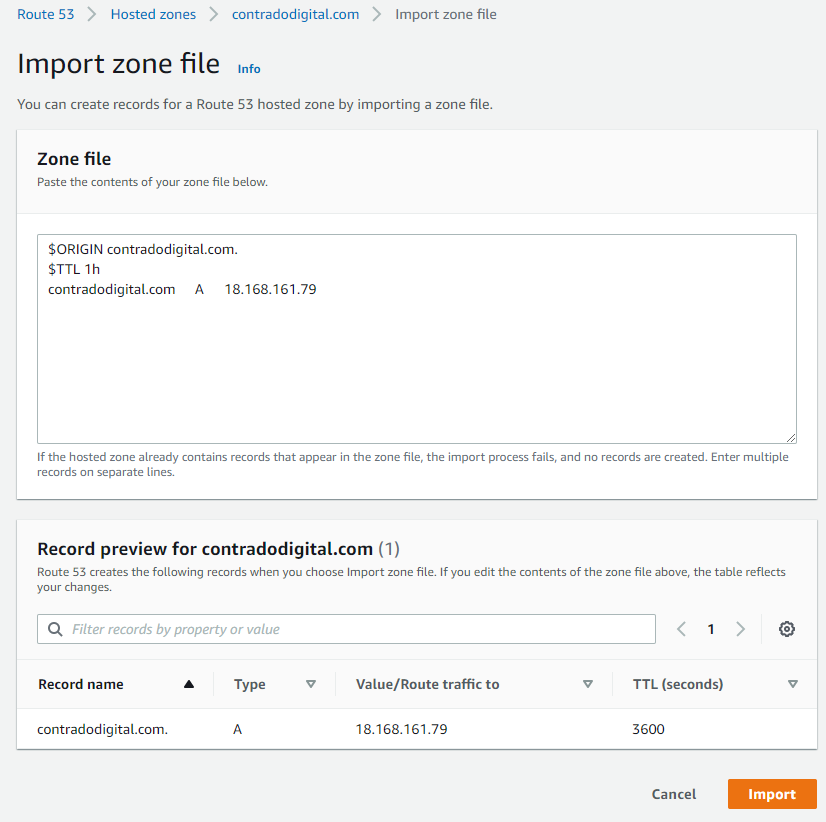
$ORIGIN contradodigital.com.
$TTL 1h
contradodigital.com A 18.168.161.79
Notice the couple of additional lines you need to add in which likely won’t be included from your export from your old provider. The above is just a very basic set of DNS entries. The reality is you will likely have 10 – 50+ DNS entries per domain depending on the complexity of your setup. One to keep an eye out on is that you may find certain record types don’t quite import seamlessly. Just a few niggles that I came across doing this included;
- MX records required a 10 included, i.e. contradodigital.com MX 10 contradodigital-com.mail.protection.outlook.com
- DKIM (TXT) and SPF (TXT) records had to be re-generated and imported manually as the format just didn’t quite work for the automatic import for some reason.
And I’m sure you’ll come across a few issues along the way that I haven’t mentioned here.
Summary
Hopefully this guide on how to import Zone Files into AWS Route53 helps to clarify some of the niggles around using the Zone File Import feature. To reiterate around this process when you are doing this in a real situation, make sure you plan this properly, have clear checklists and processes that you can methodically work through to ensure things are working as you do them. These types of changes can have a significant disruption to live systems if you don’t implement these things correctly.
by Michael Cropper | Apr 27, 2021 | Client Friendly, Developer, Technical |
We’ve got a lot of complex topics to cover here, so for the sake of simplicity we’re only going to touch on the really high level basics of these concepts to help you understand how all these different pieces of the puzzle are connected together. When you’re first getting started in the world of IT, it’s often a bit of a puzzle how all these things are plugged together under the hood which can cause a lot of confusion. By knowing how things are plugged together, i.e. how the internet works, you will have a significantly better chance of working with existing setups, debugging problems fast, and most importantly building new solutions to bring your creative ideas to life.
Firstly, let’s get some basic terminology understood;
- Registrar = This is where you purchased your domain name from, i.e. example.com
- Nameservers = This is the where the authority starts for your domain, i.e. it’s the equivalent of “tell me who I need to talk to who can point me in the right direction to get to where I want to go”. It’s the authority on the subject whose opinion on the matter is #1.
- DNS = This is the gate keeper to determine how traffic into your domain flows to where it needs to go. Think of your DNS like Heimdall from the Thor movies. You configure your nameservers to act in a way that you want, i.e. requests from www.example.com, should ultimately route to server IP address, 1.2.3.4, so that you don’t need to go remembering a bunch of IP addresses like a robot – or in the Heimdall world, “Heimdall…” as Thor screams in the movies, and he is magically transported from Earth to his home world of Asgard. Likewise, if Loki wants to visit a different planet, he just asks Heimdall to send him there and the magic happens. DNS can appear like magic at times, but it’s actually really simple once you understand it. DNS is a hard concept to explain simply, we’ll do another blog post on this topic in more detail another time. Hopefully this basic comparison helps you to at least grasp the topic at a high level.
- Servers = This is where things get fairly messy. This could be a physical piece of hardware that you can touch and feel, or could be a virtualised system, or visualised system within a virtualised system. There are multiple layers of virtualisation when you get down to this level. Although it’s not that important for the purpose of this blog post. Ultimately, all we care about is that the traffic from www.example.com, or something-else.example.com, gets to where it needs to when someone requests this in their web browser.
As mentioned, this is a difficult concept to explain simply in a blog post as there are so many different considerations that need to be made. But hey, let’s give it a go, with a basic diagram. There are elements of this diagram that have been simplified to help you understand how the different bits fit together.
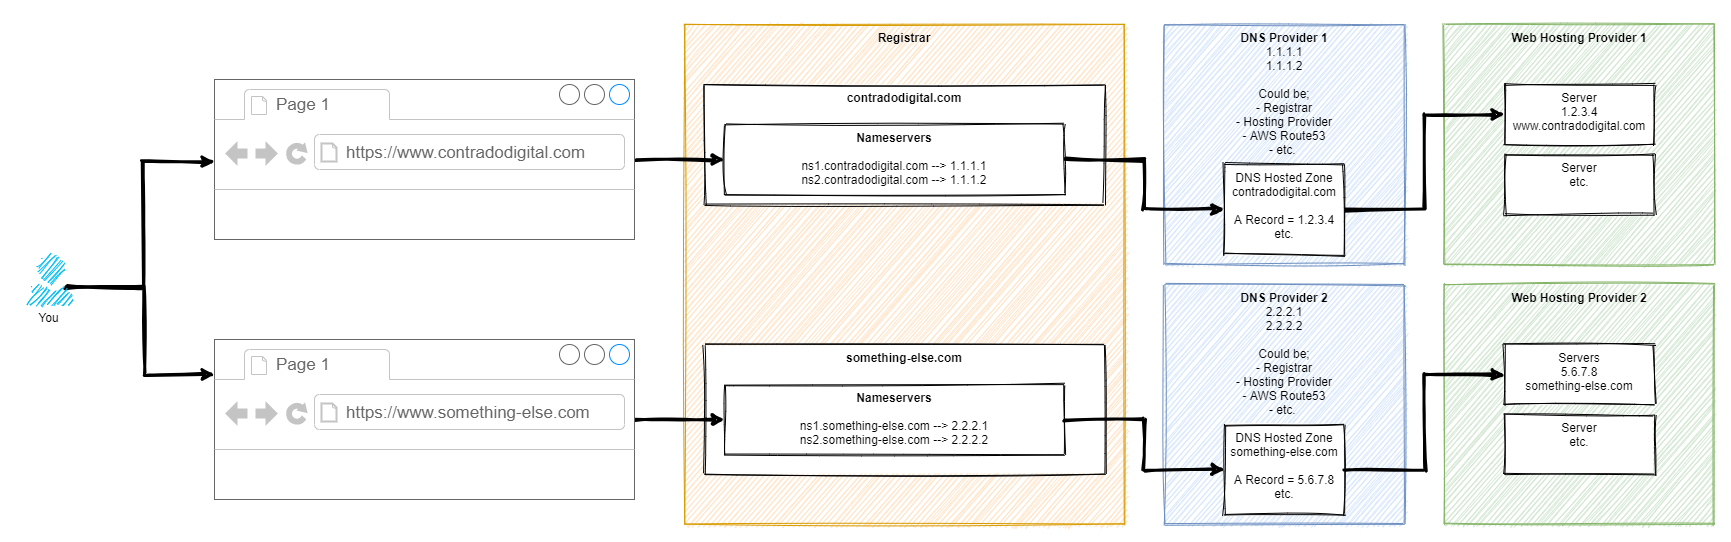
So here’s how it works step by step. For those of you who are more technical than this blog post is aimed at, yes there are a few steps in between things that have been cut out for simplicity.
Step 1 – Type Website Address into Web Browser
This step is fairly basic so we’ll skip over this one.
Step 2 – Web Browser Asks for Authoritative Nameserver for Website
This part is very complex in the background, so we’re not going to delve into these details. For the purpose of simplicity, ultimately your web browser says “Give me the name servers for contradodigital.com”, and ‘the internet’ responds with, “Hey, sure, this is what you’re looking for – ns1.contradodigital.com and ns2.contradodigital.com”.
As with all hostnames, they ultimately have an IP address behind them, so this is what then forwards the request onto the next step.
Step 3 – DNS Provider with Hosted Zones
A Hosted Zone is simple something such as contradodigital.com, or something-else.com. Within a Hosted Zone, you have different types of DNS Records such as A, AAAA, CNAME, MX, TXT, etc. (that last one isn’t an actual record, just to confirm 🙂 ). Each of these record types do different things and are required for different reasons. We’re not going to be covering this today, so for simplicity, the A Record is designed to forward the request to an IP Address.
So your DNS Provider translates your request for www.contradodigital.com into an IP address where you are then forwarded.
Step 4 – Web Hosting Provider Serves Content
Finally, once your web browser has got to where it needs to get to, it starts to download all the content you’ve asked for from the server on your web hosting provider to your web browser so you can visualise things.
This part of the diagram is so overly simplified, but it is fine for what we are discussing. The reality of this section is that this could quite easily be 10-20 layers deep of ‘things’ when you start to get into the low level detail. But that’s for another time.
If you want to get a feel for how complex just part of this area can be, we did a blog post recently explaining how Your Container Bone is Connected to Your Type 2 Hypervisor Bone.
Summary
Hopefully this blog post has given you a good understanding of how your Registrar, Nameservers, DNS and Servers are connected together under the hood. When you truly understand this simple approach, play around with a system that isn’t going to break any live environment, so you can start to test different types of configurations along the way to see how they behave. If you don’t know what you are doing, do not play around with these things on a Live system as you can do some real damage if you get things wrong which can result in your services being offline for a significant period of time.
by Michael Cropper | Apr 26, 2021 | Client Friendly, Developer |
This is quite a common requirement as you start to scale and/or change your infrastructure – how to check the available disk space on a virtual machine using Linux and/or an AWS EC2 instance. It’s one of these things that you would think in this day and age is easy to view, yet on the vast majority of systems this metric seems awkward to get your hands on with a simple click. You want something as simple as how you can see on Micro$oft Windows the percentage% of disk space you have used and what you have got left. This is all a really basic requirement that you’d think would be simple to get your hands on this information on Linux and AWS EC2, but hey, Linux is Linux and AWS EC2 is AWS EC2…..
So, let’s get into the detail.
Thankfully this is actually a really easy piece of information to get your hands onto. For the quick answer, just run the following command when you’ve SSH’d into your Linux instance;
df -hT
What you will find when you run the above command on Linux to view the available hard disk space and current usage is something along the lines of the below image;
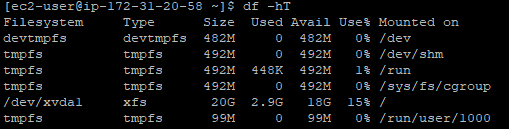
What you can see here is that the disk is currently only being used at 15% capacity. Awesome. You’ve got space to play with.
To help your understanding with some of the cryptic Linux commands;
- df = Disk Free command
- -h = Human Readable, print sizes in human readable format (e.g., 1k, 234M, 2G)
- -T = Print Type, print file system type
There are many other handy commands to the Disk Free utility on Linux, but for the purpose of this blog post these are the main ones you need to be concerned with. Ultimately you can keep track of the disk usage on your Linux machines so you know when it’s time to upgrade your hard disk to increase capacity.
Hopefully it’s obvious why you should care about this stuff… if your hard disk is full on your web server, then this can result in catastrophic results where your ecommerce customers can’t even place orders on your website, or where your B2B customers can’t even complete the contact form on your website. These are just some of the surface level issues that can come up. In essence, when your disk gets full – you’re screwed. It causes an unbelievable amount of problems under the hood that take a significant amount of time to resolve. Don’t underestimate keeping track of this core metric.