You would have thought in 2023 that this would be a 2 second job to do. A well documented thing given Apache is one of the largest open source companies on the planet and Java being the most used language on the planet that powers over 1 billion devices (as their installers used to love reminding us every time 🙂 )
But weirdly, it’s not…
So I thought it would be handy to write a blog post about how to get going in 15 minutes so you can start to have a play. After all, we don’t want people to have 10 years experience in this stuff just to get a basic local development environment up and running.
What we’re going to cover…
- Getting the Java Development Kit (JDK) installed
- Getting Apache NetBeans IDE installed, which requires the Java Development Kit (JDK) to work
- Getting Apache Tomcat installed, so your Apache NetBeans IDE can deploy your web application to the locally running web server so you can see your web application in your web browser
- Configuring Apache NetBeans so that it knows about the Apache Tomcat server that is running on your local machine
- Seeing everything in action!
So let’s get started.
Getting the Java Development Kit (JDK) Installed
First of all, just get to Google and search for “JDK Download”. I’m not going to give you the exact steps here as Oracle, the people who ‘own’ Java, seem to keep making life ever more difficult every day to download this and now even requires you to create an account with Oracle just to download the software. Rather annoying, but just jump through the latest hoops you have to at the time you are reading this, as anything I write down is going to have changed since the time this blog post was written.
The only thing to mention that you need to keep a record to when you are doing this is the Folder Path of where this is installed. You’ll need this in the next step if the installation of Apache NetBeans IDE doesn’t manage to automatically detect it.
Beginner Development
For greenfield projects, i.e. something brand new, then just download the latest version of the Java Development Kit (JDK). You may get issues when you get onto the next steps, so you may have to loop back on this step and install an older version that is compatible with the other software you are installing.
Unfortunately the different software providers throughout this blog post don’t make it simple to understand what versions are compatible with which other versions. It’s a tad annoying and is a wider problem with the software engineering in general so it’s something your going to have to get comfortable being annoyed about and regularly banging your head against the wall.
Usually there is some half-arsed documentation somewhere buried on the respective websites, but you’ll have the Google the shit out of it to find this basic info unfortunately. But hey, just giving you the heads up.
For now though, just download the latest version of the Java Development Kit (JDK) so you can give this a first attempt.
Working with Existing Projects
If you are working with existing projects, then this is a tad different as you are going to have to work within the constraints of that setup. So you are probably going to have to refer to the project documentation about what versions of what you need to get up and running with ease.
Remember when your Past-Self recommended that you document your development environment and your project technical dependencies so that your Future-Self would be thankful that you did…. Well, if your Present-Self is currently disgruntled with your Past-Self, then let that be a lesson. And document this properly this time round.
Or worse in a corporate setting where this was never documented and you simply have to talk to your software engineering colleagues to try and find the info you need through 1000 questions rather than a 1 page document that gives you everything you need. Well, yeah, good luck with that.
Getting Apache NetBeans IDE Installed
Next step is to get Apache NetBeans IDE installed. Again, just Google for the download link and run through the installation steps.
There is nothing specific to really mention on this step other than that you need to enter the Java Development Kit (JDK) installation folder path as part of the setup. Generally the Apache NetBeans IDE installer detects this automatically and puts that in for you. But you may need to enter this manually if it hasn’t been automatically detected.
Getting Apache Tomcat Installed
Right, this next step is where things get a tad tricky, or at least can do.
Again, just to get started, Google “Apache Tomcat Installation” and you’ll come across a Windows Installer .exe file that you can use to get up and running quickly.
It seems that the last time I installed this (hence the reason for writing this blog post…) this is installed in a bit of a quirky way which actually prevents Apache NetBeans IDE from deploying your application to your Apache Tomcat web server. A tad annoying, and not particularly well documented.
So during the installation process the only details you really need to make a note of are;
- Port
- Windows Service Name
- Tomcat Admin Username
- Tomcat Admin Password
- Installation Folder Path
These will come in handy in the next section when we configure Apache NetBeans to allow it to talk to Apache Tomcat.
Anyhow, for now, as part of the installation process, it is recommended that you create a Username/Password combo for your local machine so that you can actually use it. It’s a bit of a pain if you have to do this post-installation, so for the purpose of this blog post, we’re going to assume you are doing this as part of your installation procedure.
The reason I mentioned a moment ago that this step can get a little tricky is that each version of Apache Tomcat supports a LOT of different specifications and dependencies which can be tough to align – even on your local development environment. There is a “Which Apache Tomcat Version to Use” page which tries to help to simplify things, but honestly, just adds more complexity. Apache Tomcat doesn’t seem to care too much about backwards compatibility for some reason and expects software engineers to try and be a One Man Band just to figure out what they need. You’ll see what I mean with this snippet from that page;
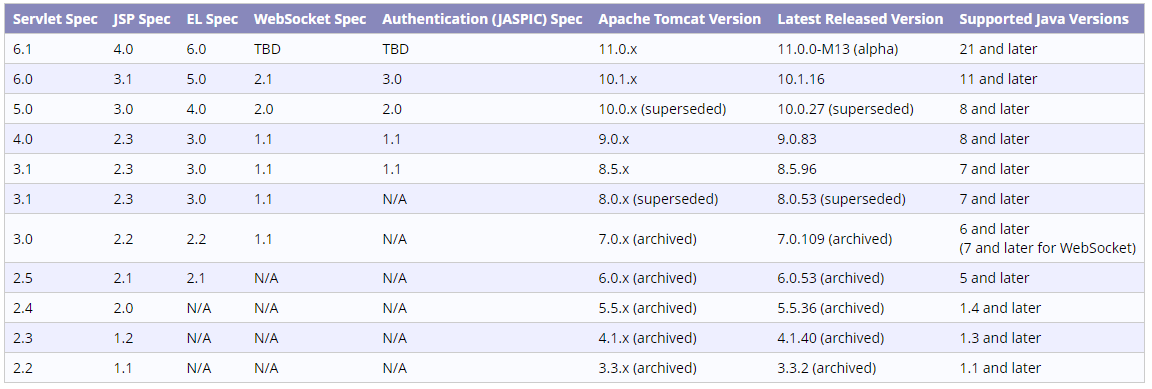
Simple, right?!?!?
So basically you need to make sure that everything aligns with the different versions mentioned above;
- Apache Tomcat Version
- Java Development Kit (JDK) Version
- Servlet Specification Version, required for developing Web Applications
- Java Server Pages (JSP) Specification Version, required for developing Web Applications that are of monolith in nature – This is essentially the ‘front end’ part of your Web Application
- Expression Language (EL) Version, required for developing Web Applications that want to handle data that is passed from the ‘back end’ (aka. the Java Servlet Specification) to the ‘front end’ (aka. the Java Server Pages JSP Specification) so that you can essentially loop through lists and such like to output the data that you need from variables, or much simpler outputting of data stored in variables
- WebSocket Specification, if your web application is using cool tech like this (probably not on your first Hello World web application!)
So I’m going to assume you’ve studied all of these different specifications over the last 5 years and fully memorised 1000s of pages worth of documentation to be able to easily know this information. Right?
Of course not. No-one has. But hey, Java often likes to make things more difficult than they need to be. But don’t let that put you off, it brings so much value over scripting languages that are all the rage at the moment.
Anyhow, for now, just go with the most recent version to get started.
Configuring Apache NetBeans to Talk to Apache Tomcat
The next step is to configure Apache NetBeans IDE to talk to your Apache Tomcat service. To achieve this, there are two core steps involved;
- Configuring Apache NetBeans by adding a Server as a Service to your IDE
- Tweaking the way that the Apache Tomcat web server Windows Service runs
Add Apache Tomcat Web Server to Apache NetBeans IDE as a Service
So let’s look at the easy step first. Simply right click on the Servers section and follow the steps through to add your Apache Tomcat server. You’ll need those details you made a note of earlier to connect to the right one as you may have multiple of these running on your local development environment over time to support different projects.
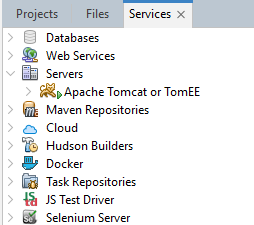
You can see in the above screenshot that I have already added the Apache Tomcat web server which is why it is showing up in the list already.
Error You Will Receive If You Try to Build & Deploy a Web Application Right Now
So it’s important to explain what error you will receive if you try to build your first Hello World Web Application right now and deploy it by pressing the green play button. The error messages can be a tad cryptic and you’ll also need to check the catalina.log file for further insights, which can be a bit of an unknown unknown when getting started with Java software development.
Building war: C:\Users\Michael Cropper\NetBeans Projects\MyHelloWorldWebApp\target\MyHelloWorldWebApp-1.0-SNAPSHOT.war
------------------------------------------------------------------------
BUILD SUCCESS
------------------------------------------------------------------------
Total time:  1.232 s
Finished at: 2023-12-01T23:04:45Z
------------------------------------------------------------------------
Deploying on Apache Tomcat or TomEE
    profile mode: false
    debug mode: false
    force redeploy: true
Undeploying ...
undeploy?path=/MyHelloWorldWebApp
OK - Undeployed application at context path [/MyHelloWorldWebApp]
In-place deployment at C:\Users\Michael Cropper\NetBeans Projects\MyHelloWorldWebApp\target\MyHelloWorldWebApp-1.0-SNAPSHOT
deploy?config=file%3A%2FC%3A%2FUsers%2FMICHAE%7E1%2FAppData%2FLocal%2FTemp%2Fcontext9586713857740903372.xml&path=/MyHelloWorldWebApp
FAIL - The application [/MyHelloWorldWebApp] is already being serviced
I’m actually pretty sure the first time I did this, I got this error message instead. The above one sems to be ever so slightly different final line in the error message. But either way, it fails, which means that it hasn’t been deployed.
FAIL - Failed to deploy application at context path [/MyHelloWorldWebApp]Which I’m sure you’ll agree isn’t actually that much of a helpful error message.
So to get to the bottom of what is really going on, you need to get into your Apache Tomcat logs, specifically the catalina.out file (or the one with today’s date on).
On a Windows machine, this is going to be located at: C:\Program Files\Apache Software Foundation\Tomcat 10.1\logs
Which is the location of where you installed Apache Tomcat earlier.
What was interesting when checking this is that this is the actual error that was reported when the error for “FAIL – Failed to deploy application at context path” came up;
“30-Nov-2023 21:32:39.679 SEVERE [http-nio-8080-exec-2] org.apache.catalina.startup.ExpandWar.copy Error copying [C:\Users\MICHAE~1\AppData\Local\Temp\context3064853893058586338.xml] to [C:\Program Files\Apache Software Foundation\Tomcat 10.1\conf\Catalina\localhost\MyHelloWorldWebApp.xml]
java.io.FileNotFoundException: C:\Users\MICHAE~1\AppData\Local\Temp\context3064853893058586338.xml (Access is denied)”
Which made me think…. that’s odd. I installed Apache Tomcat via a Windows Installer using the exact same Windows logged in user, so I can only assume that one of the installers is doing a bit of crazy on Windows and being overly secure by segmenting which user is running the application – which would prevent User A from accessing anything in User B without relevant permissions. Something you’d really only know a lot about after dealing with a lot of Linux permissions issues historically, and if you’re a noob with this stuff is probably going to be something that would be a complete blocker for you to get past.
Which brings us onto the next step for how to solve this…
Tweaking the way that the Apache Tomcat web server Windows Service runs
So when you just installed Apache Tomcat via the Windows Installer you will notice that you have an Apache Tomcat service running in your Windows Task Bad as a background service. It doesn’t auto-start on reboot by default, so you may have to start the service if you have rebooted since you installed the software.
So you need to go into the Windows Task Bar and find the Apache Tomcat software that is running and click on the Configure option. From here, you need to go to the Log On tab and change this from the default “Local Service Account” over to “Local System Account”

Do that, click Apply and then Ok. Then finally restart the Apache Tomcat service if it is already running and you’ll be good to go.
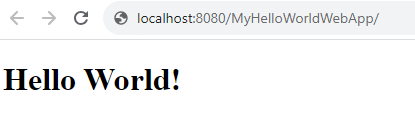
Seeing Everything in Action
Awesome. So now you’ve got all this up and running, you’ll be able to click the Play button in the Apache NetBeans IDE to run your project and it will deploy your web application successfully to your Apache Tomcat web server so you can interact with it in your web browser.
Summary
Hopefully this is a helpful guide for how to get an Java local development environment up and running in no time so that you can start to develop web applications using the power of Java.
Yes, it’s a bit of a pain as you get deeper into Java, but for getting started it’s mainly about making sure the different versions of the software you are running are aligned and designed to support each other. The documentation is often pretty awful so if things don’t quite go to plan, just lots of Google’ing will help you get to where you need to be.
Good luck!
Michael Cropper
Latest posts by Michael Cropper (see all)
- How to fix “Error establishing a database connection” on WordPress - May 19, 2026
- General Scheme of the Regulation of Artificial Intelligence Bill 2026 - February 4, 2026
- WGET for Windows - April 10, 2025