In this blog post we’re going to look at how you can host multiple websites on separate virtual machines that sit behind a pfSense firewall with HA Proxy installed. This is quite an involved topic and one that is going to vary greatly based on your physical hardware and virtualisation environments, so keep this in mind if you’re trying to follow this.
For reference, the underlying physical hardware behind the below setup is nothing more than;
- Physical Modem
- Physical pfSense Firewall
- Physical Managed Switch
- Physical Server running XCP-ng
- Multiple Virtual Servers running inside XCP-ng
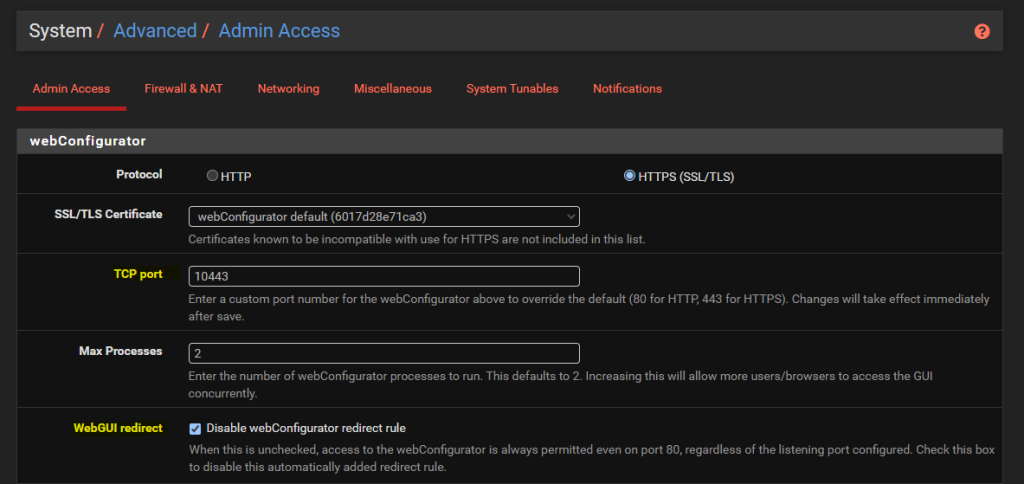
Configure pfSense System > Advanced > Admin Access
By default the pfSense WebGUI runs over port 80 and 443. What this means is that if you want to host a website behind pfSense then you need to re-configure this since your websites are going to be running over either HTTP or HTTPS.
To do this, simply change the TCP Port to an available port and disable the webConfigurator Redirect Rule as can be seen below;
Install HA Proxy via pfSense Package Manager
The first place to get started is to install the latest version of HA Proxy via the pfSense package manager by navigating through to System > Package Manager > Available Packages. Simply install the package and you’ll see this software now available for you to manage and configure.

Whenever you install packages within pfSense you’ll notice different menu items start to appear where you can configure the package and/or view the current use of it. The core menu item for configuring HA Proxy is under Services > HA Proxy;

HA Proxy Terminology and Architecture
Before we jump into the configuration for how to setup HA Proxy to host multiple websites, it’s first important to make sure we understand the overall architecture and how things fit together as the terminology and user interface often isn’t as clear as it could be for someone brand new to this. By understanding this, the configuration we’re going to go through below should hopefully make much more sense why we are configuring the things we are and ultimately will help you work with HA Proxy better in the future.
The below architecture is what we’re going to talk through in this guide for how to setup HA proxy on pfSense to allow you to host multiple websites behind a single IP address using a shared front end;
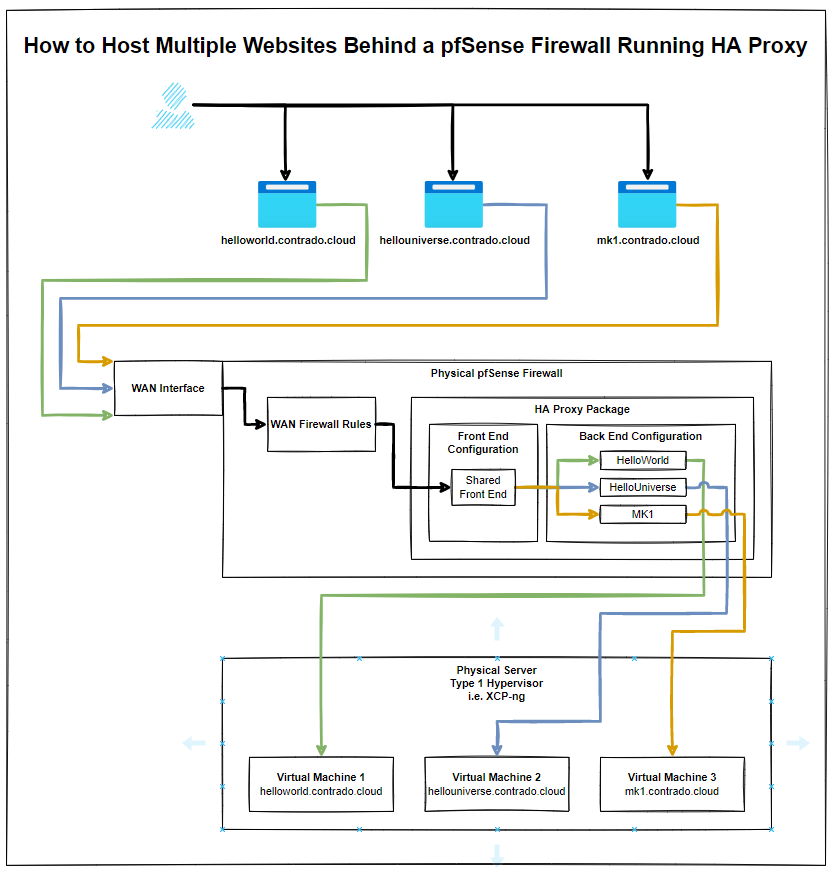
The core bits of terminology in HA Proxy that may not be as familiar to those coming from a web development background are the concepts of Front Ends and Back Ends, since these mean significantly different things in the world of web development. In web development, Front End generally refers to technologies such as HTML, CSS, JavaScript. And Back End tends to refer to server side technologies such as Java and C# to name a few for the purpose of illustration.
Those more familiar with scalable infrastructure in the web development world will be more used to the terms from cloud platforms such as AWS where there is the use of Application Load Balancers and Target Groups.
How this translates into HA Proxy terminology is that an Application Load Balancer in AWS terminology is essentially a HA Proxy Front End, and the AWS Target Group is equivalent to HA Proxy’s Back End. i.e. it is a configuration space that ultimately points to an upstream server somewhere.
And for those of you familiar with Nginx and using this as a reverse proxy, then the Back End in HA Proxy terminology tends to align closely with Upstream Server in Nginx terminology. All fun and games when every piece of technology calls essentially the same thing something completely different.
Anyhow, hopefully that’s helped to clarify a few bits of the terminology related to HA Proxy and how it loosely aligns with terminology that you may be more familiar with if you’re coming from a cloud native or web development background.
Configure HA Proxy Settings
So far all we’ve done is install the basic package with nothing configured and nothing turned on. Now we understand the architecture as explained earlier, it’s time to jump into some of the settings. First we’ll get started with the overall HA Proxy Settings.
Turn on HA Proxy
Firstly, let’s make sure HA Proxy is turned on;

Turn on HA Proxy Statistics
To do this simply configure a relevant port on the settings page;

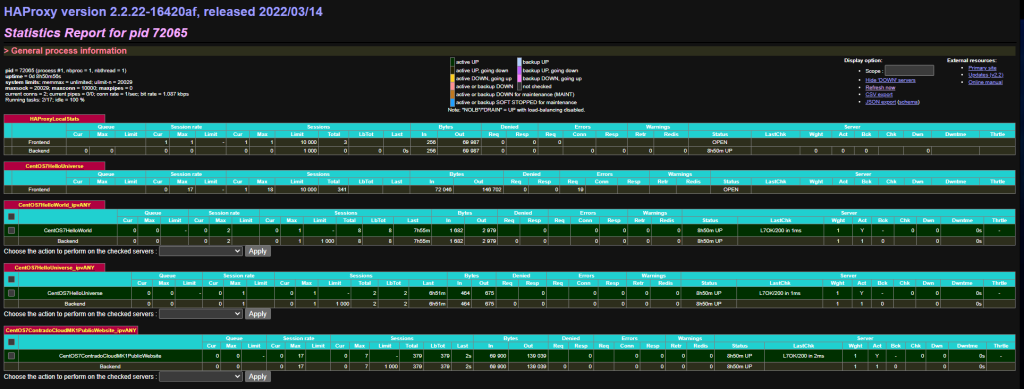
What this gives you is an extremely handy report that you can view from Status > HA Proxy Stats page which allows you to view lots of valuable information so you can understand how many sessions are hitting your Front Ends and Back Ends in HA Proxy once these have been set up a little later. This is significantly valuable when trying to debug things if they aren/aren’t working. Jumping ahead a little, but this is worth turning on while you are in this area of the configuration’
Configure the Max SSL Diffie-Hellman Size
Don’t ask me what this is, I genuinely don’t have a clue at this point in time of writing. An error message showed up in HA Proxy/pfSense when configuring future steps below which needed this setting up. So hey, do what it recommends – Seems odd that it wouldn’t automatically populate with best practice and requires a manual configuration but hey, probably one for a future contribution to the open source project by someone;

Summary of Settings Configuration
You’ll notice that we’ve skipped over a lot of the settings that are available to configure and for genuine reason. And that is that you just don’t need the majority of them to get a basic setup in place to start testing this stuff.
Sure, in a production environment you’re going to need to get finer tuning in place, but while you’re learning this then it’s more important to get a basic setup in place that you can play with and improve from there.
Setup Your Virtual Machines
Ok, so for the purpose of this blog post I’m going to assume you already have got some virtual machines set up and working in the way you want with the appropriate security in place to ensure that they are securely segmented for public access.
In our example, we’ve got the three virtual machines that are powering;
- contrado.cloud
- contrado.cloud
- contrado.cloud
In this example they have simply been configured to run Apache / httpd, configured to ensure httpd runs on startup, configured to allow inbound http traffic and added a basic index.html page in /var/www/html/index.html so that we can easily see which server we are on. Beyond that, everything else is out of the box on these virtual machines.
Configure HA Proxy Back Ends
This seems really counter intuitive to do this first, but it’s essential to do this first. This is what we’re going to achieve with this example;
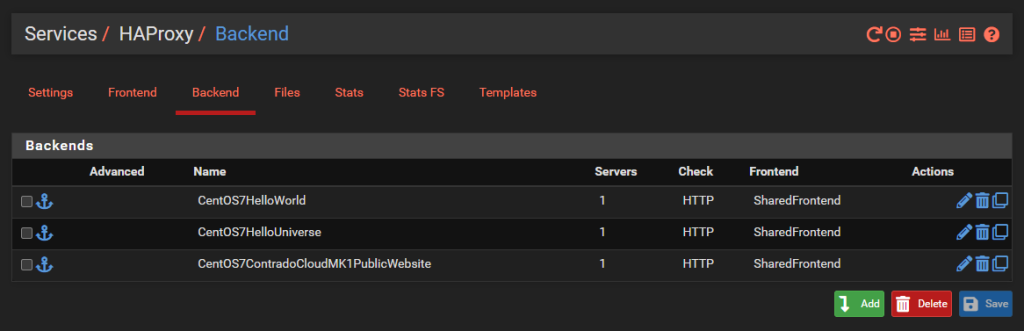
And we’ll dig into a single one as an example, the others are the same though with no differences beyond IP addresses. So configure your first Back End in HA Proxy;
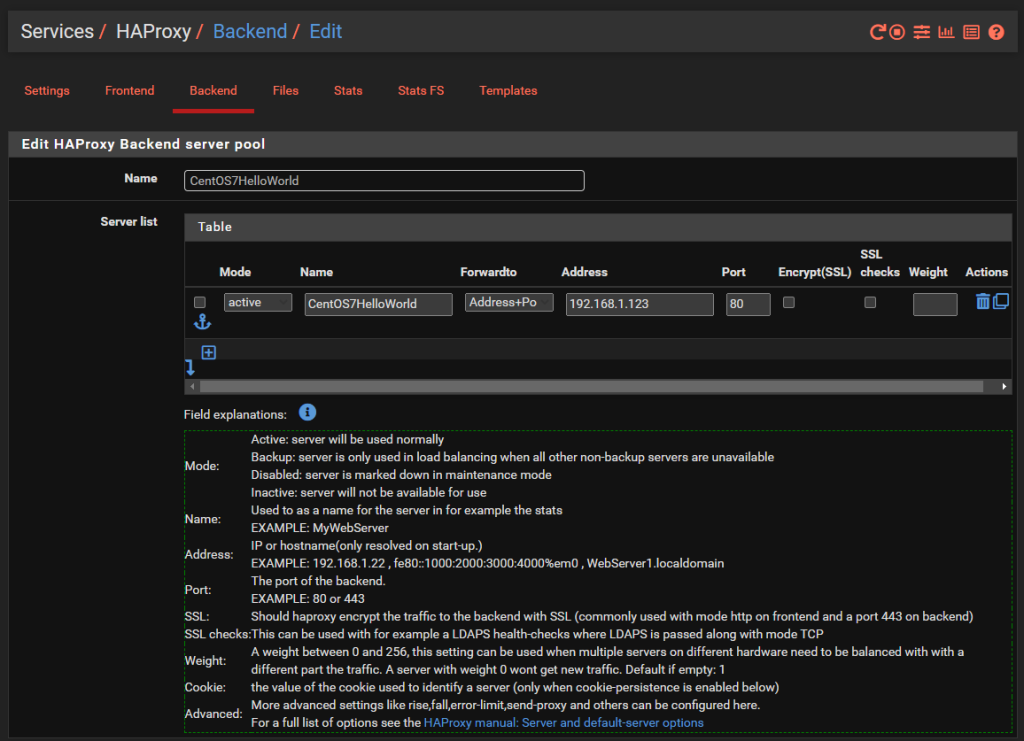
You’ll notice that the IP address is on the 192.168.1.0/24 LAN network which is clearly insecure, as is the Port 80 for insecure HTTP traffic for any real world production environment. But at least this gives an example for how to get this set up as a starting point.
There is nothing really to configure as a basic setup beyond the above. You can go configuring the Health Checking if you like, which is essential in production environments with High Availability Front Ends and disposable back end servers and infrastructure as code, but that’s well beyond the scope of this blog post. So either disable this by setting the option to None or configure as per your needs.
Rinse and repeat for your other virtual machines that you want to expose to the internet.
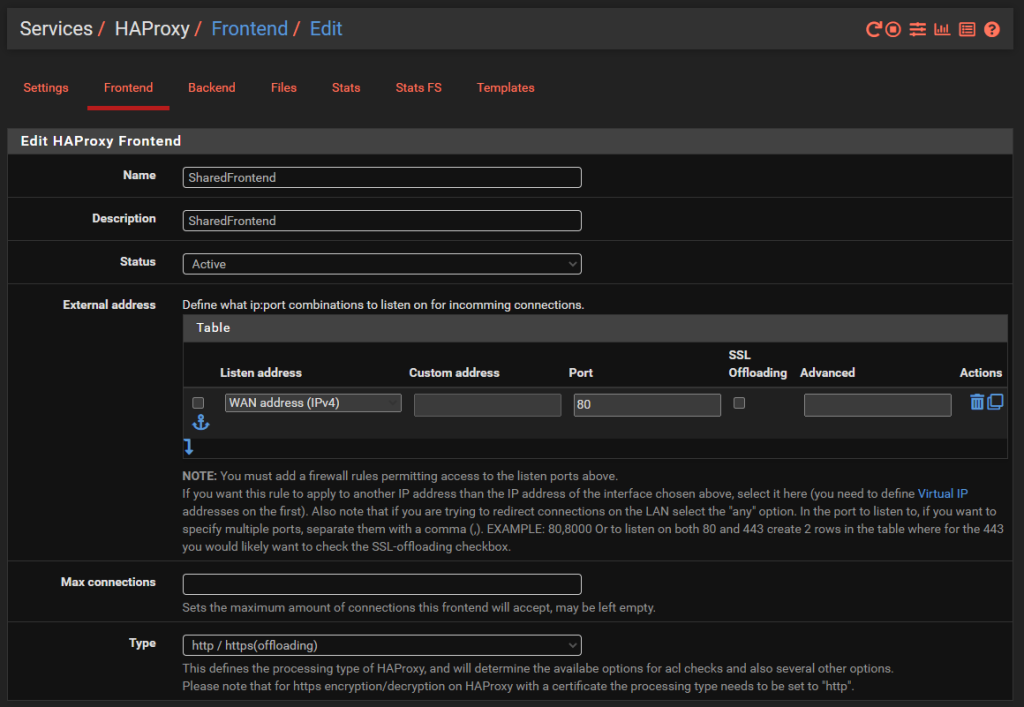
Configure HA Proxy Shared Front End
Note, if you are only hosting a single website then you can use a basic Front End rather than a shared front end, the configuration steps are very similar. You actually don’t even need to use HA Proxy if you are only hosting a single website as you can use basic Port Forwarding in pfSense as we’ve previously written a basic guide for on how to host a single website behind a pfSense firewall which you should check out if this situation applies to you.
Now that you have all of your Back End HA Proxy configured, it’s time to apply a Front End to handle traffic from the internet in a way that suits your needs. As this blog post is about hosting multiple websites behind pfSense using HA Proxy, the reality is that this is going to be primarily determined by the hostname of the incoming request, i.e. http://helloworld.contrado.cloud or http://hellouniverse.contrado.cloud or http://mk1.contrado.cloud etc.
For context, HA Proxy is really designed for traditional network infrastructure where you essentially don’t expose anything to the internet and anything you do you do minimally and with great caution. In the world of cloud and web development, well, this doesn’t quite meet expectations. There will be future blog posts about other supporting technologies in due course which significantly expand the capabilities and functionality that is explained in this blog post. This is just the basics for now.
What we’re aiming to achieve with a shared Front End in HA Proxy is the following;

What you’ll notice is that this is purely for Port 80. This comes back to the point raised earlier that the default behaviour for pfSense and HA Proxy in general is to disable all and specifically permit inbound rules. In reality, any website that is being hosted is highly likely to require multiple ports to be opened to be managed remotely with ease such as HTTP, HTTPS, SSH, SFTP and many more. That all comes down to your specific use case though, so this blog post is simply designed to get you going in the right direction, not give you all the answers to your specific use case.
Jumping into the specific details of the above to get clarity on how this is configured. Simply give the Front End a Name, Description, make sure it’s Active and listening on the WAN on port 80 then set the Type to ‘http / https (offloading)’ as can be seen in the image below;
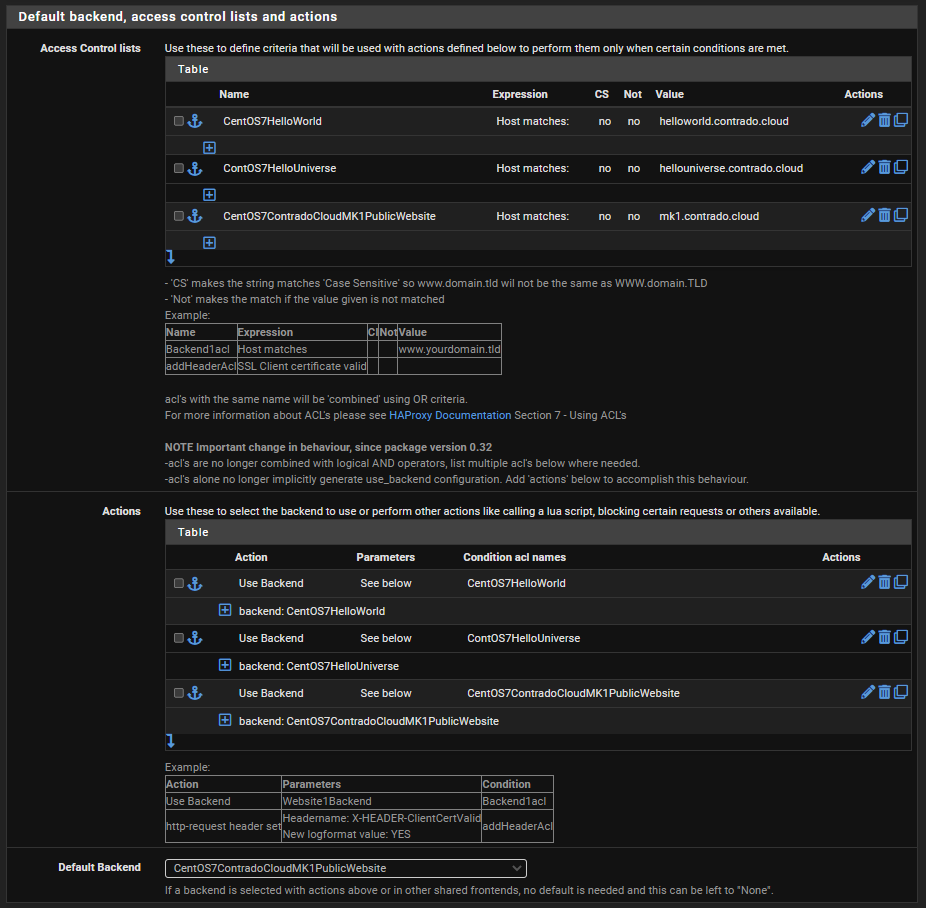
The next bit of configuration on your Front End is to configure what rules you need in place to allow your front end to talk to multiple back ends depending on your setup. For this blog post we’ve simply got the 3x virtual machines powering the HelloWorld, HelloUniverse and MK1 sub-domains to see how this works.
Firstly, configure your Access Control Lists which in this example simply gives you a way to map a hostname to a friendly name.
Next, configure the Actions by mapping how each of the Access Control List friendly names maps to a Back End in HA Proxy. The user interface in here isn’t the best if I’m honest. These things should be selectable dropdowns rather than free text field as it causes confusion, but hey.
Finally, select which is the default Back End so that HA Proxy knows where to send traffic when it doesn’t know what to do with it.
And that’s it for configuring HA Proxy. There are so many different settings throughout all those different screens we’ve looked at, but ultimately to get a very basic implementation set up so you can have a baseline to play with and improve up, this is all there is to it.
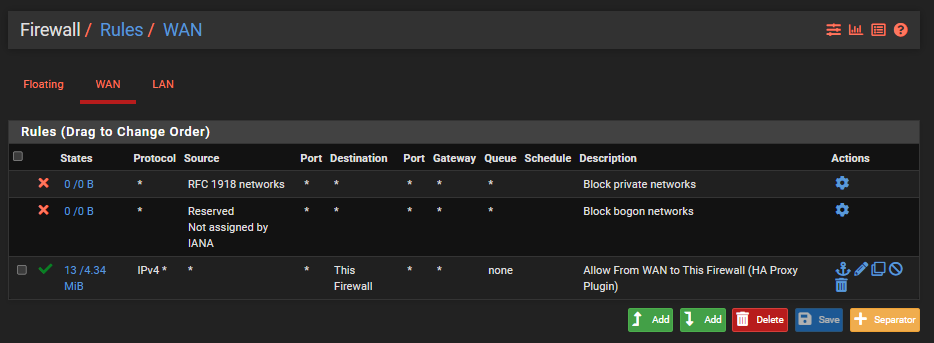
Configure pfSense Firewall Rules
Last step is to ensure you have a firewall rule on your WAN interface so that inbound traffic to the WAN from the internet can talk to the firewall and hence HA Proxy so that HA Proxy can then direct the inbound traffic to the correct destination based on what you have configured. Note that the top two rules in the screenshot below are out of the box pfSense rules to protect your network.
Check Everything is Working
Now simply navigate to your Sub-Domains and check everything is loading correctly as you expect.


Awesome!
Final Considerations
This blog post is an extremely basic setup looking at only a single port. In reality, websites are complex, particularly when hosting a wide variety of services and even more complicated when you start to look at how SSL certificates are managed and where etc. Things start to get significantly more complex from this point.
Also, don’t forget to configure things such as static IP addresses for your virtual machines, ensure Apache or Nginx is starting on boot and your firewalls on your virtual machines are allowing inbound traffic on the ports you require open as most operating systems these days default to only allowing SSH traffic in by default.
There are a lot of jumps that your connection is going through as you work through the steps, so if something isn’t working for you, be extremely methodical to trace this through step by step and confirm if the traffic is hitting the next hop or not. This is often half the battle getting these things set up properly.
Summary
Hopefully by now, the pfSense and HA Proxy architecture diagram from earlier in this blog post is making sense what we’ve configured and how we’ve configured it. All of this should help get you going in the right direction to then further customise this to your specific use case.
As always, keep security in mind at all times. What has been outlined above is an extremely insecure setup on a flat network and running over HTTP. All of the IPs and custom configurations have naturally been changed for the purpose of this example tutorial as it is designed to get you understanding the basics. We’ve other blog posts on the site for how to configure things such as managed switches and pfSense so take a look around for other helpful content.
Hey, if you’re lucky and you test one of the hostnames that have been mentioned on this site, you may even see the websites up and running. The underlying infrastructure behind this is very much a part timer at the moment, only turned on when I’m having a play around.
Michael Cropper
Latest posts by Michael Cropper (see all)
- How to fix “Error establishing a database connection” on WordPress - May 19, 2026
- General Scheme of the Regulation of Artificial Intelligence Bill 2026 - February 4, 2026
- WGET for Windows - April 10, 2025