One very common use case for using pfSense is to host a single website. So here we are going to show you how simple that is to do. As this is the very first step towards understanding how to host multiple websites behind your pfSense firewall, the reality is that the approach is very different to when you get to the point of hosting multiple websites behind your pfSense firewall. We’ll do a follow up blog post on that very shortly.
What is Port Forwarding?
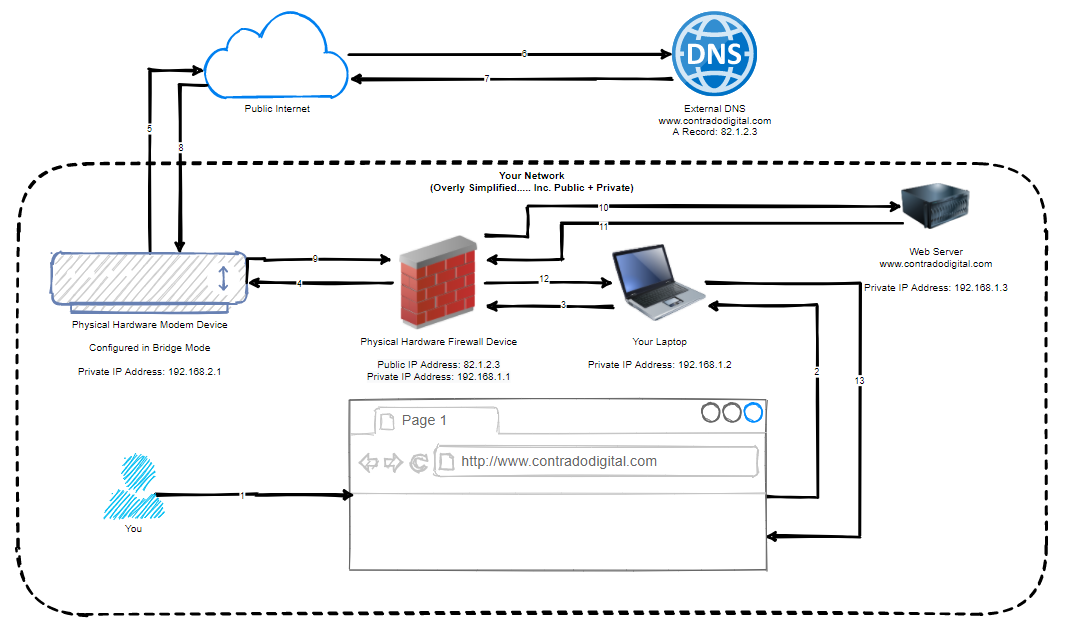
So the first step towards understanding how to host a single website behind your pfSense firewall is to understand the concept of Port Forwarding. Port Forwarding at the simplest level is to translate Port 1 Inbound on your WAN, to Port 2 on your LAN. To visualise what this means in an extremely basic setup, the diagram below looks at how Port Forwarding works.
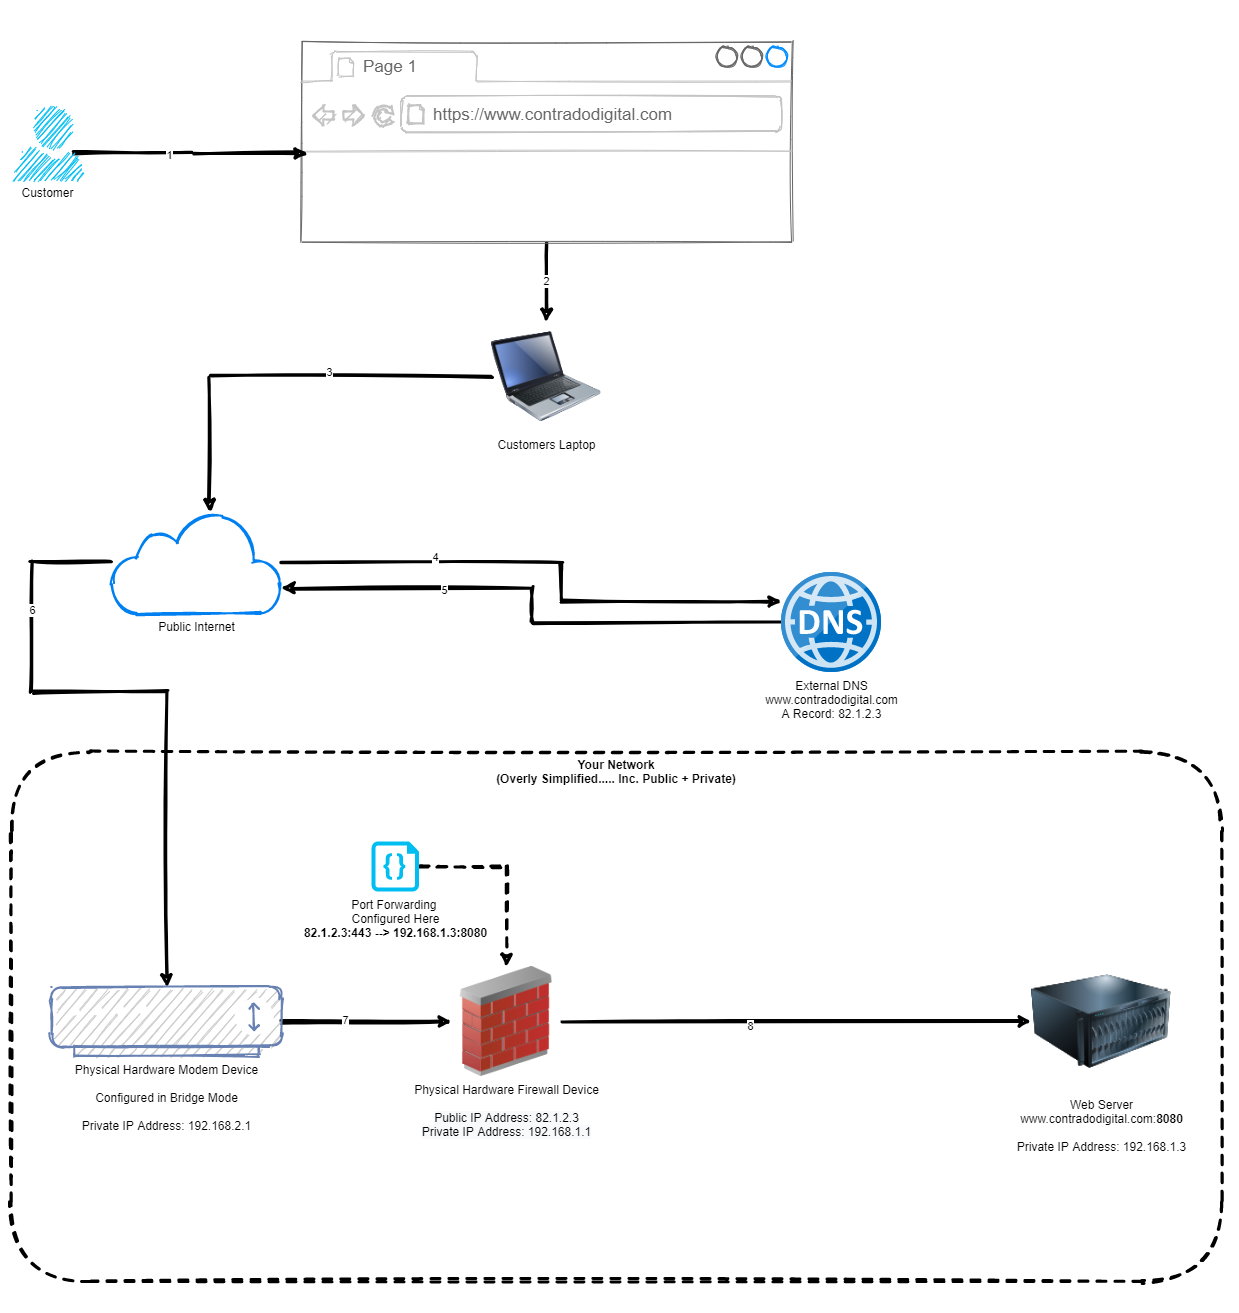
As you can see from the diagram above, this basically translates www.contradodigital.com into the IP address 82.1.2.3, which is being accessed over HTTPS (aka. Port 443). Then the firewall translates this inbound request onto your web server that is sitting behind your pfSense firewall which is hosting your website, which is on the internal IP address of 192.168.1.3 and the web server software (in this case Apache Tomcat) is running on Port 8080 to handle the request.
One point to note is that depending on what server software you are running, this will depend on which port you need to forward the request onto. Generally speaking, you only want to allow inbound traffic for your website on Port 443 as this ensures a secure connection for your customers. There are many nuances and reasons to open more secure ports, but for the purpose of simplicity, let’s say that you only want to access the website as a customer.
Now let’s look at how to configure all this within pfSense.
How to Configure pfSense to Host a Single Website
Now we’ve run through what we are looking to achieve, let’s get into the pfSense config so we can see what we need to do. For the purpose of simplicity, we’re going to assume your web server is up and running and when you are on your internal network or the server itself, you can access 192.168.1.3:8080 in the web browser and that loads the website successfully. Again, there are a lot of nuances between different web servers, configurations and web application setups so this isn’t always as straight forward as this, but hopefully this information allows you to adapt this to your own specific use case. Hence why we’ve used a basic index.html in our example behind the scenes which is acting as a Hello World example.
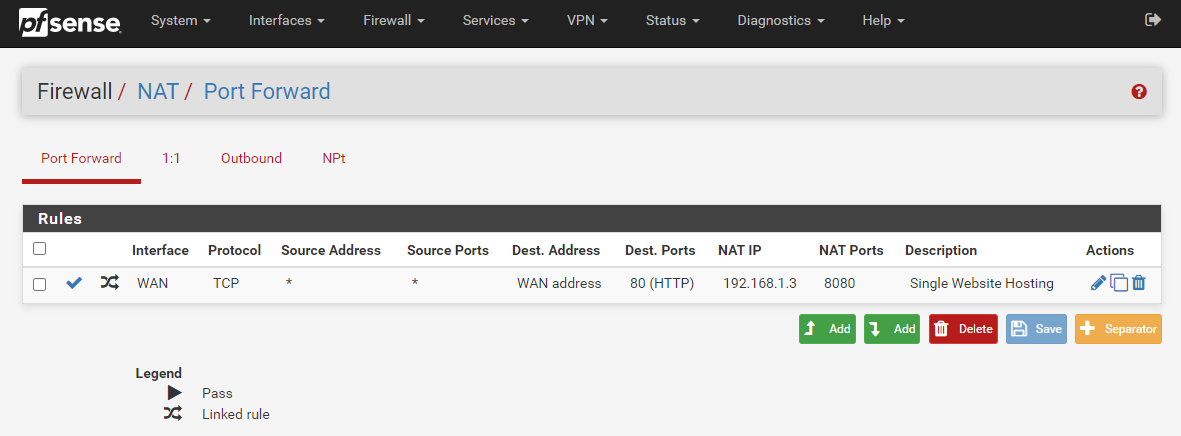
Configure: Firewall > NAT > Port Forward
Navigate to the page, Firewall > NAT > Port Forward, then click ‘Add’.
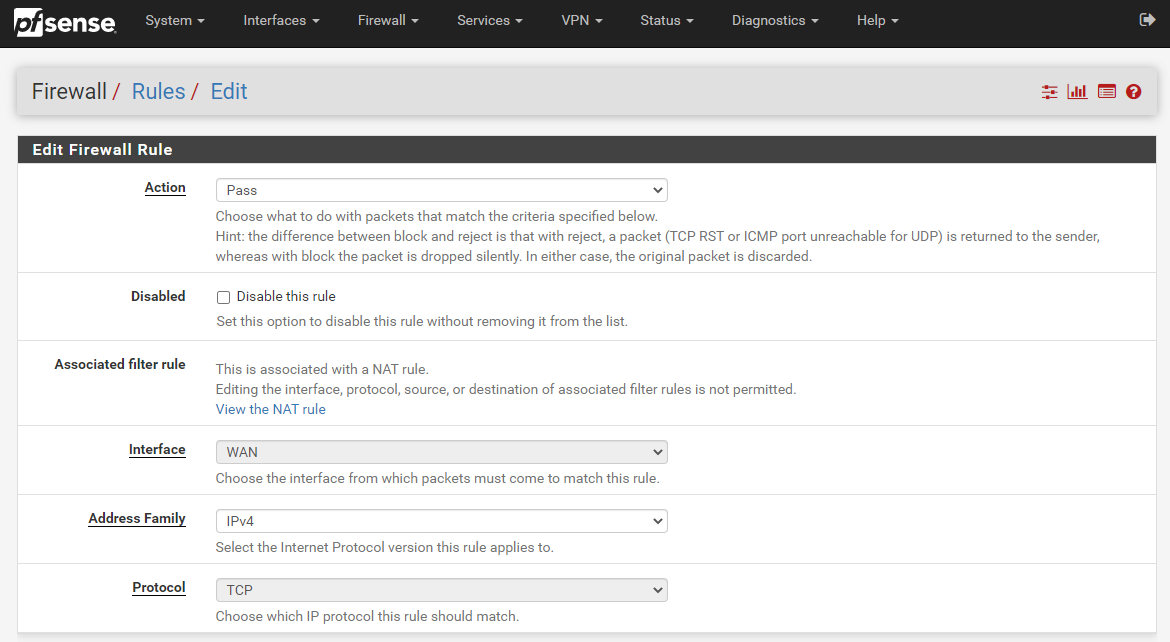
This will take you through to the page where you can configure your port forwarding rules. Enter the following information (tailored to your specific requirements);
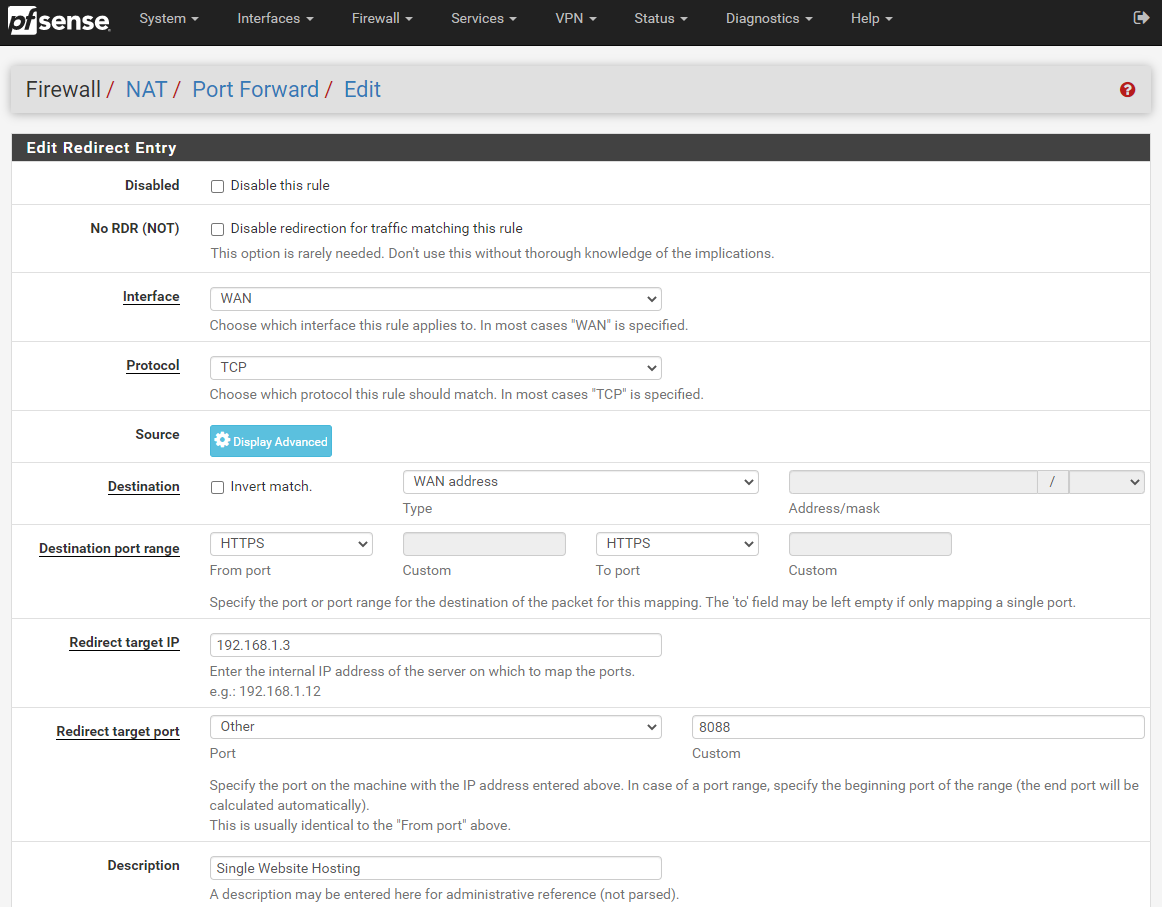
The core settings that you need to look at in the above screenshot are;
- Interface: WAN
- This is telling pfSense that it should listen on the physical port on your firewall that is being used for the WAN traffic. This is the port that is connected to your modem using an Ethernet RJ45 cable.
- Protocol: TCP
- This is fine to keep as it is. For the vast majority of configuration, TCP is the protocol you want to be using.
- Source: Ignore
- For the purpose of hosting a website, you can ignore configuring the source as you want as many potential customers around the world to access you website and buy something. On the other hand, if you are wanting to public a website that only certain IP addresses should be able to access, you are probably going to want to configure this so that you can whitelist their IP addresses in here. For now though, we’re going to keep things simple in this blog post.
- Destination: WAN Address
- This is a bit of an odd one when you first look at it, as you would assume that this should be set to LAN Address. Weirdly though, on the whole with a standard pfSense setup, this needs to be set to WAN Address. You tend to set this to LAN Address when you want to access something on localhost 127.0.0.1, which is actually the pfSense device itself. So technically when you think about this a little more, a WAN address from the pfSense software on the pfSense hardware is actually anything that is not on the pfSense hardware. Makes sense?
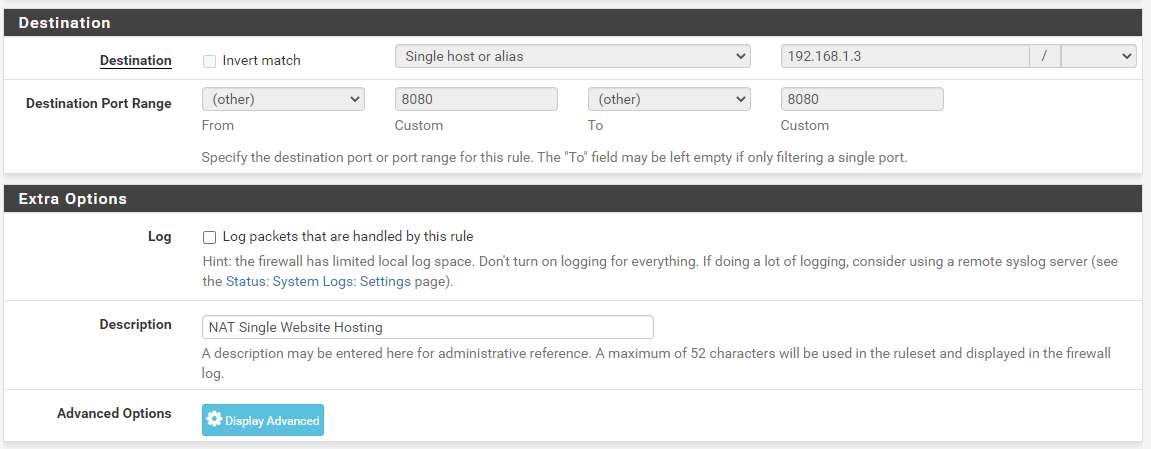
- Destination Port Range: HTTPS
- For the purpose of this blog post, we’re going to assume that you’ve got Let’s Encrypt setup on pfSense, if you haven’t, then here is a guide on how to setup Let’s Encrypt on pfSense. If you just want to test getting a single website hosted behind your pfSense firewall initially, then by all means set this to HTTP then you can set up Let’s Encrypt later and update your configuration accordingly. Generally speaking you probably want to keep things simple so that there is only one port used, rather than a range of ports – although you can configure the From Port and To Port as a range of ports if you want to try something more advanced.
- Redirect Target IP: 192.168.1.3
- Naturally enter the LAN IP address of your web server here.
- Redirect Target Port: Other – 8080
- In this specific example, this is set to 8080 as this is the default port for Apache Tomcat. If you are using Apache or Nginx then the default port will likely be 80 for standard out of the box. Or you may be getting a little smarter by using Nginx as an Application Level Reverse Proxy so you can then further redirect so you can host multiple websites behind the scenes. This can be an approach to take, but in my opinion there can be better and more secure ways of doing this. Security in general as you have probably noticed has been completely emitted from this blog post as this is a whole topic in itself. Suffice to say, in a production setting, you may not want to use the IP ranges that have been listed throughout this blog post.
- Description – Single Website Hosting
- Give this a friendly name so you know what rule this is when you come back to it later down the line. If you are just getting started and playing around then this isn’t much of an issue, but trust me, as your setup grows, your future self is going to thank you for spending that little extra time on making sure your naming conventions and descriptions are helpful.
Done. Save this and you’re good to go. Once you’ve saved this, make sure you click Apply Changes;
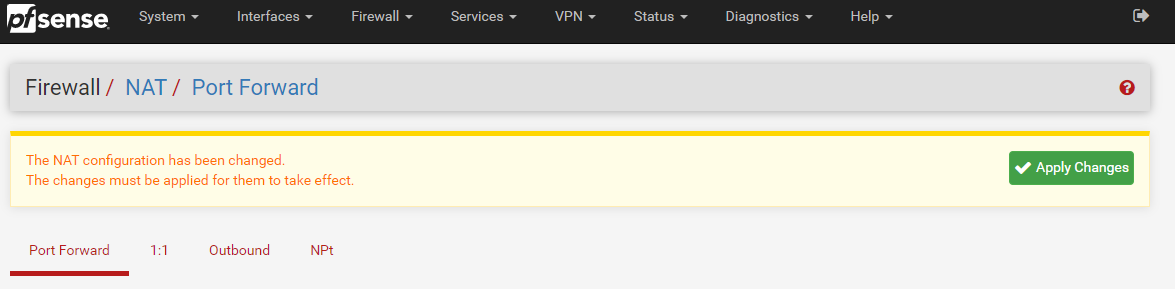
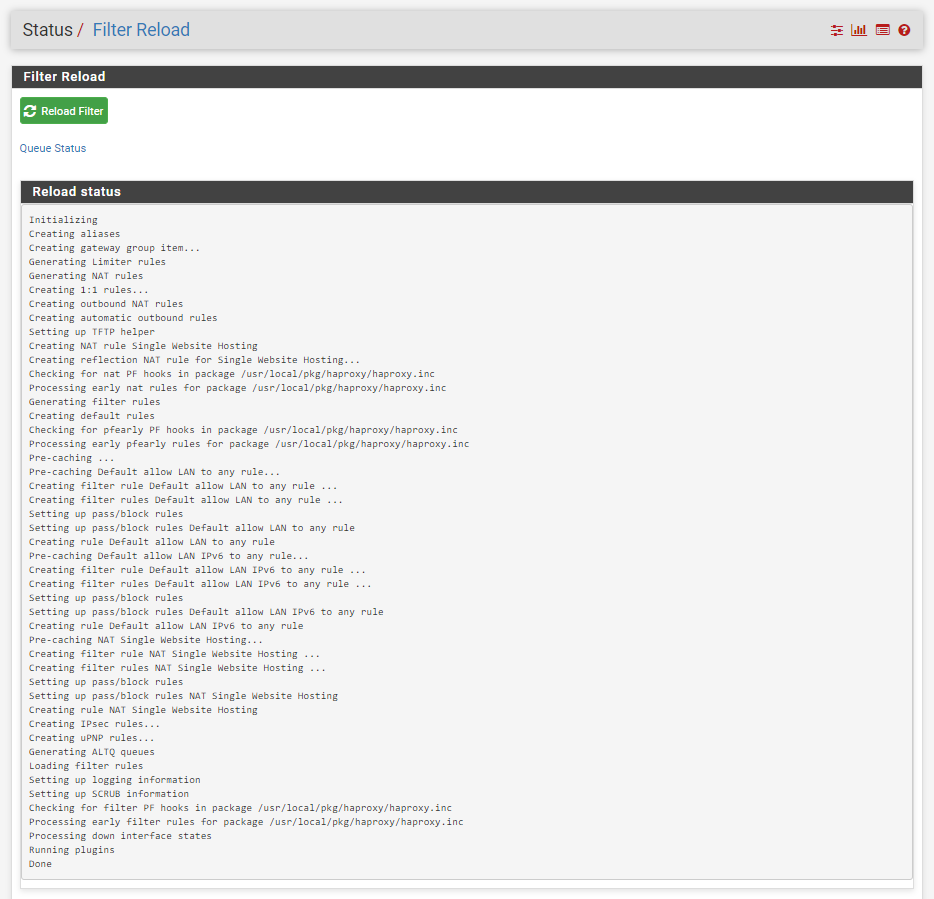
Once you have clicked Apply Changes, you will notice a message appear that asks you if you want to view the status of the firewall rules being reloaded (and hence working…) which can be handy to double check that this has loaded correctly;

When you click on the Monitor link in the above image, this shows you the reload process in real time so you can make sure that it completes successfully.
Once you have done this, you will notice that your Port Forwarding rules have now been applied;
What is important to note here is that this action has actually done something automatically for you in the background. To see what this is, first, click back into that Port Forward rule you just created to edit it. You will notice towards the bottom of the page that this has automatically created a Filter Rule Association for you with the name “Rule NAT Single Website Hosting” which is the same name you used in your previous Description field.

If you click through into that, you’ll notice that it takes you through to the Firewall > Rules > Edit screen for this specific rule. You’ll notice that some of the fields are greyed out so you can’t edit them. This is because the rules are linked so it prevents you from accidentally breaking things. Well, more minimises that risk really.
What you’ll notice is that the Firewall Rule has been automatically populated with the information you entered in the previous screen we were looking at on Firewall > NAT > Port Forward. pfSense has even automatically generated the same name for you to make your life as easy as possible which is a great little feature.
Test Your Website
Now we’ve gone through the process of setting up all of the pfSense configuration, you should now be able to access your website easily via several different mechanisms.
- Local IP: 192.168.1.3
- WAN IP: 82.1.2.3
- DNS Hostname: contradodigital.com (where the external DNS entry has the A Record pointed to 82.1.2.3)
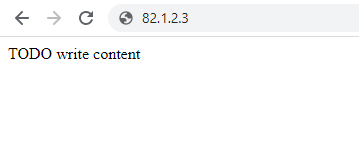
Here we can see that the website is loading successfully over the WAN IP address on Port 80;
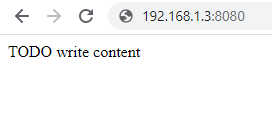
Next we can see the website loading successfully on the Local IP address on Port 8080;
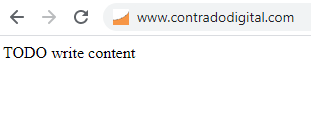
And finally we can see the website loading successfully on the DNS Hostname www.contradodigital.com over Port 80;
Something to note about the above examples. This is when I’m accessing the website from a computer that is outside of the core network, just as any customer would be accessing the website. And the above examples are just that, examples, so this isn’t the actual setup in the background – but it could be quite easily.
So all of this is working from an external user perspective. This is great, but what if you are also within your own network and are wanting to access the website with ease. Well, this is where things get a little more nuanced in relation to how networks work and how traffic routes around them.
Accessing via the Local IP + Port works absolutely fine. But the second you try to access the website via with the WAN IP Address (82.1.2.3) or the DNS Hostname (www.contradodigital.com) this is where things don’t quite work as expected.
Before we jump into that, let’s just visualise the difference between this approach and the original diagram. Here is what we are trying to access now;
You might be thinking now, but why would you need to do that, why wouldn’t you just access the web server using it’s IP address directly, why wouldn’t you be using things such as Split DNS etc. Well, ok, all those things are valid discussion points, but for the purpose of simplicity, I’m going to completely ignore those points within this blog post. We can look at those topics separately another time.
The point is, you ultimately want to be able to access a single DNS Hostname, i.e. www.contradodigital.com, and get to the destination server easily, regardless of the matter if you are what is classified as “On Network” or if you are “Off Network”. Either way, you want a seamless user experience and something that just works.
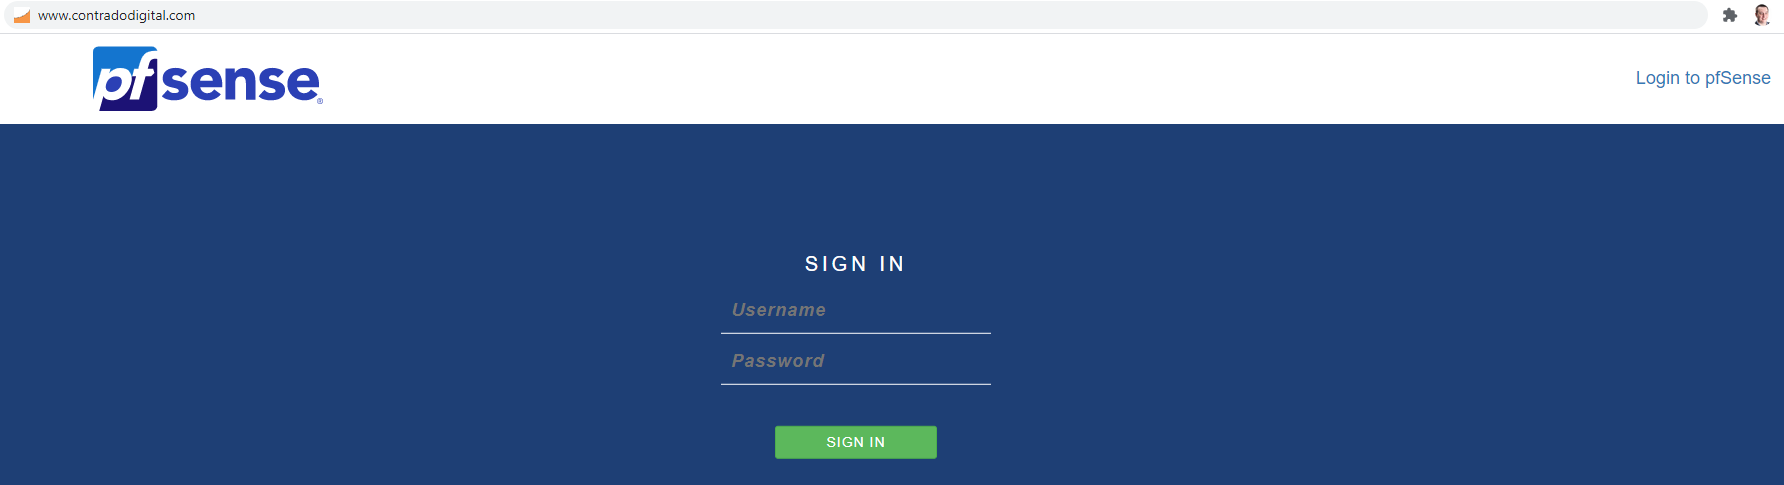
Currently with the above setup we have worked through, if you use the DNS Hostname to access your website when you are On Network, then you will simply be presented with your pfSense Firewall Admin Login Screen. Handy, but not quite what we were expecting as the end result.
This is where we need to do a bit of NAT magic, officially known as NAT Reflection / Local Loopback / Hairpin NAT / NAT Hairpinning – it’s all the same thing. In essence, you turn on a feature within pfSense to allow the firewall to loop back on itself to get to where it needs to be. This is quite a handy feature and is easier to implement than Split DNS which takes a bit more effort to do.
How to Turn on NAT Reflection on pfSense
So let’s look at how we turn on NAT Reflection in the pfSense admin. It’s actually very straight forward to turn on, simply navigate to System > Advanced > Firewall & NAT.
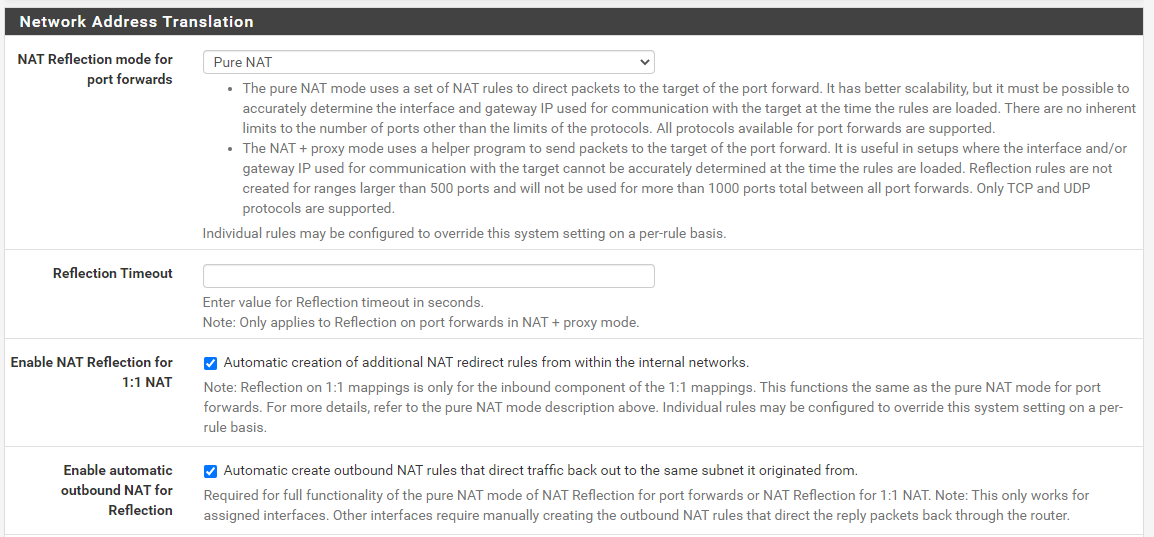
Configure;
- NAT Reflection Mode for Port Forwards: Pure NAT
- Enable NAT Reflection for 1:1 NAT: Checked
- Enable Automatic Outbound NAT for Reflection: Enabled
Save and you’re good to go. You’ll see your website loading correctly now.
So let’s have a look at NAT Reflection in a little more detail so we can understand what is actually happening under the hood and why you need this to get this setup working correctly. In summary, the main thing you need to understand in relation to NAT Reflection is this;
“NAT Reflection allows you to access local servers via your WAN Address, without leaving your LAN”
In a nutshell, if you compare an earlier diagram with the routing from your laptop on your LAN through to the web server also on your LAN, you can see the steps involved there. Compare this to what happens when you have NAT Reflection turned on (granted, the DNS is still external so this full end to end still has to happen periodically);
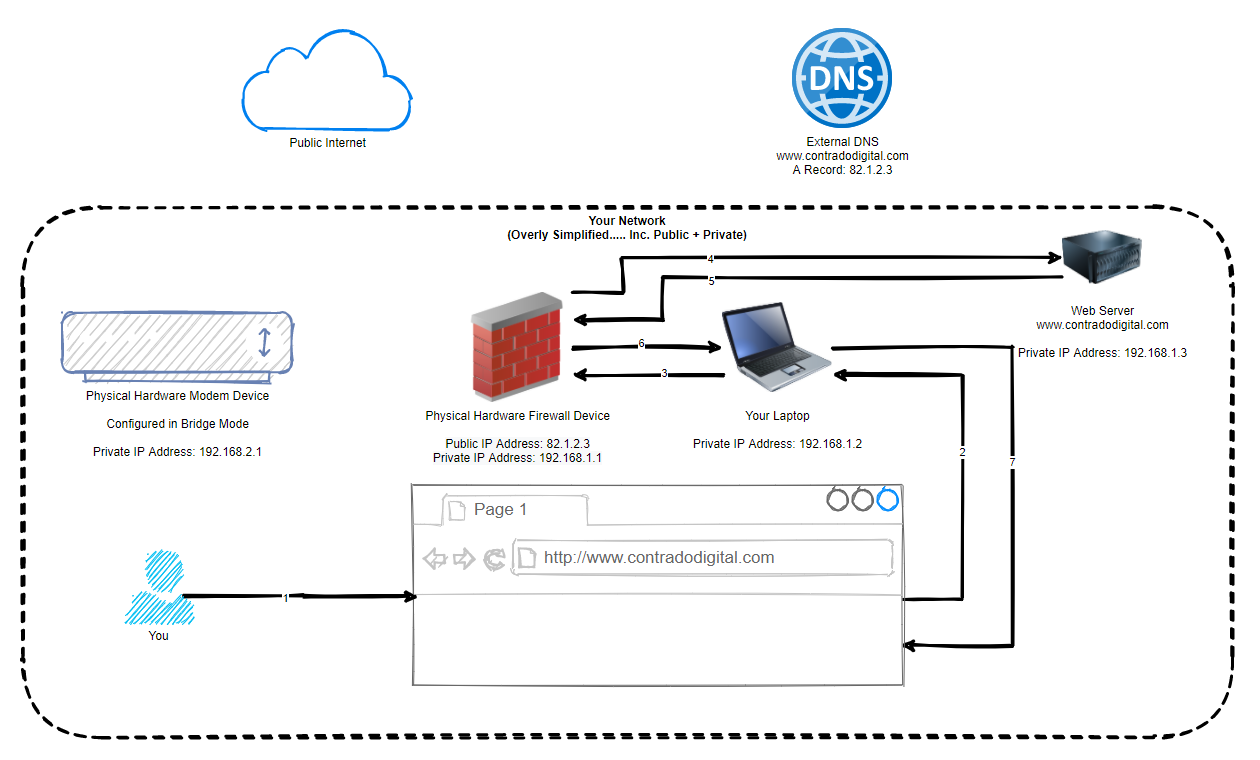
In the above image you can see that the traffic never leaves your local network, even though technically is should be doing. Awesome and this is all thanks to some smart routing within pfSense called NAT Reflection. Some people say this is a bit of a hack, I and most others say that it’s a very handy feature.
Re-Test Your Website
Ok so now we’ve got NAT Reflection turned on and we understand the basics of what it is doing. Reload your website and you should see it working correctly now;
Summary
Hopefully this guide has been a nice introduction on how to host a single website behind a pfSense firewall along with some of the nuances that come with doing so. As mentioned earlier, this only works for very simple setups as this approach here isn’t going to work without changes when you have two websites you are hosting, such as;
- contradodigital.com –>192.168.1.3
- contradodigital.com –>192.168.1.4
Since both websites are running on Port 80 or 443 so you can’t easily do this setup using purely pfSense. This is where other pieces of software come in handy such as HAProxy (a open source package that can be installed onto pfSense) which is one of the correct ways of allowing multiple websites to be hosted (along with multiple WAN IP addresses) or you can add an Nginx reverse proxy as the single destination where you can then control further redirection based on the hostname and port. This all comes down to your requirements.
And as a final note, we haven’t talked anything about security in this blog post really. So make sure you consider this so that you can achieve a secure setup with what you are looking to achieve.
Michael Cropper
Latest posts by Michael Cropper (see all)
- How to fix “Error establishing a database connection” on WordPress - May 19, 2026
- General Scheme of the Regulation of Artificial Intelligence Bill 2026 - February 4, 2026
- WGET for Windows - April 10, 2025
Ótimas informações, parabéns.
Great article.
Thanks
This helped me figure out a frustrating connection problem I was having with a game server – turns out the issue was with NAT reflection not being configured. Thank you so much!!
Glad it helped @victor7gamma
One thing to keep in mind if you are running a game server that is publicly accessible is that you are running this within a Public VLAN / DMZ in some way to keep your internal network secure. We’ve done a few related blog posts on this kind of topic over the last few years so have a peruse on this topic to help to keep things more secure.
I was having this exact issue doing a school project. I could not figure out why I was getting to a pfsense login page with the website address on the LAN clients but it worked fine on the outside client. I cannot thank you enough for this article it saved me so much time and frustration.
Glad you found this info useful Sam!