by Michael Cropper | Sep 22, 2016 | Client Friendly, Developer, WordPress |
Something which has been on our own to-do list for far too long than I’d care to admit, we’ve finally got around to automating our email marketing campaigns. Firstly, if you aren’t on our mailing list yet, why, it’s awesome and we share some amazing content like this you’re reading now. Secondly, get signed up at the bottom of this page by entering in your email address.
Now let’s look at what we’ve recently got set up and how we’ve automated our entire email marketing campaigns so we can spend more time focusing on writing great content, running events and training courses and generally connecting with businesses and people much more efficiently. Why spend time doing something manually if you don’t need to, right?
What’s Wrong with Manually Sending Email Marketing Campaigns?
Ok, so let’s quickly cover this one. Firstly, if you are sending email marketing campaigns through something like Outlook, you are doing it all wrong. Head over to our Really Simple Guide to Email Marketing to understand why.
Now, we’re assuming you’re using an email marketing tool such as MailChimp. And do you know what, sending email marketing campaigns manually is absolutely fine. There is nothing wrong with doing this at all. But. If you are sending email marketing campaigns manually to share content such as Blog Posts or Events that you are running, you are wasting time doing this manually when you could automate the entire process. It’s all about saving time so you can be more productive in what you are doing.
So let’s look at how you can automate your email marketing campaigns with WordPress and MailChimp.
WordPress RSS Feeds
If you didn’t already know, virtually every type of content on your WordPress website has an automatically generated RSS Feed URL that can be accessed when you know where you are looking. Take a look through the WordPress RSS Feeds List for information on where to look.
For example, here is our main Blog’s RSS Feed URL if you want to take a look what this looks like;
https://www.contradodigital.com/blog/feed/
Find the relevant RSS feed that you want to use to send email marketing campaigns to your audience as you’ll need this shortly.
MailChimp Groups
Within MailChimp you can segment your Lists into different Groups based on what people have subscribed to. There are many way of organising your MailChimp subscribers, so we’re not going to cover that right now. For the purpose of this blog post, we’re going to use Groups to segment a single List based on what people are interested in which helps to keep everything easy to manage to avoid duplication.
To create a Group in MailChimp you navigate to your List, then click on Manage Subscribers then Groups which will allow you to enter in specific information about how you want to group people together.
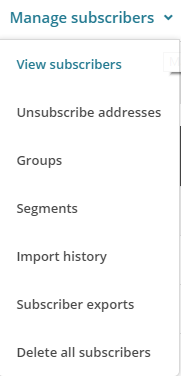
The reason you want to create a new Group is so that you can allow your audience to subscribe to multiple different groups from the same Newsletter. This allows you to send emails to specific groups of people within your mailing list. Simply configure the relevant settings for yourself as this information will display when a user is updating their subscription preferences;
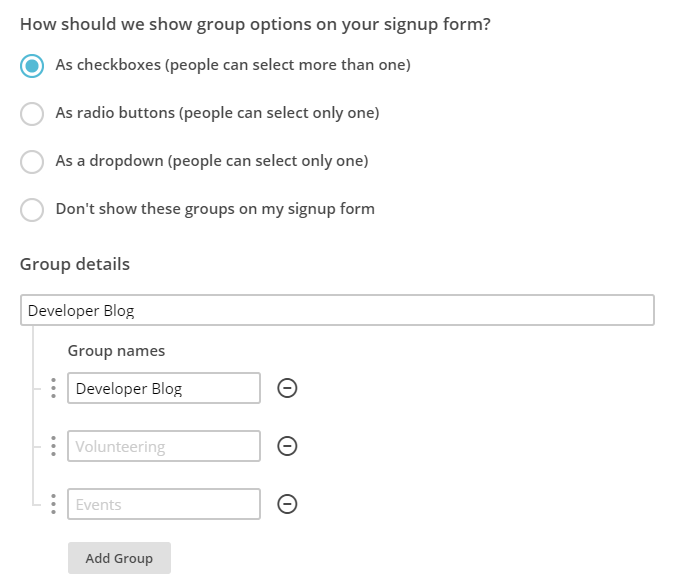
Ok, so now you’ve created a group, let’s start to join everything together. In the first instance you can even migrate people into specific groups should you wish.
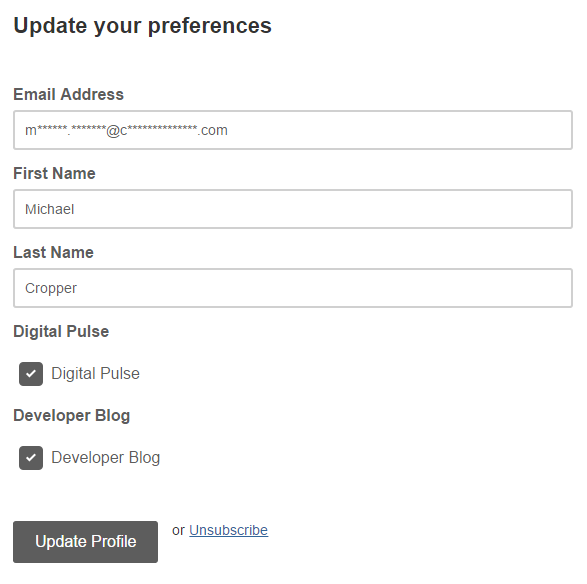
Here is how the data you enter in this section will display when the user is managing their profile on your newsletter.
MailChimp RSS Campaigns
Create a Campaign
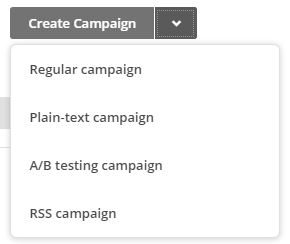
Firstly, create a new campaign in MailChimp but be sure to select an RSS Campaign as the campaign type as this comes with a few handy settings that have been automatically built in for you.
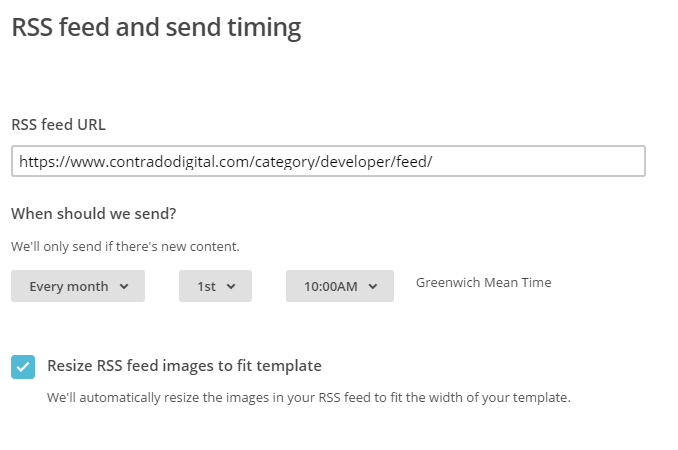
Confirm your RSS Feed Settings
Enter in all of the settings related to when you want to be sending your campaigns and where the data is coming from. In this example, we’re looking to send out content from the Developer Blog so we enter in this information here.
Select Your Recipients
Next you need to select who you are sending the emails to. Here you are going to want to send emails to a Group of users you have just created earlier. This could be for a specific set of content on your website or even a specific interest if your website has multiple interests on there.
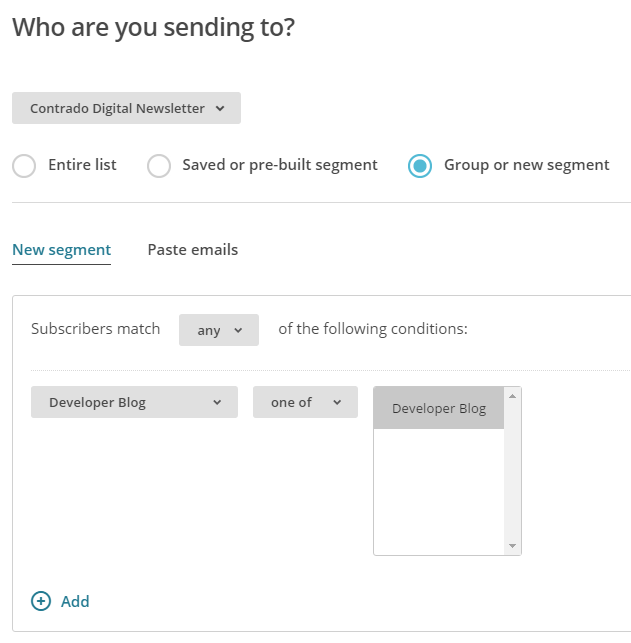
There are a lot of options here so we’re not going to cover everything. Use the options that are best suited for your individual needs.
Personalise your Campaign Information as Usual
If you are reading this blog post, you’ll already be used to creating your campaigns as normal and personalising the relevant information so we’ll skip over this bit here. Just make sure you do this when you are creating the campaign.
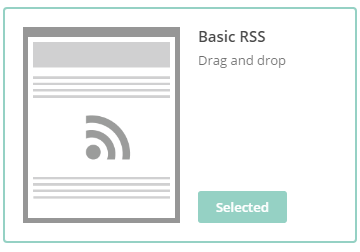
Choose an RSS Template
Simplicity is key here which is why you should choose one of the default RSS templates which you can select. This will automatically include lots of handy information for you which will speed up your development for sending RSS campaigns.
Design your Email Template as Usual
Again, we’re not going to cover this part here. All of the pre-populated fields have been created for you when using an RSS template, so you’re all good to go. Simply personalise the look and feel of your campaign as you see fit.
Preview & Test
The next step is to preview and test your campaign. This is so important to do as you can really annoy people when you mess up a campaign and send it out with missing information and or incorrect information.
Start RSS Campaign
Then you’re good to go, start your RSS campaign running and you will never have to worry about manually sending email marketing campaigns again.

This really is just the starting point about what you can do when you start to automate your email marketing campaigns. Take the time to think through what you are doing, why you are doing is and what you are looking to get out of it. Automation can save you so much time when you think strategically about what you are doing.

by Michael Cropper | Sep 19, 2016 | Client Friendly, News |
We speak with many businesses who simply do not have the budgets to pay for quality websites which is a shame as this ultimately ends up with their websites being built extremely badly, costing a lot of money in the long run and the businesses suffer as a result. Generally speaking, businesses come to us after they have gone through this pain and need the right solutions putting in place, when they have a realistic budget to work with. Digital doesn’t come cheap, until now.
Introducing CreoPressto, the only website builder that gives you full control of your website without you ever needing to get into the technical aspects at all. Whether you are looking for a basic brochure website or a fully-fledged ecommerce website, CreoPressto is capable of growing with you. It’s so easy to use, literally anyone in the office could build a website with CreoPressto.
We challenge you to take a look at how CreoPressto can revolutionise the way you work with your website by empowering your organisation and taking control of your own destiny. The self-build technology allows you to make your website look and feel however you want with no restrictions or limitations in place. If you can imagine it, the CreoPressto platform can work for you.
Never have to worry about the technical aspects in the background, we’ve brought together various industry leading website technologies to create an awesome platform that is capable of powering your entire website with ease and growing with you over time so you don’t need to keep buying a brand new website every few years.
With hundreds of features and functionality to keep you busy, the pain free quick and easy drag and drop visual website builder allows anyone to build a website with ease, with no prior knowledge required. If you can use Microsoft Word, you can build a website with CreoPressto that is safe, secure, flexible and capable of growing with you as an organisation. Here’s just a small handful of the features available with CreoPressto.
Bar Counter Modules

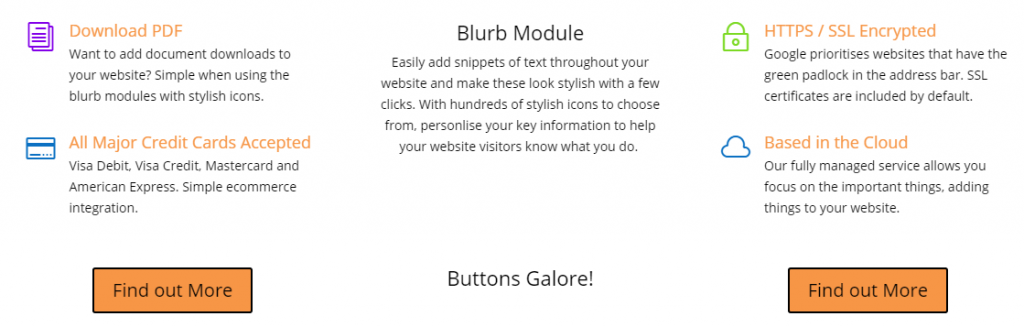
Blurb Modules
Countdown Timer Modules

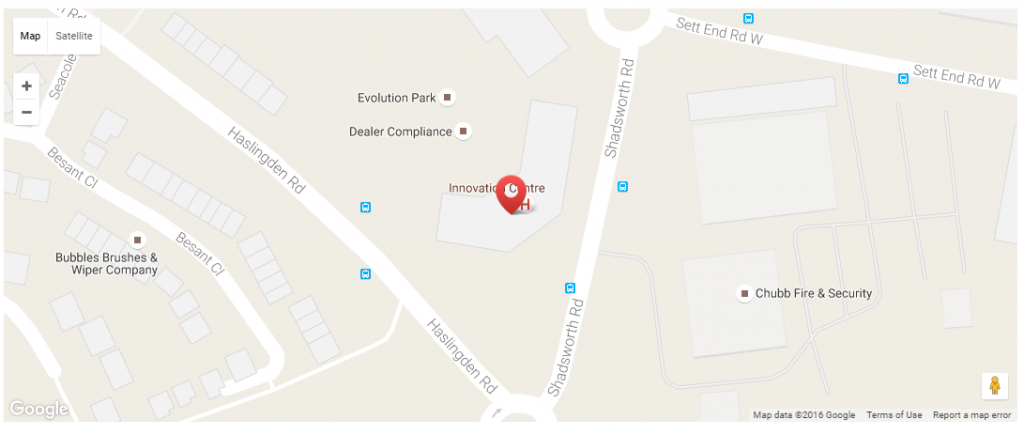
Google Maps Modules
Social Media Modules

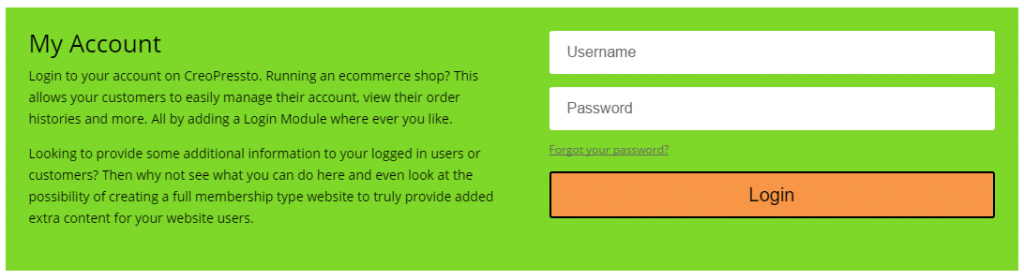
User Account Management Modules
And many many many more options to choose from!
Pricing
CreoPressto is entirely self-service, allowing you to create whatever you can imagine. Due to this, pricing starts as little as £49.99 + VAT / month which gives you enterprise level functionality on your website without the traditional costs associated with this. Pretty awesome, right? To give you an idea of what is included with this;
- Web Hosting
- SSL Certificate
- WordPress Installation
- Website Blog
- Awesome Page Builder
- Ecommerce
- Over 30,000 Free Plugins
- Forum Support
- Google Analytics
- Search Engine Optimisation
- Automatic Security Updates
- Automatic Backups
- Automatic Server Updates
- cPanel Server Access
- FTP Access
- 10 GB Storage
- 5 GB Monthly Bandwidth
- Forum Support
With packages designed to grow with you over time as your needs expand. The beauty of CreoPressto is that if you need additional support with building your website, this is on hand from the team at Contrado Digital or anyone else you wish to work with.

by Michael Cropper | Sep 19, 2016 | Client Friendly, News |
Such a common rhetoric from virtually every business who is looking to recruit digital talent within their organisation, “We can’t find people with the right skills”. Firstly, to those organisation, make sure your jobs are posted on Tendo Jobs, it’s free to do so and we have lots of active job hunters regularly searching for skills in every sector ranging from retail to highly technical digital roles to C-level roles. Secondly, instead of complaining about not being able to find the right staff, let’s look at the practical steps to growing your own talent.
Quite frankly, the lack of skills talk hasn’t changed in the digital world over the last several years and it’s getting a bit boring to keep listening to if I’m honest. So we thought we could do something about that. Introducing Contrado Academy, the practical hands on courses designed to allow your staff to learn how to ‘do digital’ the right way. With a variety of courses running in locations throughout the UK, we’re able to deliver high quality training courses that teach the practical skills and real-world experience that your employees need to know. Whether you are looking to know the basics or progress through the variety of courses and become a fully-fledged digital expert, we have courses available from beginners to advanced in a variety of areas.
Contrado Academy is not a traditional academic setup, the courses have been created by professionals working in digital day-in-day-out which covers the practical skills and information that is in demand from employers. Traditional education establishments are great, seriously, go to Colleges and Universities when you are looking for the long term investment. The unfortunately reality for people working in digital though is that employers need skills now, they cannot afford to wait for 1-3 years for a new course to be signed off by the various committees involved then a further 3-4 years for students to graduate. The world has moved on by then. Digital apprenticeships are certainly doing something to address these issues, yet not everyone wants to do an apprenticeship, they just want to complete a short course that gives them the skills and information required to do they job they are doing, do it better or develop their skills for the future.
Take a look at the variety of courses on offer and stay tuned for dates when courses are announced very shortly.
https://academy.contradodigital.com/courses/
Current courses available include;
- Web Development for Beginners
- WordPress for Beginners
- Intermediate WordPress
- Advanced WordPress
- HTML for Beginners
- CSS for Beginners
- JavaScript for Beginners
- Linux Web Server Management for Beginners
- PHP for Beginners
- Java for Beginners
- Java Web Applications for Beginners
- Social Media for Beginners
- Introduction to Digital Marketing
- Google Analytics for Beginners
- Google AdWords for Beginners
- Email Marketing for Beginners
- Ecommerce for Beginners
- Apple iOS Development for Beginners
- Android Development for Beginners
- Search Engine Optimisation SEO for Beginners
- Cyber Security for Beginners
Whether you are looking to train your current staff in the vast array of digital technologies or you are reading this as someone who is looking to enter the world of digital, there are a variety of courses available to suit your needs.
by Michael Cropper | Sep 14, 2016 | Client Friendly, Security |
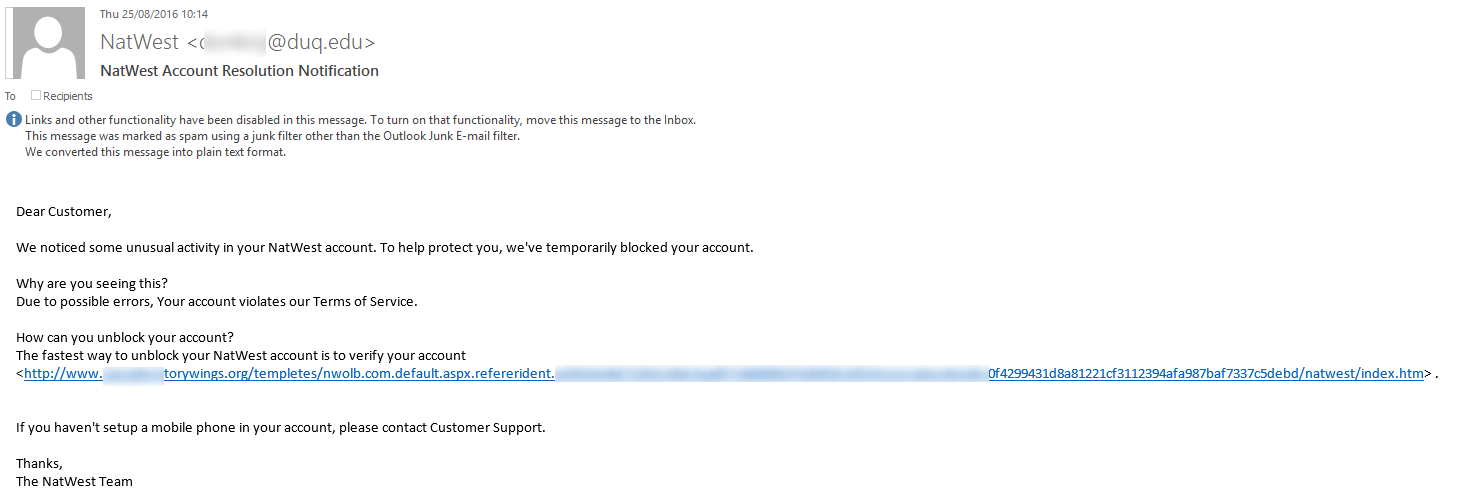
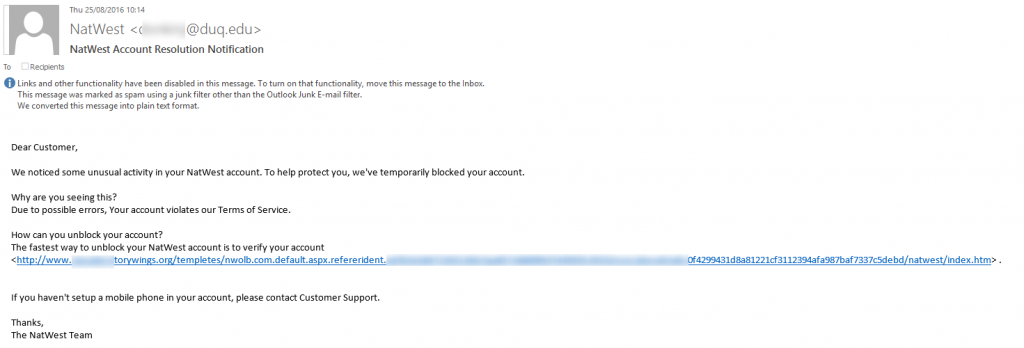
Probably one of the worst examples we’ve seen for a phishing email recently. Be aware though that these things do still catch people out. When you receive emails like this, always check the email address is from the correct website. Clearly in this case it isn’t. While this information cannot be trusted as this can be easily spoofed, many phishing emails like this one appearing to be from NatWest haven’t even bothered to add in the correct from email address.
Likewise, you will notice that the link they are asking you to click doesn’t go through to a NatWest website. Again, this information can be easily masked so you are best never to click on links in emails which appear to be suspicious. Always make sure that you open your web browser, go to the website directly without clicking on any links in emails to view notifications on your account. If the email was genuine, you will also have a notification within your account with the relevant information on.
Be safe.

by Michael Cropper | Sep 13, 2016 | Client Friendly, Events |
Great to see everyone at the event. Summary notes for reference.
Hope to see you at the next Digital Forum on 5th October 2016. Book now to avoid disappointment.

by Michael Cropper | Sep 4, 2016 | Thoughts |
This blog post is a personal bugbear of mine when it comes to people working in the digital industry and with technology. The scenario generally plays out as follows;
Client: “We’ve seen this really amazing flashy whoosh thing on {insert big brand website here} and we want you to do this on our website“
Or
Client: “I’ve had this amazing idea, hear me out, {insert the craziest wackiest idea you can imagine that is trying to do something non-website related on a website}
Digital Person / Agency: “Sure, we can look to do that. What a great idea.”…. They then scramble off to talk about how they go about doing this. Internal discussions, questions on Stack Overflow or Facebook WordPress groups or other digital groups before rushing into implementing this idea as quickly as possible to please the client.
This is such a destructive attitude to take and one which not only shows your lack of understanding about the digital world but also the lack of confidence the client has in you to recommend the right solutions. In my experience, whenever a client asks us these similar questions on a regular basis we put a halt to their thought process straight away and get to the bottom of what they are actually trying to achieve.
What do they actually want? When a client comes to you with a solution to their idea, they often haven’t shared with you their initial idea in the first place. It is your job as a digital expert to get to the bottom of what they actually want before blindly jumping into delivering a preconceived solution. I can guarantee that if you just blindly implement what the client wants, you will end up in a very sticky situation further down the line which will result in the client blaming you for implementing their ideas which were ultimately flawed. It is your responsibility as a digital expert to help the client turn their ideas into realities by using the best possible solution for their needs.
To name just a few real world situations recently to highlight this point and why you should not just blindly implement what the client wants. Below are several examples when digital people have been asking us advice on how to implement various requirements from their clients and haven’t had the guts to tell the client no;
- Requirement: Client wants to use WordPress as an intranet (which is certainly possible), and they want to have a directory structure like they see on their computer so it’s easy to find files to use.
- Why this is a bad idea: WordPress doesn’t work like this. Dropbox and other cloud based document sharing facilities do. Don’t go re-inventing the wheel. Tell the client why their solution isn’t the best setup for their requirements and keep telling them until they understand and agree. Blindly trying to implement this kind of file directory style setup in WordPress is just going to cause problems in the long run.
- Requirement: Client wants to use this fancy font from Photoshop on their website. So we implemented this as an image for all headers. Now they’ve said they want to translate their website. How do we go about this?
- Why this is a bad idea: Sorry, things now have to be rebuilt correctly. Images should have never been used for headings as they don’t work very well on mobile devices, aren’t SEO friendly and don’t work from a translations point of view. Not to mention the inherent challenges around which browsers support which fonts on different devices etc. Keep things simple.
- Requirement: Client wants to use their AOL account to send emails from their WordPress website but the emails keep going into people’s spam folders.
- Why this is a bad idea: Emails aren’t meant to be used like this, particularly AOL accounts. Seriously, who still has an AOL account? As a business owner you need to be using suitable email technologies and when sending emails from web applications, there are specific technical aspects that need configuring to get this working correctly.
You get the drift. Blindly implementing requests from clients is a fool’s game. If you are working in the digital industry, please, stop doing this. Instead, take a step back whenever a request comes through and start to think strategically about what they are ultimately trying to achieve and what the best solutions truly are.
Every single website is restrained in some way based on the web hosting setup, the technologies in use, the frameworks that are used and lots of other moving parts. You cannot simply implement something that you’ve seen on one website into another website without fully understanding the technical implications of what this means. Don’t go re-inventing the wheel and quite frankly if the idea the client has come up with is hair brained, tell them, it will save you endless problems in the future. Start to recommend the best solutions based on their requirements instead of simply blindly implementing everything they want.
Remember, the client often has no idea about the finer details of the technical and digital world. All they often see is the visual side of things and don’t understand what goes into creating functional, scalable and reliable systems that are capable of growing with them. We get a lot of work coming through to us when people have gone down this route in the past, with clients working with digital people and agencies who have blindly implemented what they wanted, only to then by told by us that everything needs rebuilding. Hey, I can’t complain, this generates a lot of work for us, but let’s be honest, from a client’s perspective they are paying, two, three or four times for things when digital people keep implementing everything they want blindly and wondering why things aren’t working for them.
Managing client projects is actually relatively simple. Assume they know nothing and question everything that they say. Start to really get to the bottom of what they are looking for, then use this information with your knowledge and expertise to recommend suitable solutions. Please, stop blindly implementing what clients want. In the meantime, we’ll happily keep picking up failed projects and getting thing working correctly. It’s what we’re best at.
by Michael Cropper | Sep 1, 2016 | Client Friendly, News, Security, WordPress |
Over the last few months there have been some really exciting changes happening in the website security world related to encryption. Something which now allows businesses of all shapes and sizes to take encryption seriously without the larger investment previously needed. Before we get into the nitty gritty, let’s take a look at what exactly SSL and HTTPS actually is and why it is important.
Google is to Flag Non-Secure Websites
Already SSL certificates are a factor in Google’s search algorithm, meaning that businesses using HTTPS are more prominent in Google’s search results when customers are searching. If this wasn’t enough for you to implement an SSL certificate, then eventually Google will be treating all websites like this that are not using HTTPS;
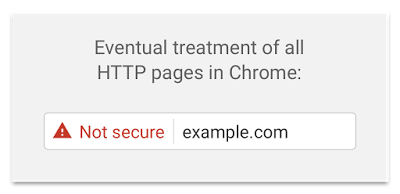
As a customer, what would you think if this warning came up when you were browsing your favourite websites? You would soon leave the website and begin to distrust the brand, right? Then the same is going through your customer’s minds too. Starting January 2016 Google will begin to flag insecure websites as not secure as can be seen below;
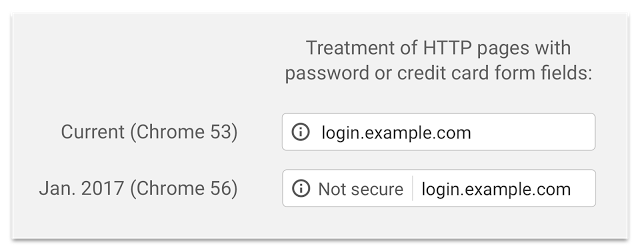
Now is the time to implement SSL on your websites to avoid the mad rush when Google turns this feature on. Read all about the finer details over on Google’s security blog.
Importance of SSL and HTTPS
Getting a little bit technical, SSL stands for Secure Socket Layer which turns the standard HTTP protocol used to access all websites on the internet into a secure connection. What this means in practice is that the connection between yourself typing www.contradodigital.com into the web browser and the web server is encrypted, meaning that no-one can listen in to what data is being sent/retrieved as you go about your day.
Take WordPress as a prime example, whenever you login to your WordPress website, if you are still using HTTP and not HTTPS then anyone listening in on the network can read your username and password in plain text, then use this data to hack into your website and do damage. So if you’re in a café or any other public place to access your website over HTTP, then it is relatively straight forward for people who know what they are doing to see your details. The same is true when you enter a username or password onto any other website on the internet, if they are using HTTP instead of HTTPS, then your password becomes visible to the world if someone is listening in on that network. SSL resolves these issues.
Anyone who is using any kind of login system on their website, whether this is simply for logging in administrators into your content management system, or running an ecommerce website, you should be using SSL. Previously an SSL certificate would have cost anywhere between £150 and £550 just for the certificate itself, plus the added cost of migrating your website from HTTP to HTTPS which can be a considerable cost in itself.
From a user perspective, implementing SSL simply means taking your website from HTTP;

To HTTPS;

End to end encryption to secure your website.
Free SSL Certificates
Over recent months we’ve been experimenting with Let’s Encrypt, the new free certificate authority, the guys who generate the SSL certificates. Let’s Encrypt is backed by the likes of Facebook, Google, Cisco, Mozilla, Akamai, Automattic, Shopify, Sucuri, Hewlett Packard and many more. When Let’s Encrypt was first launched in April 2016, it was still very much in its early stages and quite buggy on a lot of platforms. Thankfully since then, it has become a lot easier to work with and hence is now something we’re recommending all businesses should take a look at for their own websites.

Practicalities
While Let’s Encrypt does bring free SSL certificates to everyone, it’s not quite as straight forward as just clicking a button and you’re good to go. As with all website and web server technologies, there are many moving parts with endless different setups and configurations. While the SSL certificates their self are free, implementing the initial Let’s Encrypt setup on your web server can be time consuming, or even in some cases, not even possible at the moment. Likewise, once you have claimed your free SSL certificate from Let’s Encrypt, you will likely need to implement various bits of website work to ensure SSL works correctly throughout the website.
Thankfully, we’ve got this town to a tee. Anyone hosting their website with us and running WordPress, we can implement this in no time at all, so get in touch so we can implement your free SSL certificate with minimal investments associated with the implementation of this. For anyone else, drop us an email anyway and we can review your current setup to see if it is capable of implementing the free SSL certificates from Let’s Encrypt.
For anyone brave enough to have a go their self, here are a few handy resources on some of the technical aspects in the background;
But the likelihood is that you’re not going to be able to implement this yourself, nor should you try if you aren’t competent as you can do some serious damage if you do things wrong. If your current web hosting partner or website team isn’t capable of implementing this or the technology isn’t up to scratch, then it’s probably time to review your current web hosting options;
Update – May 2017
As mentioned when initially publishing this blog post, companies need to act now to avoid losing potential customers.
Google Will Warn Potential Customers Not To Contact You in October….Act Now…
Google has been encouraging website owners to move towards a secure and encrypted internet for over 12 months now and they believe they have given website owners enough time to implement encryption technologies on their website to use SSL, i.e. when people view your website they view https://www.contradodigital.com rather than http://www.contradodigital.com. This means that the connection is encrypted and your customers data is secure when they are submitting things like credit card information or personal information on contact forms.
Unfortunately many websites are still not taking cyber security seriously which is why Google is taking the next step in October. In essence what this change will mean is that if you have not implemented an SSL certificate on your website by this time, anyone wanting to contact you through the contact form on your website using Google Chrome (the most popular web browser in use…) will be told that your website is ‘Not Secure’ which will put potential customers off from entering their details and contacting you. You need to act now to prevent your website being listed as Not Secure to your customers.
Here’s how your Contact Us page will look when people are about to fill out their details. Ask yourself, would you fill in a contact form on a website if you saw this warning message?

Here is an animation of what your contact form would do when people start entering in information;

What you need to do…
If you haven’t implemented an SSL certificate on your website to date, then you need to do so as soon as possible. This can be a relatively straight forward thing to do, or something a little more complex which depends on the technology you’re using in the background. Don’t worry about that though as we have implemented a lot of these for businesses over the last few years across a range of technologies.
Even better, SSL certificates are now FREE which is great as they would previously have set you back several hundred pounds for the certificate alone. So simply drop me an email directly and we can schedule some time in to implement this for you, michael.cropper@contradodigital.com
by Michael Cropper | Aug 24, 2016 | Developer |
In the latest release of WHM comes a seriously handy tool which allows domains within one cPanel account to be migrated to their own cPanel account. In an ideal and perfect world, every domain would be contained under its own cPanel account as this allows much more granular reporting when using tools such as New Relic or command line resource usage commands such as atop. In reality though when dealing with many different web servers which have a lot of history and often non-optimal configurations, often you find that multiple domain names are contained within a single cPanel account. This is bad for a whole host of security reasons, primarily because if one website gets hacked into, it’s possible to access all of the websites under the single cPanel account which is an inherent risk. And if those websites are WordPress, if they get hacked into after then have been built badly or aren’t maintained securely then a quick install of a certain plugin allows the hacker to gain access to absolutely every file under this cPanel account. So it’s really important to structure your web servers for optimal security.
So now that’s clear, here’s how to use the Convert Addon Domain to Account tool within WHM.
Convert Addon Domain to Account within WHM
Open WHM and navigate to Home > Transfers > Convert Addon Domain to Account. This will list all Addon Domains listed within all cPanel accounts on the server. Select the one you wish to migrate to its own account and press “Convert”;

Here you will then be presented with a list of options. Make sure you check through everything and make a note of what the new settings are.
Create an account name for the new cPanel account;
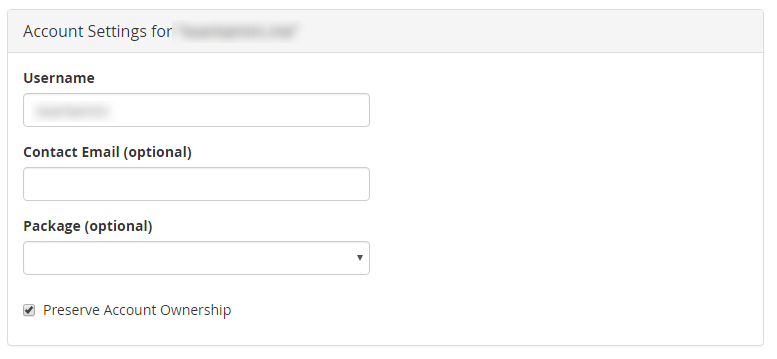
Check through your settings which have been automatically selected;
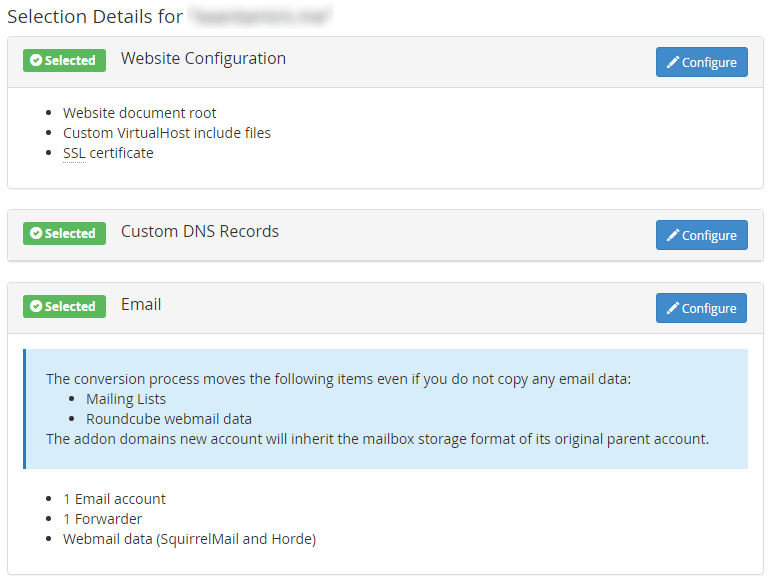
What likely hasn’t been picked up by default is your database table(s) so make sure you click on the Configure option and select which databases belong to the website being transferred to its new account.
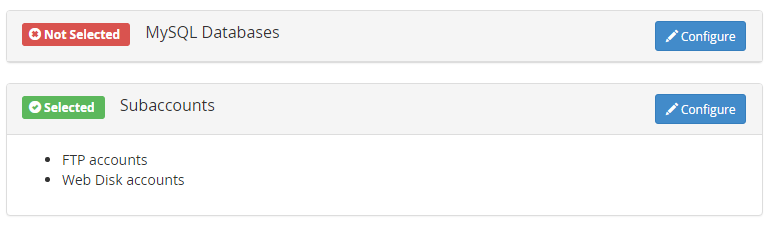
Then let it do its thing by clicking on the Start Conversion button. Depending on the size of your website will depend on how quickly, or slowly, this transfer happens. Once everything is completed you’ll see a completion message along the lines of;
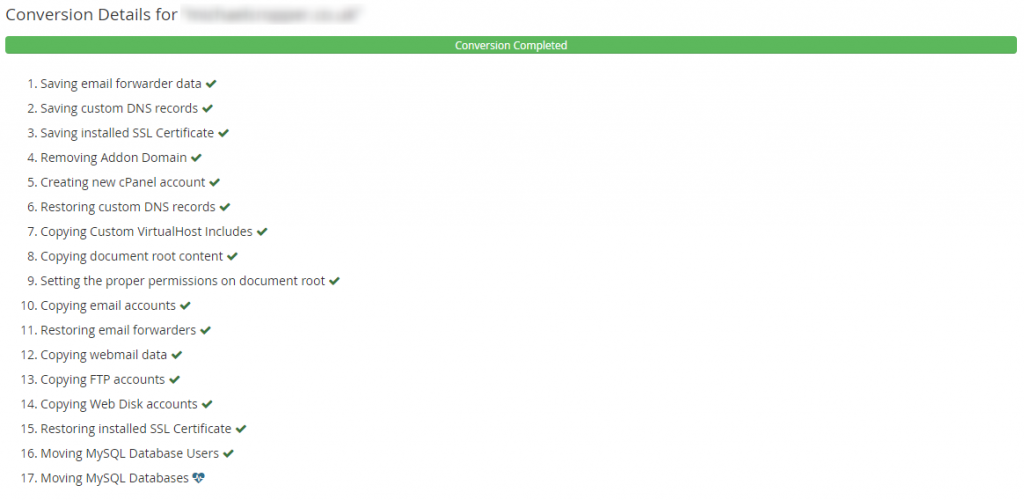
Transfer Complete
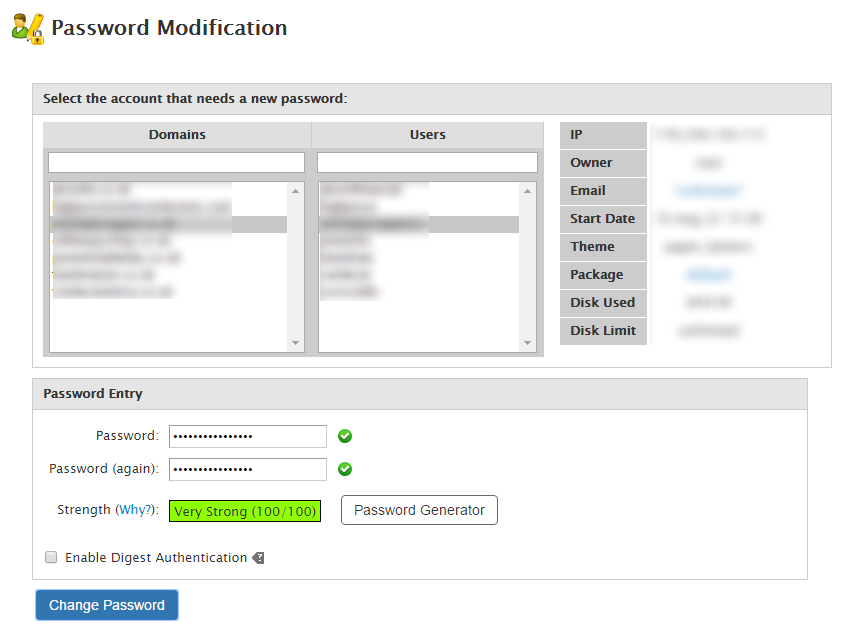
It really is as simple as that to use. Once the migration is complete you’ll need to modify the password for the account via WHM;
Performance Challenges
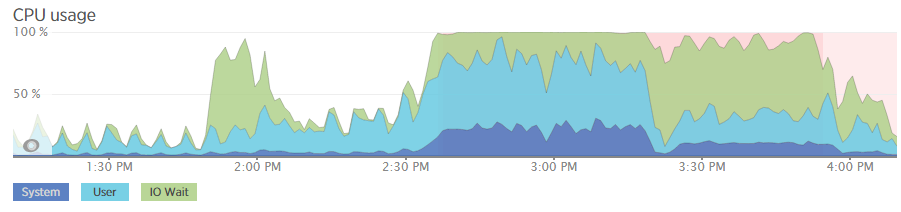
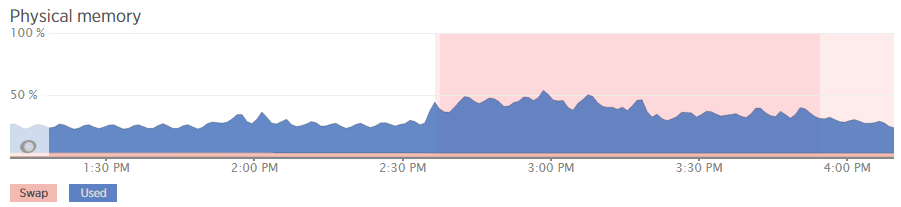
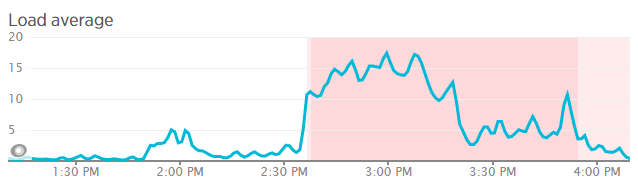
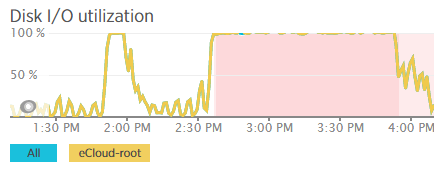
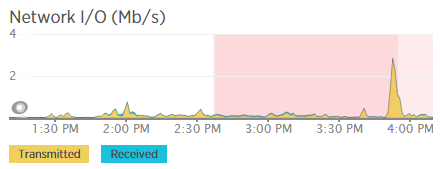
While this is a great tool, something to mention is around performance. Performance wise for one project we were working on, the resources completely maxed out on one web server and took a total of 90 minutes to migrate a small website of around 10GB in size for files and databases. This is something to bear in mind and it’s probably best that you run these kinds of migrations at low points during the day to prevent issues impacting people using the websites in question. Below are a select of screenshots which clearly shows the performance difference at a normal point in time compared to when the process was running to put this into perspective.
Summary
All domains should be under their own cPanel account for security reasons. If you have multiple domains contained under a single cPanel account, start to get things set up properly as they should be. Recovering one hacked website is time consuming and costly enough for you as a business, recovering multiple just multiples the problem. Do not leave this until it is too late. If you are unsure how your web server infrastructure should be set up then get in touch and we can help you with getting things set up correctly.
by Michael Cropper | Aug 24, 2016 | Developer |
For those of you using cPanel and WHM as a system, you’ll be as glad as I am to hear about the latest release of AutoSSL which enables SSL certificates to be set up across accounts much easier than ever before. In summary, it’s possible to generate and install SSL certificates for individual cPanel accounts all via the WHM interface which is super useful when managing web servers with multiple accounts and domains hosted. All of which is powered by Let’s Encrypt which traditionally would have required quite a bit of command line set up via SSH.
To get this up and running is actually relatively straight forward.
Set up Let’s Encrypt for AutoSSL via SSH
This is the only part that you need to do via SSH and it is only required once. Simply login to SSH and run the following command;
/scripts/install_lets_encrypt_autossl_provider
Let everything install and configure, all automatically.
Configure AutoSSL in WHM to Use Let’s Encrypt
Navigate to the following page within WHM, Home > SSL/TSL > Manage AutoSSL. Now update the settings to use Let’s Encrypt instead of any other providers that you may have installed as can be seen below.
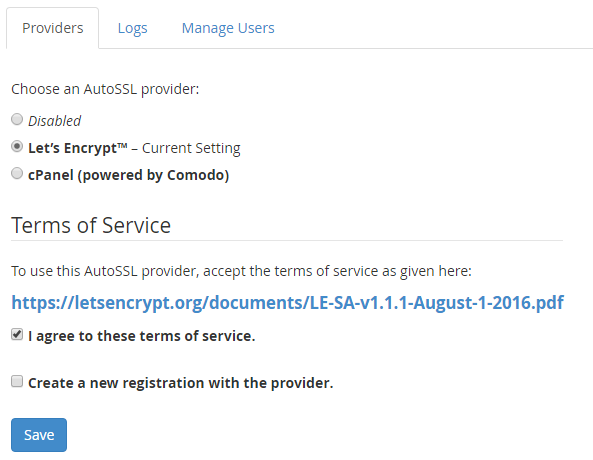
Once this is set up, when you use the AutoSSL feature Let’s Encrypt will be the certificate authority which manages this.
Run AutoSSL for cPanel Accounts
Now everything is set up to run AutoSSL, it’s time to start running it. While you can simply run this for all domains, it is recommended to take a more structured approach so you can be sure that you are updating everything correctly. Particularly when migrating WordPress websites from HTTP to HTTPS, there are a lot of additional tweaks to make to ensure everything works correctly.
To run AutoSSL on a specific cPanel account, simply click on the “Check” button next to the account you want to run this for. This will run AutoSSL for all Addon Domains associated within this cPanel account. There are a few restrictions currently for what will work here, so be sure to check the official cPanel documentation.

SSH Now Setup
Now access the HTTPS version of your website and everything should be set up and working. As mentioned previously, there will likely be other items to clean up to ensure the green padlock shows in your browser bar. From an AutoSSL standpoint, everything is complete. Simple.
Check within the individual cPanel account you have just updated and you should see that the certificate has been installed on the domains that are listed. This is super useful and saves a lot of time manually generating and implementing SSL certificates.
Caveats
If this doesn’t work for some reason then check the error logs for AutoSSL within WHM. This will provide you a lot of information about what has gone wrong. Particularly if you are using cloud based CDNs or firewalls such as Sucuri, then you’ll need to disable this to get AutoSSL working correctly. Be sure to check your .htaccess files too as sometimes you may have restrictions in here which only allows traffic to the website from the cloud based CDNs or firewalls such as Sucuri.
As with everything, make sure you know what you are doing before playing around with these types of things and make sure you fully understand your technical stack and setup. Just because this works for us, does not mean that this will be as seamless for you. Get in touch should you have any support requirements for getting this set up on your websites and web servers.
by Michael Cropper | Aug 23, 2016 | Developer |
When you’re building a website from scratch implementing HTTPS is actually relatively straight forward in comparison to migrating a current website from HTTP to HTTPS. When migrating a WordPress website from HTTP to HTTPS there are multiple aspects you need to take into consideration to implement this successfully which are outlined below.
Get an SSL Certificate
This goes without saying, but I’m going to say it anyway. Make sure you have an SSL certificate installed on your domain. There are many options available including the free SSL certificates from Let’s Encrypt. Details outlined for how to get that set up on the linked post.
Update WordPress Address and Site Address in General Settings
Firstly you need to update the settings within Settings > General Settings to update the WordPress Address and Site Address from HTTP to HTTPS as can be seen below.
From HTTP

To HTTPS

This will tell WordPress to use HTTPS throughout the site.
Update Your wp-config.php File for SSL
Add the following line of code to your wp-config.php file which is often needed to ensure SSL works correctly;
if (isset($_SERVER['HTTP_X_FORWARDED_PROTO']) && $_SERVER['HTTP_X_FORWARDED_PROTO'] == 'https'){
$_SERVER['HTTPS'] = 'on';
}
This is required for when your website is behind a load balancer or reverse proxy. Full details about this can be found in the WordPress Codex.
Fix Mixed Content Warnings
Now you’ve successfully set up SSL on your WordPress website, although when you browse the website you may notice that you don’t get the nice green padlock showing in the browser bar. Instead you’ll see lots of mixed content warnings which causes the green padlock not to show;
The reason this is happening is because some of the assets in use on your page such as images, JavaScript files or CSS files are being loaded over HTTP when the page is HTTPS, meaning that the browser cannot be certain that nothing has been intercepted in transit and edited. Browse the Google Chrome Developer Tools window and you will see notices that look like the following;

This is not quite the desired impact that you had in mind when implementing SSL. Now, assuming that you have a well build website, tidying everything up should actually be relatively straight forward. If your website has been built badly then it’s likely going to be a lot more challenging to fix. For example if URLs have been hardcoded in any of your plugins or themes that are in use.
Update All Assets to Use HTTPS instead of HTTP
So now you need to run through the database and get everything updated. Thankfully there is a handy plugin which can automate a large amount of this work which is the Search and Replace plugin. Once this is installed go to Tools > Search & Replace > Replace Domain URL tab and enter in your details within here;

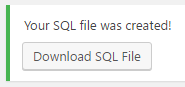
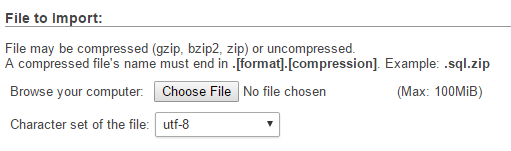
Then you will be able to download a .sql file which has been created for you now the Search and Replace has been completed. From here, login to your web server’s control panel, navigate to phpMyAdmin if you have this installed and upload the SQL file you have just downloaded. Make sure you are uploading this to the correct database if you have multiple databases in use. And as always, make sure you take a backup before you do anything in case you break anything by mistake.
SSL Now Fully Working
Now you have completed all the steps involved with migrating a WordPress website from HTTP to HTTPS and cleaned up all of the mixed content warnings. So when you browse your website now, you should see a nice green padlock when you browse the website. Make sure to have a browse around your website in case anything has been missed. So many WordPress websites have been built badly so you may need to do some additional cleaning up in various places.
301 Redirect HTTP Traffic to HTTPS
This is just good practice to do so that you are forcing the use of HTTPS on your website. Add the following code to your .htaccess file;
RewriteEngine On
RewriteCond %{SERVER_PORT} 80
RewriteRule ^(.*)$ https://www.example.com/$1 [R,L]