by Michael Cropper | May 14, 2016 | Developer, Security, Technical, WordPress |
A web developer or digital agency has built our website, so surely they must have backed it up, right? Probably not. Well ok, we have a web hosting company, and surely they back things up, right? Probably not. Some of the many assumptions that business owners make about their website and backups. I can honestly say that for the average business, your backups are probably woefully inadequate for your needs and should anything go wrong, which again I can guarantee that it will do at some point, you will be left up ‘the’ creek without a paddle.
Going one step further there is no magic ‘backup’ solution, it’s not like buying a lemon from the supermarket. A lemon is a lemon, there is nothing else it can be. Instead, backups are a bit like Apples. You can have many different types of apples, all with their different purposes based on your requirements. You wouldn’t put a cooking apple in a lunch box unless is was baked into apple pie. Likewise you wouldn’t put a custard apple in an apple pie, seriously these things exist and have an interesting taste. I digress.
Back to backups. There are many different types of backup technologies which give you differing levels of security as a business and hence are either easier or harder to restore when something does go wrong. Again, it will go wrong at some point, trust me, it always does, this is technology we’re talking about. With unscrupulous cybercriminals targeting websites running certain technologies at scale, fully automated. Do not think that you are off someone’s radar.
So let’s take a look at a couple of the different website backup technologies and what they both mean. This is by no means a definitive list but hopefully this should get you thinking about what you need to be investing in as a business.
Server Level Backups
Surely my web host runs server level backups? Maybe, but are you paying them to do that? Backups use server resources, CPU, RAM, Hard Drive space and bandwidth on the network, which all cost money to run. Unless you are paying your web hosting company specifically for backups, it is unlikely that they will be running server level backups for you.
Server level backups are great and are essential to have in place for any business. If you are unsure if you have this in place, then contact your web hosting company to check or get in touch and we can have a quick check to see what you have or haven’t got and advise accordingly.
Your server level backups are designed for one thing, restoring the entire server should anything go wrong with the hardware or similar. They are often run daily and stored for a period of time with multiple restoration points for added levels of protection. This is great if you’re on your own dedicated web server with just your own website as this means that restoring a backup can be much faster than if you are on a shared web server of sorts.
If you are on any kind of shared web server, where there is multiple websites hosted on the server, then this is where things get tricky. The likelihood is that if you are on any kind of shared web server or similar, i.e. if you don’t have as a minimum your own Virtual Private Server (VPS), then this applies to you. What this means is that your website is on the same web server as other websites, then should anything go wrong with your individual website, then restoring just this part is much more time consuming and costly for you to do.
You see, the server level backups are designed to protect everything on the web server should anything go wrong at the web server level, they aren’t designed to protect against a single issue on a single website for example if your website was hacked into and deleted. This means that if this did happen, it is not easy to simply restore your individual website as the backups have to be combed through and reinstated which is a fiddly job for the technical team to do and hence costly.
Server level backups are designed for keeping backups of things like any server settings that have been implemented specific to the needs of the websites hosted along with any control panel settings which may be in place. They are designed to be used as a single setup which can then be restored as a whole, not parts of the whole.
So yes, server level backups are extremely important and if you don’t have these in place now, then you need to get these in place.
Website Level Backups
The next type of backup to make sure you have in place is a website level backup. This is where your website setup as a whole, which sits on your web server, is backed up in its entirety. Far too often, the website backup technologies that people have in place are woefully inadequate.
Your website level backups need to be fully automated, so if you have to manually set this running, then this is no good. Your website level backups need to include everything on your website, files and databases to ensure that the data can be easily restored. Your website backups also need to be stored in a remote location, so not on your web server. A backup sitting in the same place as the main system means that when the main system goes down, you have potentially lost your backup too.
WordPress makes the website level backups reasonably straight forward which means that when you invest in WordPress Security & Backups, the backups and security side of things are taken care of for you. This also means that when you have the right website level backups in place, when things do go wrong, as they always do, then restoring this backups is far faster and hence much cheaper for you. Make sure you have adequate levels of website level backups in place suitable for your needs. If you are in any doubt, then get in touch and we’ll happily review your current setup for free and advise accordingly.
Restoring a Backup and Responsibilities
Surely if anything happens it is the responsibility of your web developer, digital agency or web hosting company to restore any kinds of backups for free? No. Restoring any kind of backups takes time to implement, and depending on the level of backups you have chosen to invest in previously, this determines the ultimate cost involved for restoring any backups.
As explained previously, if you are on a shared web hosting environment of any kind, then this is going to cost you a lot more to restore the backups as they have to be unpicked form the whole server level backups and reinstated. Opposed to using website level backups alongside server level backups, these are far easier to restore and hence cheaper for you in the long run.
As a business owner you are responsible if your website is hacked, not the service provider, it will cost you either way. It’s your choice to pay a small amount every month or a large amount when things go pear shaped. We would always recommend regular maintenance, security updates and automated backup technologies being implemented as we have seen time and time again how this saves companies money in the long run.
If you are worried about the level of backups you have in place within your organisation for your website technologies, then get in touch and we’ll review your current setup and recommend relevant solutions that can be implemented.
by Michael Cropper | May 11, 2016 | Client Friendly, Security |
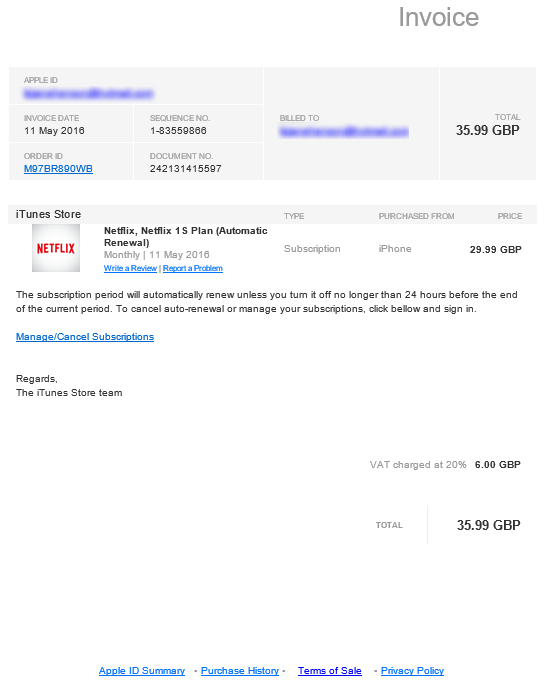
Another scam email to be aware of if you receive something similar. You can tell the email is a scam by hovering over, not clicking, on one of the links in the email, it doesn’t link to Apple. If you are ever in any doubt, always make sure you open the website in question in your browser by typing in the address, never click on any links in the emails. For any services like this, you will have a notification waiting in your account if this is genuine.
by Michael Cropper | May 9, 2016 | Developer, Technical, WordPress |
Accelerated Mobile Pages, AMP for short, is an open source project designed to make the web faster. For people accessing web content on mobile devices, speed is a challenge for many users and with over 50% of content accessed on the web via mobile devices, this is more important now than ever.
The concept of Accelerated Mobile Pages is all about stripping out irrelevant styling and fancy JavaScript technologies to make the page load much faster, with the most important aspect, the content, loading virtually instantly.
If you’re interested in the finer details behind the project, have a read all about it here, https://www.ampproject.org/. The technical aspects behind the project are quite significant as are the underlying details about how your web browser loads content as standard.
Accelerated Mobile Pages AMP Speed Test
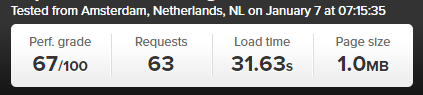
So we thought we’d put AMP to the test to see just how much faster it really is for WordPress in comparison to a rather bloated website which requires a bit of TLC, like most WordPress websites on the whole. The results below we repeated on the same website multiple times and cannot believe the performance increases we saw. The Accelerated Mobile Pages plugin for WordPress is available for download from the WordPress repository. A note on the plugin at the time of writing, it only supports Posts in WordPress, i.e. your blog posts. Pages and Ecommerce Products aren’t supported currently.
Blog Post Loaded As Normal
Blog Post Loaded with Accelerated Mobile Pages APM Technology
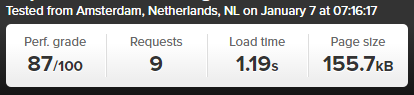
Awesome! Try loading this page you are viewing now as an Accelerated Mobile Page here to see how this looks: https://www.contradodigital.com/2016/05/09/wordpress-accelerated-mobile-pages-amp-speed-test/amp/
As a footnote. Yes, 30 seconds is darn slow for a website to fully load. Yes, tools like Pingdom are not perfect as many users are more interested in the time when the website appears to have completed to load opposed to when the last byte has arrived. And yes, this is only a single site as a comparison. Get involved and give this a go on your own website to see how this performs for you. Every website is significantly different and ever web server has been configured differently based on your individual needs.
by Michael Cropper | May 9, 2016 | Developer, Security, Technical |
Just like the computer that you are reading this blog post on, your web server has a lot of software installed to keep it running. And like all software, it needs to be kept up to date to avoid security issues. Web server security is an enormous topic with many moving parts, many which are often uncomprehendable to the non-teckie.
Seriously though who is updating your web server software?
Your web developer? Unlikely, often web developers have very limited knowledge of the underlying technologies of web servers.
Your web hosting company? Possibly, but unlikely unless you’re paying them to do so.
Your IT team? Unlikely, your IT team is often focused around the computers, laptops and devices around the office and often believe that it is the web developer’s or web hosting company’s job to do this.
As a business owner it is your responsibility to be asking these questions and making sure that you have this part of your cybersecurity looked after. If you don’t know who is looking after this for you, you need to find out. Get in touch if you find out that this is not being looked after, as I suspect is the case for most people reading this blog post. As with all software, it is essential that your web server software is kept up to date to avoid potential cyber attacks.
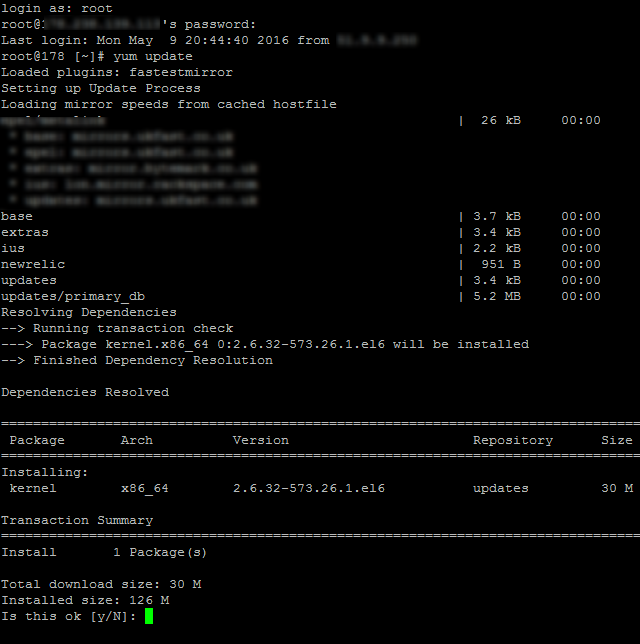
This is what one small part of updating server software actually looks like to the teckies managing this for you, no pretty user interface, it’s primarily command line management;
by Michael Cropper | May 9, 2016 | Security, WordPress |
Another day, another hacked website. This time, thankfully due to the security and backup solutions in place, restoring this backup was relatively straight forward and much cheaper than if these security solutions and automated backups weren’t in place.
Usually we get businesses running to us when things have gone wrong and they have failed to plan accordingly for when this happens. Thankfully, whichever way you look at this, this business had been hacked before and since then had additional levels of security and automatic backup solutions in place to reduce the risk and help to resolve issues when they do go wrong. This being said, on this occasion, no amount of technology can protect against basic human error and weak passwords.
Below is a brief outline about what happened. It’s only a rough guide but does go to show how something as simple as a weak password can even bypass the additional security. And most importantly, this highlights the reason why you should always be planning for the worst and expecting the best. Naturally, all of the sensitive information is blocked out of the screenshots, as is information about the hackers as they deserve no additional praise for the work they have done.
Website takeover

Server Logs
The website isn’t hosted with ourselves, so by the time we investigated this we couldn’t access the server logs as web server had already been rebooted, so the error logs lost.
WordPress Access Logs
Show that the user ‘Admin’ logged in on 08-05-2016 at 8:55 am;

From the IP address 41.111.14.83 which is based in Algeria, Africa;
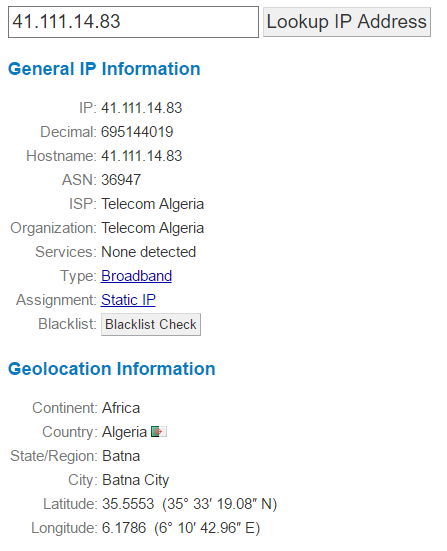
This username belonged to a member of staff at the web hosting company whose account was compromised and used to initiate the attack;

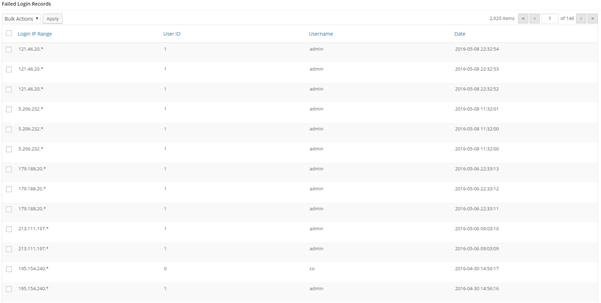
Which when looking at the access logs on the date, there weren’t many failed login attempts which suggests that their password was rather weak;
Plugin Uploaded
Now the hackers had Administrator access to the site, they uploaded a plugin which allowed them to upload a script to the site and run this script via the command line;

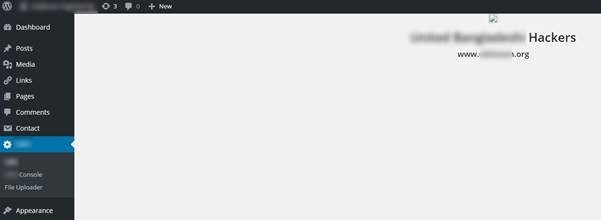
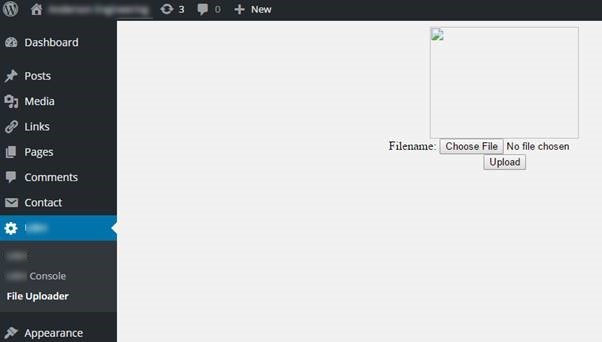
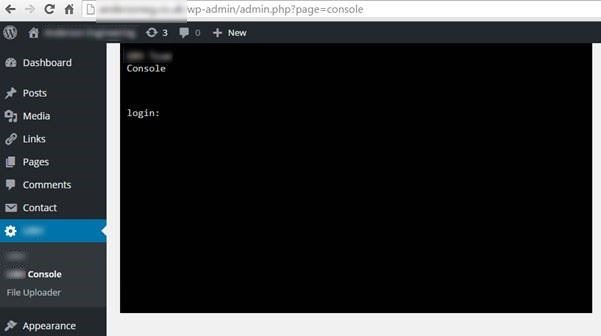
This plugin & script allowed the hackers to take over control of the whole site and display the messages.
Summary
While this does seem like an extremely simple thing, essentially guessing someone’s password. This does highlight the importance of being able to trace exactly what happened when a hack occurs. Being able to track the path the hackers took to exploit the website ultimately led to the root cause of the problem being able to be fixed to prevent this from happening again.
If you don’t have website security and automated backups in place, then get in touch. Seriously, get in place what you need to before you get hacked. Do not think that this will not happen to you. As we have just shown, even with added levels of security in place, a hack can be as simple as a weak password. Make sure you have the right technology in place to be able to identify the root causes of problems when they do occur to save yourself significant time and money dealing with things when the inevitable does happen. No-one wants to get hacked and everyone believes they will never be a target. The reality is that most businesses will get hacked at least once in their lifetime. It is only the large businesses that we often hear about in the news. In this instance, this is a story of a small business, less than 10 staff, for whom this kind of issue is something that they would prefer not to have to deal with.
In this example, we were able to respond to the issue, identify the affected areas of the website, identify the root cause & patch all within a morning. All for the cost of the price of a coffee per day. You have to ask yourself, if you don’t have the right technologies in place to deal with situations like this, how long would your website have been offline for? A day or two? A week? More? I can’t stress enough that preparation is key when dealing with cybercrime. Your digital back door is probably wide open, waiting for someone to walk by and exploit it, you just probably aren’t aware as it’s not something you can physically touch and feel.
by Michael Cropper | Apr 24, 2016 | Data and Analytics, Digital Marketing |
Sorry, I’m calling it. Businesses purchasing subscriptions to companies that are offering free data at a hugely premium price need to stop paying for this now. Stop wasting your money. Hell, give it all to a charity of your choice, it will be better money spent.
The company I’m talking about, for anyone working in digital will be well aware who this is, but for legal purposes let’s just call them a fictitious name which bears no resemblance to any company or person which happens to have a similar name, EnquiryForensics.
The offer for these types of companies is that you can “See who is looking at your website”. In summary, no you can’t. The only information that these types of companies generally provide is information that someone in Company X was looking at your website, then joining this data together with generic contact details for this company or publically accessible contact information for various staff within this organisation. This does not tell you who specifically is looking at your website. There are a whole host of data protection issues with tracking individual user website usage which is why services like Google Analytics are obliged to anonymise certain aspects of the data.
So beware, any company trying to sell you access to a tool or service which can show you who is looking at your website in a company, it is likely a snake oil salesman or company. You can generally get whatever data that have completely for free, and here’s how.
Google Analytics is Awesome
I’m not going to go into depth about Google Analytics. In summary though, Google Analytics tracks over 560 points of data for every website visitor and when you know where to look, you too can start to see how valuable this data is.
Identify the Companies Looking at your Website
Simple. Within Google Analytics, go to the following report: Audience > Technology > Network. This report will show you the companies who have been looking at your website, which can be extremely valuable for any type of B2B business as you can then feed this into your outreach pipeline and support the work your business development manager is doing on a daily basis. Look;
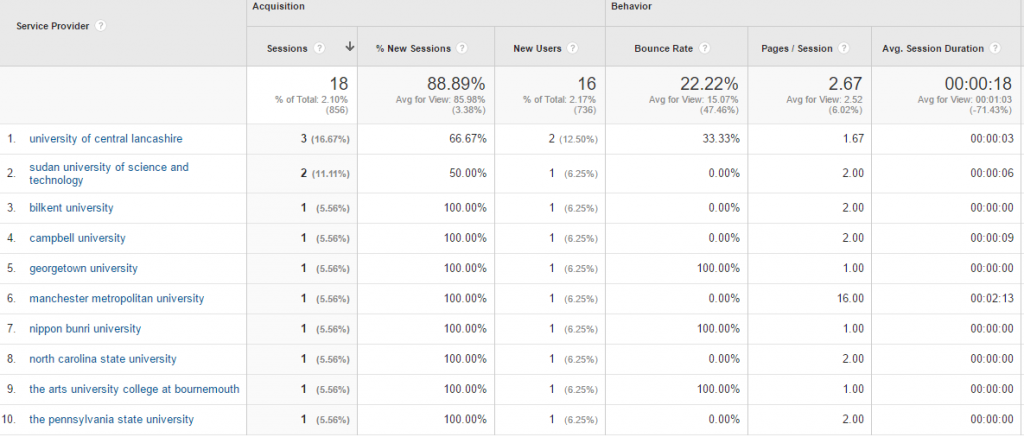
It’s all there. The companies who have been looking at your website which you can filter through to your hearts contempt. For any companies listed within here which are SMEs, a quick Google search for the company name and check on LinkedIn will soon allow you to identify the relevant person to speak with in the company who could be interested in your products and services.
Even better, you can then begin to filter down by looking at these individual companies and see what pages they viewed on your website too, so that you get a better understanding of what they are looking for.
The key here is not to be too creepy though when you reach out to these people.
All in all, you rarely ever need to pay for premium services and tools which allow you to identify who is looking at your website. With a bit of know-how, you can have access to all of this type of information for free.
If you want to find out how Google Analytics can help your business, get in touch.
by Michael Cropper | Apr 15, 2016 | Ecommerce, WooCommerce, WordPress |
WooCommerce is the leading ecommerce technology in the WordPress ecosystem, yet many people, both beginners and experienced users, struggle with adding products to WooCommerce in the right way. I say the right way, as getting this part wrong can lead do long term issues and time consuming mistakes to fix when data isn’t entered in the right way. WordPress and WooCommerce are database driven technologies, meaning that to be used effectively data must be stored in the correct place for it to be used effectively.
To put this into something that is simple to understand. Imagine you’re a chef, a really good one too. You don’t just see a carrot as a carrot which can be eaten. You see the carrot as an ingredient which can make many things. Now imagine a whole host of ingredients that you have in your fridge ready to cook into anything you fancy. The ingredients in this instance it essentially the data behind a product, the pieces of information. If you take all of your ingredients and keep them in separate containers, you can continue having the flexibility to choose what you cook when you like, i.e. putting your product data in the right place within WooCommerce. Compare this with if you took all of your ingredients and mashed them up into a single container. You simply wouldn’t be able to work with that data in any effective way at all. Whatever you made, you’re stuck with essentially. This is why it is important to create your products in the right way when adding to WooCommerce, so you can work with them effectively longer term.
So let’s look at how to add a product to WooCommerce in WordPress. We’re not going to be talking about how to SEO the product you’re adding. For information around SEO, have a read through a few guides we already have on the topic including the Really Simply Guide to Search Engine Optimisation or our guide on How to Get the Most from Yoast SEO in WordPress.
Basic Product Data
The basic product data you’re working with within WordPress includes the following details which all need to be entered with specific information as this determines how they display to the customer on the website.
- Product Name: This is used to describe your product in a short succinct way. This data is used to generate your Meta Title (see SEO guide above), your Permalink (see below) along with your main Heading 1 tag on the page (see SEO guide above).
- Permalink: This is the full website URL which is generated for the specific product such as, www.example.com/product/product-name-here/
- Main Product Description: This is the main content which describes the product in as much detail as possible. The more detailed you can be with your product, the more visible your products will be on Google, the more information is provided to potential customers which can boost conversion rates and generate more sales.
- Product Short Description: This is a section which often sits next to your main product images, it is the piece of content which is designed to provide key unique selling points about the product to entice customers to read further and ultimately purchase the product.
- Product Image: This is the main product image which will be visible on the page when it is first loaded. This is also the image which will be used throughout the website when your product is linked to for example from the Category pages. Make sure it’s a good quality image and it is clear what the image is.
- Product Gallery: The more high quality images detailing every aspect of your product you can add the better. Product with more high quality images often significantly out perform in terms of sales when compared with products with low quality images or lower number of images.
- Product Categories: This is how your product is going to be categorised on your website. Think of a logical way to categorise your products, just in the same way supermarkets do. You wouldn’t find a fresh apple in the clothing section. Categorise your products by core areas to help your users navigate around the website with ease. If you want your product to appear in multiple categories, select multiple categories when adding your product to the website.
- Regular Price: This is what you are selling your product for. Depending on how you have configured your WooCommerce settings, this price may include or exclude VAT so make sure you get this one correct.
At the basic level, this is the only information you need to add a product to WooCommerce in WordPress. Make sure you are as detailed as possible when adding products to help users in the best way possible.
Advanced Product Data
Now we’ll look at some of the finer details as WooCommerce is an extremely powerful platform for powering ecommerce shops. To try and keep this as simple to understand as possible, let’s look at the different product options based on the type of product that is being sold, whether that is a single item, a grouped item, an external or affiliate item, or a variable product. Each of these allows you to customise many options for your products to offer your customers the best products possible. When adding a product to WooCommerce, all of the following data is within the following section;
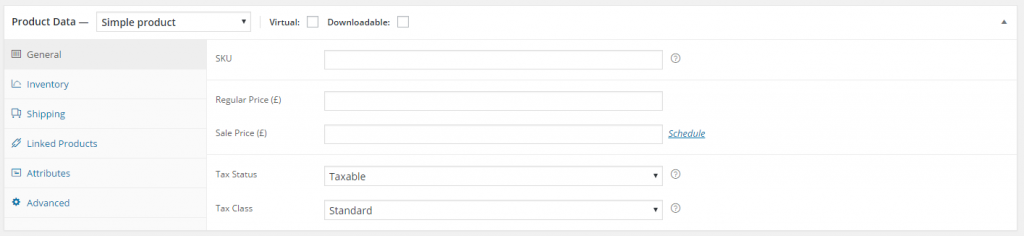
For simplicity, if a piece of information has already been discussed previously, I’ve omitted this from the data below to avoid repeating myself.
Simple Product
General Tab
- SKU: This is your Stock Keeping Unit, the unique identifier which you can link to your own internal systems about the products you keep. This is a number that you can identify yourself. For example you may use something as simple as 001, 002, 003 or something much more complex. This piece of information is useful as your ecommerce store grows and you begin to add more products to the website. Customers may enquire about a specific product and being able to refer to the SKU can help you quickly identify what product they are talking about.
- Sale Price: Everyone loves a discount, right! If you want to run a special promotion, here you can select what discounts you want to apply to the individual product. You can even schedule the discount to be only applicable between certain dates so you don’t have to remember to turn the discount on and off.
- Tax Status: Tax is a complicated area which you need to discuss with your accountant and website developer to understand how this works for your business. With so many tax rules for businesses depending on who they are selling to and what they are selling, this is too big of a topic to cover here. The important point to note though is that you can edit the tax settings at the individual product level should you need to do this.
- Tax Class: As above.
Inventory Tab;
- Manage Stock: Select this option if you are using WordPress to manage stock levels. This can be useful if your WordPress website is your only point of sale for your products so you can be sure this information is accurate. The challenge over time comes when you are selling on multiple platforms both online and offline, stock management becomes a bit of a nightmare to get perfect which is a topic we’ll be covering in the future. If you do wish to manage stock levels for the product, simply tick the box.
- Stock Quantity: Self-explanatory, i.e. how many of this product do you have in stock to sell
- Allow Backorders: For many businesses, items which are out of stock are often only out of stock for a day or two. In which case you may prefer to allow backorders for products to generate the sale and post out as soon as the product is back in stock. This can often be better than losing the sale completely.
- Stock Status: If you prefer to manage this manually, you can simply change the stock status from either ‘In Stock’ or ‘Out of Stock’ accordingly which can be useful should an item suddenly become unavailable or otherwise.
- Sold Individually: This setting allows you to restrict the number of this specific item a customer can order on a single order. This can be useful for products you wish to offer to customers for free with their orders. For more advanced customisations related to order freebies there are other plugins and technologies to look at which significantly boost this functionality.
Shipping Tab;
- Weight: Self-explanatory
- Dimensions: Self-explanatory
- Shipping Class: Within the main WooCommerce settings, you can customise shipping classes to make things easier to calculate. This can be very useful if groups of your products all fall under the same shipping category. In which case you can then simply select which shipping class they fit under and the price will be automatically reflected.
Linked Products Tab;
- Up-Sells: Up-sells are products which will be recommended to customers who are interested in this product. This could be another product which is either more profitable which could be a very similar product with more features and functionality.
- Cross-Sells: Cross-sells are products which are recommended to customers who are interested in this product. This could be a product which is often used with this product. For example if someone is looking to purchase a winter hat, then they may also be wanting to purchase a winter scarf which matches this one.
- Grouping: This allows you to select if this product is part of a group of products which can be sold as a bundle. There are additional WordPress plugins which achieve this functionality which give you much more flexibility to customise grouped products.
Attributes Tab;
- Name / Value: This data is used to create additional attributes for your products which could include items such as colour and size. For example, you would add a Colour attribute which included items such as Blue | Green | Orange etc. And then add another attribute which is for Size which included items such as Small | Medium | Large etc. This data is really important to structure correctly as this data can be used in the future to filter search results on pages on your website based on these attributes. Make sure you don’t include all of this structured data about your products within the main description only as this data isn’t filterable in the same way data within the Attributes area is.
Advanced Tab;
- Purchase Note: This allows you to send customer specific information about this product once they have purchased which can be extremely useful if someone has purchased a product which may need additional information about how to set up for example.
- Menu Order: Ignore this, there are better ways to arrange menus
- Enable Reviews: Products with customer reviews significantly out-perform products with no reviews. Encourage customers to leave reviews of the products they have purchased which will then be displayed on the main product page.
Grouped Product
This product type allows you to create a product bundle which includes many products which can be easily purchased. The main problem is that this at the same price as if customers were to add them to the shopping cart individually. While this is certainly a nice feature, there are much more advanced plugins available for WooCommerce which allow you to create custom product bundles with associated discounts and special offers.
All of the settings within the Grouped Product type have already been discussed above.
External / Affiliate Product
This product type allows you to list products from external websites on your own website. This can be great if you are looking to run an affiliate based website which many small business owners do. When adding an External / Affiliate Product to your website, the purchase doesn’t actually happen on your website, the button on the product page simply takes the potential customer to the external website you specify which allows them to make the purchase directly with the product owner.
The couple of additional settings included with this product type include;
- Product URL: This is where you want to send customers to when they want to buy the product. You may want to check that if you are an affiliate that you have the relevant affiliate ID included within the link you add in here should the technology require this.
- Button Text: This allows you to customise the button text as people aren’t adding the item to the cart, they are essentially viewing more information about the product.
Variable Product
Variable products are where the more advanced features and functionality live which can help you truly customise your product page to do many of the things you have seen available on big brand websites. Again, many of the settings within here are identical to what has already been discussed so these have been omitted. The settings which are additional within here include;
- Attributes: As previously mentioned, this could include Colour or Size for the product along with many other options which are relevant to the product you are selling. When using this, make sure you select the checkbox stating that the product attribute is ‘used for variations’, this is really important and is a prerequisite to the next step, adding Variations. You need to save the product attribute that you have created.
- Variations: Think of product variations as a way to sell the same product with many different customisable options. Imagine ordering a pizza at a restaurant, £9.99 for a basic pizza. Add 50p for more chicken, add 50p for chilli sauce etc. It’s the same concept for variable products within WooCommerce. With variable products you can charge different amounts based on these different variations. For example, you may have a basic product with a variation of ‘{Product} with {Additional Feature X}’ which you can charge a premium for. You may not want to add this as a product in its own right as it is essentially the same product, so by using product variations it is possible to simplify this process to allow customers to select the features they wish to purchase for this product in a simple way. Make sure you add a Variation Description within here to explain to your customers how this variation is different than the main product or they will not be able to understand how this more expensive product is different.
Overall
In summary, adding a product to WooCommerce in WordPress is actually quite involved and is extremely flexible based on your individual requirements. Make sure you are adding in all of the relevant information for your products to make your life much easier in the long run as you build on the features and functionality on the website.
If you are having challenges with your WooCommerce WordPress website, get in touch and we’ll talk you through the options available to get you going in the right direction. WooCommerce and WordPress are complex systems which take a while to get used to.
by Michael Cropper | Apr 13, 2016 | Data and Analytics, Digital Marketing |
Blogging is a core part of any digital marketing strategy which is why we talk about this on a regular basis to businesses. We’ve already produced a Really Simple Guide to Blogging, so have a read of that resource once you have finished reading this blog post.
We get asked a lot about how important is blogging, really? Well I thought it was worth putting a few numbers behind this to put this into perspective about why we talk about this so much;
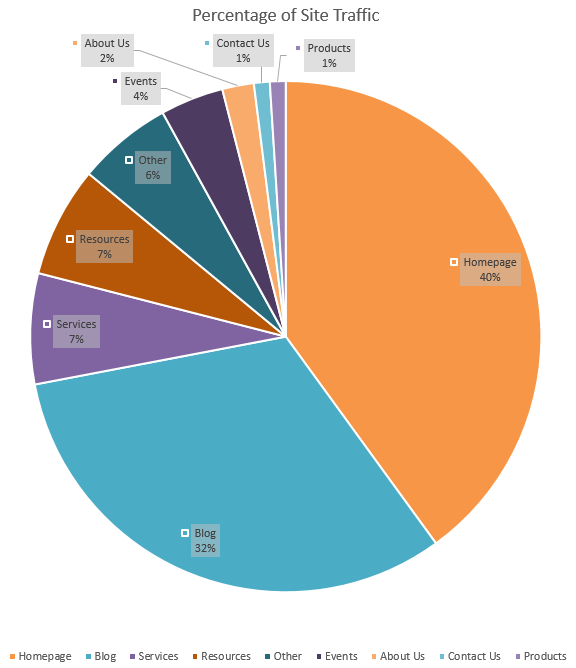
As you can see from the data above from our own website, when looking at the Blog and Resource pages which drive traffic to the website, this accounts for almost 40% of website traffic. Now to put this into perspective, imagine if you currently aren’t blogging on a regular basis. You are missing out on an enormous amount of traffic to your website. Assuming you aren’t blogging, by starting blogging based on these figures you could grow traffic to your website by almost 70%, imagine a 70% growth in traffic to your website. Pretty awesome, right?
Sure, things are a little more complex than this in the real world and for ecommerce websites this split is likely to be significantly different, but hopefully this gives you a few figures to highlight the importance of blogging. Get in touch if you would like to talk to us about how blogging can help boost your digital strategy.
by Michael Cropper | Apr 9, 2016 | Developer |
When developing basic websites, never need to be able to access your local machine form the internet. Whatever language or platform you are using, you’ll likely have your local development environment at something like http://localhost:8080 or similar. This allows you to test the code you are writing with ease without keep uploading it to your web server which is a more time consuming process.
When you start getting involved with building more advanced web applications, opening up your localhost environment to the internet is such a valuable tool, I can’t stress this enough. Particularly when working with technologies like webhooks, payment gateways and other integrated technologies. This is required because these websites need to send data back to your application outside of the initial request, and they cannot send this data to your local machine without being able to access it. You see, your local machine is protected by multiple firewalls, within your router as a hardware firewall and also with the firewall software running on your machine. So even if the outside website did know your IP address to send the data to, they wouldn’t be able to get through your firewalls anyway.
This is why you need to be able to access localhost from the internet which is only possible with specialist software designed to do exactly this. There are several different tools available to allow you to do this, personally I find the ease of use of Ngrok making it the only choice for me. To understand how Ngrok works, a couple of images shown on their website helps explain this in more detail as this is quite a technical topic to get your head around if you haven’t used before;
How to Access Localhost form the Internet with Ngrok
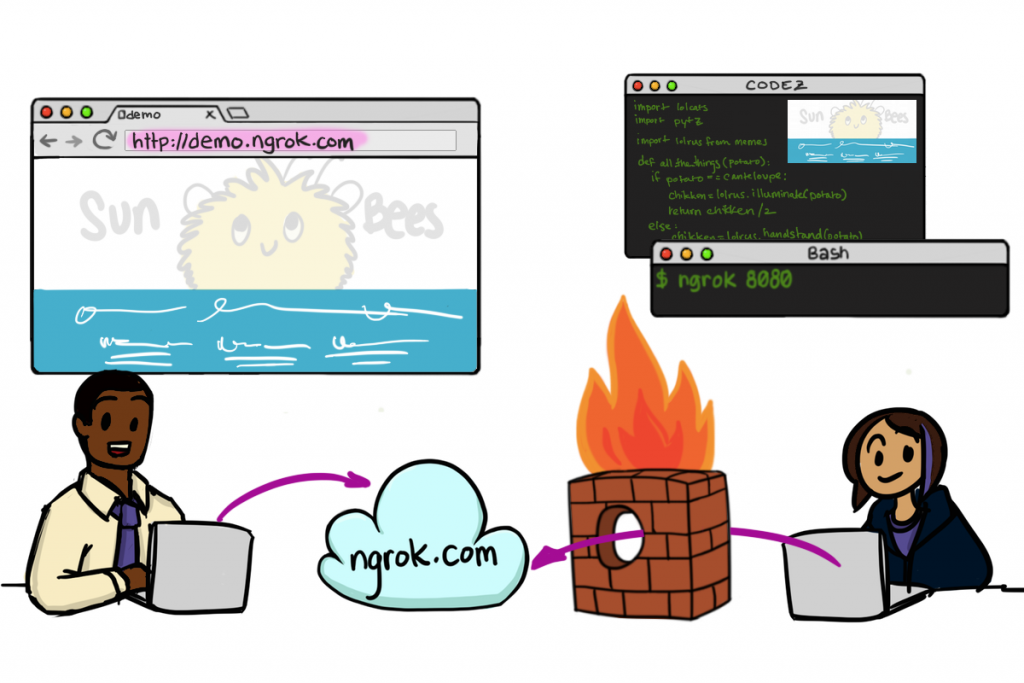
Image source
How to Send Data from Webhooks to Localhost with Ngrok
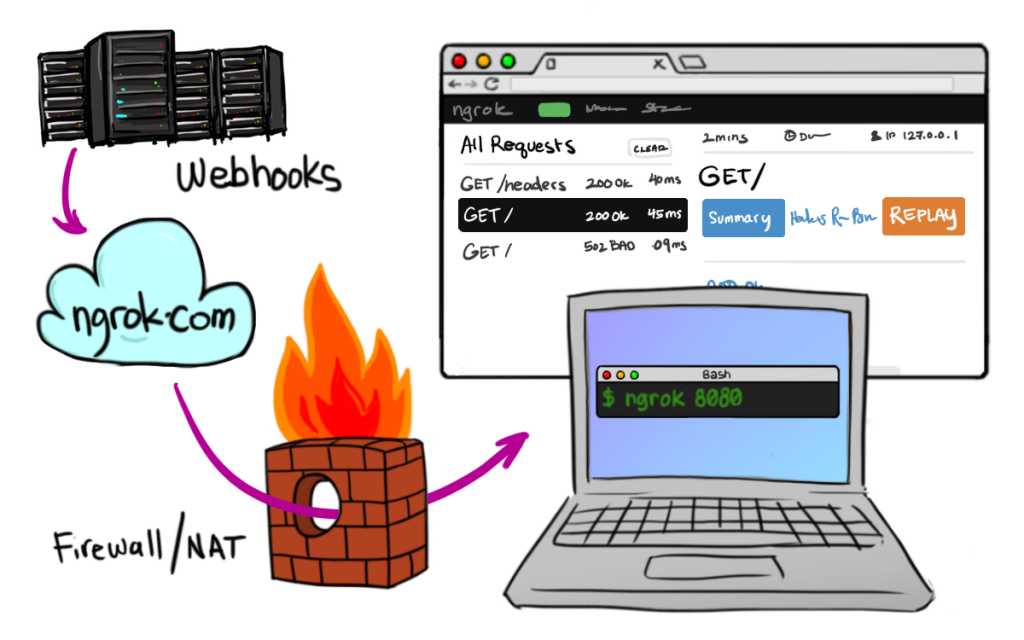
Image source
Ngrok have a list of platforms that it works on and this can be set up in as little as 30 seconds, it is seriously awesome. So anyone wanting to know how to access localhost from the internet or send webhooks data to your local machine, then take a look at Ngrok. They have free versions of the software and paid subscriptions which are dirt cheap.
by Michael Cropper | Apr 6, 2016 | Developer, WordPress |
The WordPress REST API Version 2 is brand new in the developer world which means that the documentation is extremely limited. Hopefully this can help a little for others trying to debug problems like this.
Posting comments to WordPress via the REST API Version 2 is actually relatively straight forward once you figure out how to do this. For those looking for a quick solution, using POST on the following URL will do just that, post a comment on this blog post you are reading right now.
https://www.contradodigital.com/wp-json/wp/v2/comments?author_name=Your%20Name%20Here&author_email=your-email-address@website-address-here.com&author_name=Your%20Name%20Here&content=Your%20Comment%20Here&post=1604252
Now for a few comments on the technical aspects to understand how this works.
Read the WordPress API documentation under the Create a Comment heading. As you will see, the documentation is minimal to say the least. It’s something the WordPress Core team are working on, so stick with it.
Essentially though, there are various query string parameters you can append to the request to send data into WordPress as a comment. It’s important to note that this is a POST request not a GET request. GET requests on this URL will not work. You need to use a tool such as Advanced REST client which allows you to POST data to API URLs which is extremely handy.
You will no doubt have debugging to do when you are first testing this as nothing ever goes to plan. Make sure you have comments turned on at the global WordPress level under the Settings > Discussions tab and also make sure that you have comments turned on for individual posts as sometimes these have been disabled. It’s always best to show these on your website too.
As with anything comment related with WordPress, make sure you are using the Akismet plugin to block any spam as this is a real nightmare on WordPress without Akismet.
There are lots of extremely useful uses for using this, we’ve been recently using this to post comments from a mobile app into WordPress which is used as a comment moderation system which means we don’t have to go and build that side of the functionality.
Make sure you are escaping the content which is included in the query string too and keep an eye out for any rogue spaces or special characters which may be breaking your POST request if this hasn’t worked. The usual things to check which you often miss J
When you successfully post a comment, you will see this waiting in your comment queue;
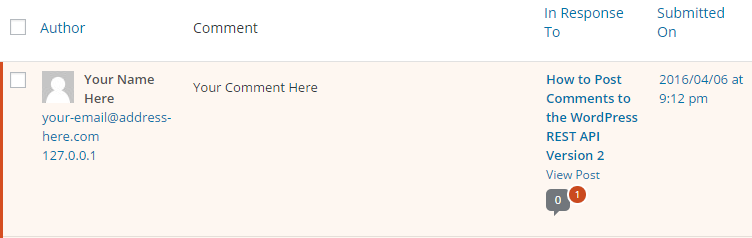
Then when you approve the comment you will see this displays correctly on your website as you would expect;

Have a go yourself. Customise the above URL with your own details and comments within the parameters and I’ll publish any successful comments. This handy URI Encoder / Decoder tool may come in useful when writing a comment or your name if it includes spaces or special characters, something I haven’t got around to migrating over to this site just yet.