by Michael Cropper | Aug 29, 2015 | Developer |
You may recall a while ago how we covered how to migrate a web server seamlessly with zero downtime. This was great in that specific example as there were no ecommerce websites hosted on that specific web server. Things get a little more complex when with ecommerce websites for several reasons including;
- You won’t want customers placing orders on the website which is still hosted on your old web server as you may not actually pick this up and this would be a very bad experience for the customer and potentially lost revenue
- Your payment gateway technology may actually inform the website on your old server that a payment has been made, but not the website on your new web server due to the way the backbone of the internet works, the DNS.
- Any downtime during an ecommerce website migration between web servers is likely to result in a lot of lost revenue
You simply cannot afford any mistakes when working with an ecommerce website as any mistakes could result in a real mess. All of this is due to the way the Domain Name System, the DNS, works which we’ll go into in a little bit more detail.

In the previous example outlined in the other blog post referenced earlier, we simply updated the name servers and off we went. For ecommerce sites though, this is a problem. Updating the name servers at your registrar (the people you bought your domain name from) can take up to 24-48 hours to fully propagate the whole Domain Name System. Meaning that during this time, some website visitors would see the website that is hosted on your old web server and some customers would see the website that is hosted on your new web server. For many businesses, this is not a problem as the two sites would be identical anyway. For ecommerce websites though, this actively creates problems which then need to be cleaned up later which can be a nightmare. So we need a different approach here.
How to Migrate an Ecommerce Website between Servers with Zero Downtime
A note before we get started, this setup is not a definitive guide to the topic as every single setup is different so please check your own settings before jumping in with changing things unless you are fully sure what you are doing. Making changes with the settings below can result in a lot of problems if you don’t get things right. If you need any support with migrating your ecommerce website, then get in touch and we can help you with this process. . Anyhow, let’s just jump straight into how to do this and we’ll look at the explanations along the way;
- Identify the current DNS Authority: You need to be working with a system which gives you full control over the DNS management, so that you can add A Records to your DNS specifically. The DNS Management is currently sitting with whoever your name servers are pointing at. For example, our name servers, ns1.contradodigital.com and ns2.contradodigital.com mean that our DNS is being managed by contradodigital.com. If your name servers are set to your registrar then this is who the authority is for your DNS settings.
- Migrate your DNS Settings: Generally speaking, when you are migrating your ecommerce website you are also wanting to migrate your DNS management from your old supplier to your new supplier. Assuming this, then you’ll need to migrate your DNS settings first. Firstly you need to look at all of your current DNS settings that are in place and migrate all of these settings, except the name server settings, over to your new DNS Authority.
- Keep the A Record in the DNS Settings at your new DNS Authority the same for now: As part of the DNS settings migration you just did, you will have copied over an A Record which is specifically used to tell the Domain Name System what the IP address of the server is when someone types in http://example.com or http://www.example.com into their browser. For now, keep this record pointing at your old web server so that everything continues to work as normal.
- Sit back and wait 24 hours: As the Domain Name System can take a while to update all the records everywhere, just go and do something else for a while until you are confident that the systems have updated. Most systems are much faster than this, and we can actually customer the Time To Live (TTL) with our DNS Management which means we can specifically set the amount of time other computers should store certain information they have about the DNS settings before requesting the information again from the authoritative source. This comes in extremely useful later on which is why we can migrate an ecommerce website with zero downtime (almost).
- Update your Name Servers: The name servers at your registrar will currently be pointing to your old DNS Authority, likely the same company who managed your old web server. You need to update your name servers to point to the correct location for the company who is managing your DNS from now. For example, when companies are migrating their web hosting to us, this means that they would update their name servers to ns3.contradodigital.com and ns4.contradodigital.com.
- Sit back and wait 24 hours: As before, we now need to wait a while for the Domain Name System to update all of the data so that the new authority for the DNS management is your new company. During this time, as people visit http://www.example.com, some people will see the old name server settings, which means they will view the website on your old server, and some people will see the new name server settings, which means they will also view the website on your old server as we kept the A Record the same so that the website continues to work.
- Migrate the Website: This is very specific to each website, technology and other server settings that need to be migrated so we won’t touch on the topic a great deal here. Suffice to say that whatever technologies you are using, you need to copy across the files, databases, plugins, extensions, well basically everything. If you miss anything during this point you will be picking up the pieces afterwards. When migrating your database specifically, you may find that you need to do a bit of intermediate work to update the table names potentially based on how the old and new servers automatically generate the table names for any website technologies you are using so bear this in mind.
- Add a Holding Page on the Website: This is extremely important to do this during the migration to avoid any activities happening on the website on the old server as we would need to comb through the differences and manually migrate anything that happened during the time from migrating the website to updating the A Records later on. Depending on your technical setup, websites purpose and other factors, you may choose to do this before Step 7 which would mean the website would be offline for a short period of time but would mean that you don’t need to implement Step 9 below.
- Migrate the Database Again: For ecommerce websites, the majority of the activities are database driven from users, such as purchasing a product or commenting on a blog post. There is often very little files that are uploaded to the website which means that you should be OK to just migrate the database one last time. Your website may be different though, so if in doubt, get in touch and we can guide you through the process. It is essential that your holding page throws a 503 Error in the header or your Google website rankings will fall off a cliff, meaning your website traffic and revenue will follow and could take a few weeks to recover. Google’s guidelines on dealing with planned maintenance is useful to read over.
- Update the A Records to Point to the new Web Server: Now you have migrated the database again, the website on your new web server is ready to go live. So pop back into your DNS settings and update the A Record to point to the IP address of your new web server instead of your old web server. As mentioned earlier, you are better off if you can manage the Time To Live (TTL) settings directly so that you can speed up the time it takes for the new settings to spread throughout the Domain Name System.
- Deactivate the Holding Page: Your website on the new web server is ready to go, so let your customers come flooding back in!
The entire process above means that your website should be offline for no longer than 5-10 minutes (virtually Zero downtime!). If you get anything wrong within this process of you don’t have the ability to manage certain settings then this clearly may take longer, which is why we always recommend you use a reputable web hosting company and that you are working with the right digital agency who has the skills, knowledge and expertise to manage this effectively for you.
For Windows users, several of the steps above require changes to your hosts file so that you are sure you are looking at the right web server when making changes. Make sure you double check your hosts file settings throughout the entire process to make sure you are doing what you think you are doing on the right server as it could cause you problems if you do the wrong thing. Particularly if it is database related and you accidentally overwrite your database with a blank database. That would not be good.
Considerations during the Migration
Any business has many moving parts, all of which touch on the website in one way or another. For larger businesses you need to really plan the timelines involved with this process and communicate this with everyone in your organisation. The last thing you want to see is customers calling you about a problem and your staff not being able to access your website for further information or have no idea about what is going on;
- SEO: From an SEO point, you need to make sure your website is throwing a 503 Error in the header to avoid you losing your website rankings, traffic and sales during the migration. Getting this wrong can result in a situation taking a good few weeks to resolve itself. Google’s guidelines on dealing with planned downtime are useful to read over.
- PPC: Are you running any pay per click advertising campaigns currently that need to be paused during the migration? If Google AdWords picks up that they are seeing 503 Error messages on your website, they will start to flag problems within your Google AdWords account. So it’s always best to pause these if your planned downtime may not quite go according to plan. Alternatively for high volume websites you may decide to continue running AdWords campaigns to maximise revenue during the process and simply mop up and messages that have been flagged within your AdWords account afterwards.
- Email marketing campaigns: Communicating with your entire business means that you aren’t going to be sending out any email marketing campaigns during your planned website migration. Sending out an email marketing campaign resulting in hundreds of thousands of extra visitors trying to access the website only to find it is not available for those few minutes can damage your branding.
- Social media activities: As above, it’s best not to plan any significant social media campaign during this time which encourages customers to visit your website for the same reasons as outlined earlier.
- Offline activities: Are there any offline activities within your business that could be impacted by a short period of time with the website migration?
- Server settings: Are there any other server settings that you need to be aware of during the migration such as SSL certificates, redirects that have been implemented in a server control panel, email accounts or mail forwarders that have been set up on the server instead of on Microsoft Exchange? Double & triple check everything because in our experience, it is that one setting that everyone forgot about or never knew was implemented on the old server which causes the biggest problems.
Migrating an ecommerce website with (virtually) zero downtime requires a lot of planning, the right systems, technology and people in place to get things right. If you are in any doubt about migrating your ecommerce website then get in touch and we can guide you through the process.
by Michael Cropper | Jun 29, 2015 | Developer, Digital Marketing, SEO, Technical |
We’ve spotted a trend recently with many website developers utilising technologies that make it difficult for search engines to crawl and index the website. Meaning that when search engines find it difficult to understand the content of your website, that you are in a position whereby Google may either penalise your website for spammy behaviours or simply losing a significant portion of the traffic to your website and ultimately revenue too. Clearly for websites that are generating a lot of visits from search engines, if this suddenly dropped off, how much revenue would you lose out on?
The trend we have spotted is around using JavaScript technologies which are inhibiting search engines from crawling websites. So while a new website may look flashy and all-singing-all-dancing, but if the new website cannot be easily crawled by search engines then quite simply you are going to be losing a lot of organic traffic to your website and ultimately sales / enquiries. Don’t make the same mistake that so many website developers do and use the latest technology without thinking through the consequences of what this means for your overall digital marketing strategy.
Common Problems
The common problems we are seeing more frequently at the minute are with developers using JavaScript technology which often looks nice for users. From a search engines perspective, JavaScript technology is difficult to crawl which can confuse the search engines and would always be recommended to avoid.
As a prime example, a local business recently re-launched their ecommerce website which certainly looked pretty but when viewing the website with JavaScript turned off (as Google would see it), then there is no content to display at all;

A website that looks good but can’t be indexed to Google is the equivalent of having a beautiful shop on the high street and keeping your doors locked at all times – you aren’t going to be generating any sales. For this business specifically, they have been notified of the issue and are working to fix the problem. Let’s be clear though, this is the exact reason why it is important that you are working with the right digital agency who understands how each piece of the digital marketing jigsaw fits together. A good looking website is often not the same as a good performing website. Good performing websites think about usability, functionality, SEO, PPC, Email Marketing, Conversion Rate Optimisation and more.
Why this is a problem for search engines
Developers love to use new technology, but this isn’t always the right decision to make. As a nice comparison, if a new website removed the traditional login username and password and instead replaced this with fingerprint scanning technology to access the website, which is possible. Sounds like a fun and exciting thing to play around with, right? But when you dig a little deeper, this means that only those with the latest Samsung Galaxy phones and certain specialist laptops would be able to use this technology, forcing everyone else away.
There is always a place for new technology and we would always encourage people to experiment with new technology to lead the way in their industry. That being said, you cannot do this at the expense of forcing people to use this technology if they don’t have the means to do so.
The same is true for Google. Search engines cannot easily index content that is powered by JavaScript. Which means that all pages on your website need to be accessible when JavaScript is turned off. Google recently updated their official guidelines on the topic which states that websites should be developed using Progressive Enhancement. So while some of your JavaScript based content may be being found by Google, it would always be recommended to follow Google’s guidelines on the topic to improve the chances of benefitting the website in terms of SEO;
What is Progressive Enhancement?
So what exactly is progressive enhancement? Well it comes down to creating a website (or mobile app) that can be run on all devices easily with basic functionality. Then if a certain device has a specific piece of functionality or technology, then you can enhance the usability of the website based on this technology. Most importantly, don’t assume that everyone accessing your website has all of the technology available that you think they do.
For example, how many times have you been prompted when accessing a website from your laptop which asks if it is OK if this website uses your location?
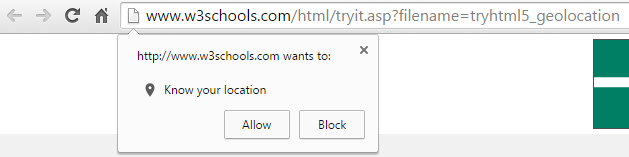
While this technology can certainly work on website, it is often rather inaccurate due to the way your location is essentially guessed based on several factors. Compared with the GPS signal from your mobile phone which is accurate to within a few feet of your location. This is a prime example of when progressive enhancement would be used, with a baseline set of website features not using the Geolocation and only asking the user if you can use their location when they are accessing from a mobile device. People accessing services through their mobile device are used to giving websites their location in return for some form of added features or functionality. As an obvious example, Google Maps clearly needs your location to help you get from A to B.
From a search engines perspective, it is important to use progressive enhancement at all times to ensure that they can easily crawl and index your website and content. Far too often are JavaScript based websites (and Flash websites back in the day!) are built without thinking about how Google is going to be able to crawl them. When using progressive enhancement, this ensures that the baseline website is still accessible to Google when JavaScript is turned off.
Progressive enhancement is not only recommended by Google, but it is also recommended by the wider community opposed to the older approach of graceful degradation. The reason behind this is because it provides a much better user experience when people are accessing a website from a variety of devices with multiple technologies.
As a simple summary of the above, all modern smartphones come built with GPS, accelerometers, gyroscopes, compasses, barometers and more. Whereas most laptops and desktop computers don’t have any of these technologies built in by default. Any website that depends on technology for key features or functionality that not everyone has is doomed to fail.
How to Test
To check your own website is displaying correctly for Google, turn JavaScript off in your web browser and navigate around your website. If you can’t easily access all parts of your website with JavaScript turned off, then the chances are that search engines are also having difficulty. While it is true that Google does attempt to index JavaScript based content, they do still find it difficult which is why they recommend progressive enhancement their self.
Removing any ambiguity from your website means that Google will be able to crawl and index your website with ease. It is easy for Google to assume that you are showing one version of content to the user and another version of content to search engines – for which websites can be penalised for this behaviour. Always use progressive enhancement as a way to develop websites effectively.
If you need any tips, advice or pointers related to the technology your website is using then get in touch. We have a range of services to support your individual needs, from starter Digital Lifeline support packages to our high end consultancy packages designed to be tailored to your every need.
by Michael Cropper | Mar 24, 2015 | Developer |
We recently migrated over to a UK leading web hosting infrastructure which involved migrating a large number of websites from one web server to another, and we did this with zero downtime. Which meant that the business websites involved never suffered from lost traffic, sales or enquiries. This is not as straight forward as it sounds on the face of things and requires planning and careful implementation to ensure all data, databases, files, settings, configurations and more are transferred with ease. As this is a common problem for people I thought it would be good to document the steps we took which served us well. Depending on the server technology you are moving from and to will depend on how simple (or difficult) this will be for you to implement. These guidelines are generic so you should be able to take what you need from these and see how this fits in with your technology.
DNS Records
Depending on where your DNS records are setup, if you are using your current DNS records, if you are using new DNS records or something else – will fully depend on if this is relevant for you.
If your current name servers are set to your old hosting provider such as ns1.your-web-host.com and ns2.your-web-host.com then this makes life a little simpler for you. When the time is right, you can simply point your domain names at the new web server by changing the name servers to ns1.your-new-web-host.com and ns2.your-new-web-host.com. That said, many people prefer branded name servers, such as the ones we run for ns3.contradodigital.com and ns4.contradodigital.com. This causes a few more challenges when migrating branded name servers.
If you are wanting to migrate branded name servers then you need to set up an interim stage. For us, our old branded name servers were set up as ns1.contradodigital.com and ns2.contradodigital.com which pointed to the old DNS server (a specific IP address) which then handled the traffic to websites with these name servers and pointed this traffic to the correct web server. If we were to simply migrate the DNS server IP address for ns1.contradodigital.com and ns2.contradodigital.com over to the new DNS server, this would take time to propagate, up to 48 hours which could cause inconsistent behaviour for users accessing websites listed.
Instead, by setting up new name servers which point to the new DNS server we can have ns3.contradodigital.com and ns4.contradodigital.com which can then propagate throughout the Domain Name System until we are ready to officially migrate the websites over. Once we are confident that the new name servers have propagated (see http://dnswatch.info to check) we can then begin the migration.
Beyond this, if you have any A, TXT, MX records or other that are configured on your old server, then make sure these are migrated too.
Transfer Data
Getting all of your data, files, databases, settings and more from your old web server over to your new website can be a challenge. Thankfully for us, we use a leading web server management system, cPanel which comes with a handy little transfer tool. This allows the old and new servers to talk to each other and automatically migrate everything over. This setup does require that you have SSH Root access to both servers, which you may or may not have depending on the old technology you are using.
If you are migrating between different web server control panels then this is going to be a much more manual process and often requires a detailed checklist to make sure you have transferred everything correctly and it has been implemented correctly on your new system.
It is important to reiterate this, but make sure you have transferred absolutely everything on your web server. To give you an idea this could include; files, redirects, email forwarders, distribution groups, emails, databases, FTP accounts, user logins, server logs (if needed) and more. Depending on how much of the functionality you use on your old and new webserver will depend on the areas that you need to check over. Always by over cautious to make sure you have checked everything since if you miss anything then you are unlikely to be able to recover this once you have cancelled the subscription on your old web server.
Website Migration
Once you have successfully migrated all of your data, it’s time to start migrating your websites to run from the new server and get rid of the old server. To start things off, start with a non-descript website if possible to make sure that the process has worked for your individual settings. The details above are specific to what we did and may or may not work for you. The final step is to switch your name servers so your domain names will be looking at your new web server instead of your old one.
Once you have updated the name servers for the test domain, then you can check that everything is working correctly before migrating the remaining domains on the system. This process will allow you to migrate your web servers seamlessly with zero downtime. This is a little more challenging for large scale ecommerce websites due to data continuity related to transactional data, but this is a little outside the scope of this blog post as this again depends on the technology being used related to the ecommerce setup.
Nuances
A few other points to note about web server migration is that you can trip up if you are migrating to servers with different versions of software running (PHP for example), different file systems, different operating systems, different access rights and more. When upgrading your web server, you are likely moving away from technology that isn’t suitable for your needs anymore or is limiting in some way. This causes a few problems naturally which may need to be overcome. You may also have some specific technology, non-standard and inaccessible server settings configured on your old server which can easily be missed during the migration. To avoid tripping up on some of these issues, it is always recommended to speak with your current web host to understand the full technical setup and software that is installed to make sure you have everything installed on the new server that is needed to support the websites and web applications that you are running.
Summary
The information outlined worked for us. It may not work for you. Understand the technology you are working with, in terms of what you are moving from and what you are moving to. If you are in any doubt, get in touch and we can help you with this process. Working with industry leading web hosting solutions means that we have a lot of experience working with great solutions, and also very poor solutions that people are migrating away from.
by Michael Cropper | Mar 22, 2015 | Developer |
You would have thought that a company the size of PayPal would have this problem solved, but they haven’t. So here is the solution to a problem that affects many businesses and website owners as they start to scale their payment solutions. Before we jump into the solution, to recap for those not too familiar with PayPal and IPN, let’s take a look at what this is and where the problem actually lies.
PayPal IPN
PayPal has functionality called Instant Payment Notification (IPN) which will automatically inform your website, web application or other URL when ‘something’ happens. Within your PayPal business account you manually set a single PayPal IPN URL which is a page on your website. This page on your website then listens for information from PayPal when any transaction related changes are made.
To understand more about PayPal IPN and its purpose, this information extracted from the PayPal website helps to explain this;
Instant Payment Notification (IPN) notifies merchants almost instantly about transaction events, such as:
- Payments received, including Express Checkout, and Adaptive Payments.
- Credit card authorizations.
- eCheck payments and related pending, completed, or denied status events.
- Recurring payments and subscription actions.
- Chargebacks, disputes, reversals, and refunds.
Merchants can act based on the information they receive. For example, they can:
- Update their inventory.
- Email a purchase confirmation.
- Trigger order fulfillment.
- Enable download of digital media.
- Update their customer list.
- Email a shipping notification.
- Issue a refund.
- Update accounting-related information.
Source, https://developer.paypal.com/docs/classic/products/instant-payment-notification/
At first glance if you haven’t used this before, this sounds seriously awesome. And you know what, it is. But there are a couple of problems with this which can cause problems and that comes down to the PayPal IPN URL that you specify. More information about PayPal Instant Payment Notification can be found here and here.
Problems with PayPal IPN and why it may not be working
By default, the PayPal IPN URL is set at the PayPal account level. Another point to note at this stage is that you are only allowed one personal PayPal account per bank account and one business PayPal account per bank account. More information about this can be found here, here and here. In addition to this, many systems that utilise PayPal for their payment gateway are legacy 3rd party systems which are difficult, if not impossible, to customise. And herein lies the problem.
When using industry leading software that utilises PayPal as the payment gateway, this software will generally work out of the box and override the account level IPN URL to use a different IPN URL. This means that when a payment is made through this system, then PayPal will inform the IPN URL that is sent to PayPal as part of the transaction, rather than the IPN URL that is contained within the PayPal account. This is great and is how most systems should function, or at least have the flexibility to function in this way.
If you are using just a single system, then there isn’t really a problem here. The problem comes as you start to scale your business, websites and web applications while looking to keep financial management simple by using a single payment gateway for all of those systems. While we would always prefer to work with leading software and systems, the reality of website and web application development means that this is not always the case and we often deal with legacy systems or more basic functional systems that perform different tasks within a business.
An important point to note here is that while you can override the PayPal IPN URL if you are using standard payments and systems, you cannot override the PayPal IPN URL if you are using recurring payments. When speaking with PayPal about this issue, apparently this is something they are aware of and are working on which should be live ‘shortly’. We will see.
The problem here is that if you have multiple systems that don’t have the functionality or flexibility to override the PayPal IPN URL then this leave you with a bit of a problem. Because you can’t go creating another PayPal account as this is against PayPal’s guidelines, and you can’t go customising the systems as they aren’t capable of doing so. So you have either two solutions, either use different payment gateways for different systems which means that your payment information is going to be all over the place and difficult to manage, or you could hack a solution together that works.
Solution to Multiple PayPal IPN URLs
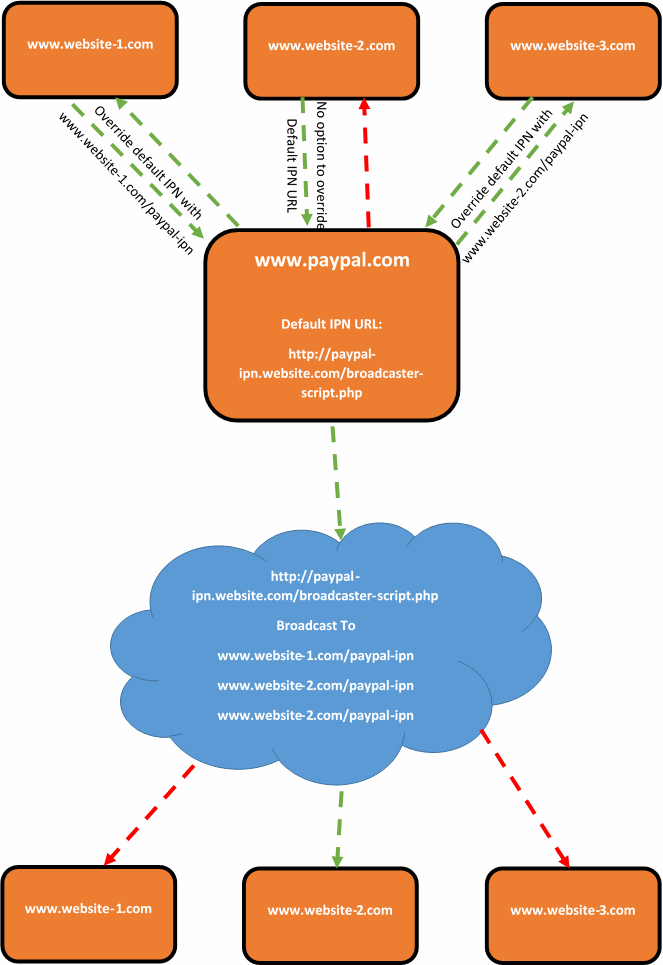
Thankfully, there is a solution. It is not a very elegant one, and one that I would personally prefer to avoid. Although there are no perfect systems, so this is a solution to one of those imperfect systems. The solution is to create a broadcasting script which acts as the default PayPal IPN URL. For example, this could sit on your website at www.your-website.com/paypal-ipn-listener-broascaster.php.
The purpose of the broadcaster script is so that your Instant Payment Notification messages can be picked up in a single location and forwarded on to wherever you like. This could be a single URL or multiple URLs. As the IPN messages contain transactional details and references, if another website, web application or system picks up on a message about a transaction that it knows nothing about, then it will simply ignore this message. So if you have 5 systems receiving messages from the broadcaster script, 4 of the systems are going to ignore the message and one of the systems will be able to tie this message to the specific transaction back to the correct piece of information and take the next steps required.
What this also means that if you start using systems that are capable of overriding the PayPal IPN URL, or PayPal get around to implementing the official solution for multiple IPN URLs within the account, then this solution does not interfere with this.
This can be a little difficult to picture, so here is a brief representation of what happens;
Summary
While you more than happy to use multiple payment gateways when looking to scale systems, many businesses want to keep things simple and use a single payment gateway for multiple systems. If the payment gateway that you have chosen is PayPal and you are looking to solve the problem related having multiple Instant Payment Notification (IPN) URLs, then it would be recommended to look at creating some kind of broadcast script that will handle all messages from PayPal and forward them on to where you would like. Depending on the software, programming languages and more that you are using, the implementation will clearly differ. If you need any help in relation to this, then get in touch.
by Michael Cropper | Jan 25, 2015 | Data and Analytics, Developer, Tracking |
We have been seeing a large rise in referrer spam in Google Analytics which is causing problems for a lot of website owners. There is also a lot of misinformation on the web about how to resolve these issues which we will look to clear up in the blog post and the subsequent resources we have created to block spam bots in Google Analytics. This blog post will look at what causes referral spam in Google Analytics.

What is a Referrer
A referrer is a HTTP Header that is sent to a website when a user clicks on a link from one website to another. For example, within your web analytics software such as Google Analytics, you can see what other websites (the referrer) are driving traffic to your website which can be useful to track how popular your website content it around the web.
The referrer is extremely valuable although due to its nature, it is possible to abuse this information and trick web analytics software into thinking a genuine user has performed an action on an external website to visit your website. When in fact this was just completed by a software script to mess with your analytics data, often to place links into your web analytics platform designed to make users take a look at those which can often be a virus or an affiliate link to a popular website so that they can earn money the next time you purchase something from that website.
How Referrer Spam Works
It depends. Referrer spam comes in two main forms, particularly when related to Google Analytics. Sometimes the script will actually visit your website and execute the JavaScript files for Google Analytics, which then sends the data into Google Analytics. Whereas other times data is just sent directly into Google Analytics without the script ever visiting your website. Depending on what is happening within your own analytics software will depend on how you deal with the spam and remove it.
What actually happens with all types of referral spam is that the HTTP Referrer header information is faked. When creating scripts to spam people, to explain this simply, you say what the URL is and what the HTTP Referrer header information is. For example;
URL: www.contradodigital.com
HTTP Referrer: www.another-website.com
So when Google Analytics receives this information, the www.another-website.com shows as a referral website visit which is why it then appears within the Google Analytics reports. The finer details are a little more complex than this in the background, but this gives you a basic understanding of what is happening.
Referral Spam that Visits your Website
One way referral spam gets into your Google Analytics reports is when a spam bot actually visits your website and loads the Google Analytics JavaScript.
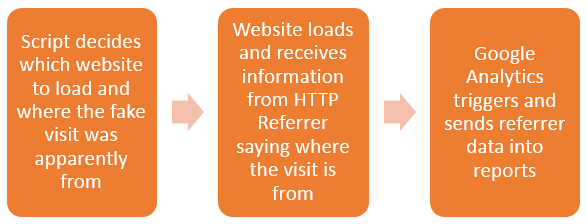
From Google’s point of view, the data that has been received for the HTTP Referrer is genuine and there is no way of determining any difference. Hence why this data is sent straight into Google Analytics just like a valid website visitor’s data would be sent into Google Analytics.
This type of referrer spam is actually reasonably simple to block using the .htaccess file. Read up on the finer details on the resources page about how to stop this. Essentially, you can block certain website visits if they have come from a certain source. For example, you could block anyone trying to access your website if they have come from www.google.com. But you wouldn’t do that, that would be insane. Instead, you can identify the spam domains and block access from these.
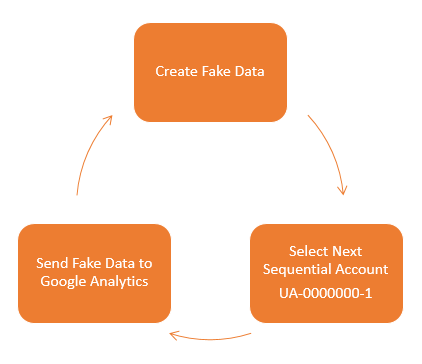
Referral Spam that Sends Data Directly into Google Analytics
Other types of referral spam will send data directly into your Google Analytics account without ever visiting your website. Which makes dealing with this type of referral spam a little different. How this actually works is that a script sends the data directly to Google Analytics and associates this with your account. Your account has an ID number which looks like, UA-00000001-1, then another website owner has an account like UA-00000002-1 and so on.
So how these types of scripts work is that they simply send the fake data directly to Google and the different accounts, essentially looping through the account numbers hundreds of thousands of times so their referral spam ends up in as many different accounts as possible. The data that is sent through into Google Analytics by spammers can be customised to whatever they like, which is a little annoying for website owners and a continual job to keep up to date with this.
What this means is that you need to take a different approach to block this type of spam from Google Analytics. This needs to be implemented directly within Google Analytics. There are two things that you can do within Google Analytics which are blocking spam bots that Google is aware of and also blocking individual referral domains that aren’t being blocked by default. There is a full guide on how to block this type of referral spam over on our resources page. If you have any specific queries about how to deal with referral spam within your own Google Analytics account then get in touch and we can take a look at what the solution will be for you. If you are interested in reading the highly technical details behind what is happening, then this post explains this in great detail.
by Michael Cropper | Jun 7, 2014 | Developer, Technical |
Within our daily work we use Excel an awful lot, so naturally we like to use Excel to its full potential using lots of exciting formulas. One of the major challenges within Excel is trying to use a VLOOKUP function within a VLOOKUP function. In summary, this isn’t possible. The reason this isn’t possible is due to the way the VLOOKUP function works. Let’s remind ourselves what the VLOOKUP function actually does;
=VLOOKUP(lookup_value,table_array,col_index_num,range_lookup)
What this means in basic terms is “find me a specific cell within a table of data where a certain criteria is met”. This is such a powerful function that can be used to speed up work in so many different ways. But we aren’t going to look at why this is so great here, we are going to look at the main limitation and most importantly how to get around this with more clever magical Excel formulas.
Solutions
The solution to this is quite a complex one and one that involves many different Excel formulas including;
- =ROW()
- =INDEX()
- =SUMPRODUCT()
- =MAX()
- =ADDRESS()
- =SUBSTITUTE()
- =MATCH()
- =CONCATENATE()
Throughout this blog post we’ll look at what each of these mean and how they can all be used in conjunction to perform a function what is essentially equivalent to a VLOOKUP within a VLOOKUP.
The Data
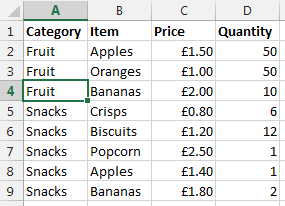
Before we jump into how to solve the problem of performing a VLOOKUP within a VLOOKUP, here is the data that we will be working with. Let’s assume that we have a large list of products which are associated with multiple different categories as can be seen below;
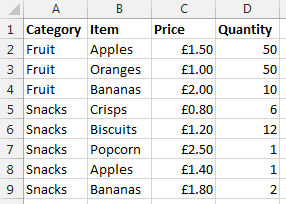
Data Sheet – Prices
You may be wondering why apples and bananas are classed as snacks in the data. Don’t worry about that. Just go with it. There are many different situations whereby you may be presented with this type of data so this is purely to illustrate the example in a simple way.
Now let’s say that you want to visualise this information a little easier. The above table of only 8 entries is reasonably straight forward. Although one example we’ve been recently working with had over 35,000 rows of data which was a little more challenging to view in this format and we wanted a simpler way of looking at this information within Excel. So let’s say we want to look at the data in the following way;
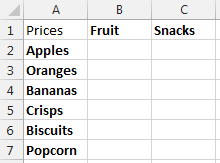
Data Sheet – Summary Prices
This is the data that we will be working with so you can clearly see how this technique can be implemented. To keep things easier to understand, these two pieces of data are kept on two separate sheets within the Excel worksheet.
Quick Answer
Looking for the quick answer to this complex formula? Then here is the answer;
=IFERROR(VLOOKUP($A2, INDIRECT(CONCATENATE(“‘Prices’!”, SUBSTITUTE(ADDRESS(MATCH(B$1, Prices!$A$1:$A$100, 0), 1), “A”, “B”), “:”, SUBSTITUTE(ADDRESS(ROW(INDEX(Prices!$A$2:$A$100,SUMPRODUCT(MAX((Prices!$A$2:$A$100=B$1)*ROW(Prices!$A$2:$A$100))-1))), 1), “A”, “D”))), 2, FALSE), 0)
You may be a little confused with the above, so this post will explain exactly what each part of this means and why it is contained within the rather large and complex formula above. Most importantly, you will be able to understand how to perform the equivalent of a VLOOKUP inside a VLOOKUP.
Steps
The individual steps within the above formula can be broken down into much smaller and easier to understand steps as can be seen below;

Steps for how to perform a VLOOKUP inside a VLOOKUP
Below we will talk through each of the above steps so you can understand why it is important.
Find the Sub-Table
Firstly if you are wanting to perform a VLOOKUP within a VLOOKUP then you need to find where the sub-table starts and ends. While you could manually enter this in for very small data sets, this is simply not practical for large data sets.
To perform this action we need to define search for the first and last occurrence of when ‘something’ is found. A note on this point, you will need to ensure that your lookup data, in this case the ‘Prices’ sheet, is ordered by the column you are looking up, in this case the ‘Category’ column. Since if this isn’t the case, then data will be included within this sub-table which shouldn’t be.
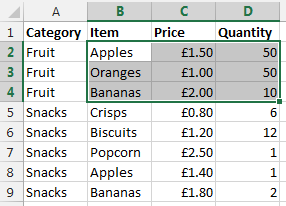
To do this, we need to find both the first occurrence and the last occurrence. What we are looking to achieve is identify the sub-table for ‘Fruit’ which can be seen below;
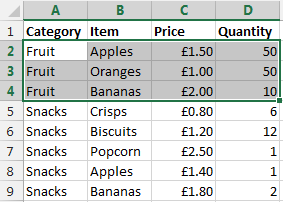
The sub-table we are looking for
Once this has been identified, then we can use the standard =VLOOKUP() function on this sub-table to find the data we would like.
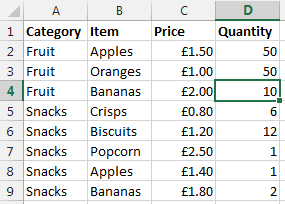
Find the First Occurrence
There are a few different formulas included to find the first occurrence of data within a column which are outlined below.
=MATCH()
To find the first occurrence of ‘something’ within a range of data then we use the =MATCH() function. To remind ourselves of what the MATCH() function is, here is the official description from Microsoft;
The MATCH function searches for a specified item in a range of cells, and then returns the relative position of that item in the range. For example, if the range A1:A3 contains the values 5, 25, and 38, then the formula
=MATCH(25,A1:A3,0)
returns the number 2, because 25 is the second item in the range.
Use MATCH instead of one of the LOOKUP functions when you need the position of an item in a range instead of the item itself. For example, you might use the MATCH function to provide a value for the row_num argument of the INDEX function.
MATCH(lookup_value, lookup_array, [match_type])
Source
Looking back at our example, this translates into the formula;
=MATCH(B1, Prices!$A$1:$A$100, 0)
What this means is;
- Find the contents of B1, which is ‘Fruit’ in our example
- Within the range of data Prices!$A$1:$A$100
- And make sure it matches exactly (0)
This has now found the first occurrence of this information within the column of data. Now we need to translate this into something that a VLOOKUP formula can use.
=ADDRESS()
The next bit we need to look at is turning the row & column numbers into an ‘Address’ which Excel can understand. To do this we simple create the formula;
=ADDRESS(E2, E3)
The =ADDRESS() function takes a Row Number and a Column Number and turns that into an Address. In this case, the row number is generated from the previous function, =MATCH() and the value of E3 in the example above is 1. We use 1 because for this we are only interested in starting on the first column of data. Once we know we are starting here we can always move the cells along accordingly.
In our example, this address at this point in the large formula is set to $A$2.
=SUBSTITUTE()
Now we know we have created an Address in the previous step which was within column 1, this is also the same as column A. This makes life easy for us as we know where this is. The next step is to nudge the sub-table over so the =VLOOKUP() function can easily lookup the data in the later step.
To do this, we simply nudge the starting Address over to the right by one column using the following formula;
=SUBSTITUTE(E4, “A”, “B”)
Where E4 is the cell which contains the Address from the previous step.
The cell that has been identified as part of this step is the first occurrence as can be seen below;
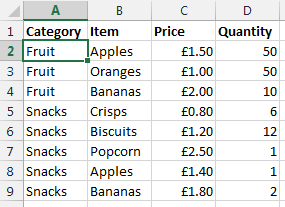
Find the first occurrence of data within the column
Now we want to nudge this over using the above function which will mean this item is now set to $B$2 which is the starting point of our sub-table.
Ok, so we now have the starting point for the sub-table for the VLOOKUP to use. We now need to calculate the end point so the sub-table can be used within the VLOOKUP.
Find the Last Occurrence
Finding the first occurrence of data in column is a lot easier than finding the last occurrence as you can see from the formula below that we need to do this;
=ROW(INDEX(Prices!$A$2:$A$100,SUMPRODUCT(MAX((Prices!$A$2:$A$100=B1)*ROW(Prices!$A$2:$A$100))-1)))
The key functions we need here are;
- =ROW() – Which takes a reference and calculates which row number this is on
- =INDEX() – Which returns a value or the reference to a value from within a table or range.
- =SUMPRODUCT() – This is used to tell Excel the calculations are an array and not an actual number
- =MAX() – This is used to find the largest row number in the array where the lookup value occurs
- =ROW() – This, as before, is pulling out the Row Number from the data retrieved
Unlike previously, it is not simple to break this out into sub-sections to explain the different points as the formulas don’t work when breaking them our separately due to the way the =SUMPRODUCT() function works. As such, I’ll talk through what each of the different parts of the formula mean and what they do.
=SUMPRODUCT(MAX((Prices!$A$2:$A$100=B1)*ROW(Prices!$A$2:$A$100))-1)
This formula is identifying the last occurrence of the data that is in cell B1 within the range of data $A$2:$A$100, which in our example is ‘Fruit’. We then wrap this in the =INDEX() function to get the cell reference then wrapping this in the =ROW() function which will identify the row number where this data is found;
=ROW(INDEX(Prices!$A$2:$A$100, SUMPRODUCT(MAX((Prices!$A$2:$A$100=B1)*ROW(Prices!$A$2:$A$100))-1)))
You may have spotted the -1 in the formula above. This is to ensure that the data is pulling back the correct row number. If this isn’t there, then you will notice that the data that is pulled back is a row below where you would expect.
To get a good understanding of the above part of the formula, then I’d recommend reading the fantastic guide over at Excel User.
What we have achieved using the above combination of formulas can be seen below as the last occurrence of data in the column;
Find the last occurrence of data in the column
Once we have this data we then wrap this in an =ADDRESS() function then a =SUBSTITUTE() formula which first turns the result into an Address that Excel can understand, opposed to standard text, then moves the data over several columns from column A to column D. This is needed, since we will be creating a sub-table that includes several columns. In this case, 3 columns which are column B, C and D. If you are working with data with more columns, then you will need to replace the D with a higher column.
SUBSTITUTE(ADDRESS(ROW(INDEX(Prices!$A$2:$A$100,SUMPRODUCT(MAX((Prices!$A$2:$A$100=B$1)*ROW(Prices!$A$2:$A$100))-1))), 1), “A”, “D”)))
Move the column to the end so we can create a sub-table that contains all the required data
So now the end of the sub-table is set to $D$4 which means that we have a starting point and an end point for our sub-table which can be used in the =VLOOKUP() function as outlined below.
Lookup Data in the Sub-Table
Now we have the sub-table defined using all of the above formulas, we can use the standard =VLOOKUP() function once we have joined all of the above data together.
Create the lookup table
Now we have all of the above points, we need to create the lookup data using the standard =CONCATENATE() formula as can be seen below;
=CONCATENATE(“‘Prices’!”, E5, “:”, E11)
The data within E5 is the starting point of the sub-table, and the data within E11 is the end point within the sub-table. In our example, this gives us the answer of ‘Prices’!$B$2:$D$4.
Lookup data
Now we have the sub-table to lookup the data we want, we can simple use the standard =VLOOKUP() function to find the data that we require as follows;
=VLOOKUP(A2, INDIRECT(E13), 2, FALSE)
We wrap the concatenate function within the =INDIRECT() function so that the data is treated as a reference, opposed to text. The data within E13 is the result of all of the work previously in this post, I’ve just left this in here to make this easier to read and understand. For the full formula, this would be replaced with the individual parts. Now the data that is brought back is exactly what we want.
Sub-table of data based on initial criteria
What this final =VLOOKUP() function is doing is saying “find the value in A2 within the sub-table we have identified, then bring back the second column of data. So in our example, the long formula in column B1 is bringing back the data £1.50 as can be seen below;
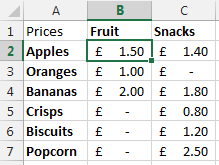
Result of a VLOOKUP inside a VLOOKUP
Summary
So there you have it, how to perform the equivalent of a VLOOKUP within a VLOOKUP using a few different formulas within Excel. You may be a little scared of such a huge formula at first, but you will see that when you do need to use this, I would always recommend breaking this out into the different parts before trying to create one monolithic formula as you will be able to put this together much easier.
Also, in the formula below, you will notice that it is all wrapped in an =IFERROR() function which simply sets the data to 0 if nothing can be found. You can set this to whatever you like, I just chose 0 since this was about prices.
=IFERROR(VLOOKUP($A2, INDIRECT(CONCATENATE(“‘Prices’!”, SUBSTITUTE(ADDRESS(MATCH(B$1, Prices!$A$1:$A$100, 0), 1), “A”, “B”), “:”, SUBSTITUTE(ADDRESS(ROW(INDEX(Prices!$A$2:$A$100,SUMPRODUCT(MAX((Prices!$A$2:$A$100=B$1)*ROW(Prices!$A$2:$A$100))-1))), 1), “A”, “D”))), 2, FALSE), 0)
=IFERROR(VLOOKUP({Main-Lookup-Value}, INDIRECT(CONCATENATE(“‘{Sheet}‘!”, SUBSTITUTE(ADDRESS(MATCH({Sub-Table-Lookup-Value-First-Occurrence}, {Sheet}!{Sub-Table-Lookup-Range}, 0), 1), “A”, “B”), “:”, SUBSTITUTE(ADDRESS(ROW(INDEX({Sheet}!{Sub-Table-Lookup-Range},SUMPRODUCT(MAX(({Sheet}!{Sub-Table-Lookup-Range}={Sub-Table-Lookup-Value-Last-Occurrence})*ROW({Sheet}!{Sub-Table-Lookup-Range}))-1))), 1), “A”, “{Column-Letter-For-End-Of-Table}“))), 2, FALSE), 0)
Simple really!
Ok, so this isn’t for the faint hearted. But for those advanced Excel users around I’m sure you will have come across times when you really needed to perform a VLOOKUP inside a VLOOKUP and found that after a long time researching how to do this online that it isn’t a simple task. So hopefully you can see the clear steps included above and this will help in the future. The beauty of the above formula is that you can now drag this into new rows and new columns without having to update anything, all thanks to the $ signs throughout the formula.