by Michael Cropper | Mar 10, 2021 | Client Friendly, IT, Networking |
This is one of the most misunderstood concepts when people start to get into the murky world of networking and computer networks. It’s no real surprise why there is so much confusion as the manufacturers confuse things further as it’s not always 100% clear when looking on certain websites whether a switch is managed or unmanaged. Then there is even more confusion since folks in IT like to just talk about ‘Switches’ as a general topic without being specific about which specific type of switch they are talking about. So hopefully by the end of this blog post you’ll have a good understanding of what the difference is between a Managed Switch and an Unmanaged Switch.
Baseline Physical Architecture
To help with discussions throughout this blog post, let’s look at common variations of a very basic network architecture.
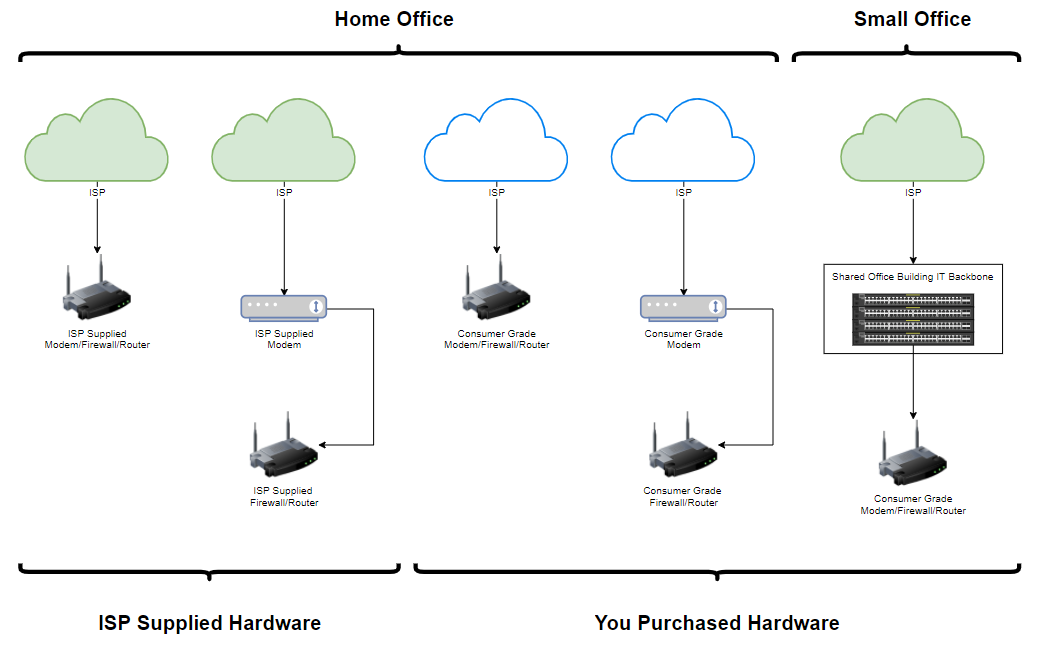
In the above image we have given five basic examples of how the vast majority of Small Office or Home Office networks are set up. We’ve only included everything up to your core router/firewall in this example above to highlight some of the common setups that we see. This helps to pave the way for discussing Managed Switches and Unmanaged Switches as this is where things start to get a little more complex.
What is an Unmanaged Switch – Basic Concept
The basic concept of an unmanaged switch is that it is designed for ease of use to easily extend your network without worrying about networking. I say that in the sense that you can purchase an unmanaged switch and simply plug in the cables and everything magically works.
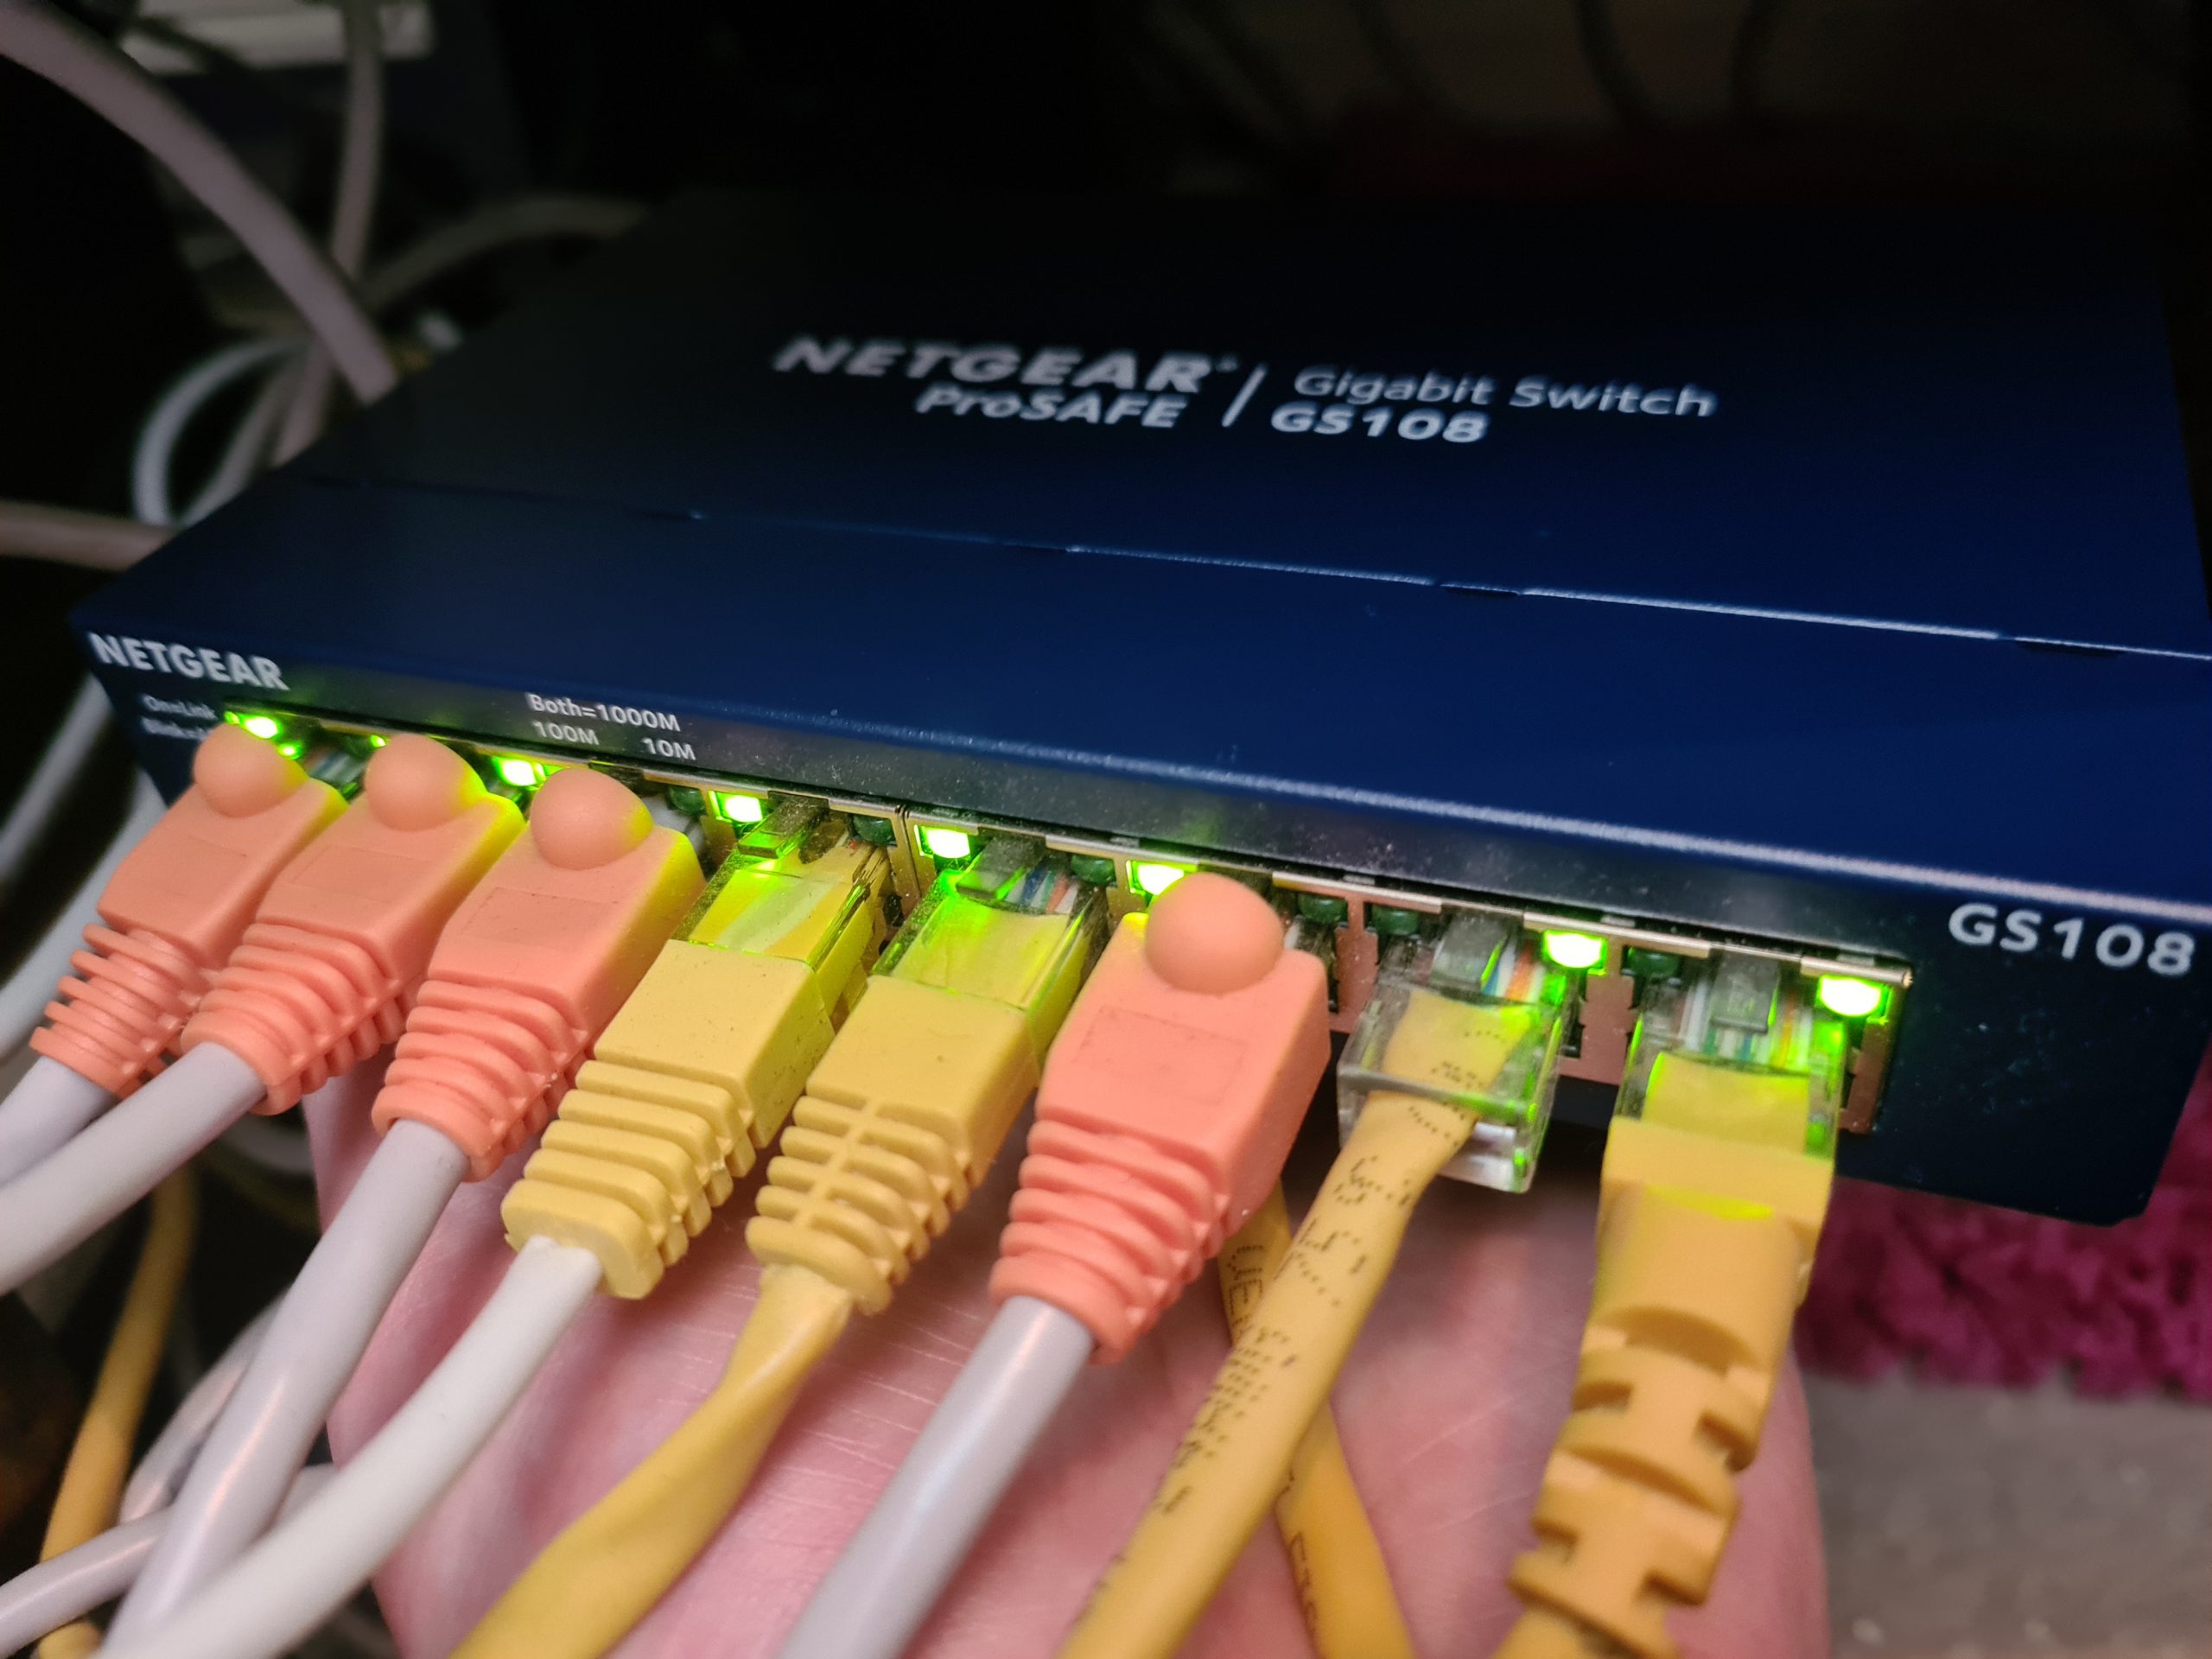
You can see an example of an unmanaged switch above, this is the Netgear ProSafe GS108 Unmanaged Switch. In this example, this is an 8-Port unmanaged switch. So let’s take a look at what that means for the baseline diagram.
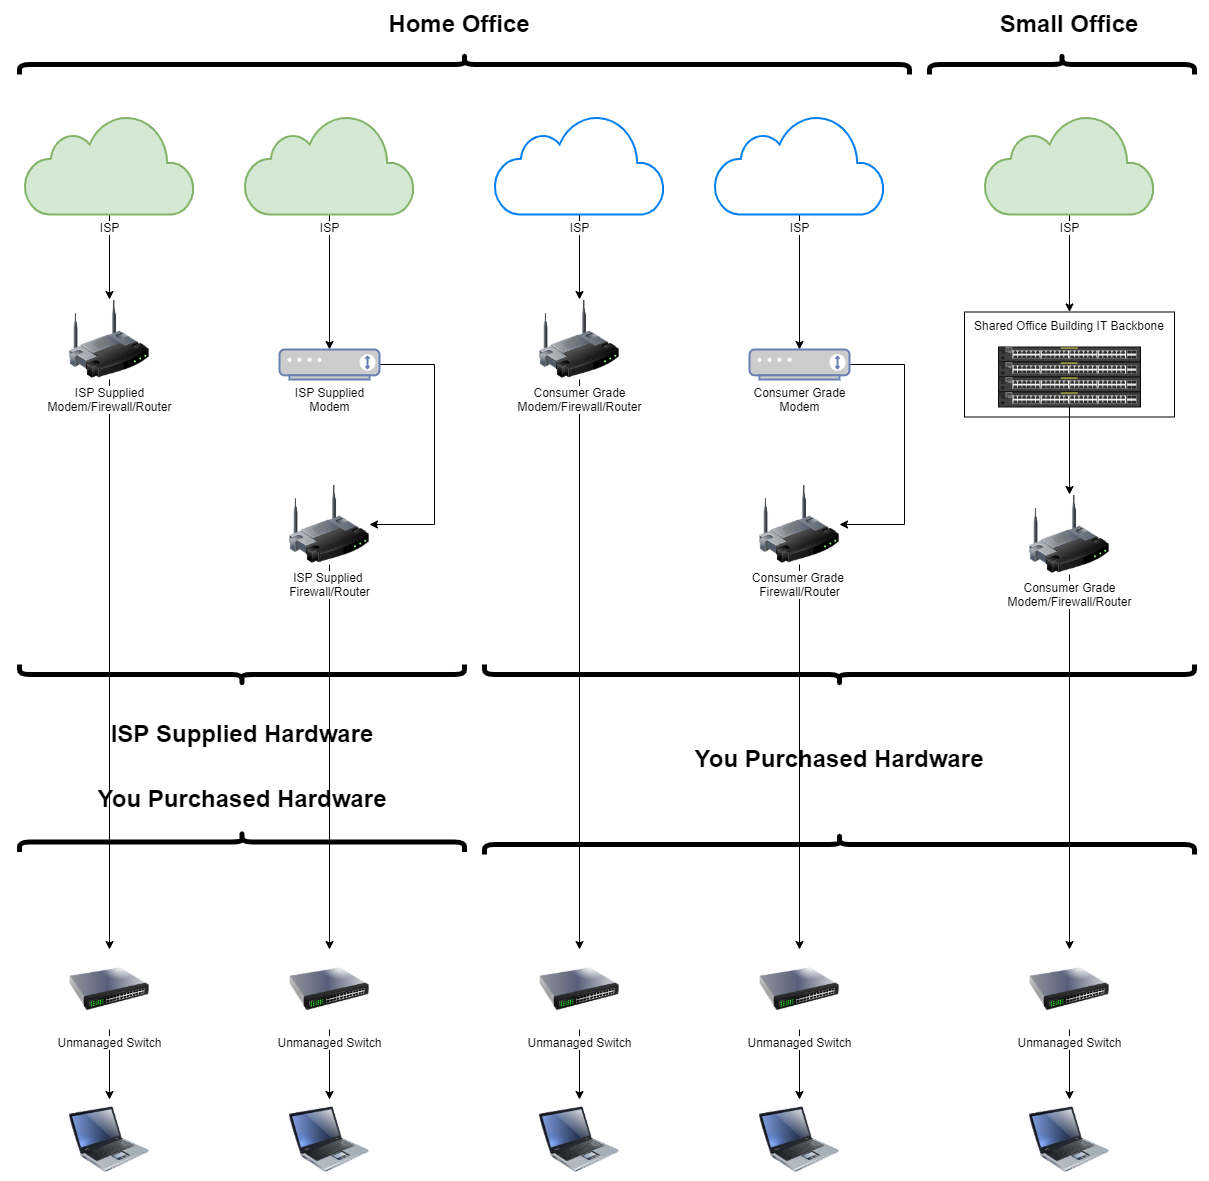
In the above image you can see that all we’ve done here is place an unmanaged switch in between your laptop and your primary router. Simple. No configuration required, all you’ve had to do is to plug the cables in and you’re good to go. This is the beauty of unmanaged switches, they are extremely handy to use when you want to get additional devices connected into a single network. And this is an important point that we’ll come onto next. Granted in the above example, we don’t actually need an unmanaged switch for this to work as you could just plug your laptop directly into the router/firewall, or connect over WiFi. But the reality is that you likely have more than one device here so it can be beneficial to use unmanaged switches depending on the physical layout of your home office or small office to make your networking life as easy as possible.
The example we’ve looked at above is what is commonly referred to a as a Flat Network, meaning that every device that is plugged in is on the same network, meaning that every device can see and talk to every other device. Ok, it’s a little more complex than that as every end device generally has a level of protection built into that too, but you get the point. Ultimately though, what this means is that every device on the network can see the network traffic that is flowing through the network which is a large security risk for complex networks, and should be a serious consideration for any networks both small and large in the modern world we live in.
Take Internet of Things (IoT) devices as an example. The second you plug one of these into your network (or connect it wirelessly), then if that device becomes a target for attack, that single device can flood through your network and at best, ‘only’ snoop on all your internet traffic, and at worst, spread throughout your network and infect all your machines.
There are endless stories coming out daily about these types of attacks happening to businesses of all sizes. If you’re still in the mind set of ‘why would anyone target us?’ then you need to have a strong word with yourself and start taking security seriously. Anyhow, that rant over.
Hopefully you now understand why an unmanaged switch is called an unmanaged switch… because you don’t have to manage anything, it just works.
What is a Managed Switch – Basic Concept
Ok, so let’s compare all of the above with a Managed Switch. As you can probably guess, with managed switches…. You need to manage them, aka. Configure them to work in the way that you want them to. And this is where things get from zero complexity to 100x complexity as there are endless ways you can configure your managed switch depending on your use cases and network design.
Generally speaking managed switches are physically larger in size as can be seen in the image below which is a Ubiquiti UniFi 1 Port PoE Managed Switch.

You can get managed switches that are much smaller and of similar sizes and with varying levels of functionality which can make managed and unmanaged switches physically difficult to see the difference between them.
Most importantly about managed switches is that you now have to administer them. They don’t just work by plugging them in. You need to configure which physical ports on the managed switch are used for what purposes, and this all comes down to how you want your network to be configured.
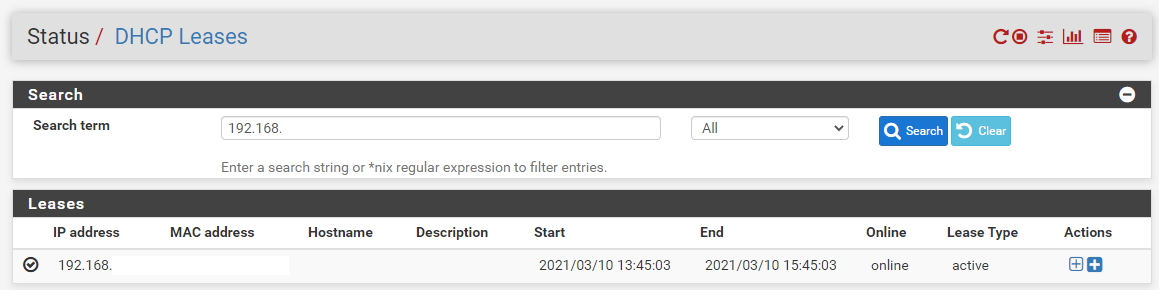
The core difference between unmanaged switches and managed switches is that unmanaged switches do not receive an IP address that is visible within your firewall/router, whereas managed switches appear in your firewall/router with an IP address as can be seen below;
While the managed switch has an IP address, it doesn’t necessarily mean that you can pop the IP address into your web browser and login to it like you can do with your Router/Firewall. The reason for this is because this is totally dependent on how your managed switch works. Some managed switches, and particularly either older models or higher end enterprise clunky makes/models, you will find that you are presented with a user interface when you access the IP address into the web browser. And it likely looks like something that was built in the 1990s, maybe early 2000s, it certainly won’t look like a modern user interface and the features and functionality you see in there will remain fairly static throughout the lifecycle of the managed switch from purchase to dispose and recycle. You tend to find more modern managed switches have external controller based software that gives you a fully modern and nice user interface to managed your switches and multiple devices on your network, whether you have a single managed switch or hundreds.
Some of the core features and functionality you get with managed switches that you don’t get with unmanaged switches to get you a flavour of the differences;
- VLAN 802.1q Tagging
- Redundancy Features
- Managing Physical Ports for VLANs
- Managed Quality of Service (QoS) – i.e. phone network getting higher priority than backup network
- Monitor and Control Network Traffic
- Traffic Filtering
- Security Policies
- Access Control Lists
To visualise how a managed switch fits into your physical architecture, well, it’s exactly the same as where an unmanaged switch fits into the picture. The core difference being is that you now get into the virtualised layer where you start to configure how to securely segment traffic on your network and how this then maps through to physical ports on your managed switch. Let’s take a look at that in a little more detail below.
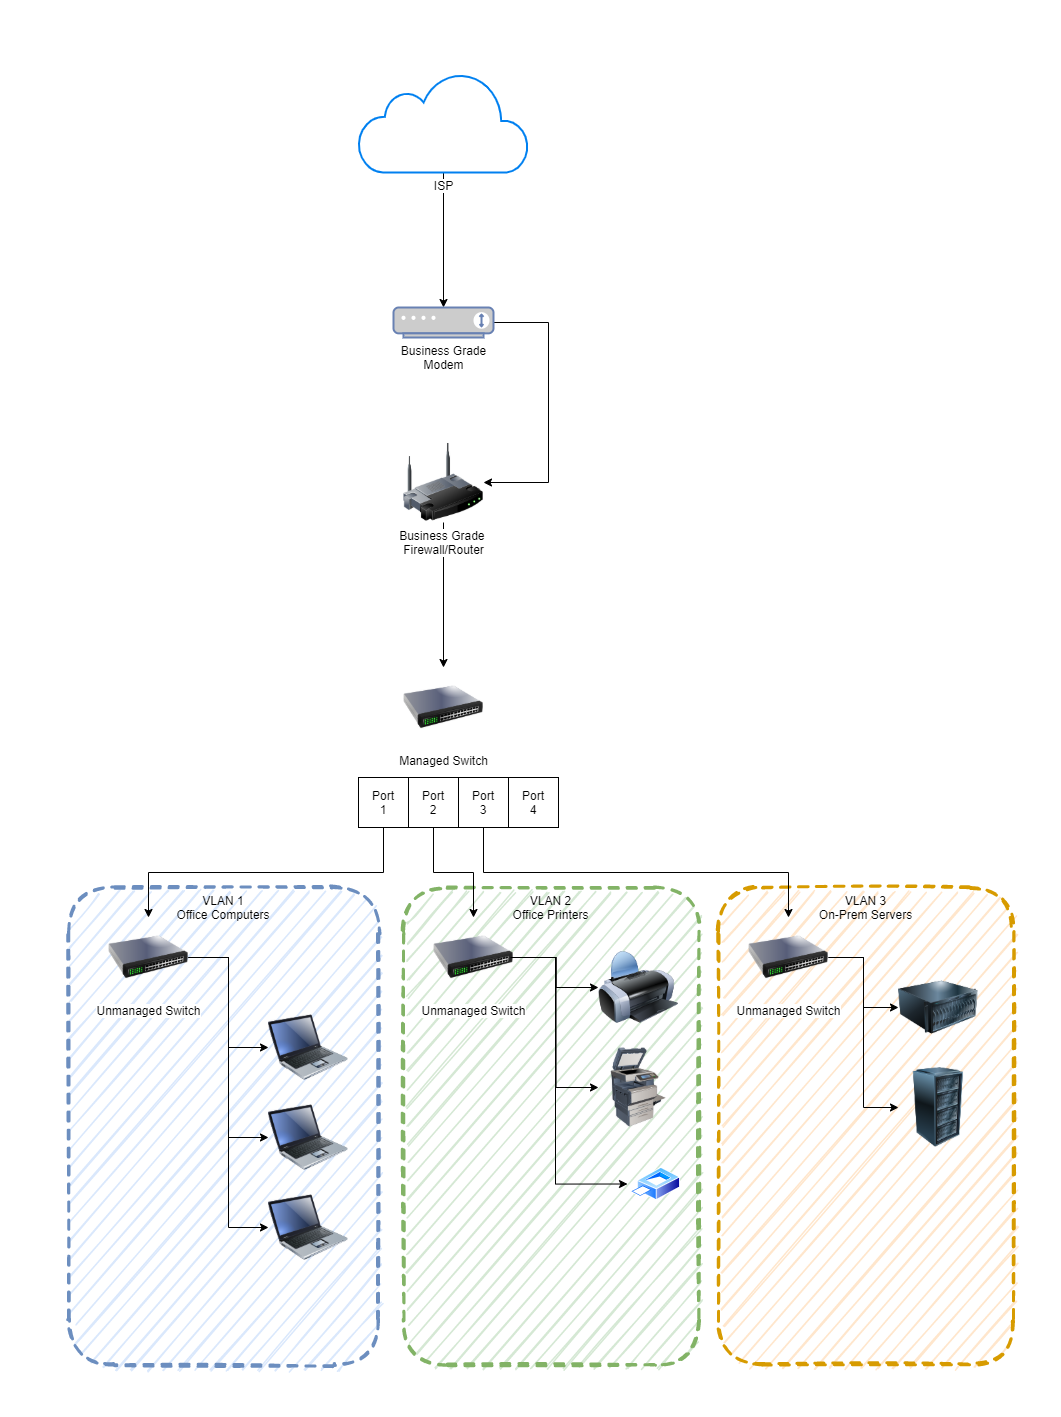
The above is a relatively straight forward example for visualising how managed switches fit into a network and how they are configured. You can configure all of the different types of things you want to be specific against physical ports and VLANs which gives you the full control over what you need to do to manage your network effectively.
What you will notice when you start to plug in a managed switch into your network. To do this properly you need to be working with business grade modems and firewall/routers to ensure things just work without issues. You’ll find that even with high end consumer grade hardware, that they just don’t work very well as they are all combo devices that don’t do anything particularly well.
What you will also notice in the image above is how both managed and unmanaged switches can work together. They both serve a different purpose.
Things to Look Out For on Managed Switches and Unmanaged Switches
This is where things get a little more nuanced. Well, more like there are a lot of nuances which aren’t always obvious when looking at different makes/models of both managed and unmanaged switches. Researching IT hardware is an absolute nightmare, I’m not going to sugar coat this. Do significantly more hardware research than you think you need to so that you can minimise the risk of purchasing IT hardware that is not fit for your specific use case. You also need to consider that there is often a difference between what manufacturers list as features from a branding perspective VS the reality of how much they truly support the specific feature. This often isn’t always possible to tell up front either which makes life difficult.
The best advice would be to create a list of features that you want your managed switch to support then you can research and properly assess the various hardware available that fits your specific use case. We’ve already covered off some of the features above that may be a consideration for you. There are other considerations you may want to make including specific network level protocols and/or configurability and propagation across many devices and complex network infrastructures etc. You will also find that some unmanaged switches will pass through network traffic containing tagged VLANs, whereas others will strip off that part of the message as it travels through the unmanaged switch which is the equivalent of posting a letter into your local post box, only for the post box to then remove the address, so by the time the letter goes to the sorting office, they have no idea what to do with the letter so just throw it in the bin. You get the idea.
It’s difficult to provide a full list of things to look out for, but I wanted to call this out as a section to make sure you really think through your requirements and understand what you are looking for. You may also find that some managed switches may or may not support routing capabilities or may or may not support VLAN capabilities, certain managed switches come with Power over Ethernet (PoE) which can support either smaller or larger number of devices/ports, some managed switches will come with licencing implications whereas others are licence free etc. It’s a complex area.
Choosing Between Managed and Unmanaged Switches
Suffice to say that any Small Office or Home Office and above should absolutely be using at least one managed switch, and will naturally be using one or more unmanaged switches deeper in the network to solve the available physical ports problem. In this day and age you cannot afford to be using flat networks to simply connect all your devices together, you need to be doing this in a safe and secure way to protect yourself and your business, regardless of how big or small your business is. After all, even big global brands have ended up with security breaches because someone in the office thought it’d be great to plug in an internet connected coffee machine to the network which allowed unauthorised access to the network causing a security breach. Don’t let this be you!
As can be seen in the diagram in the managed switches section earlier, both managed and unmanaged switches work together but independently serve very important purposes so you need to understand what to user where and why.
Summary
Hopefully that gives you a good understanding of the core differences between managed and unmanaged switches and where they fit into a network architecture. There is no right or wrong answer about which one or how many of both you need, this all comes down to the design and implementation of your network depending on your needs.
If in doubt, you need to be speaking to a professional who understands how to design networks to fit your specific business requirements. If in doubt, get in touch.
by Michael Cropper | Feb 25, 2021 | Client Friendly, Developer, Software Development, Technical |
In this guide we’re going to look at how to setup Selenium using Java and Apache NetBeans as an end to end guide so you can be up and running in no time. If you’ve not set this up before, there are a few nuances throughout the end to end process and other areas where the official documentation isn’t the best at times. So hopefully this guide can clear up some of the questions you likely have so you can start working on using Selenium to run automated browser based testing for your web applications.
Create a New Maven Java Application Project
Firstly we’re going to use Maven to simplify the installation process. If you aren’t familiar with Maven, it is essentially a package manager that allows you to easily import your project dependencies without having to manually download JAR files and add them to your libraries. You can manually install the JAR files if you like, it’s just a bit more time consuming to find all of the dependencies that you are going to need.
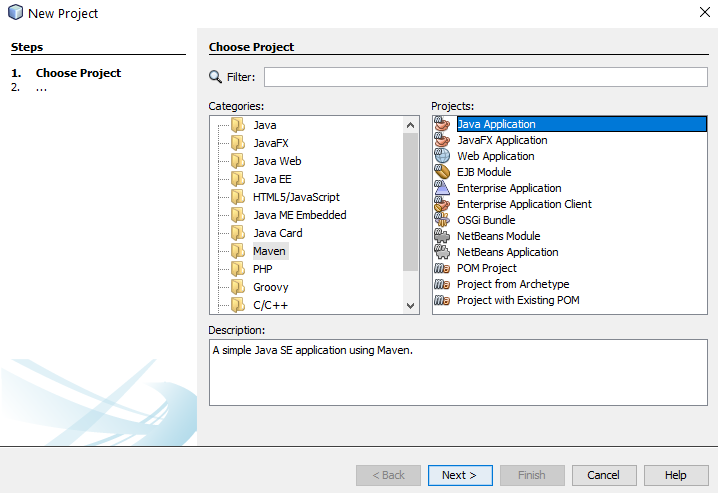
To create a new Maven project, click File > New Project and select Maven then Java Application;
Configure Maven Project and Location
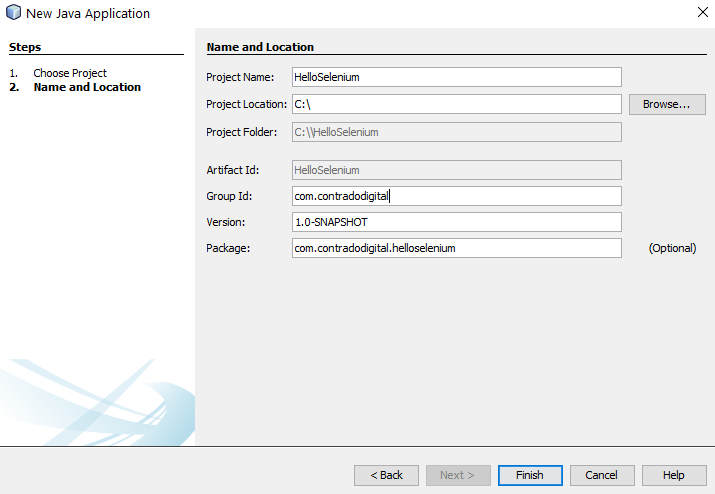
Next you need to configure some details for your project. For the purpose of simplicity we’re going to call this project HelloSelenium. And you’ll notice that when you enter the Group ID field, set this to the canonical name of your package which you generally want to set to your primary domain name in reverse, i.e. com.contradodigital, which will then automatically populate the Package name at the bottom to be com.contradodigital.helloselenium. This is industry best practice for naming your packages so that they have a unique reference.
Open Your Pom.xml File
Next we need to configure your pom.xml file which is used for Maven projects to manage your dependencies. Out of the box within NetBeans, when you create a Maven project, a very basic pom.xml file is created for you. Which sounds like it would be handy, but it doesn’t contain a great deal of information so can be more confusing than helpful for those less familiar with Maven.
When you open up the default pom.xml file, it will look similar to the following;
<?xml version="1.0" encoding="UTF-8"?>
<project xmlns="http://maven.apache.org/POM/4.0.0" xmlns:xsi="http://www.w3.org/2001/XMLSchema-instance" xsi:schemaLocation="http://maven.apache.org/POM/4.0.0 http://maven.apache.org/xsd/maven-4.0.0.xsd">
    <modelVersion>4.0.0</modelVersion>
    <groupId>com.contradodigital</groupId>
    <artifactId>HelloSelenium</artifactId>
    <version>1.0-SNAPSHOT</version>
    <packaging>jar</packaging>
    <properties>
        <project.build.sourceEncoding>UTF-8</project.build.sourceEncoding>
        <maven.compiler.source>1.8</maven.compiler.source>
        <maven.compiler.target>1.8</maven.compiler.target>
    </properties>
    <name>HelloSelenium</name>
</project>
Which looks like a good starting point, but is a long way for you to be able to simply add in the relevant dependencies and get this working. So let’s look next at what your pom.xml file needs to look like to get you up and running with Maven.
Configure Your Pom.xml File
Before we jump into what your pom.xml file needs to look like, let’s first take a look to see what the required primary libraries are that we need to get Selenium up and running. There are a fairly small number, but behind the scenes there are quite a few dependencies too which aren’t always obvious.
Just don’t ask me why you need all these and what the differences are. The Selenium documentation isn’t that great and it just seems that these are needed to get things working. If you fancy having a play with the combinations of the above to see what the absolute minimum set of libraries are, then please do comment below with your findings.
So now we know this, there are a few bits that we need to configure in your pom.xml file which include;
- Plugin Repositories – By default there are none configured. So we need to get the Maven Central Repository added in
- Repositories – As above
- Dependencies – We need to add the 6x project dependencies so that they can be imported directly into your NetBeans environment
So to do all the above, your pom.xml file needs to look like the following;
    <?xml version="1.0" encoding="UTF-8"?>
<project xmlns="https://maven.apache.org/POM/4.0.0" xmlns:xsi="http://www.w3.org/2001/XMLSchema-instance" xsi:schemaLocation="https://maven.apache.org/POM/4.0.0 http://maven.apache.org/xsd/maven-4.0.0.xsd">
    <modelVersion>4.0.0</modelVersion>
    <groupId>com.contradodigital</groupId>
    <artifactId>HelloSelenium</artifactId>
    <version>1.0-SNAPSHOT</version>
    <packaging>jar</packaging>
    <properties>
        <project.build.sourceEncoding>UTF-8</project.build.sourceEncoding>
        <maven.compiler.source>1.8</maven.compiler.source>
        <maven.compiler.target>1.8</maven.compiler.target>
    </properties>
    <pluginRepositories>
        <pluginRepository>
            <id>central</id>
            <name>Central Repository</name>
            <url>https://repo.maven.apache.org/maven2</url>
            <layout>default</layout>
            <snapshots>
                <enabled>false</enabled>
            </snapshots>
            <releases>
                <updatePolicy>never</updatePolicy>
            </releases>
        </pluginRepository>
    </pluginRepositories>
    <repositories>
        <repository>
            <id>central</id>
            <name>Central Repository</name>
            <url>https://repo.maven.apache.org/maven2</url>
            <layout>default</layout>
            <snapshots>
                <enabled>false</enabled>
            </snapshots>
        </repository>
    </repositories>
    <dependencies>
        <!-- https://mvnrepository.com/artifact/org.seleniumhq.selenium/selenium-java -->
        <dependency>
            <groupId>org.seleniumhq.selenium</groupId>
            <artifactId>selenium-java</artifactId>
            <version>3.141.59</version>
        </dependency>
        <!-- https://mvnrepository.com/artifact/org.seleniumhq.selenium/selenium-api -->
        <dependency>
            <groupId>org.seleniumhq.selenium</groupId>
            <artifactId>selenium-api</artifactId>
            <version>3.141.59</version>
        </dependency>
        <!-- https://mvnrepository.com/artifact/org.seleniumhq.selenium/selenium-server -->
        <dependency>
            <groupId>org.seleniumhq.selenium</groupId>
            <artifactId>selenium-server</artifactId>
            <version>3.141.59</version>
        </dependency>
        <!-- https://mvnrepository.com/artifact/org.seleniumhq.selenium/selenium-chrome-driver -->
        <dependency>
            <groupId>org.seleniumhq.selenium</groupId>
            <artifactId>selenium-chrome-driver</artifactId>
            <version>3.141.59</version>
        </dependency>
        <!-- https://mvnrepository.com/artifact/org.seleniumhq.selenium/selenium-remote-driver -->
        <dependency>
            <groupId>org.seleniumhq.selenium</groupId>
            <artifactId>selenium-remote-driver</artifactId>
            <version>3.141.59</version>
        </dependency>
        <!-- https://mvnrepository.com/artifact/junit/junit -->
        <dependency>
            <groupId>junit</groupId>
            <artifactId>junit</artifactId>
            <version>4.13.2</version>
            <scope>test</scope>
        </dependency>
    </dependencies>
</project>
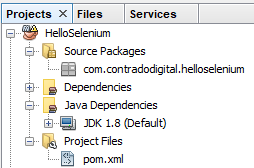
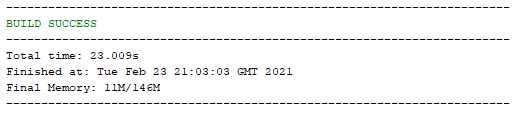
Once you’ve done this, save. Then Right Click on your project name and select ‘Build with Dependencies’ which will pull all of the dependencies into your NetBeans project. You should see a successful build message here;
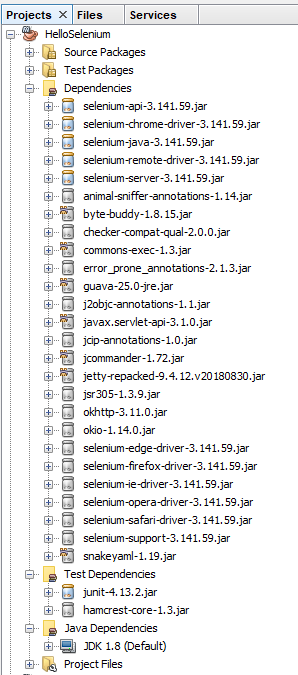
And you should also notice that within your NetBeans Project the total number of Dependencies and Test Dependencies that have now been imported have grown to significantly more than 6 JAR files that have been imported. This is one of the huge benefits of using a package dependency management system such as Maven as it just helps you get things working with ease. Can you imagine having to find all of the different libraries that have now been imported manually and keeping everything in sync? Here is what has now been imported for you automatically;
Note, if this is the first time you are getting Maven set up on your machine, you may find a few issues along the way. One of the common issues relates to an error that NetBeans throws which states;
“Cannot run program “cmd”, Malformed argument has embedded quote”
Thankfully to fix this you simply need to edit the file, C:\Program Files\NetBeans 8.2\etc\netbeans.conf and append some text to the line that contains netbeans_default_options;
-J-Djdk.lang.Process.allowAmbiguousCommands=true
So that the full line now reads;
netbeans_default_options=”-J-client -J-Xss2m -J-Xms32m -J-Dapple.laf.useScreenMenuBar=true -J-Dapple.awt.graphics.UseQuartz=true -J-Dsun.java2d.noddraw=true -J-Dsun.java2d.dpiaware=true -J-Dsun.zip.disableMemoryMapping=true -J-Djdk.lang.Process.allowAmbiguousCommands=true”
If you’re interested in why this is required, this release note outlines the issue in more detail.
You will find there will be the odd nuance like this depending on the version of NetBeans / Java / JDK / Maven etc. that you are running. Rarely do things seamlessly line up. So if you encounter any slightly different issues within your setup, then please do leave a comment below once you’ve found a solution to help others in the future.
Install Selenium IDE
Ok, so now we’ve got our NetBeans environment up and running. It’s time to make life as easy as possible. I’m assuming you don’t want to be writing everything manually for your web browser test scripts? I mean, if you do, enjoy yourself, but personally I prefer to make life as easy as possible by using the available tools at hand. This is where the Selenium IDE comes into play.
The Selenium IDE is a Google Chrome Extension that you can easily download and install at the click of a button;
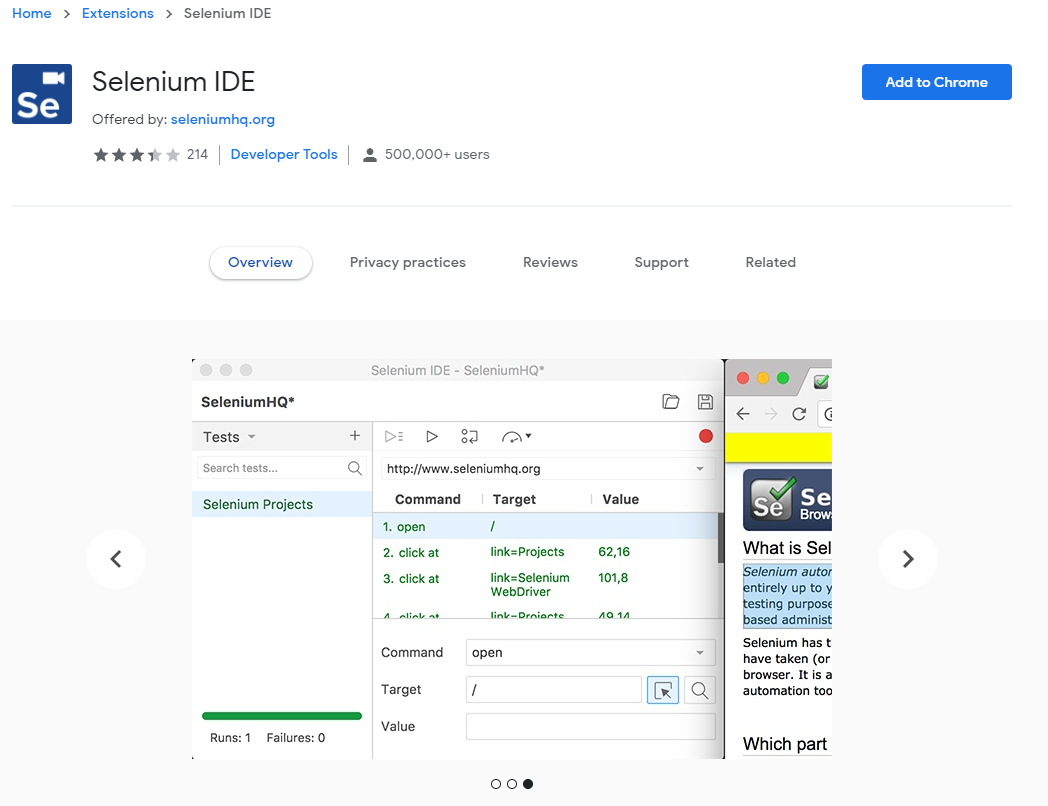
Once you’ve done this you will notice that the Extension has added a button at the top right of your Chrome browser that you can click on to open the Selenium IDE. If you’re from a tech heavy software development background, you’re probably expecting an installed desktop application whenever you hear the word IDE mentioned, but in this case it is nothing more than a Chrome Extension.
Click the Selenium IDE icon in Chrome to open it up. Once it is open for the first time you will notice a basic welcome screen;
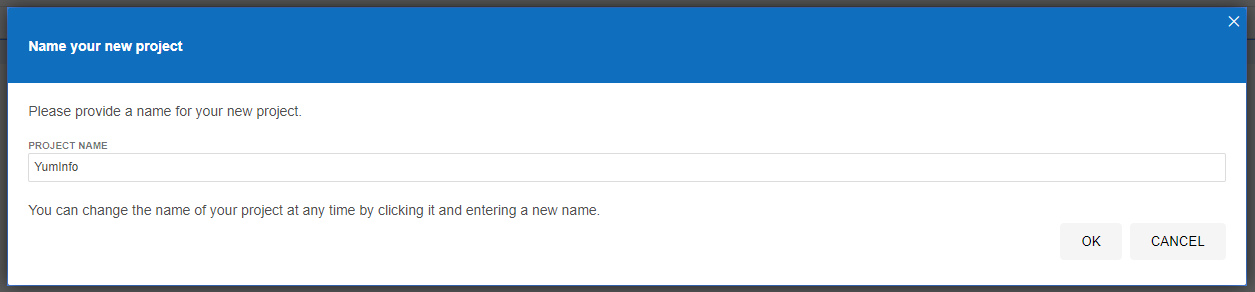
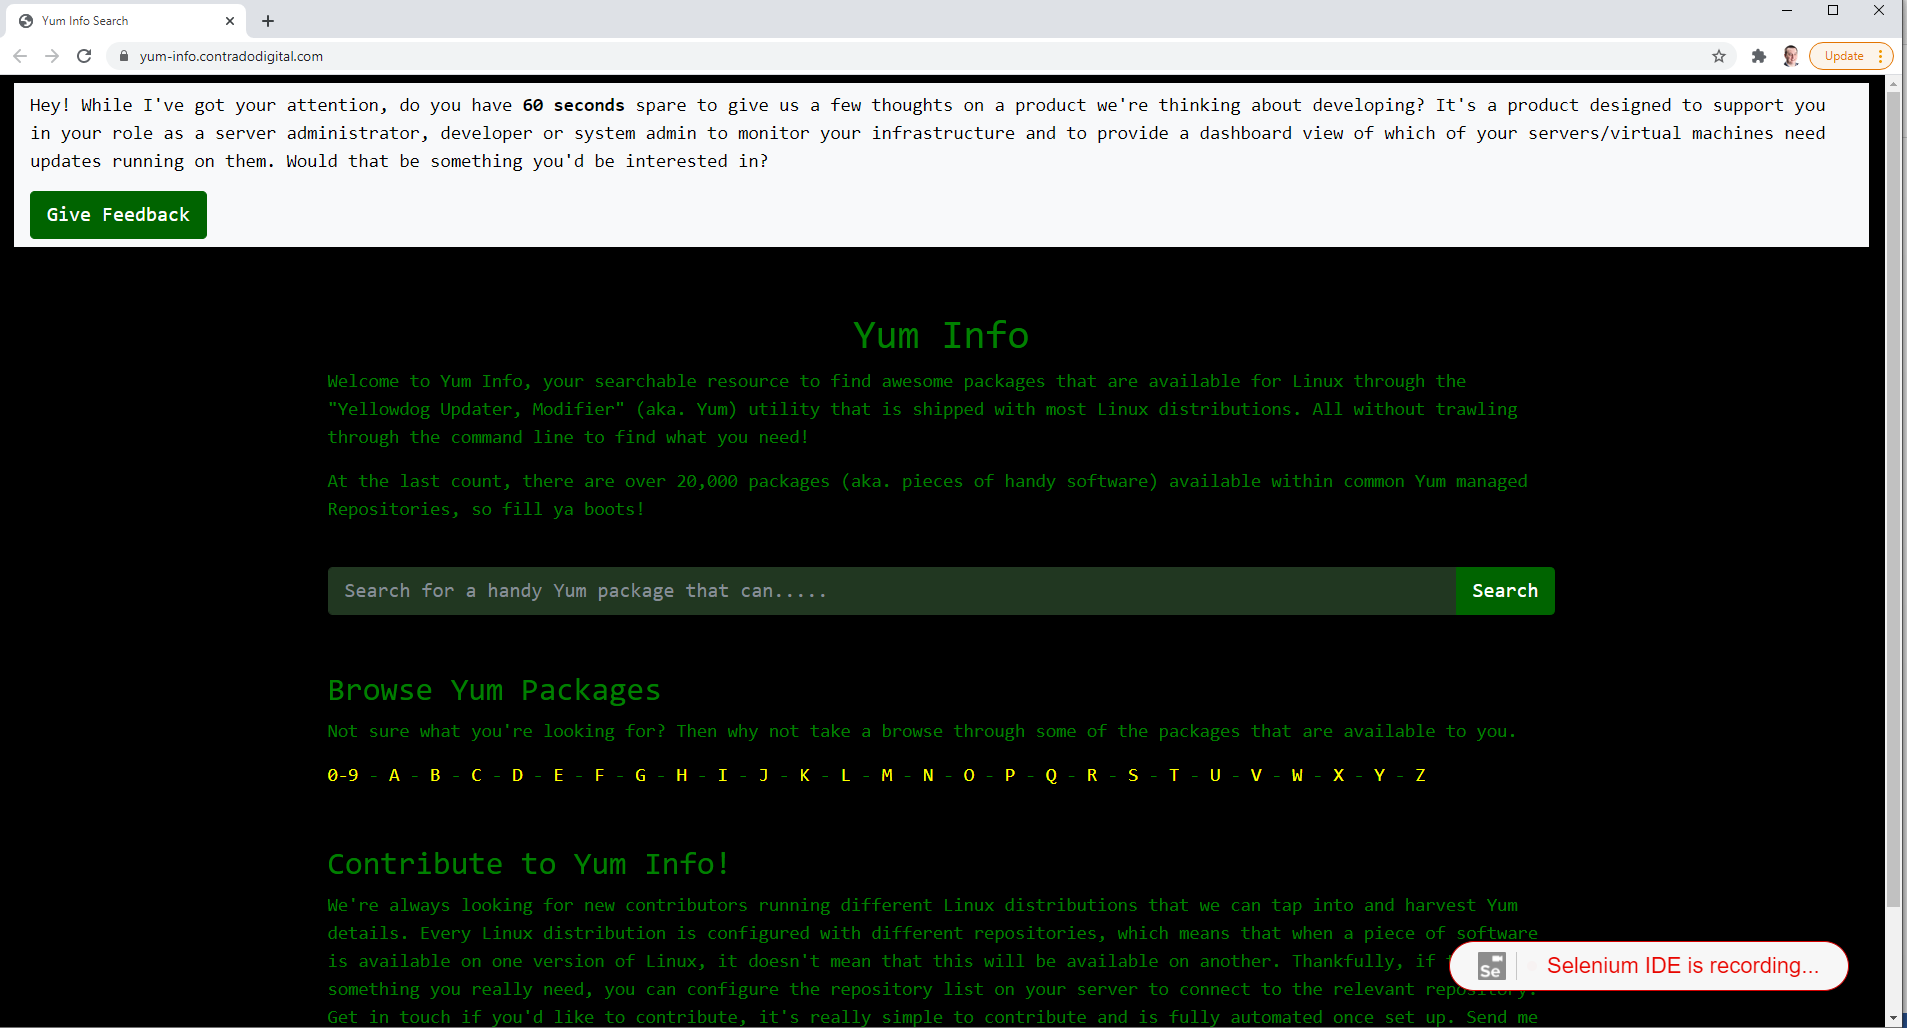
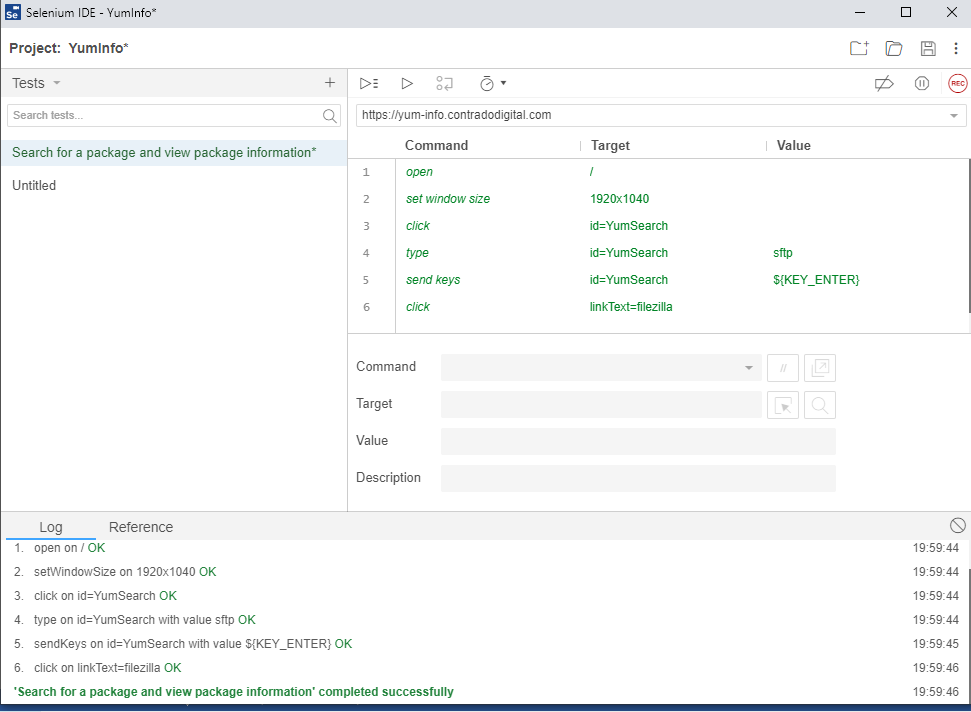
Click on Create a New Project to get started. Give your project a name so it’s clear what you are testing. In this example we’re going to be doing some testing on YumInfo which is an application we created to help software developers and infrastructure engineers easily search through the 20,000 packages that are contained within common Yum Repositories. Exactly like we have the Maven Central Repository for installing Java packages, it’s the same thing, just focused on Linux level software packages instead.
Create Your First Automated Web Browser Test in Selenium IDE
Ok, so now we’ve got Selenium installed and a new project created, let’s get onto creating your first automated browser test so you can get a feel for how all this works. It’s extremely simple to do so.
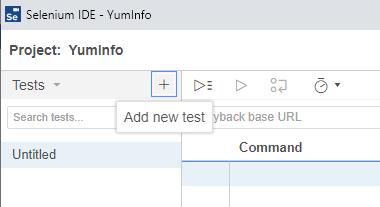
Firstly click on the + button to add a new test;
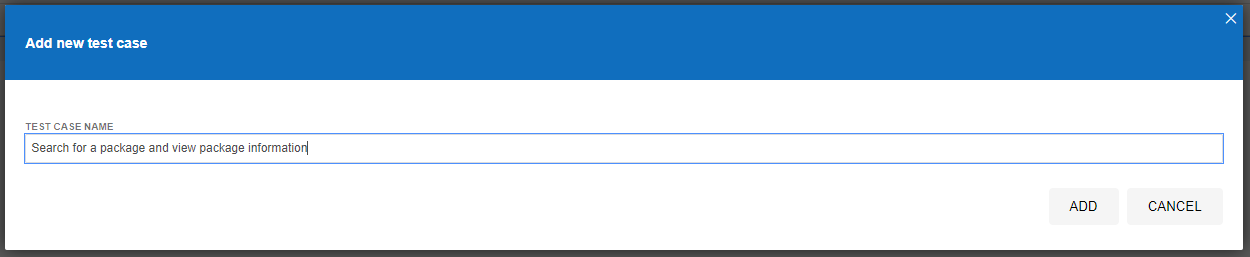
This will then open up the popup which allows you to give your new test a name. In this example, we’re going to test if we can use the search functionality on the YumInfo site to easily find a useful package.
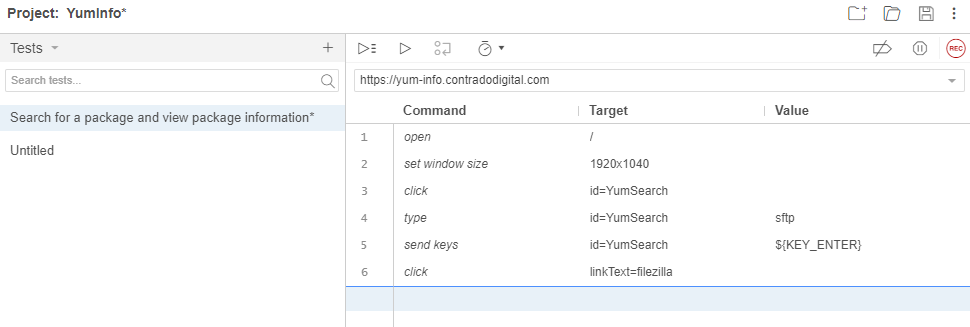
Once you’ve done this, you’ll notice that a new Test Case has been created for you which is in the left section of the screenshot below, but you’ll notice there are no steps that have been created yet which is why the section on the right of the screenshot below is still all blank.

What you will notice in the above screenshot is there are two core sections that we are going to look at next;
- Playback base URL – This is the landing page that you are going to start your tests from. Generally speaking this is so you can test in the same way that your users would use the website.
- Record Button – This is in the top right coloured in red. This allows you to start the process running for recording your automated test scripts within Selenium IDE.
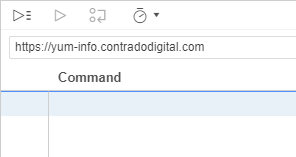
To get started, enter the base URL you want to work with. In our case we’re going to enter https://yum-info.contradodigital.com as that is the website we are doing the automated browser based testing on.
Then once you’ve done that. Click the red Record Button at the top right.
This step will open a brand new Chrome window and it will inform you that recording has started. It’s a very similar concept as you can record Macros in Excel if you have ever used those before.
Now all you need to do is to click around your website and use it like a user would. In this case, as this specific Test Case we are looking to search for a package and then view the package information we’re going to do just that.
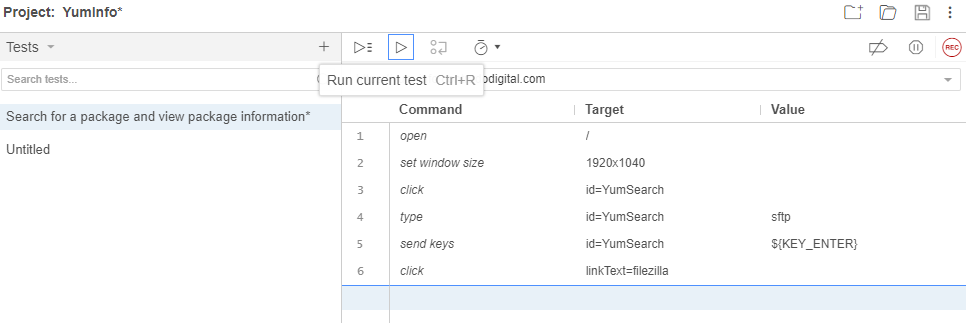
Once you are done clicking around, simply navigate back to your Selenium IDE that is open and click on Stop Recording. Once you have done that you will notice that the specific steps that you have just taken within the web browser have been recorded within Selenium IDE. Awesome!
What the above steps are saying is that I followed these actions;
- Open the Base URL https://yum-info.contradodigital.com
- Set the browser window size to the default of your computer setup
- Click on the HTML Element that has an ID of ‘YumSearch’, which in this case is the search box that allows users to search for packages
- Type into the search box “sftp” without the quotes
- Then click Enter to trigger the search
- And finally, click on the link titled FileZilla which is a relevant package that can handle SFTP based communications
What all this has shown us is that as a user doing these steps, this all works as expected on the website. Hopefully this isn’t an unexpected result that basic functionality on your website is working. But this is just a simple example we are using to get you up and running.
Save this Test Case so you can reference back to it later down the line.
Re-Run Your First Automated Web Browser Test Case
Now that you have recorded your first test, you want to replay it so that you are confident that it has been recorded accurately. For traditionally built websites that use a single Request/Response you’ll find that these test generally record perfectly first time around. Whereas for websites build using more Single Page Applications / Front End Frameworks that load content dynamically into the page past the initial page load, you’ll find you will likely have a few issues with the default recordings and that the automated recording will need some manual intervention to get them to work properly.
To re-run the test you have just created, simply click on the Play button;
Once you click that button, you will notice that magic starts to happen. Your web browser will open and the exact steps that you just took will be replicated in real time right in front of your eyes. Most importantly, once it is complete, you will see that it has completed successfully.
By doing this you have just proved that the Test Case has been recorded successfully and can run through to the end to confirm this end to end process works correctly. This is important as you build up your Test Cases as you will find many larger websites can have 1000s and even 10,000s of Test Cases created over time that ensure the stability of the platform.
Why Build a Library of Test Cases in Selenium IDE for Automated Web Browser Testing?
Just stepping back a little though, why are we even bothering to do this? Well quite frankly, that is a very good question – and one that you should genuinely be asking for any project that you are working on. Yes, many people say this is best practice to build automated web browser testing for web applications, and there is a very solid argument to this. Then on the other hand, if you are working with solid web application development principles, and you have awesome developers, and you have an extremely slick development process to fix forward, then you may find that Selenium automated web browser testing is just an added burden that adds very little value.
The reality is that most organisations, this isn’t the reality, so Selenium comes in extremely handy to mitigate any risk of pushing bad code through to the live environment and streamlines regression testing. Meaning that you can run a significant amount of automated tests without ever having to worry about getting users to manually test features and functionality every time you want to do a release.
Download Chrome Web Driver
Now we’ve utilised the power of the Selenium IDE to create our automated web browser for us, it’s time to take that and move it into a proper software development environment, aka. NetBeans. Before we jump into the details we’re going to need to download the Chrome Web Driver. This will allow you to make NetBeans, more specifically the Selenium and JUnit dependencies, interact with your Chrome web browser.
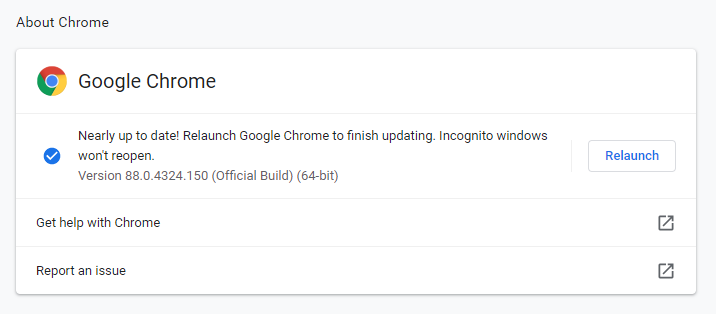
As with anything, versioning is important. So the first thing you need to do is understand what version of Google Chrome you are running. To do this, go into Google Chrome > Settings > About Chrome and you will see your version number there;
Now you know what version of Google Chrome you are using. Next you need to download the specific Google Chrome Driver that applies to your version of Google Chrome. Head over to the Chromium Chrome Driver Downloads page and find the version that applies to you.

Once you’ve downloaded the ChromeDriver and you have unzipped it, you have this on your system which we’ll reference a little later as we move your Selenium IDE generated Test Case into NetBeans.
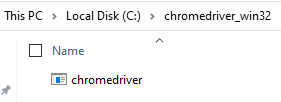
You want to put this file into a location that you aren’t going to change next week as your code will break. You need this in a handy reference location that suits how you personally organise your development environments.
Export Test Case from Selenium IDE to JUnit Format
Next we need to export the Test Case that we created in Selenium IDE so that we can then import that into NetBeans. To do this go back to Selenium IDE and right click the Test Case you created then click on Export;
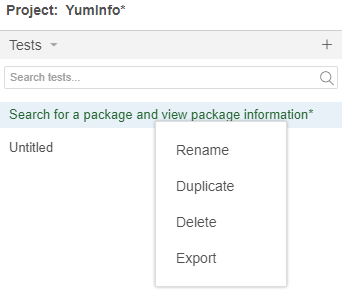
Then select the language we want to export the file to. The beauty of the Selenium IDE is that it is cross language compatible which means that you can import the Test Case into any number of your preferred automated web browser testing setups you use, in this case we’re using JUnit in Java, but you could quite easily use either NUnit or xUnit for C#, or Mocha for JavaScipt or pytest for Python or RSpec for Ruby. The choice is yours.

Once this has been exported, this will save a .java file in our example to your local file system which will look as follows;
// Generated by Selenium IDE
import org.junit.Test;
import org.junit.Before;
import org.junit.After;
import static org.junit.Assert.*;
import static org.hamcrest.CoreMatchers.is;
import static org.hamcrest.core.IsNot.not;
import org.openqa.selenium.By;
import org.openqa.selenium.WebDriver;
import org.openqa.selenium.firefox.FirefoxDriver;
import org.openqa.selenium.chrome.ChromeDriver;
import org.openqa.selenium.remote.RemoteWebDriver;
import org.openqa.selenium.remote.DesiredCapabilities;
import org.openqa.selenium.Dimension;
import org.openqa.selenium.WebElement;
import org.openqa.selenium.interactions.Actions;
import org.openqa.selenium.support.ui.ExpectedConditions;
import org.openqa.selenium.support.ui.WebDriverWait;
import org.openqa.selenium.JavascriptExecutor;
import org.openqa.selenium.Alert;
import org.openqa.selenium.Keys;
import java.util.*;
import java.net.MalformedURLException;
import java.net.URL;
public class SearchforapackageandviewpackageinformationTest {
  private WebDriver driver;
  private Map<String, Object> vars;
  JavascriptExecutor js;
  @Before
  public void setUp() {
    driver = new ChromeDriver();
    js = (JavascriptExecutor) driver;
    vars = new HashMap<String, Object>();
  }
  @After
  public void tearDown() {
    driver.quit();
  }
  @Test
  public void searchforapackageandviewpackageinformation() {
    // Test name: Search for a package and view package information
    // Step # | name | target | value
    // 1 | open | / |
    driver.get("https://yum-info.contradodigital.com/");
    // 2 | setWindowSize | 1920x1040 |
    driver.manage().window().setSize(new Dimension(1920, 1040));
    // 3 | click | id=YumSearch |
    driver.findElement(By.id("YumSearch")).click();
    // 4 | type | id=YumSearch | sftp
    driver.findElement(By.id("YumSearch")).sendKeys("sftp");
    // 5 | sendKeys | id=YumSearch | ${KEY_ENTER}
    driver.findElement(By.id("YumSearch")).sendKeys(Keys.ENTER);
    // 6 | click | linkText=filezilla |
    driver.findElement(By.linkText("filezilla")).click();
  }
}
The core bits of information that are relevant for this are the following;
  @Test
  public void searchforapackageandviewpackageinformation() {
    // Test name: Search for a package and view package information
    // Step # | name | target | value
    // 1 | open | / |
    driver.get("https://yum-info.contradodigital.com/");
    // 2 | setWindowSize | 1920x1040 |
    driver.manage().window().setSize(new Dimension(1920, 1040));
    // 3 | click | id=YumSearch |
    driver.findElement(By.id("YumSearch")).click();
    // 4 | type | id=YumSearch | sftp
    driver.findElement(By.id("YumSearch")).sendKeys("sftp");
    // 5 | sendKeys | id=YumSearch | ${KEY_ENTER}
    driver.findElement(By.id("YumSearch")).sendKeys(Keys.ENTER);
    // 6 | click | linkText=filezilla |
    driver.findElement(By.linkText("filezilla")).click();
  }
Here you can see the 6 steps that were in the original Selenium IDE which are visualised as code. This is extremely handy as this now gives you full control over every aspect of Selenium by using the power of the library to do what you need to do and more by using the power of JUnit too. Selenium by itself will only take you so far, you need to integrate Selenium with a proper testing framework such as JUnit to get the most from the technology. By exporting this code, this is the first step of the process to enhancing your automated web browser testing setup.
Create a New JUnit Test File in NetBeans
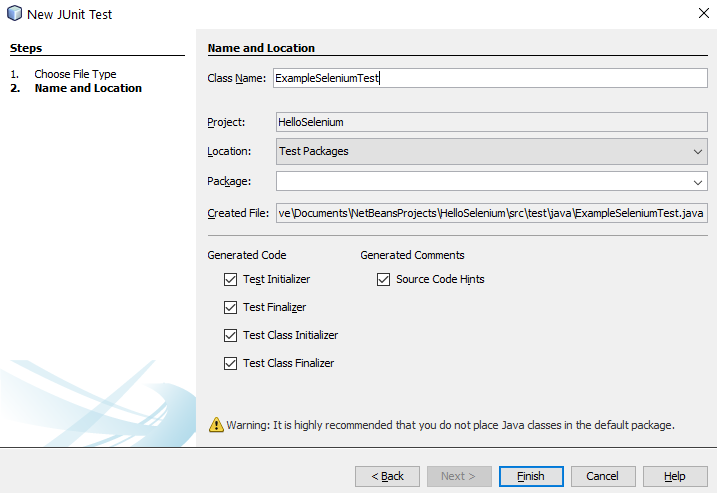
Ok, so back over to NetBeans. We want to import the Exported JUnit file from Selenium IDE into NetBeans so that we can manage the lifecycle of this Test Case better and work collaboratively with our colleagues. We’ll jump into more around the team collaboration elements of Selenium a little later. For now, let’s first jump in and get the JUnit Test added to NetBeans. To do this, right click on a folder in your project in NetBeans and select New File, then search for JUnit, then select JUnit Test and click Next.
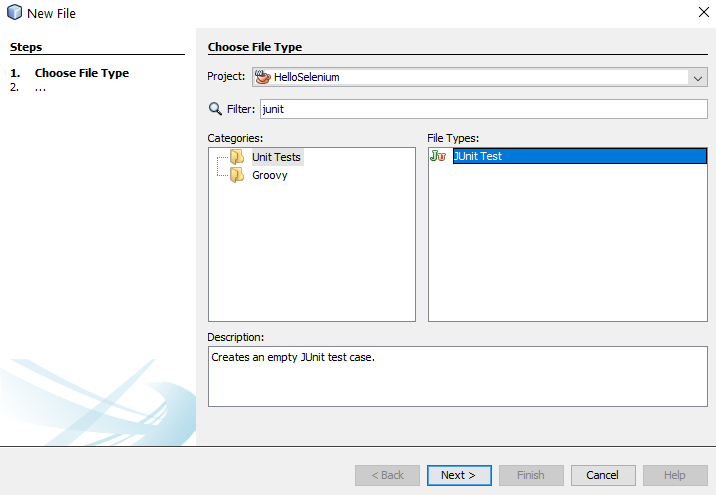
Once you’ve done that, give your new JUnit Test a Class Name and click Finish.
You will notice that this has generated a bunch of code for your automatically which is quite handy. This is great, but what you will also notice is that this doesn’t quite align 100% with the code that has been generated by the Selenium IDE. This is because here you have created a specific JUnit Test based on what NetBeans thinks a Test looks like, whereas the code that was generated in Selenium IDE was code that was a JUnit test that is specific to the test you created.
import org.junit.After;
import org.junit.AfterClass;
import org.junit.Before;
import org.junit.BeforeClass;
import org.junit.Test;
import static org.junit.Assert.*;
import org.openqa.selenium.By;
import org.openqa.selenium.WebDriver;
import org.openqa.selenium.WebElement;
import org.openqa.selenium.chrome.ChromeDriver;

/**
 *
 * @author Michael Cropper
 */
public class ExampleSeleniumTest {

    public ExampleSeleniumTest() {
    }

    @BeforeClass
    public static void setUpClass() {
    }

    @AfterClass
    public static void tearDownClass() {
    }

    @Before
    public void setUp() {
    }

    @After
    public void tearDown() {
    }

    // TODO add test methods here.
    // The methods must be annotated with annotation @Test. For example:
    //
    // @Test
    // public void hello() {}
}
Merge Your Exported Selenium IDE Test Case Into Your NetBeans JUnit Test Class
The next step is generally best to be done as a copy and paste to fit the automatically generated Selenium IDE Test Case code into the standardised approach you use for your JUnit Test Classes within NetBeans. Don’t just blindly copy and paste the code as while the automatically generated code is handy, you need to manage this code to fit with your specific needs and use cases.
In this example, here’s what the JUnit Test Class looks like now I’ve manually merged this code;
import org.junit.After;
import org.junit.AfterClass;
import org.junit.Before;
import org.junit.BeforeClass;
import org.junit.Test;
import static org.junit.Assert.*;
import org.openqa.selenium.By;
import org.openqa.selenium.Dimension;
import org.openqa.selenium.Keys;
import org.openqa.selenium.WebDriver;
import org.openqa.selenium.WebElement;
import org.openqa.selenium.chrome.ChromeDriver;

/**
 *
 * @author Michael Cropper
 */
public class ExampleSeleniumTest {

    public ExampleSeleniumTest() {
    }

    @BeforeClass
    public static void setUpClass() {
    }

    @AfterClass
    public static void tearDownClass() {
    }

    private WebDriver driver;

    @Before
    public void setUp() {
        System.setProperty("webdriver.chrome.driver", "C:/chromedriver_win32/chromedriver.exe");
        driver = new ChromeDriver();
    }

    @After
    public void tearDown() {
        driver.quit();
    }

    @Test
    public void searchforapackageandviewpackageinformation() {
        // Test name: Search for a package and view package information
        // Step # | name | target | value
        // 1 | open | / |
        driver.get("https://yum-info.contradodigital.com/");
        // 2 | setWindowSize | 1920x1040 |
        driver.manage().window().setSize(new Dimension(1920, 1040));
        // 3 | click | id=YumSearch |
        driver.findElement(By.id("YumSearch")).click();
        // 4 | type | id=YumSearch | sftp
        driver.findElement(By.id("YumSearch")).sendKeys("sftp");
        // 5 | sendKeys | id=YumSearch | ${KEY_ENTER}
        driver.findElement(By.id("YumSearch")).sendKeys(Keys.ENTER);
        // 6 | click | linkText=filezilla |
        driver.findElement(By.linkText("filezilla")).click();
    }
}
A couple of really important parts to be made aware of in the above code snippet are these;
private WebDriver driver;

    @Before
    public void setUp() {
        System.setProperty("webdriver.chrome.driver", "C:/chromedriver_win32/chromedriver.exe");
        driver = new ChromeDriver();
    }

    @After
    public void tearDown() {
        driver.quit();
    }
These are the following lines of code / methods;
- private WebDriver driver;
- This line of code is required to ensure you can easily open/close the WebDriver at the start and end of this Test Class. Over time you may have many Tests contained within a single Test Class, so by using this approach it is significantly more efficient and allows you to re-use the object without having to instantiate it every single time you run a Test within this Test Class.
- This then aligns with the contain within the setup() method and the teardown()
- setProperty(“webdriver.chrome.driver”, “C:/chromedriver_win32/chromedriver.exe”);
- This is what enables your JUnit code to communicate with your Google Chrome Web Browser and control it.
- public void searchforapackageandviewpackageinformation()
- Hopefully you recognise the contents of this method which is the automatically generated code produced by Selenium IDE that we have merged into this JUnit Test Class.
Run Your JUnit Test Class
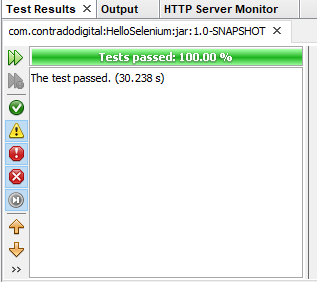
Excellent, now we’re at a point that we can actually run our JUnit Test Class to confirm everything is still working as expected. To do this simply Right Click and select Test File within your JUnit Test Class. If everything has merged successfully you should see your Google Chrome Web Browser kick into action, run the test and the test should pass.
Collaborating with Colleagues
Finally we’re going to briefly touch on how you now collaborate with colleagues using Selenium and JUnit Test Classes. Everything we have done so far is excellent if you are working by yourself and just having a play around. But in any real world environment you are going to be working with a lot of colleagues that span different roles/responsibilities and even departments. This is where the collaboration element really kicks in. For the purpose of this blog post and to keep things fairly simplistic we’re going to highlight how this approach works when you are working between Developers and Quality Assurance (QA) or Test people.
One point to note is that this isn’t going to be a tutorial on how to use Git, so if you are unfamiliar with some of the concepts below then you are going to need to do a bit of background reading. To get up to speed with how to use Git and why it is important, then read the Git Book. Once you’ve read that about 10x from a standing start with zero knowledge you’ll probably understand it. We’ll do a write up on Git in a bit more detail at some point as it is a topic that is hugely misunderstood and often implemented incorrectly which can cause a lot of problems.
Below is a diagram of a generic process that can be handy to implement in organisations to show you how the different steps fit together along the Software Development Life Cycle, specifically focused around Selenium and team collaboration.

Summary
Hopefully this guide on how to setup Selenium using Java and Apache NetBeans has been helpful to get you up and running with Selenium in no time at all. This is very much the basics of automated web browser testing using a very specific set of technology, tooling and processes. There is an awful lot more that could be covered on this topic and that is perhaps one for another day. For now, this is just the very basics about getting up and running.
by Michael Cropper | Feb 19, 2021 | Client Friendly, IT, Technical |
One very common use case for using pfSense is to host a single website. So here we are going to show you how simple that is to do. As this is the very first step towards understanding how to host multiple websites behind your pfSense firewall, the reality is that the approach is very different to when you get to the point of hosting multiple websites behind your pfSense firewall. We’ll do a follow up blog post on that very shortly.
What is Port Forwarding?
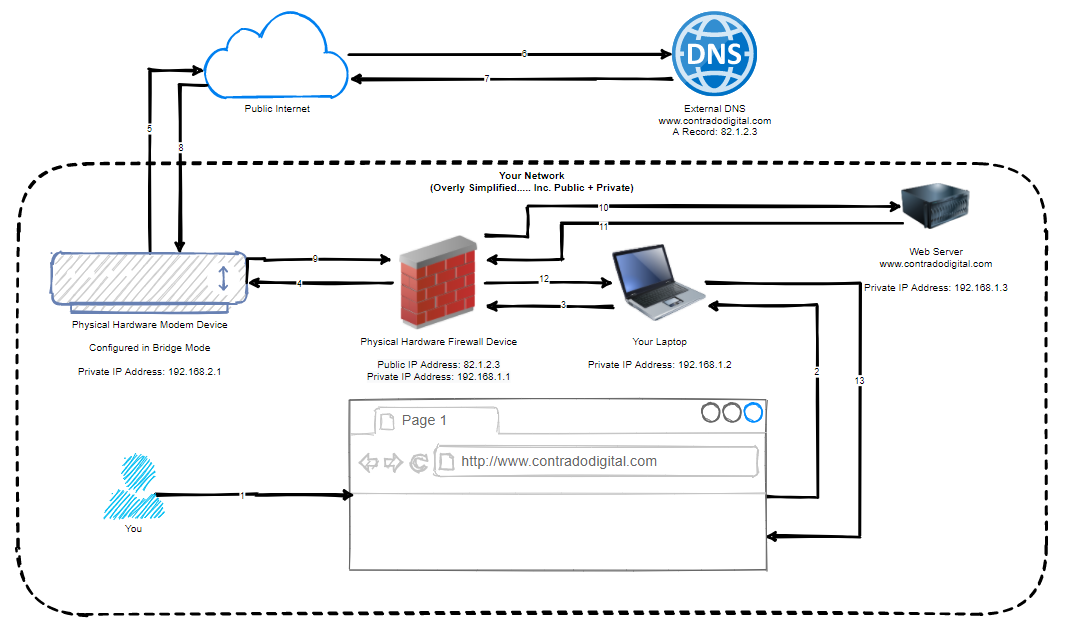
So the first step towards understanding how to host a single website behind your pfSense firewall is to understand the concept of Port Forwarding. Port Forwarding at the simplest level is to translate Port 1 Inbound on your WAN, to Port 2 on your LAN. To visualise what this means in an extremely basic setup, the diagram below looks at how Port Forwarding works.
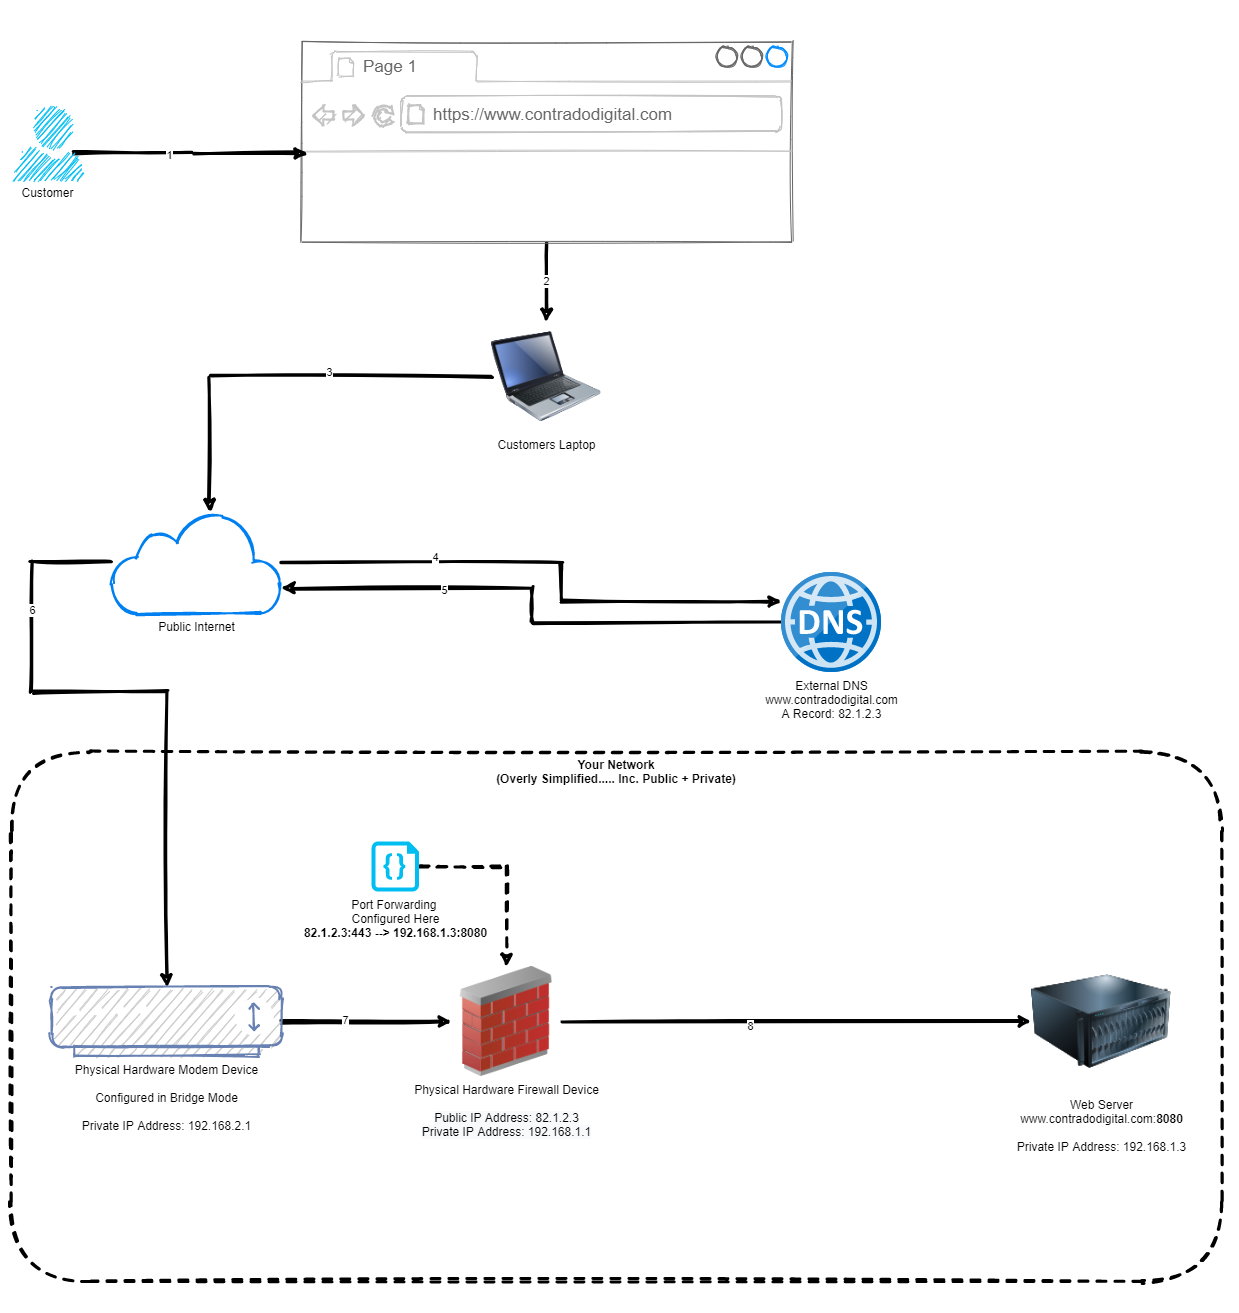
As you can see from the diagram above, this basically translates www.contradodigital.com into the IP address 82.1.2.3, which is being accessed over HTTPS (aka. Port 443). Then the firewall translates this inbound request onto your web server that is sitting behind your pfSense firewall which is hosting your website, which is on the internal IP address of 192.168.1.3 and the web server software (in this case Apache Tomcat) is running on Port 8080 to handle the request.
One point to note is that depending on what server software you are running, this will depend on which port you need to forward the request onto. Generally speaking, you only want to allow inbound traffic for your website on Port 443 as this ensures a secure connection for your customers. There are many nuances and reasons to open more secure ports, but for the purpose of simplicity, let’s say that you only want to access the website as a customer.
Now let’s look at how to configure all this within pfSense.
How to Configure pfSense to Host a Single Website
Now we’ve run through what we are looking to achieve, let’s get into the pfSense config so we can see what we need to do. For the purpose of simplicity, we’re going to assume your web server is up and running and when you are on your internal network or the server itself, you can access 192.168.1.3:8080 in the web browser and that loads the website successfully. Again, there are a lot of nuances between different web servers, configurations and web application setups so this isn’t always as straight forward as this, but hopefully this information allows you to adapt this to your own specific use case. Hence why we’ve used a basic index.html in our example behind the scenes which is acting as a Hello World example.
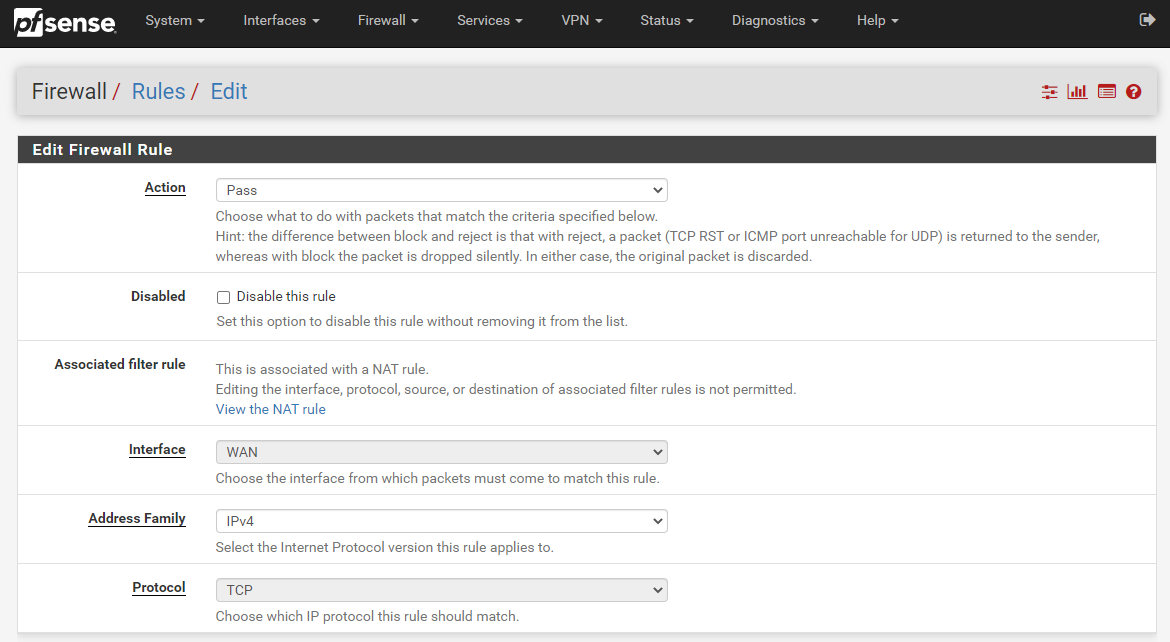
Configure: Firewall > NAT > Port Forward
Navigate to the page, Firewall > NAT > Port Forward, then click ‘Add’.
This will take you through to the page where you can configure your port forwarding rules. Enter the following information (tailored to your specific requirements);
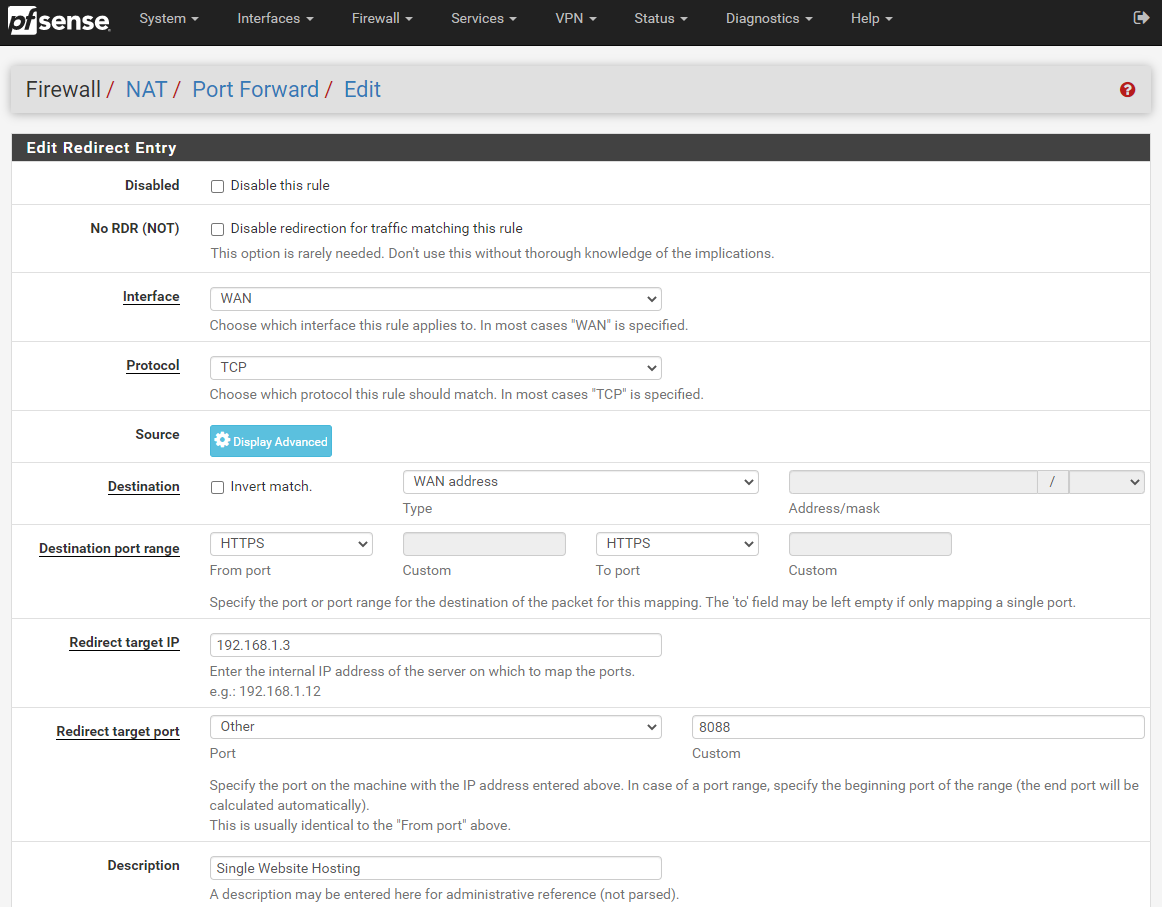
The core settings that you need to look at in the above screenshot are;
- Interface: WAN
- This is telling pfSense that it should listen on the physical port on your firewall that is being used for the WAN traffic. This is the port that is connected to your modem using an Ethernet RJ45 cable.
- Protocol: TCP
- This is fine to keep as it is. For the vast majority of configuration, TCP is the protocol you want to be using.
- Source: Ignore
- For the purpose of hosting a website, you can ignore configuring the source as you want as many potential customers around the world to access you website and buy something. On the other hand, if you are wanting to public a website that only certain IP addresses should be able to access, you are probably going to want to configure this so that you can whitelist their IP addresses in here. For now though, we’re going to keep things simple in this blog post.
- Destination: WAN Address
- This is a bit of an odd one when you first look at it, as you would assume that this should be set to LAN Address. Weirdly though, on the whole with a standard pfSense setup, this needs to be set to WAN Address. You tend to set this to LAN Address when you want to access something on localhost 127.0.0.1, which is actually the pfSense device itself. So technically when you think about this a little more, a WAN address from the pfSense software on the pfSense hardware is actually anything that is not on the pfSense hardware. Makes sense?
- Destination Port Range: HTTPS
- For the purpose of this blog post, we’re going to assume that you’ve got Let’s Encrypt setup on pfSense, if you haven’t, then here is a guide on how to setup Let’s Encrypt on pfSense. If you just want to test getting a single website hosted behind your pfSense firewall initially, then by all means set this to HTTP then you can set up Let’s Encrypt later and update your configuration accordingly. Generally speaking you probably want to keep things simple so that there is only one port used, rather than a range of ports – although you can configure the From Port and To Port as a range of ports if you want to try something more advanced.
- Redirect Target IP: 192.168.1.3
- Naturally enter the LAN IP address of your web server here.
- Redirect Target Port: Other – 8080
- In this specific example, this is set to 8080 as this is the default port for Apache Tomcat. If you are using Apache or Nginx then the default port will likely be 80 for standard out of the box. Or you may be getting a little smarter by using Nginx as an Application Level Reverse Proxy so you can then further redirect so you can host multiple websites behind the scenes. This can be an approach to take, but in my opinion there can be better and more secure ways of doing this. Security in general as you have probably noticed has been completely emitted from this blog post as this is a whole topic in itself. Suffice to say, in a production setting, you may not want to use the IP ranges that have been listed throughout this blog post.
- Description – Single Website Hosting
- Give this a friendly name so you know what rule this is when you come back to it later down the line. If you are just getting started and playing around then this isn’t much of an issue, but trust me, as your setup grows, your future self is going to thank you for spending that little extra time on making sure your naming conventions and descriptions are helpful.
Done. Save this and you’re good to go. Once you’ve saved this, make sure you click Apply Changes;
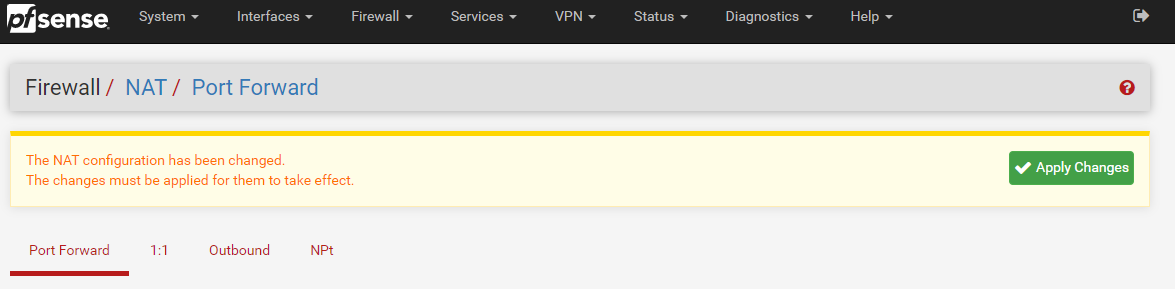
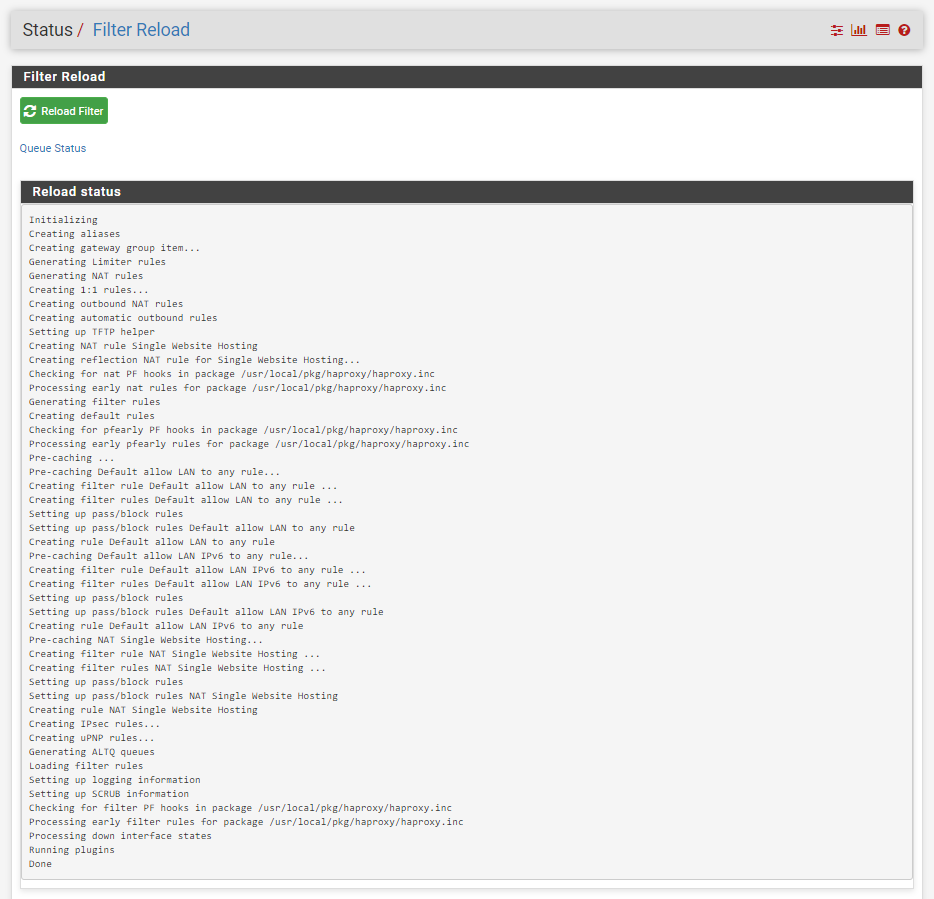
Once you have clicked Apply Changes, you will notice a message appear that asks you if you want to view the status of the firewall rules being reloaded (and hence working…) which can be handy to double check that this has loaded correctly;

When you click on the Monitor link in the above image, this shows you the reload process in real time so you can make sure that it completes successfully.
Once you have done this, you will notice that your Port Forwarding rules have now been applied;
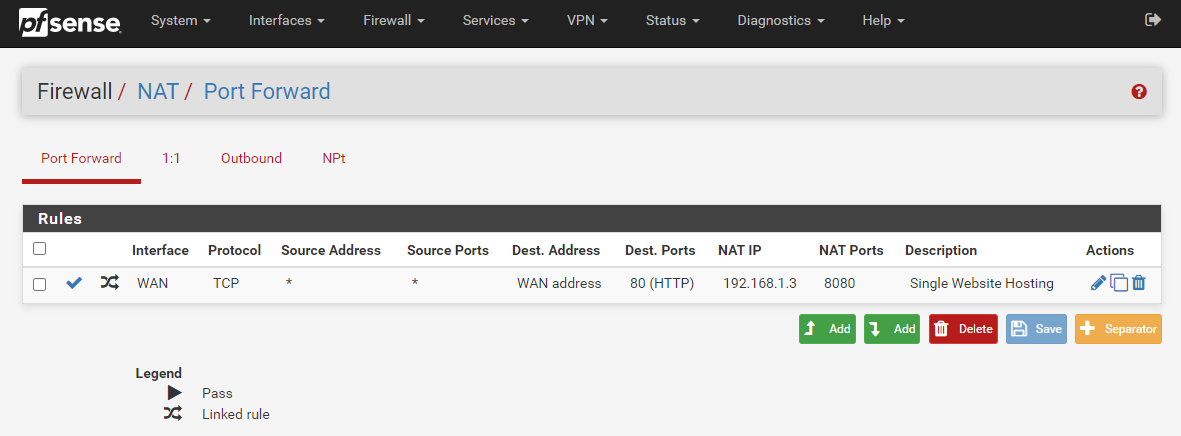
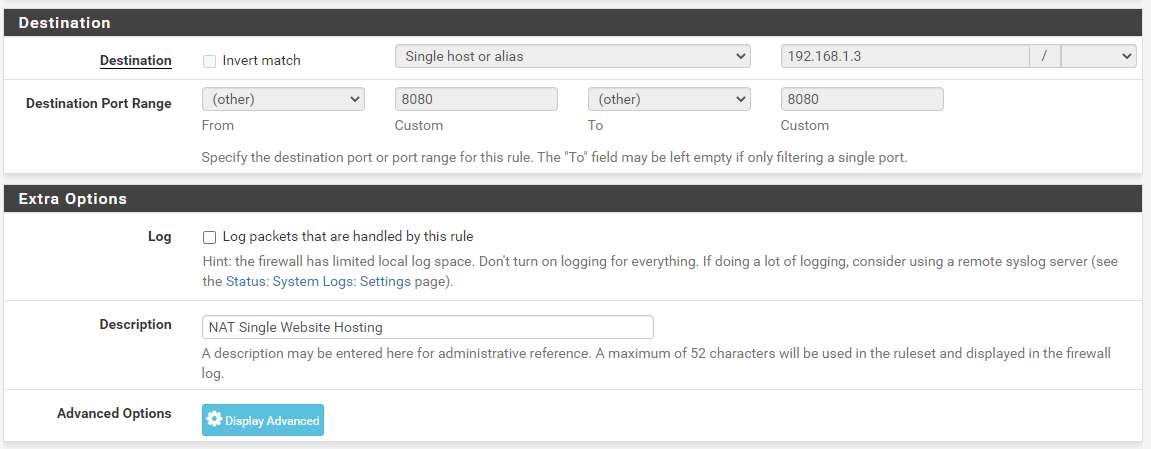
What is important to note here is that this action has actually done something automatically for you in the background. To see what this is, first, click back into that Port Forward rule you just created to edit it. You will notice towards the bottom of the page that this has automatically created a Filter Rule Association for you with the name “Rule NAT Single Website Hosting” which is the same name you used in your previous Description field.

If you click through into that, you’ll notice that it takes you through to the Firewall > Rules > Edit screen for this specific rule. You’ll notice that some of the fields are greyed out so you can’t edit them. This is because the rules are linked so it prevents you from accidentally breaking things. Well, more minimises that risk really.
What you’ll notice is that the Firewall Rule has been automatically populated with the information you entered in the previous screen we were looking at on Firewall > NAT > Port Forward. pfSense has even automatically generated the same name for you to make your life as easy as possible which is a great little feature.
Test Your Website
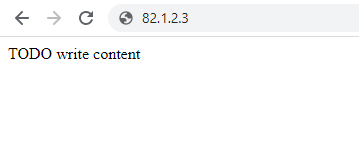
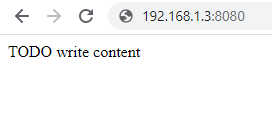
Now we’ve gone through the process of setting up all of the pfSense configuration, you should now be able to access your website easily via several different mechanisms.
- Local IP: 192.168.1.3
- WAN IP: 82.1.2.3
- DNS Hostname: contradodigital.com (where the external DNS entry has the A Record pointed to 82.1.2.3)
Here we can see that the website is loading successfully over the WAN IP address on Port 80;
Next we can see the website loading successfully on the Local IP address on Port 8080;
And finally we can see the website loading successfully on the DNS Hostname www.contradodigital.com over Port 80;
Something to note about the above examples. This is when I’m accessing the website from a computer that is outside of the core network, just as any customer would be accessing the website. And the above examples are just that, examples, so this isn’t the actual setup in the background – but it could be quite easily.
So all of this is working from an external user perspective. This is great, but what if you are also within your own network and are wanting to access the website with ease. Well, this is where things get a little more nuanced in relation to how networks work and how traffic routes around them.
Accessing via the Local IP + Port works absolutely fine. But the second you try to access the website via with the WAN IP Address (82.1.2.3) or the DNS Hostname (www.contradodigital.com) this is where things don’t quite work as expected.
Before we jump into that, let’s just visualise the difference between this approach and the original diagram. Here is what we are trying to access now;
You might be thinking now, but why would you need to do that, why wouldn’t you just access the web server using it’s IP address directly, why wouldn’t you be using things such as Split DNS etc. Well, ok, all those things are valid discussion points, but for the purpose of simplicity, I’m going to completely ignore those points within this blog post. We can look at those topics separately another time.
The point is, you ultimately want to be able to access a single DNS Hostname, i.e. www.contradodigital.com, and get to the destination server easily, regardless of the matter if you are what is classified as “On Network” or if you are “Off Network”. Either way, you want a seamless user experience and something that just works.
Currently with the above setup we have worked through, if you use the DNS Hostname to access your website when you are On Network, then you will simply be presented with your pfSense Firewall Admin Login Screen. Handy, but not quite what we were expecting as the end result.

This is where we need to do a bit of NAT magic, officially known as NAT Reflection / Local Loopback / Hairpin NAT / NAT Hairpinning – it’s all the same thing. In essence, you turn on a feature within pfSense to allow the firewall to loop back on itself to get to where it needs to be. This is quite a handy feature and is easier to implement than Split DNS which takes a bit more effort to do.
How to Turn on NAT Reflection on pfSense
So let’s look at how we turn on NAT Reflection in the pfSense admin. It’s actually very straight forward to turn on, simply navigate to System > Advanced > Firewall & NAT.
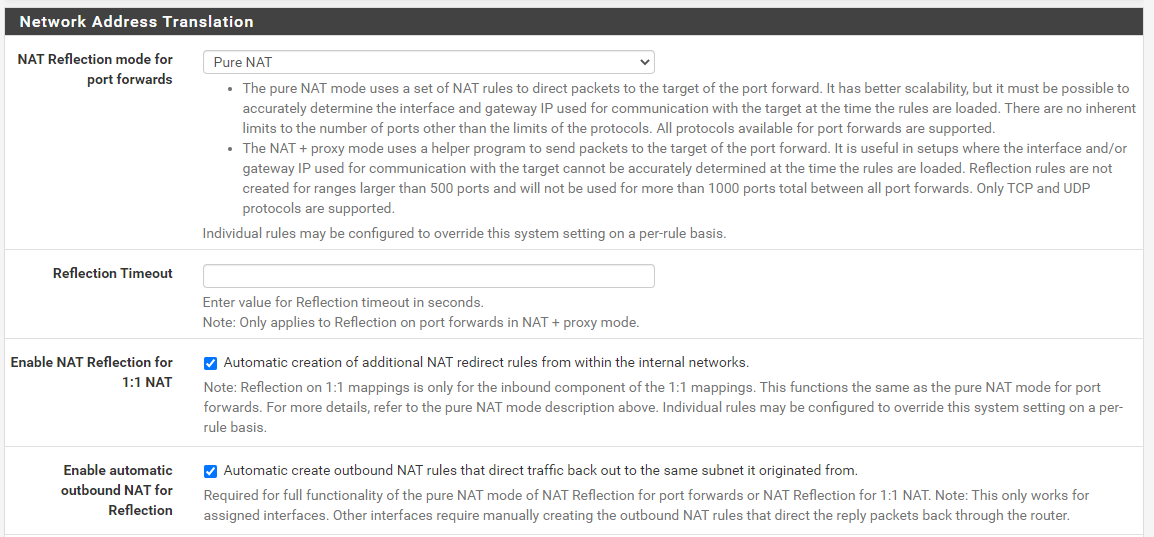
Configure;
- NAT Reflection Mode for Port Forwards: Pure NAT
- Enable NAT Reflection for 1:1 NAT: Checked
- Enable Automatic Outbound NAT for Reflection: Enabled
Save and you’re good to go. You’ll see your website loading correctly now.
So let’s have a look at NAT Reflection in a little more detail so we can understand what is actually happening under the hood and why you need this to get this setup working correctly. In summary, the main thing you need to understand in relation to NAT Reflection is this;
“NAT Reflection allows you to access local servers via your WAN Address, without leaving your LAN”
In a nutshell, if you compare an earlier diagram with the routing from your laptop on your LAN through to the web server also on your LAN, you can see the steps involved there. Compare this to what happens when you have NAT Reflection turned on (granted, the DNS is still external so this full end to end still has to happen periodically);
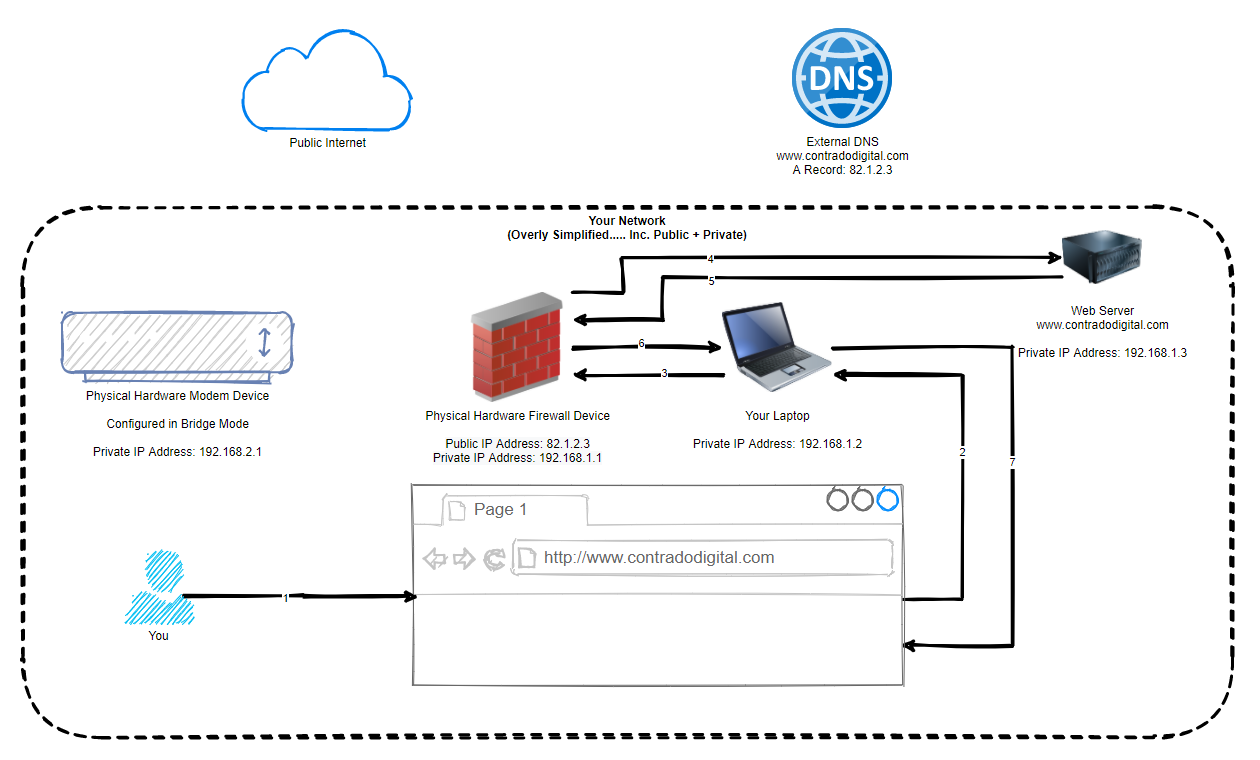
In the above image you can see that the traffic never leaves your local network, even though technically is should be doing. Awesome and this is all thanks to some smart routing within pfSense called NAT Reflection. Some people say this is a bit of a hack, I and most others say that it’s a very handy feature.
Re-Test Your Website
Ok so now we’ve got NAT Reflection turned on and we understand the basics of what it is doing. Reload your website and you should see it working correctly now;
Summary
Hopefully this guide has been a nice introduction on how to host a single website behind a pfSense firewall along with some of the nuances that come with doing so. As mentioned earlier, this only works for very simple setups as this approach here isn’t going to work without changes when you have two websites you are hosting, such as;
- contradodigital.com –>192.168.1.3
- contradodigital.com –>192.168.1.4
Since both websites are running on Port 80 or 443 so you can’t easily do this setup using purely pfSense. This is where other pieces of software come in handy such as HAProxy (a open source package that can be installed onto pfSense) which is one of the correct ways of allowing multiple websites to be hosted (along with multiple WAN IP addresses) or you can add an Nginx reverse proxy as the single destination where you can then control further redirection based on the hostname and port. This all comes down to your requirements.
And as a final note, we haven’t talked anything about security in this blog post really. So make sure you consider this so that you can achieve a secure setup with what you are looking to achieve.
by Michael Cropper | Feb 15, 2021 | Client Friendly, Developer, IT |
Today we’re going to look at how to setup Let’s Encrypt on pfSense so that you can install, manage and automatically renew your SSL certificates completely free of charge with ease. If you don’t know about Let’s Encrypt, you really should. Go read up on it on the main Let’s Encrypt website, it’s awesome, it supports over 225,000,000 SSL certificates on websites around the globe and is supported by the biggest companies powering the internet.
Let’s Encrypt is part of the global movement to secure the internet free of charge to prevent the people between you, and the web servers you are visiting as a user from reading the traffic – people like governments, Internet Service Providers (ISPs) and other people snooping around. We’ve done a few blog posts on Let’s Encrypt over recent years including, How to Configure Let’s Encrypt on CentOS6 with cPanel and WHM, How to Use AutoSSL on WHM and cPanel for SSL Certificates and Claim Your Free SSL Certificates for HTTPS.
OK, so back to the main point of this blog post, how to get Let’s Encrypt setup on your pfSense hardware. For the purpose of this blog post we’re going to assume you’re running pfSense directly on one of the Netgate hardware devices as there are too many nuances to running pfSense virtually that make the setup too problematic in any real world environment. A virtual pfSense environment is great for playing around, but beyond that, personally I’ve had too many issues for that setup to be taken seriously for a production ready setup. If you have managed to get that working, then please do comment on the setup that you’ve got working!
For reference, ACME stands for Automated Certificate Management Environment. It has no link to the Acme Corporation in the Road Runner/Wile E. Coyote animated series.
Why Use Let’s Encrypt on pfSense
This is a very good question, and one that doesn’t have a straight forward answer. This comes down to two basic use cases, one of which is to manage SSL certificates at the edge of the network (i.e. your pfSense device), the other of which is to manage SSL certificates at the destination server. And as usual in the world of IT, the answer is that “it depends…” and it does. There is no hard and fast answer for a solution as it all depends on what you want to do. Both approaches have merits and drawbacks.
Personally speaking, I tend to lean towards utilizing SSL connections using Let’s Encrypt or otherwise on the destination devices rather than the edge network firewall. The reason behind this is because this approach gives significantly more flexibility to the portability of services as there is a more decoupled approach, meaning that it’s more pain free.
In the scenario whereby you need to move a virtual machine from an on-premises network to the cloud and you have a tight coupling via the SSL certification process to your on-premises network, the migration process will be more difficult. Whereas if you had everything contained within the single box, you could easily take a snapshot and migrate that to the cloud without ever worrying about the network firewall and any SSL certificates installed on there. Granted, there are many other considerations and this is an over simplification, but you get the gist.
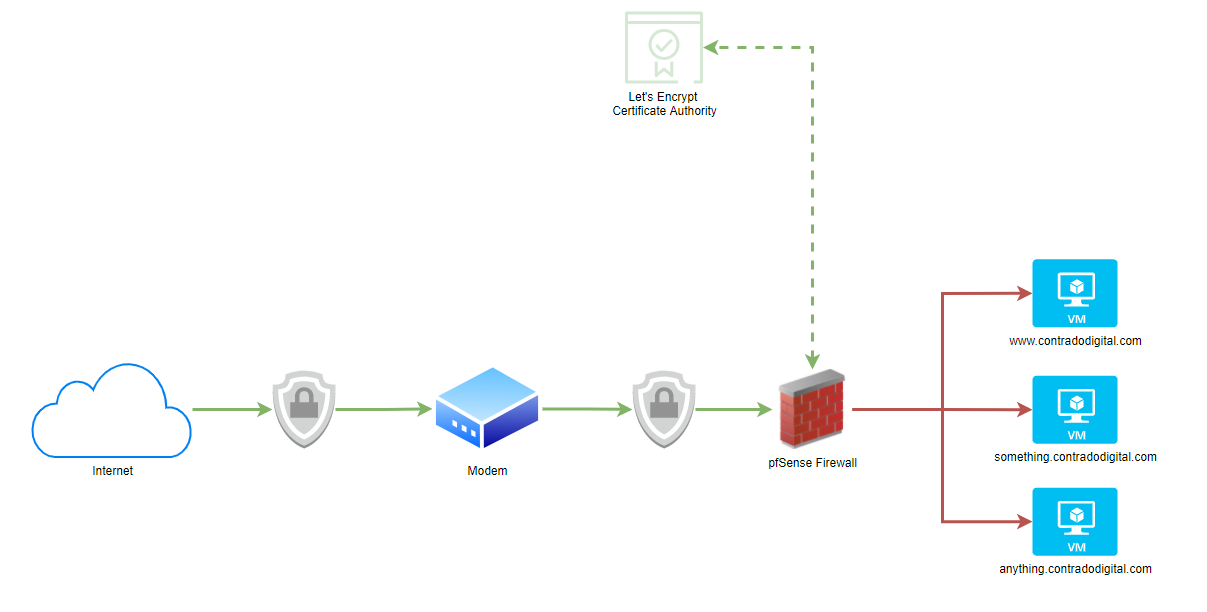
What this means pictorially. The whole point of setting up Let’s Encrypt on your pfSense hardware device fundamentally means that traffic from the Internet to your pfSense device is encrypted using SSL, which then means the traffic from your pfSense device to your destination computer/server/virtual machine is not encrypted.
As you can see in the image below, the lines highlighted in Green show where SSL encryption is present and the Red lines highlight where SSL encryption is not present. This is an overly simplified architecture as there are no notions of VLANs highlighted in this diagram to suggest if this is a safe or not safe space to be dealing with. Non the less, it highlights the main point around the approach for simplicity.
As mentioned previously, there are both pros and cons to this approach depending on your specific needs.
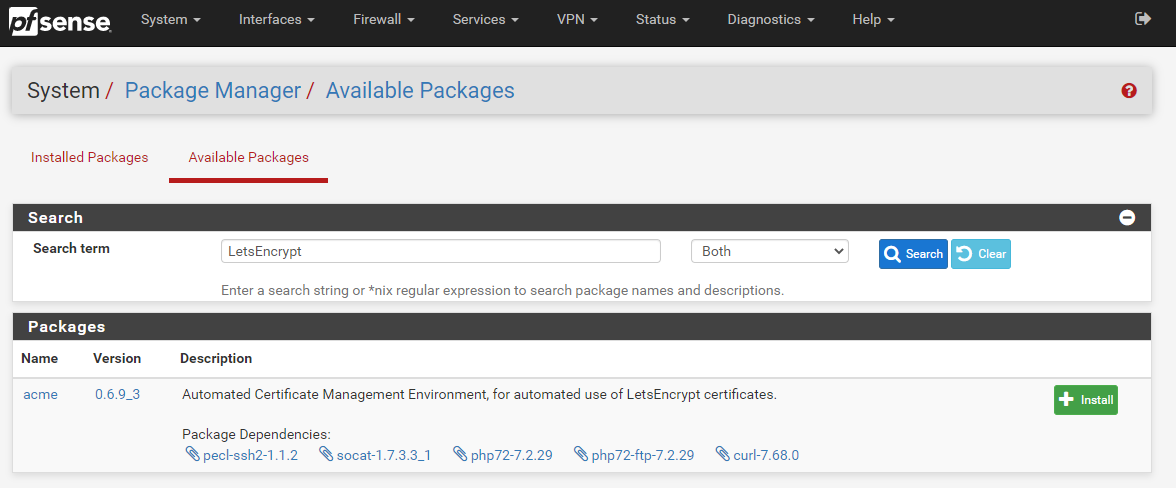
Step 1 – Install ACME Package
Thankfully pfSense comes with a list of available packages that you can install with ease. Very much in the same way to how Yum works for Linux, the only difference being that within pfSense you install the packages via a visual graphical user interface GUI to help you do this easily via the pfSense administrator console.
To install the Let’s Encrypt ACME Package onto your pfSense device it is actually extremely simple, simply navigate to, System > Package Manager > Available Packages;
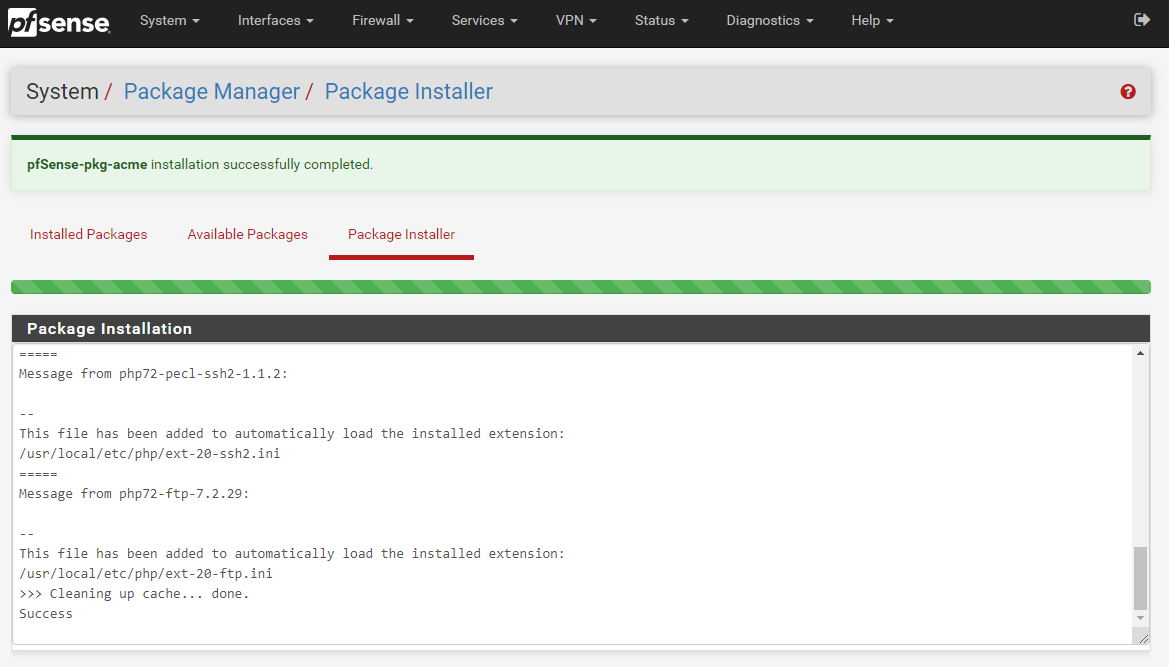
Once the installation process has complete for Let’s Encrypt on your pfSense device you’ll see a nice message stating that “pfSense-pkg-acme installation successfully completed”.
Excellent, now we’re onto configuring your Let’s Encrypt ACME package so that you can then install, manage and automatically renew your SSL certificates with ease.
Step 2 – Register an ACME Account
So next we need to get your system registered as an official ACME provider. This step is important as Let’s Encrypt controls the use of their system through basic rate limiting, meaning that once you reach the rate limit you will be blocked for a period of time. This helps to maintain the ecosystem for everyone. By registering your account, not only is this a required step to get Let’s Encrypt up and running on your pfSense hardware device, this also allows you to work within the rate limits of certificate renewals so that you can plan accordingly for your SSL certificates.
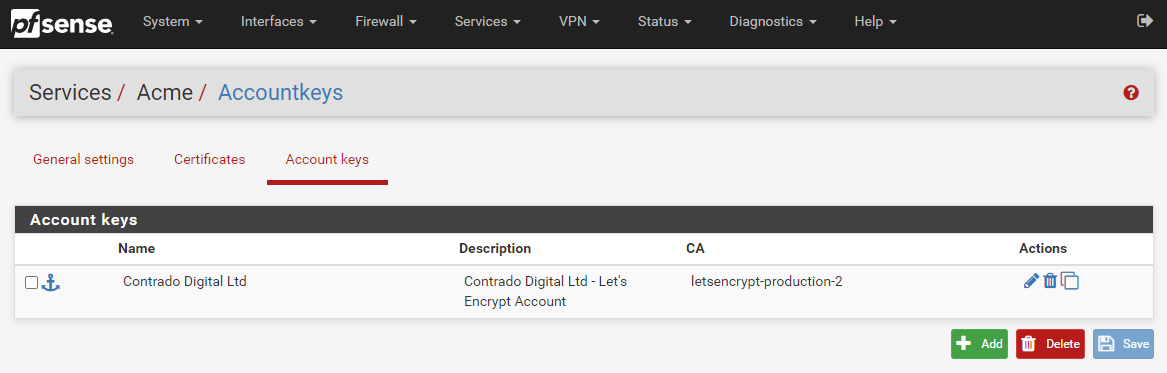
To get your Let’s Encrypt account registered first of all you need to create an Account Key by visiting, Services > ACME > Account Keys, then clicking ‘Create new account key’, which will generate the Account Key automatically.
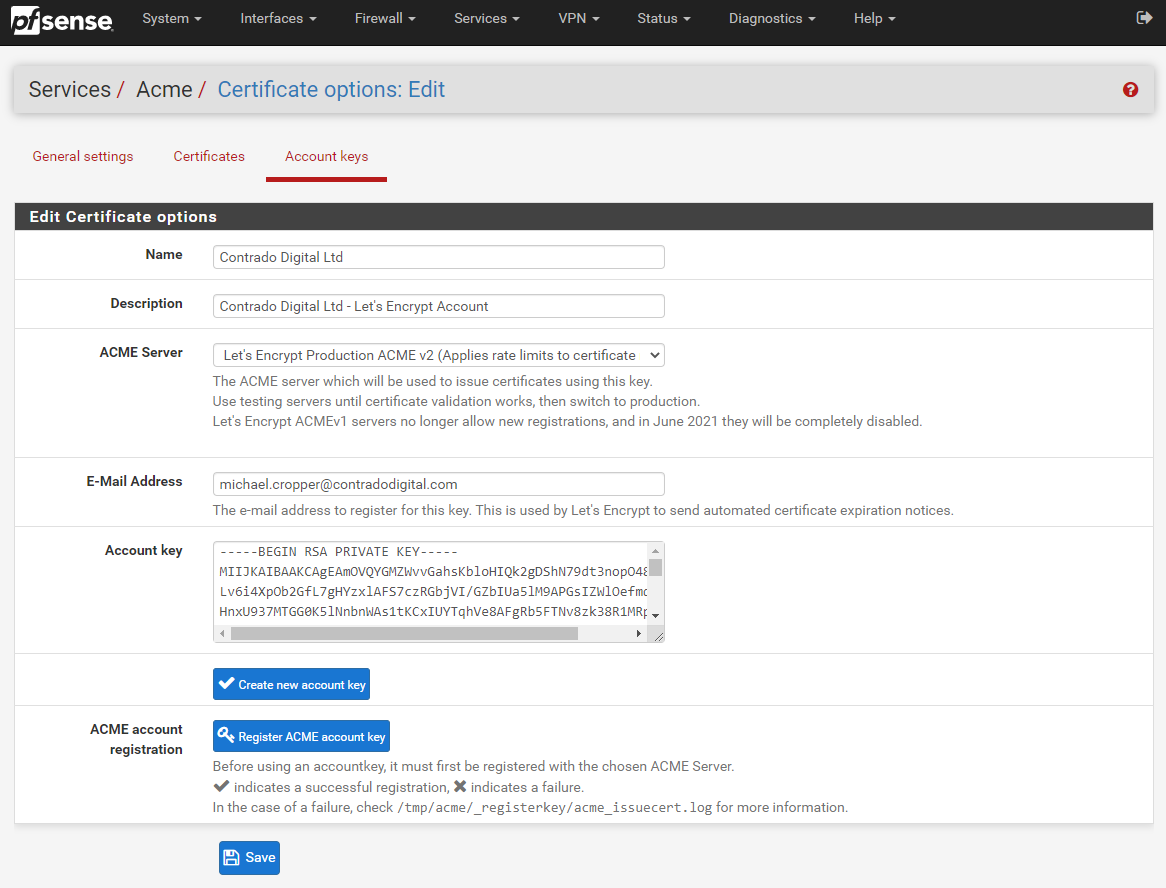
Now click ‘Register ACME account key’ and you should see the process complete with a tick;

Now click ‘Save’ and you’re good to go. You will then see your Account Key registered within your pfSense settings;
Step 3 – Configure Automatic Renewal of SSL Certificates Using Let’s Encrypt ACME Plugin on pfSense
OK, so next we need to turn on the configuration settings so that your Let’s Encrypt SSL certificates are automatically renewed when they are due. Unlike commercial SSL certificates which are generally valid for a minimum of a 12 month period, Let’s Encrypt SSL certificates are valid for a 90 day (3 month) period, upon which you are required to regenerate the SSL certificate. Quite frankly, no-one is this dedicated to remember to do this every 90 days, which is where the automated renewal process comes in extremely handy.
To turn on the automatic SSL certificate renewal process, simple navigate to Services > ACME > General Settings and configure the CRON Entry as can be seen below;
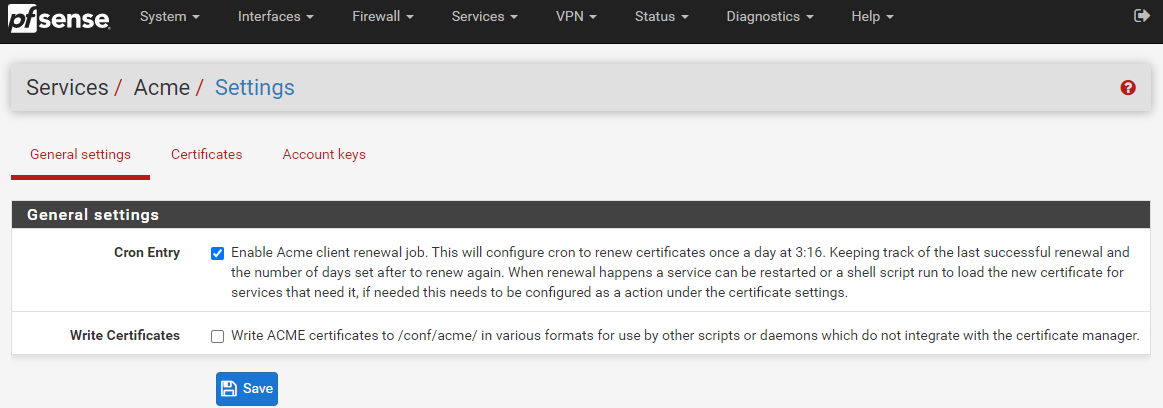
For reference, a CRON Entry is more commonly referred to as the CRON or a CRON Job. For which CRON is a geeky term for how the Greek God of time Chronos is able to control things. An interesting point, but completely irrelevant to what you are reading about.
Summary
And that’s it, you’re done. You can now use Let’s Encrypt to secure the encryption between the users accessing the systems/websites/applications behind your pfSense hardware over a secure network.
by Michael Cropper | Feb 12, 2021 | Client Friendly, Developer, IT |
The concept of a “Proxy” is often hugely misunderstood by people who know a little about these things, which results in a large amount of confusion for others who know less than those who know a little. It doesn’t help as the term “Proxy” is often used interchangeably with Reverse Proxy. While they have similar names, they serve completely different purposes. We’ll do another blog post soon on what a Reverse Proxy is. But before we do that, let’s take a look at a basic Network Firewall Proxy. What is it and why is it used?
Basic Network Physical Hardware Setup
Ok, so this is a hugely simplified diagram to illustrate the point. Let’s look at the physical hardware involved. It helps to get the point across about what a proxy is and most importantly how traffic is routed from A to Z when using these types of technologies.
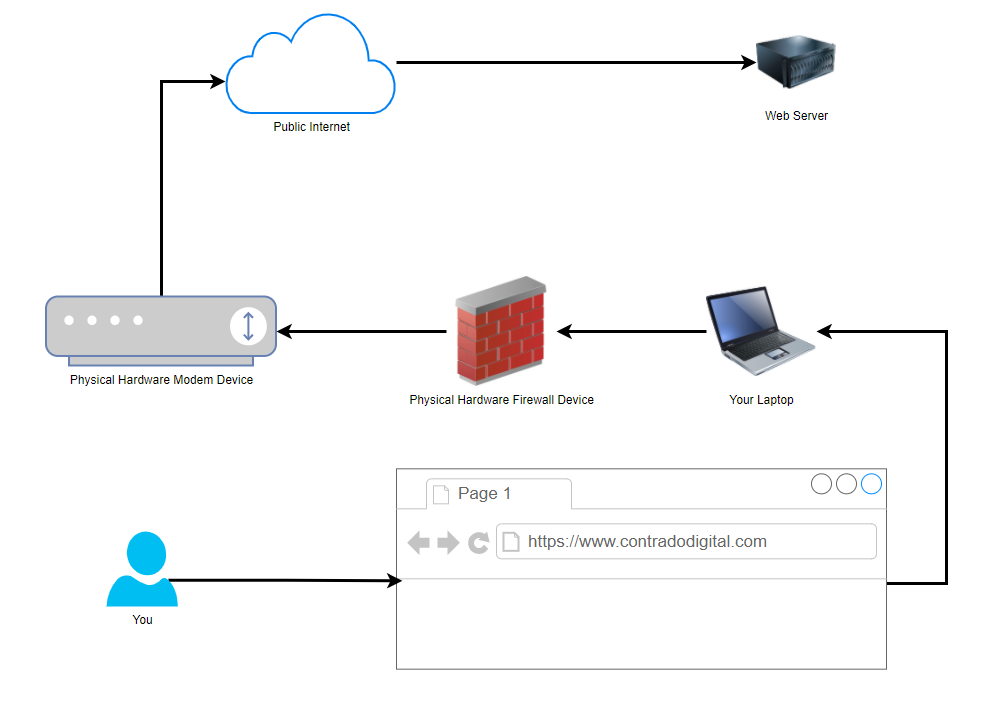
You type the website into your web browser on your computer and that is how the traffic is ends up at the web server where the website lives. Some of underlying routing between the Public Internet and the Web Server have been omitted for simplicity in this diagram as we are focusing on the Network Firewall Proxy at the moment.
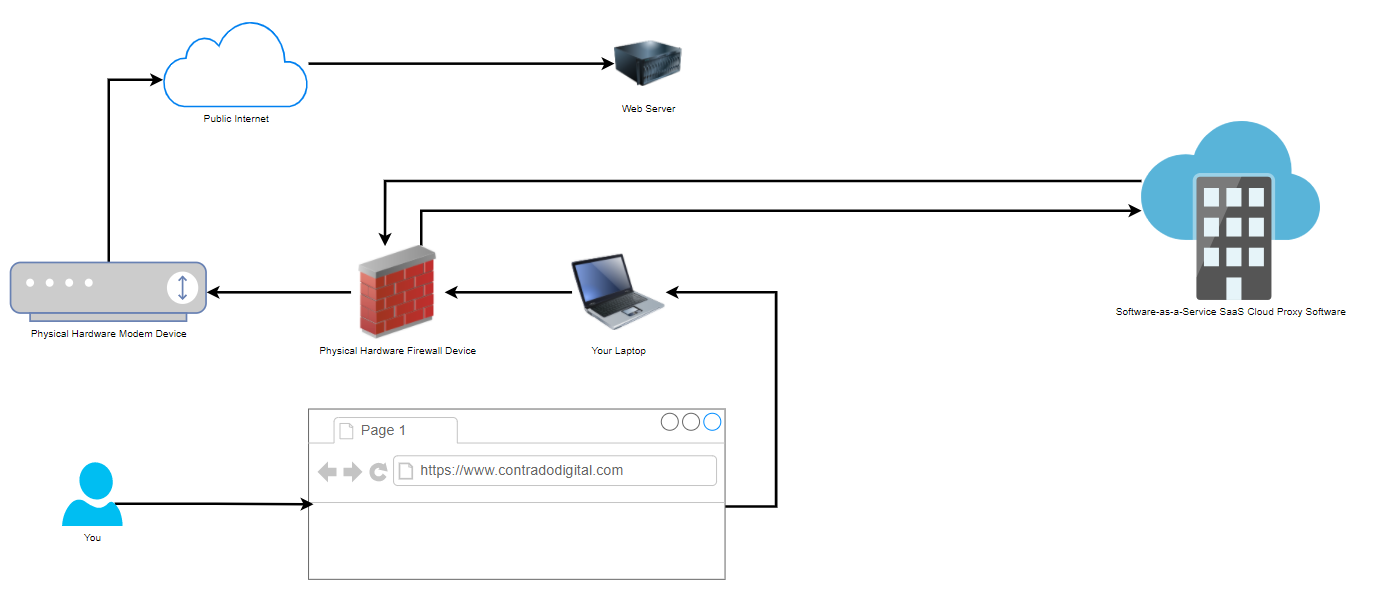
Physical Network Setup with Proxy Used
Now when we compare the above basic setup with the setup when you are using a Proxy, also known as a Proxy Server (generally something you manage) or Proxy Service (generally something you pay as a subscription fee for someone else to manage and you just plug into), you can see how there is just one additional step involved in the routing of how the network traffic gets from your computer to where it needs to get to on the internet.
That really is the only difference when you are using a Network Firewall Proxy VS not using one. As I mentioned at the start, don’t get this concept confused with things such as a Reverse Proxy which is completely different. Fundamentally, a Reverse Proxy does a similar ‘thing’, i.e. going via a middle man, but the architecture is significantly different and the tools used are significantly different. So despite their similar names, treat them as completely different things.
How to Configure a Network Firewall Proxy on your Hardware Firewall
Well as the section heading kind of suggests, you do this on your hardware firewall. To help you visualise this, let’s look at a hardware based pfSense firewall device which is capable of configuring a Network Firewall Proxy, here is what that looks like in the settings;
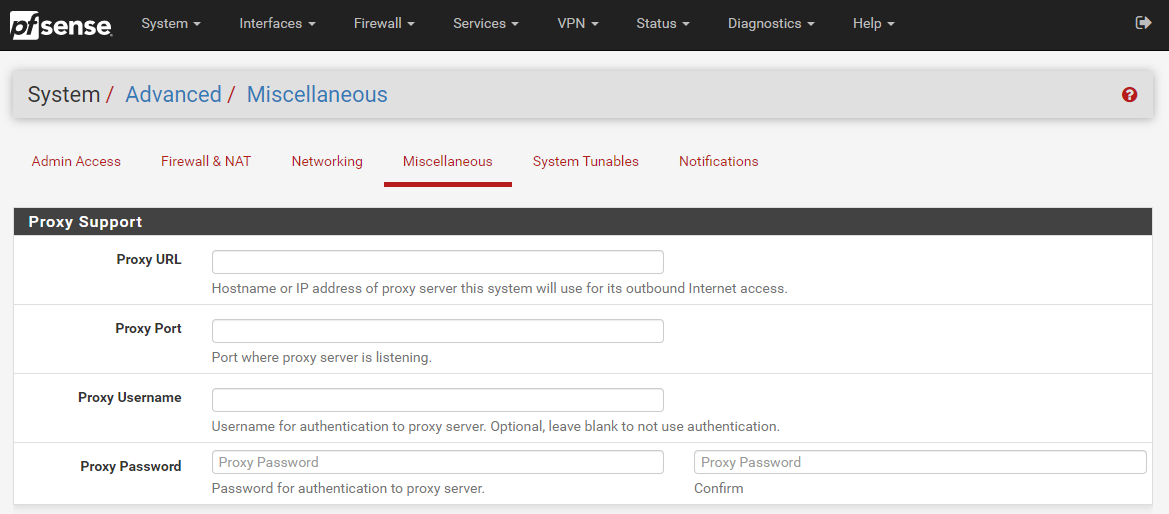
The above image shows you how you can easily configure a Proxy within your pfSense Firewall so that you can achieve this middle man setup as outlined in an earlier diagram. This Proxy could be one that you host yourself or one that is an external Software-as-a-Service SaaS Cloud Proxy that you subscribe to. Either way, pfSense gives you the options you need.
Why Use a Network Firewall Proxy?
You may be asking yourself right now why we even bother to use a Network Firewall Proxy. Well, you tend to find that it is fairly common practice in large enterprises as they like to monitor the network traffic to see what people are doing on the network. The physical hardware firewall just isn’t capable of doing the job easily as this is purely at the hardware level which is very low level and hence low levels of user functionality.
To put it into context, while modern websites are often updated multiple times per day, you’ll tend to find the software on a physical firewall is updated once every few years, and even still this is really just to patch any critical security vulnerabilities that have been discovered, not to improve the user experience of people using this device. Hence why Software-as-a-Service SaaS Proxy Services have become so popular.
Generally in the enterprise world, Proxys are used as one type security mechanism to protect both users and the corporate network from attack. While there are positives to this there can be drawbacks too. For example, let’s say you are accessing a trusted source such as Microsoft Office 365 online platform, https://www.office.com, why on earth would you run that through a Proxy service as you know full well that this is a trusted source. Let’s be honest, if Microsoft has a security incident that relates to how users are accessing their cloud services, we’re all f****d, and using a Proxy or not using a Proxy is going to be the least of all our issues. So we have to be sensible about how we use Proxy services.
This extra leg in the network journey adds latency (aka. It’s slower) for users. Slowness results in lack of productivity and lack of profitability as a business. Which is where the next topic comes into play around a Proxy Bypass.
Proxy Bypass
Here is where things get a little more nuanced. The name Proxy Bypass does exactly that, it allows you to configure things which are required to run through your Proxy, and things that should not run through your Proxy. There are many valid reasons why you need to implement Proxy Bypass to filter some parts of your internet traffic to go through the Proxy and others to not go through the Proxy.
You’ll find that some Proxy services (internal or external) are quite frankly a bit rubbish and don’t perform properly. Take for example any modern technology that does SSL validation at the client side, some Proxy services actively strip out SSL certificates in-transit and replace them with their own on different legs of the journey. Naturally with modern technology, they can detect this interference, so when the final Request-Response comes back to the client machine, it distrusts the response and bins it off – and rightfully so. This can cause a lot of problems for software developers who are utilising modern development technologies to pull in packages and dependencies from remote sources as part of their systems using things such as Maven, Gradle, NPM, Git and more.
Corporate networks acting as a Man-in-the-Middle Attack is not great. While, yes, there are corporate security controls that need to be adhered to, but at the same time, this means that when SSL is being decrypted on-route, that things such as passwords and credit card details can be read in plain text if one were to wish to do so. This is a very fine line between corporate security and employee/user privacy.
Summary
Hopefully that is a good summary of what a Network Firewall Proxy is and now you know not to confuse it with a Reverse Proxy. There are many different types of Proxys out there, from large enterprise class systems to self-hosted open source systems too.