by Michael Cropper | Sep 1, 2016 | Client Friendly, News, Security, WordPress |
Over the last few months there have been some really exciting changes happening in the website security world related to encryption. Something which now allows businesses of all shapes and sizes to take encryption seriously without the larger investment previously needed. Before we get into the nitty gritty, let’s take a look at what exactly SSL and HTTPS actually is and why it is important.
Google is to Flag Non-Secure Websites
Already SSL certificates are a factor in Google’s search algorithm, meaning that businesses using HTTPS are more prominent in Google’s search results when customers are searching. If this wasn’t enough for you to implement an SSL certificate, then eventually Google will be treating all websites like this that are not using HTTPS;
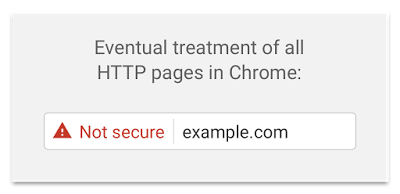
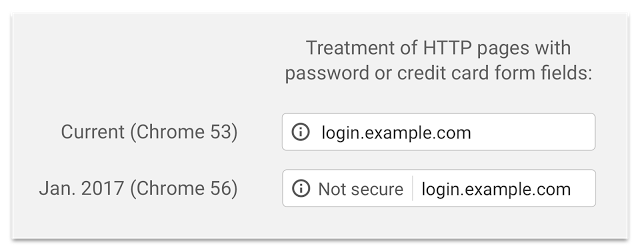
As a customer, what would you think if this warning came up when you were browsing your favourite websites? You would soon leave the website and begin to distrust the brand, right? Then the same is going through your customer’s minds too. Starting January 2016 Google will begin to flag insecure websites as not secure as can be seen below;
Now is the time to implement SSL on your websites to avoid the mad rush when Google turns this feature on. Read all about the finer details over on Google’s security blog.
Importance of SSL and HTTPS
Getting a little bit technical, SSL stands for Secure Socket Layer which turns the standard HTTP protocol used to access all websites on the internet into a secure connection. What this means in practice is that the connection between yourself typing www.contradodigital.com into the web browser and the web server is encrypted, meaning that no-one can listen in to what data is being sent/retrieved as you go about your day.
Take WordPress as a prime example, whenever you login to your WordPress website, if you are still using HTTP and not HTTPS then anyone listening in on the network can read your username and password in plain text, then use this data to hack into your website and do damage. So if you’re in a café or any other public place to access your website over HTTP, then it is relatively straight forward for people who know what they are doing to see your details. The same is true when you enter a username or password onto any other website on the internet, if they are using HTTP instead of HTTPS, then your password becomes visible to the world if someone is listening in on that network. SSL resolves these issues.
Anyone who is using any kind of login system on their website, whether this is simply for logging in administrators into your content management system, or running an ecommerce website, you should be using SSL. Previously an SSL certificate would have cost anywhere between £150 and £550 just for the certificate itself, plus the added cost of migrating your website from HTTP to HTTPS which can be a considerable cost in itself.
From a user perspective, implementing SSL simply means taking your website from HTTP;

To HTTPS;

End to end encryption to secure your website.
Free SSL Certificates
Over recent months we’ve been experimenting with Let’s Encrypt, the new free certificate authority, the guys who generate the SSL certificates. Let’s Encrypt is backed by the likes of Facebook, Google, Cisco, Mozilla, Akamai, Automattic, Shopify, Sucuri, Hewlett Packard and many more. When Let’s Encrypt was first launched in April 2016, it was still very much in its early stages and quite buggy on a lot of platforms. Thankfully since then, it has become a lot easier to work with and hence is now something we’re recommending all businesses should take a look at for their own websites.

Practicalities
While Let’s Encrypt does bring free SSL certificates to everyone, it’s not quite as straight forward as just clicking a button and you’re good to go. As with all website and web server technologies, there are many moving parts with endless different setups and configurations. While the SSL certificates their self are free, implementing the initial Let’s Encrypt setup on your web server can be time consuming, or even in some cases, not even possible at the moment. Likewise, once you have claimed your free SSL certificate from Let’s Encrypt, you will likely need to implement various bits of website work to ensure SSL works correctly throughout the website.
Thankfully, we’ve got this town to a tee. Anyone hosting their website with us and running WordPress, we can implement this in no time at all, so get in touch so we can implement your free SSL certificate with minimal investments associated with the implementation of this. For anyone else, drop us an email anyway and we can review your current setup to see if it is capable of implementing the free SSL certificates from Let’s Encrypt.
For anyone brave enough to have a go their self, here are a few handy resources on some of the technical aspects in the background;
But the likelihood is that you’re not going to be able to implement this yourself, nor should you try if you aren’t competent as you can do some serious damage if you do things wrong. If your current web hosting partner or website team isn’t capable of implementing this or the technology isn’t up to scratch, then it’s probably time to review your current web hosting options;
Update – May 2017
As mentioned when initially publishing this blog post, companies need to act now to avoid losing potential customers.
Google Will Warn Potential Customers Not To Contact You in October….Act Now…
Google has been encouraging website owners to move towards a secure and encrypted internet for over 12 months now and they believe they have given website owners enough time to implement encryption technologies on their website to use SSL, i.e. when people view your website they view https://www.contradodigital.com rather than http://www.contradodigital.com. This means that the connection is encrypted and your customers data is secure when they are submitting things like credit card information or personal information on contact forms.
Unfortunately many websites are still not taking cyber security seriously which is why Google is taking the next step in October. In essence what this change will mean is that if you have not implemented an SSL certificate on your website by this time, anyone wanting to contact you through the contact form on your website using Google Chrome (the most popular web browser in use…) will be told that your website is ‘Not Secure’ which will put potential customers off from entering their details and contacting you. You need to act now to prevent your website being listed as Not Secure to your customers.
Here’s how your Contact Us page will look when people are about to fill out their details. Ask yourself, would you fill in a contact form on a website if you saw this warning message?

Here is an animation of what your contact form would do when people start entering in information;

What you need to do…
If you haven’t implemented an SSL certificate on your website to date, then you need to do so as soon as possible. This can be a relatively straight forward thing to do, or something a little more complex which depends on the technology you’re using in the background. Don’t worry about that though as we have implemented a lot of these for businesses over the last few years across a range of technologies.
Even better, SSL certificates are now FREE which is great as they would previously have set you back several hundred pounds for the certificate alone. So simply drop me an email directly and we can schedule some time in to implement this for you, michael.cropper@contradodigital.com
by Michael Cropper | Aug 24, 2016 | Developer |
In the latest release of WHM comes a seriously handy tool which allows domains within one cPanel account to be migrated to their own cPanel account. In an ideal and perfect world, every domain would be contained under its own cPanel account as this allows much more granular reporting when using tools such as New Relic or command line resource usage commands such as atop. In reality though when dealing with many different web servers which have a lot of history and often non-optimal configurations, often you find that multiple domain names are contained within a single cPanel account. This is bad for a whole host of security reasons, primarily because if one website gets hacked into, it’s possible to access all of the websites under the single cPanel account which is an inherent risk. And if those websites are WordPress, if they get hacked into after then have been built badly or aren’t maintained securely then a quick install of a certain plugin allows the hacker to gain access to absolutely every file under this cPanel account. So it’s really important to structure your web servers for optimal security.
So now that’s clear, here’s how to use the Convert Addon Domain to Account tool within WHM.
Convert Addon Domain to Account within WHM
Open WHM and navigate to Home > Transfers > Convert Addon Domain to Account. This will list all Addon Domains listed within all cPanel accounts on the server. Select the one you wish to migrate to its own account and press “Convert”;

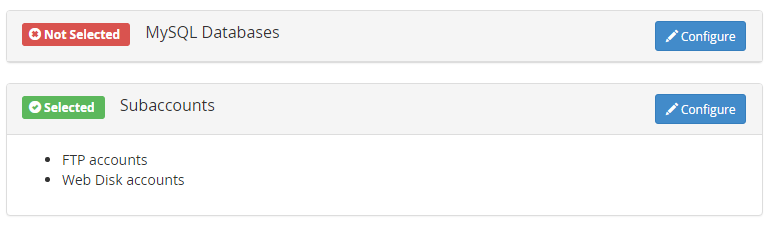
Here you will then be presented with a list of options. Make sure you check through everything and make a note of what the new settings are.
Create an account name for the new cPanel account;
Check through your settings which have been automatically selected;
What likely hasn’t been picked up by default is your database table(s) so make sure you click on the Configure option and select which databases belong to the website being transferred to its new account.
Then let it do its thing by clicking on the Start Conversion button. Depending on the size of your website will depend on how quickly, or slowly, this transfer happens. Once everything is completed you’ll see a completion message along the lines of;
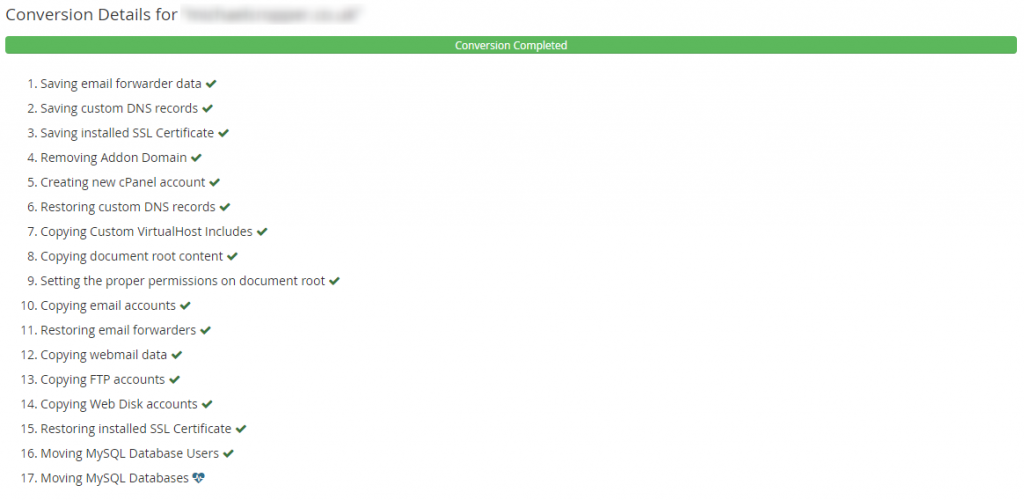
Transfer Complete
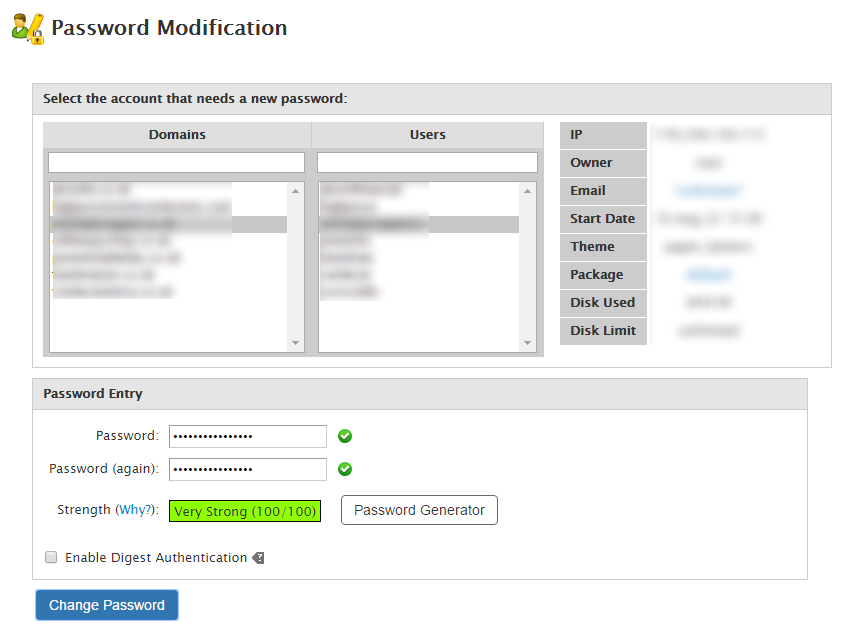
It really is as simple as that to use. Once the migration is complete you’ll need to modify the password for the account via WHM;
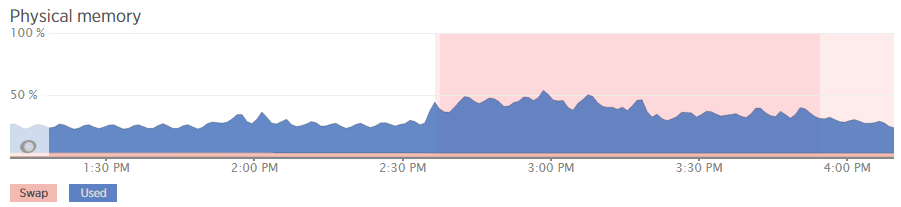
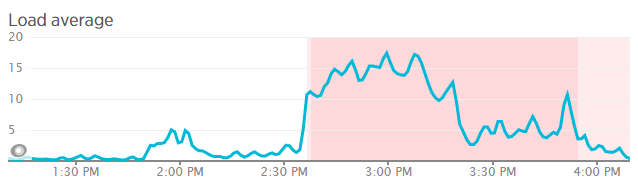
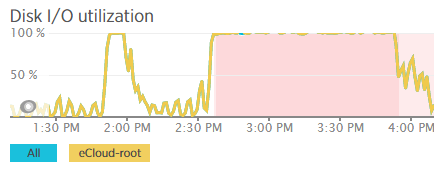
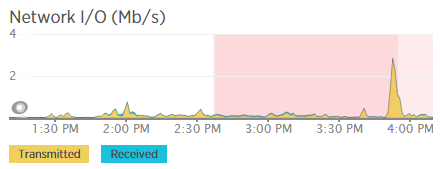
Performance Challenges
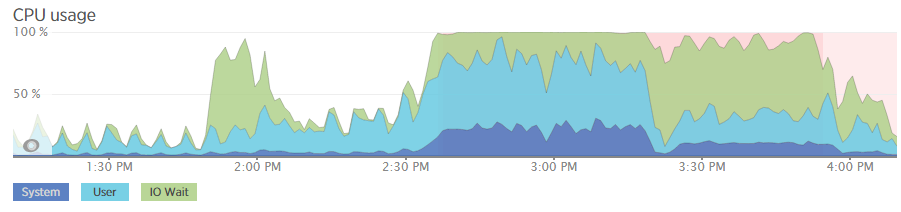
While this is a great tool, something to mention is around performance. Performance wise for one project we were working on, the resources completely maxed out on one web server and took a total of 90 minutes to migrate a small website of around 10GB in size for files and databases. This is something to bear in mind and it’s probably best that you run these kinds of migrations at low points during the day to prevent issues impacting people using the websites in question. Below are a select of screenshots which clearly shows the performance difference at a normal point in time compared to when the process was running to put this into perspective.
Summary
All domains should be under their own cPanel account for security reasons. If you have multiple domains contained under a single cPanel account, start to get things set up properly as they should be. Recovering one hacked website is time consuming and costly enough for you as a business, recovering multiple just multiples the problem. Do not leave this until it is too late. If you are unsure how your web server infrastructure should be set up then get in touch and we can help you with getting things set up correctly.
by Michael Cropper | Aug 24, 2016 | Developer |
For those of you using cPanel and WHM as a system, you’ll be as glad as I am to hear about the latest release of AutoSSL which enables SSL certificates to be set up across accounts much easier than ever before. In summary, it’s possible to generate and install SSL certificates for individual cPanel accounts all via the WHM interface which is super useful when managing web servers with multiple accounts and domains hosted. All of which is powered by Let’s Encrypt which traditionally would have required quite a bit of command line set up via SSH.
To get this up and running is actually relatively straight forward.
Set up Let’s Encrypt for AutoSSL via SSH
This is the only part that you need to do via SSH and it is only required once. Simply login to SSH and run the following command;
/scripts/install_lets_encrypt_autossl_provider
Let everything install and configure, all automatically.
Configure AutoSSL in WHM to Use Let’s Encrypt
Navigate to the following page within WHM, Home > SSL/TSL > Manage AutoSSL. Now update the settings to use Let’s Encrypt instead of any other providers that you may have installed as can be seen below.
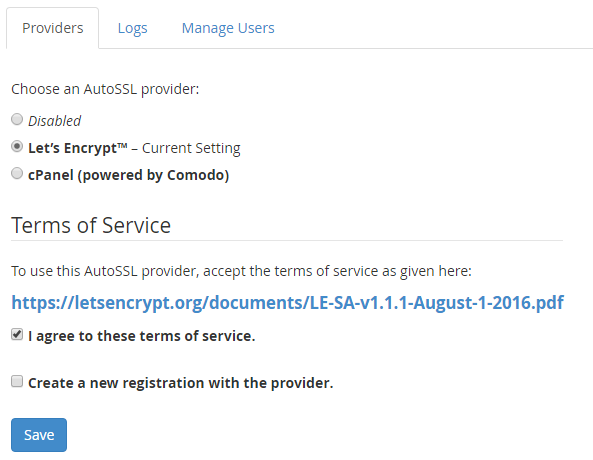
Once this is set up, when you use the AutoSSL feature Let’s Encrypt will be the certificate authority which manages this.
Run AutoSSL for cPanel Accounts
Now everything is set up to run AutoSSL, it’s time to start running it. While you can simply run this for all domains, it is recommended to take a more structured approach so you can be sure that you are updating everything correctly. Particularly when migrating WordPress websites from HTTP to HTTPS, there are a lot of additional tweaks to make to ensure everything works correctly.
To run AutoSSL on a specific cPanel account, simply click on the “Check” button next to the account you want to run this for. This will run AutoSSL for all Addon Domains associated within this cPanel account. There are a few restrictions currently for what will work here, so be sure to check the official cPanel documentation.

SSH Now Setup
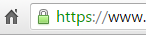
Now access the HTTPS version of your website and everything should be set up and working. As mentioned previously, there will likely be other items to clean up to ensure the green padlock shows in your browser bar. From an AutoSSL standpoint, everything is complete. Simple.
Check within the individual cPanel account you have just updated and you should see that the certificate has been installed on the domains that are listed. This is super useful and saves a lot of time manually generating and implementing SSL certificates.
Caveats
If this doesn’t work for some reason then check the error logs for AutoSSL within WHM. This will provide you a lot of information about what has gone wrong. Particularly if you are using cloud based CDNs or firewalls such as Sucuri, then you’ll need to disable this to get AutoSSL working correctly. Be sure to check your .htaccess files too as sometimes you may have restrictions in here which only allows traffic to the website from the cloud based CDNs or firewalls such as Sucuri.
As with everything, make sure you know what you are doing before playing around with these types of things and make sure you fully understand your technical stack and setup. Just because this works for us, does not mean that this will be as seamless for you. Get in touch should you have any support requirements for getting this set up on your websites and web servers.
by Michael Cropper | Aug 23, 2016 | Developer |
When you’re building a website from scratch implementing HTTPS is actually relatively straight forward in comparison to migrating a current website from HTTP to HTTPS. When migrating a WordPress website from HTTP to HTTPS there are multiple aspects you need to take into consideration to implement this successfully which are outlined below.
Get an SSL Certificate
This goes without saying, but I’m going to say it anyway. Make sure you have an SSL certificate installed on your domain. There are many options available including the free SSL certificates from Let’s Encrypt. Details outlined for how to get that set up on the linked post.
Update WordPress Address and Site Address in General Settings
Firstly you need to update the settings within Settings > General Settings to update the WordPress Address and Site Address from HTTP to HTTPS as can be seen below.
From HTTP

To HTTPS

This will tell WordPress to use HTTPS throughout the site.
Update Your wp-config.php File for SSL
Add the following line of code to your wp-config.php file which is often needed to ensure SSL works correctly;
if (isset($_SERVER['HTTP_X_FORWARDED_PROTO']) && $_SERVER['HTTP_X_FORWARDED_PROTO'] == 'https'){
$_SERVER['HTTPS'] = 'on';
}
This is required for when your website is behind a load balancer or reverse proxy. Full details about this can be found in the WordPress Codex.
Fix Mixed Content Warnings
Now you’ve successfully set up SSL on your WordPress website, although when you browse the website you may notice that you don’t get the nice green padlock showing in the browser bar. Instead you’ll see lots of mixed content warnings which causes the green padlock not to show;

The reason this is happening is because some of the assets in use on your page such as images, JavaScript files or CSS files are being loaded over HTTP when the page is HTTPS, meaning that the browser cannot be certain that nothing has been intercepted in transit and edited. Browse the Google Chrome Developer Tools window and you will see notices that look like the following;

This is not quite the desired impact that you had in mind when implementing SSL. Now, assuming that you have a well build website, tidying everything up should actually be relatively straight forward. If your website has been built badly then it’s likely going to be a lot more challenging to fix. For example if URLs have been hardcoded in any of your plugins or themes that are in use.
Update All Assets to Use HTTPS instead of HTTP
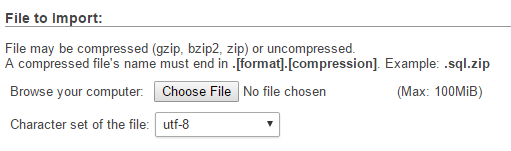
So now you need to run through the database and get everything updated. Thankfully there is a handy plugin which can automate a large amount of this work which is the Search and Replace plugin. Once this is installed go to Tools > Search & Replace > Replace Domain URL tab and enter in your details within here;

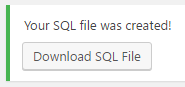
Then you will be able to download a .sql file which has been created for you now the Search and Replace has been completed. From here, login to your web server’s control panel, navigate to phpMyAdmin if you have this installed and upload the SQL file you have just downloaded. Make sure you are uploading this to the correct database if you have multiple databases in use. And as always, make sure you take a backup before you do anything in case you break anything by mistake.
SSL Now Fully Working
Now you have completed all the steps involved with migrating a WordPress website from HTTP to HTTPS and cleaned up all of the mixed content warnings. So when you browse your website now, you should see a nice green padlock when you browse the website. Make sure to have a browse around your website in case anything has been missed. So many WordPress websites have been built badly so you may need to do some additional cleaning up in various places.
301 Redirect HTTP Traffic to HTTPS
This is just good practice to do so that you are forcing the use of HTTPS on your website. Add the following code to your .htaccess file;
RewriteEngine On
RewriteCond %{SERVER_PORT} 80
RewriteRule ^(.*)$ https://www.example.com/$1 [R,L]
by Michael Cropper | Aug 12, 2016 | Developer |
The same questions come up time and time again online about how to debug WordPress problems. The challenge with WordPress and the web servers they live on is that there are an awful lot of moving parts, of which one or more of these moving parts can be the root cause of the problem. Unfortunately there is no handy traffic light system which says what is working well and what is causing problems as problems can be intermittent, appear random or only occur under specific circumstances. This being said, there is always a logical way to debug WordPress problems to identify what the root cause of the problem actually is.
Identify What is Actually Happening and When
This is extremely important as this will help you to understand where the problem actually lies. Is what you are experiencing really a WordPress problem or something web hosting related or something email related or something else completely?
Check your Server Raw Access Logs
See what is happening on your web server when you are experiencing the issues. This will help to identify if there are any other external items that could be the potential cause of the issues or if this is indeed an isolated incident.
Check your Server Error Logs
Has anything been resulting in a recorded error on your web server that can help you identify the problem that is happening? Have a good rummage around here to see if you can spot anything and tie this back to the times and dates when the problems are occurring.
Check your Server Monitoring Software
Tools such as Munin and New Relic are invaluable when debugging issues, they can help you identify what is currently happening on your web server. This enables you to see if the problem is indeed WordPress related or an issue that is being caused elsewhere.
Check your Server Firewall
Make sure your IP address isn’t being blocked for some reason. This can sometimes be triggered when you have entered an incorrect password on multiple occasions.
Check your Cloud Based Firewall
As above.
Check your WordPress Firewall
If you have a WordPress level firewall installed, then it is possible that your IP address / user account is being blocked here too. You’ll likely need to check via phpMyAdmin to view this data to see if you can find your IP address in the database for locked users or accounts. Depending on the plugin you are using for this, this data could be anywhere. Check the documents for the plugin you are using to figure out where this information could be. If your IP address is being blocked, it’s usually safe to delete this row and you should regain access. Again, make sure you know what you are doing before you go deleting things though as you may delete a whole host of incorrect things depending on how everything has been set up.
Check if the Problem is Just You
http://isup.me will tell you if your website is up or if it is just you experiencing the problem.
Check in Another Web Browser
Often issues can be browser specific, so check on a different web browser that you have installed.
Check on Another IP Address
Use your mobile phone, with WiFi turned off, to access the website. Is the issue still being caused now?
Check Google Analytics
Is there anything happening at the time when the issues are occurring? This could help you narrow down where the issue lies, for example if you suddenly receive a large spike in traffic which would show on the Real Time reports or on the hourly reports which could show out of the ordinary behaviour on the website.
Check Google Chrome Developer Tools
If the problem is occurring when you are either viewing a specific page or when you are logged in as a user or administrator, open the Google Chrome Developer Tools to see if any issues are being flagged in the console window. If there are any error being flagged here, this should give you an idea of where the problem may be coming from.
Compose Yourself
So far you have been gathering data about what is happening so you can make an informed decision about if you are certain the problem actually lies with WordPress or if it is somewhere else. Assuming you have identified that the problem is indeed WordPress related then continue reading.
Enable WP_Debug
Turn on wp_debug by adding the following line of code to your wp-config.php file;
define( 'WP_DEBUG', true );
Once turned on, this will flag any errors that are being caused by the themes, plugins or PHP files which need addressing. When you turn this setting on, both you and everyone using your website will be able to see the errors. So if you must do this on a live website, do it quickly and turn if off again by setting the value to false.
define( 'WP_DEBUG', false );
On poorly built WordPress websites with plugins purchased from theme market places and other less salubrious sources, this will flag up a whole host of errors. Take note of where these errors are being caused as this will help you to identify where the problem lies and ultimately what you need to do about resolving the issue.
While the WP_Debug option is great, it doesn’t do everything for you. Particularly on custom built systems with lots of custom code and functionality, you need something extra. This is the WordPress Debug Log. Firstly, add the following code to your functions.php file;
if (!function_exists('write_log')) {
function write_log ( $log )  {
if ( true === WP_DEBUG ) {
if ( is_array( $log ) || is_object( $log ) ) {
error_log( print_r( $log, true ) );
} else {
error_log( $log );
}
}
}
}
Then where ever in your code you feel that a problem lies, add the following code to check that this part of the code is actually being called;
write_log('THIS IS THE START OF MY CUSTOM DEBUG');
You’ll also need to make sure that you have the following settings turned on in your wp-config.php file;
define( 'WP_DEBUG', true );

define( 'WP_DEBUG_DISPLAY', false );

define( 'WP_DEBUG_LOG', true );
Then when you start running through your system to check which bits are and aren’t working, you can view the data that is output into the debug.log file which is added to your Document Root for your WordPress installation.
Backup Your Setup
A full backup including database and files. So you can restore the site to it’s current broken, but functional, state if the following debugging ends up breaking things even more. This can happen when WordPress websites haven’t been built particularly well, so make sure you have a full backup. Even better, use a backup plugin which allows you to easily restore everything should you need to. It is a lot easier to restore backups when part of the task is automated.
Update Everything
WordPress Core, Themes and Plugins. Make sure absolutely everything is running the latest versions. Often problems are caused by outdated plugins which are either using deprecated PHP functions or making calls to 3rd party systems which have been updated since they were installed, or even conflicts between other Plugins, Themes or WordPress core that needs resolving. When you have updated everything, at least you know that everything should in theory be working correctly, assuming you are using well respected Themes and Plugins for WordPress and not poorly developed ones.
Disable All Plugins and Themes
This one is the one that on-one ever wants to do, particularly when debugging issues that are only happening on a live website and not on a development server. Unfortunately this is a required step in the process as this will help to identify what is causing the problem.
Firstly switch your Theme back to the latest version of the core WordPress theme such as 2016 and soon to be 2017. These themes have been built as near perfect examples of how Themes should be build, meaning that there are no issues contained within these themes which could be causing the issue. If the issue disappears when you do this, the problem lies with your theme. Contact the theme author to get it resolved so they can push an update out. It is important to note that on occasions, if your website has been built or customised incorrectly then it is possible that any custom CSS (for example if you have stored this in the JetPack plugin Edit CSS area) or other customisations you have made can actually disappear completely, which if this is a large website, then it’s going to take either yourself a good amount of time to resolve, or it’s going to cost you a lot of money to resolve paying someone to re-implement the different aspects properly.
If this doesn’t solve the problem, next, disable all plugins on your website. See if this solves the problem. If so, then it is one of the plugins you’re using which is causing the problem. Systematically re-activate the plugins you are using and check to see when the problem starts to happen again. As mentioned previously, some plugins will delete and customisations when they are deactivated which is annoying and causes more problems to resolve which can often take some time to re-implement some of the customisations. Good plugins don’t do this, bad plugins often do.
Check Server PHP Settings
As part of the process outlined above, on occasions the error lies with the web server, specifically the php.ini settings and configurations. There are various settings which are often causing the problems which include;
- Max_execution_time
- Memory_limit
- Upload_max_filesize
- Post_max_size
Check your WordPress PHP Memory Limit
In addition to the server settings, it is also possible to configure memory limits within WordPress itself. Check within the wp-config.php file to see if any arbitrary memory limits have been added which could be causing scripts to time out and produce errors. The line will look like the example below, likely with a different number included;
define(‘WP_MEMORY_LIMIT’, ‘64M’)
WordPress Debugging Plugins
There are also a few handy WordPress debugging plugins which can provide additional information including WordPress Query Monitor and WordPress P3 Plugin Performance Profiler. When you install these there are various debugging tools included which can help to identify where the root cause of the problem lies.
Check your .htaccess File
Sometimes this can become corrupted, either by someone who has access to the site messing around without knowing what they are doing, or, a plugin may have altered the file which is then causing problems.
Check your Database is Correct
You will at some point when working with WordPress come across the “Error establishing database connection” error which can be caused by multiple things. One thing is clear though, it’s an error connecting with the database.
Firstly, check your database credentials within the wp-config.php file to make sure they are correct.
Secondly, make sure that the MySQL daemon is running on your web server. Sometimes this can get a bit tangled in a knot and need a restart.
Thirdly, sometimes your WordPress database gets corrupted and needs to be fixed. To fix this, when you visit yourwebsite.com/wp-admin, you will see a message that your database needs to be repaired. Sometimes, you can go ahead and implement this straight away. Other times, you need to add the following code to your wp-config.php file;
define('WP_ALLOW_REPAIR', true);
Then visit yoursite.com/wp-admin/maint/repair.php to start the repair process. Be sure to remove this line of code once you have completed the process to prevent others from accessing the URL.
Should none of this work, speak with your web hosting company. On occasions, the maximum size of the database may have been reached or there is something gone really wrong with your database that WordPress cannot restore. All kinds of crazy things can happen and they will be able to identify the root cause of the issue.
Check File Permissions
If your issue appears to be related to file permissions, i.e. you cannot upload a plugin maybe or you’re having trouble uploading an image for example. Then check the file permissions on your web server to make sure that they are set correctly. And make sure to check the owner of the files too. For example, if you have restored a backup via SSH using a root user account, then the files you copy to a cPanel account for example will belong to that user and not the cPanel account user, meaning that you technically don’t have permission to do anything with them when you are trying to do so via your WordPress interface. This is rare, but worth checking.
Check that Maintenance Mode Hasn’t Got Stuck
If you have been updating WordPress core, Plugins or Themes and your maintenance mode has got stuck, it is likely that it has timed out and not been able to complete. What this means is that you’ll first need to identify why this has happened in the first place, check your error logs for details.
To get you back up and running though, login to your server via FTP, make sure hidden files . [dot] files are showing and you’ll likely see a .maintainence file. This is the file that WordPress adds when it is doing maintenance, which is then deleted at the end of the process. So if the process timed out, it didn’t complete and the file is still there which causes the message to appear for everyone. Delete this file and you should be back up an running.
Re-Save your Permalinks
Bizarre things can happen related to permalinks which cause strange issues around the site such as 404 errors showing and more. Even when they look correct when you view them in the settings page, just re-save them. Often this can fix random errors which you haven’t been able to identify yet.
Check your PHP Version
WordPress websites are hosted on a variety of PHP versions. What this means is that with newer and older versions of PHP, certain functions are not available that your Plugins or Themes may be trying to use. There is no easy way of debugging issues like this and as such, this is a last record for identifying issues, so rebuild you web server with different versions of PHP to see if this solves the issue. One recently I came across related to email not being sent via a plugin due to a specific version of PHP that was being used. The lower version of PHP did work but broke something else, the newest version didn’t work but the other thing was fixed, the middle version broke something, etc. In the end the solution was to upgrade to a newer version and fix on of the bugs that was being caused elsewhere. No simple solution to these types of problems.
Check WordPress User Permissions
Sometimes issues can relate to what permissions a specific WordPress user has. Set up the Members WordPress plugin to see if the issue relates to a specific user group as to why they can or cannot do something.
Monitor What WordPress Users are Doing
When multiple administrators have access to the website, all with varying levels of skill, it is impossible to know what people are changing and when. Install a plugin such as Stream which can log all of this information which can come in handy for debugging issues next time around.
Summary
Following the above process systematically can identify the root cause of the majority of WordPress problems. Often identifying is a completely different thing than fixing the problem. Often during this process you will realise that your website has been built fairly poorly and requires a significant overhaul. Should you require any support debugging your WordPress problems, get in touch and we’ll happily help.