by Michael Cropper | Feb 12, 2021 | Client Friendly, Developer, IT |
The concept of a “Proxy” is often hugely misunderstood by people who know a little about these things, which results in a large amount of confusion for others who know less than those who know a little. It doesn’t help as the term “Proxy” is often used interchangeably with Reverse Proxy. While they have similar names, they serve completely different purposes. We’ll do another blog post soon on what a Reverse Proxy is. But before we do that, let’s take a look at a basic Network Firewall Proxy. What is it and why is it used?
Basic Network Physical Hardware Setup
Ok, so this is a hugely simplified diagram to illustrate the point. Let’s look at the physical hardware involved. It helps to get the point across about what a proxy is and most importantly how traffic is routed from A to Z when using these types of technologies.
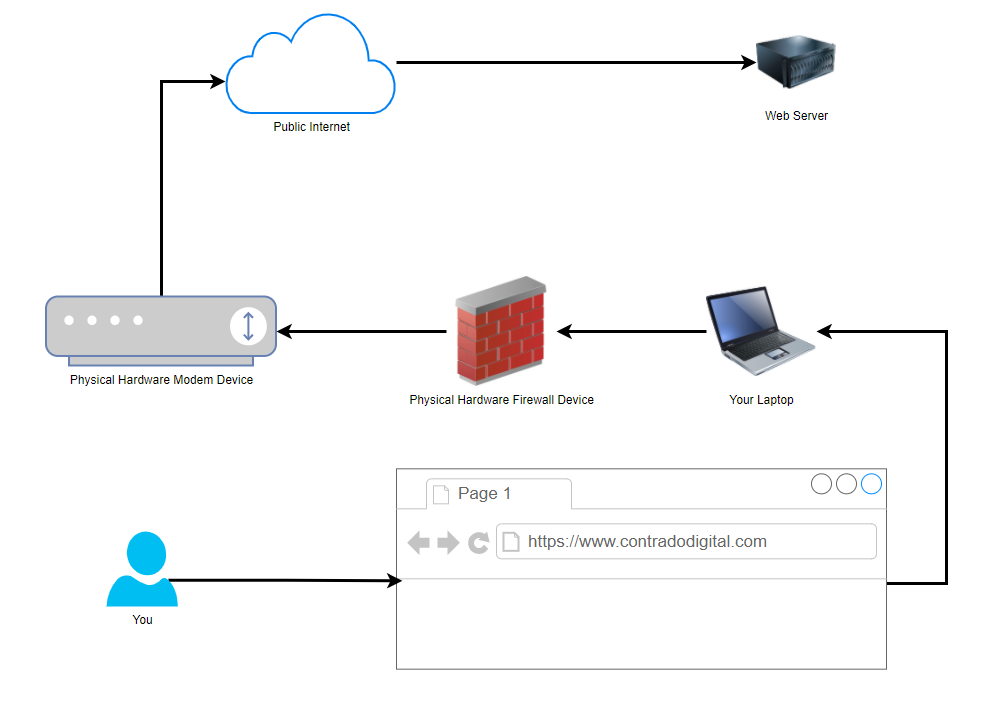
You type the website into your web browser on your computer and that is how the traffic is ends up at the web server where the website lives. Some of underlying routing between the Public Internet and the Web Server have been omitted for simplicity in this diagram as we are focusing on the Network Firewall Proxy at the moment.
Physical Network Setup with Proxy Used
Now when we compare the above basic setup with the setup when you are using a Proxy, also known as a Proxy Server (generally something you manage) or Proxy Service (generally something you pay as a subscription fee for someone else to manage and you just plug into), you can see how there is just one additional step involved in the routing of how the network traffic gets from your computer to where it needs to get to on the internet.
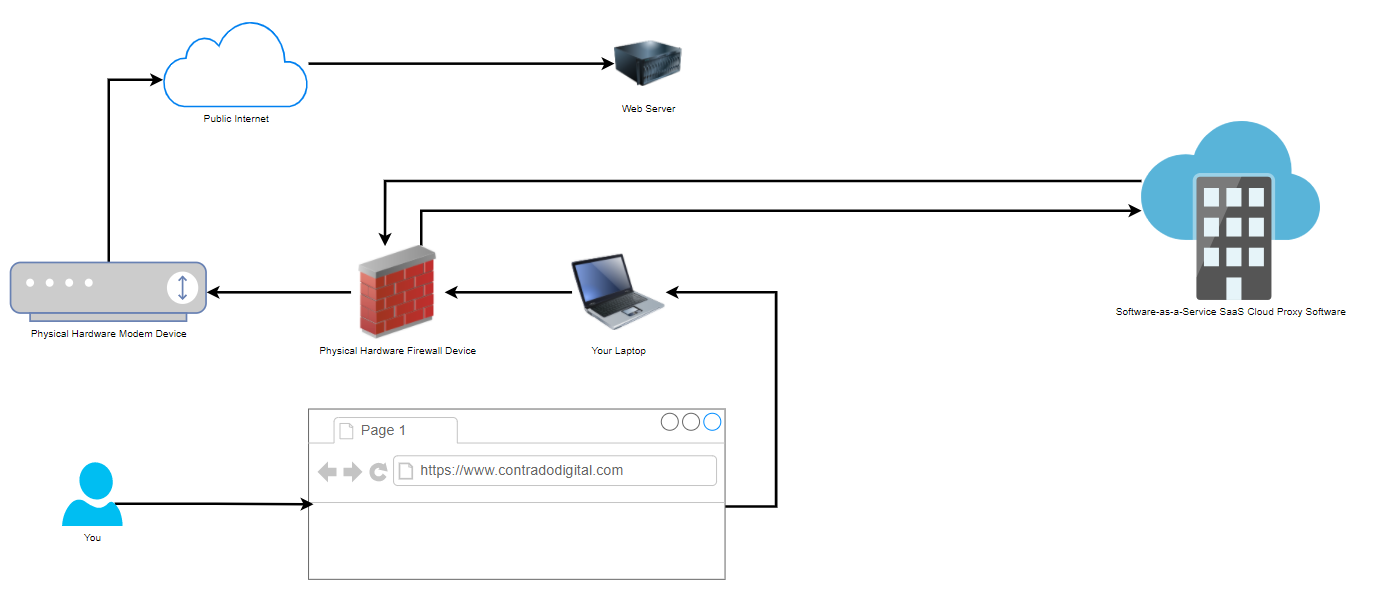
That really is the only difference when you are using a Network Firewall Proxy VS not using one. As I mentioned at the start, don’t get this concept confused with things such as a Reverse Proxy which is completely different. Fundamentally, a Reverse Proxy does a similar ‘thing’, i.e. going via a middle man, but the architecture is significantly different and the tools used are significantly different. So despite their similar names, treat them as completely different things.
How to Configure a Network Firewall Proxy on your Hardware Firewall
Well as the section heading kind of suggests, you do this on your hardware firewall. To help you visualise this, let’s look at a hardware based pfSense firewall device which is capable of configuring a Network Firewall Proxy, here is what that looks like in the settings;
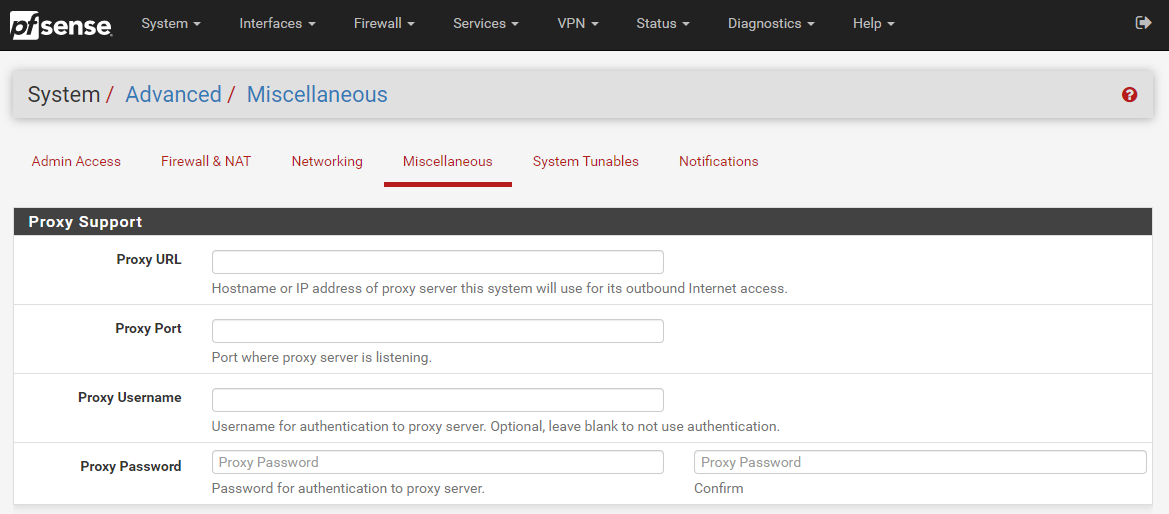
The above image shows you how you can easily configure a Proxy within your pfSense Firewall so that you can achieve this middle man setup as outlined in an earlier diagram. This Proxy could be one that you host yourself or one that is an external Software-as-a-Service SaaS Cloud Proxy that you subscribe to. Either way, pfSense gives you the options you need.
Why Use a Network Firewall Proxy?
You may be asking yourself right now why we even bother to use a Network Firewall Proxy. Well, you tend to find that it is fairly common practice in large enterprises as they like to monitor the network traffic to see what people are doing on the network. The physical hardware firewall just isn’t capable of doing the job easily as this is purely at the hardware level which is very low level and hence low levels of user functionality.
To put it into context, while modern websites are often updated multiple times per day, you’ll tend to find the software on a physical firewall is updated once every few years, and even still this is really just to patch any critical security vulnerabilities that have been discovered, not to improve the user experience of people using this device. Hence why Software-as-a-Service SaaS Proxy Services have become so popular.
Generally in the enterprise world, Proxys are used as one type security mechanism to protect both users and the corporate network from attack. While there are positives to this there can be drawbacks too. For example, let’s say you are accessing a trusted source such as Microsoft Office 365 online platform, https://www.office.com, why on earth would you run that through a Proxy service as you know full well that this is a trusted source. Let’s be honest, if Microsoft has a security incident that relates to how users are accessing their cloud services, we’re all f****d, and using a Proxy or not using a Proxy is going to be the least of all our issues. So we have to be sensible about how we use Proxy services.
This extra leg in the network journey adds latency (aka. It’s slower) for users. Slowness results in lack of productivity and lack of profitability as a business. Which is where the next topic comes into play around a Proxy Bypass.
Proxy Bypass
Here is where things get a little more nuanced. The name Proxy Bypass does exactly that, it allows you to configure things which are required to run through your Proxy, and things that should not run through your Proxy. There are many valid reasons why you need to implement Proxy Bypass to filter some parts of your internet traffic to go through the Proxy and others to not go through the Proxy.
You’ll find that some Proxy services (internal or external) are quite frankly a bit rubbish and don’t perform properly. Take for example any modern technology that does SSL validation at the client side, some Proxy services actively strip out SSL certificates in-transit and replace them with their own on different legs of the journey. Naturally with modern technology, they can detect this interference, so when the final Request-Response comes back to the client machine, it distrusts the response and bins it off – and rightfully so. This can cause a lot of problems for software developers who are utilising modern development technologies to pull in packages and dependencies from remote sources as part of their systems using things such as Maven, Gradle, NPM, Git and more.
Corporate networks acting as a Man-in-the-Middle Attack is not great. While, yes, there are corporate security controls that need to be adhered to, but at the same time, this means that when SSL is being decrypted on-route, that things such as passwords and credit card details can be read in plain text if one were to wish to do so. This is a very fine line between corporate security and employee/user privacy.
Summary
Hopefully that is a good summary of what a Network Firewall Proxy is and now you know not to confuse it with a Reverse Proxy. There are many different types of Proxys out there, from large enterprise class systems to self-hosted open source systems too.
by Michael Cropper | Feb 3, 2021 | Client Friendly, Developer, IT, Software Development
IT and project delivery rarely have a positive connection in peoples minds in companies both large and small. It’s almost the norm these days that IT projects always delivery late and over budget. But this doesn’t have to be the case. When you have the right people, processes and governance in place within your IT department, delivering projects becomes a breeze. One specific aspect we’re going to look at in this blog post is around achieving more by doing less. By that I mean how we can increase the throughput of delivery to deliver value to the business faster with the same amount of resource and the same amount of project demands.
Seems impossible, right? Well, no. It all comes down to process, communication and managing dependencies. Let’s dig into this a little more, firstly with an analogy for building a house.
Let’s say you are a housing developer and you have an estate of 100 houses to build. You know that you have 100 houses to build and you know the resources you have on your team for building those houses. Let’s say this breaks down as follows for 100x staff;
- 1x Site Manager
- 2x Quantity Surveyors
- 2x Project Managers / Construction Managers
- 15x Groundworks People
- 50x Brick layers
- 10x Electricians
- 10x Plumbers
- 5x Plasterers
- 4x Roofers
- 1x Carpet Fitters
So looking at that split, it sounds fairly sensible for a split of resources to enable delivery of 100x houses. For argument’s sake, let’s say that we have all materials on site at the start of the process to enable us to build the 100x houses without worrying around delivery timelines from suppliers. Before we set the team running ahead with building the units, we need to have a plan, and a plan isn’t purely to build the houses in the fastest time possible. A plan needs to understand resource dependencies, and in this case, this is people. The same as in IT.
Before jumping into the details of what this means. We have to think back to what this means for a business and why project delivery is so important. It comes down to two factors;
- Capital tied up in Work-in-Progress, meaning that this is an opportunity cost as this limits what we can invest in elsewhere and often can result in having to source additional finance to support investments, when in fact with a change of approach that may not be needed.
- Lost revenue for every day something is not delivered. In this case for houses, that is the profit that could be gained today by selling or renting a completed house VS waiting 3 or 6 months for that profit to be released.
The same is true in IT. All IT projects deliver value to the business, enabling the business to move faster, be more agile, and keep ahead of the competition. Delays in delivery in IT result in the company becoming a laggard in the industry.
So, let’s get back to the plan for building 100 houses. In a nut shell, we have three core approaches;
- Delivery Plan 1 – Big Bang: We build all 100 houses, then start to sell them
- Delivery Plan 2 – Phased Delivery: We build the houses in batches of 25 so we can release 4x lots for sale at one time. This tends to be how the majority of housing developments work.
- Delivery Plan 3 – Agile Delivery: We build and sell the houses one by one as they become available.
Taking into account the considerations around having capital tied up and lost revenue, let’s visualize what this means in practice. For the purpose of illustration we’re going to assume;
- Every property is rented
- Every house takes 1 week to build end to end
- Every house generates a rental income of £750 per month
- The house is rented out the day it is completed
What this looks like in numbers;

As we can see from the above graph, the Agile delivery plan, selling 1 house at a time, results in a higher cumulative revenue by the end of the 110 weeks. But this is not just a small difference, this is a significant performance improvement.

Delivery Plan 2 – Phase is 341% more efficient than Delivery Plan 1 – Big Bang. Delivering £937,500 revenue and releasing that working capital to the business in the 12 months.
Delivery Plan 3 – Agile is 25% more efficient than Plan 2 – Phased. Delivering an additional £300,000 revenue and releasing that working capital to the business in the 12 months.
When compared to the least VS worst efficient delivery method for providing value, Delivery Plan 3 – Agile is 450% more efficient than Delivery Plan 1 – Big Bang. Delivering an additional £1,237,500 revenue and releasing that working capital to the business in the 12 months.
Meaning you can delivery 4.5x the value to the business without changing either budgets or people resources available.
Now we know things aren’t always as smooth as this in reality, there are a lot of nuances which get in the way of this perfect scenario. And this brings us onto the main point of this blog post around achieving more by doing less. It’s kind of a given these days that Agile is the way forward for the vast majority of IT projects, or a combination of a more Waterfall-Agile (aka. Wagile) delivery for hugely complex projects that have a lot of dependencies both in and outside of IT.
There are always blockers throughout any process, whether that is building houses or delivery IT projects. Taking the house building example, let’s say for arguments sake that it takes a carpet fitter 2 weeks to fit carpets throughout an entire house. Regardless of which delivery method you choose, you ultimately have a bottle neck and this bottle neck gets compounded the more efficient your overall delivery method is (Big Bang –> Agile). In the Agile example, you are already 1 week over estimate (100% over planned time for delivery) by the time you deliver your first property because of the bottle neck with the carpet fitter. Not great. But, that’s still more efficient than Deliver Plan 2 – Phased because you’ve still sold one house in 2 weeks rather than none.
So how does this apply to IT project delivery?
Hopefully the analogies above has put things into context and you can relate to the elements within IT. The reality for something like IT is that it gets even more complex from the overly simplified example above.
Imagine you have 100x IT projects that you need to deliver and 100x IT staff. The nuances of skills, specialties and experience of staff will hugely vary which can result in issues cropping up that should never have been an issue if the right processes were in place an dependency on a few key resources where they only know how a certain system or technology works. Rarely in IT are we building things from scratch, we’re often either extending or upgrading current functionality and/or integrating with these systems.
Imagine having to re-build a wall on a house because it was done wrong on the first attempt and because that work wasn’t managed properly and peer reviewed for quality. This is what happens in IT on a near daily basis in many organisations, albeit it’s not quite a visible as this. It’s more like having to rebuild a server, refactor poorly written and unsupportable code etc. Ultimately, it’s all waste that needs to be removed.
What this often results in is a situation whereby multiple projects that are running in parallel agile delivery methods end up stuck on the same bottle necks with resources who are either specialized in a specific technology or only have access to that system and this can add weeks and months onto the delivery of a project which is ineffective.
Take the simple example, if we have 21x staff and 4x projects to deliver. We could split this up as;
- Parallel Projects: 4x Projects of 5x staff and 1x shared resources with specialist skills
- Sequential Projects: 1x Project of 21x staff including the specialist resource
Let’s say that each project takes a total of 4 weeks to deliver.
Given that, in the Parallel Projects delivery method each of the 4x projects will be complete in 4 weeks, so we can deliver 4x projects in 4x weeks, but, only at the end of the 4 weeks.
When compared with the Sequential Projects delivery method, we’d deliver 1x project per week for each of the 4x weeks. Delivering value faster and without blockers. The reality is though that while the 20x staff working on these 4x projects are wanting to get them over the line, the specialist resource is likely working across 20x, 30x, 50x other projects too where they are required only for a small part of the project. So this person/area soon becomes a significant blocker on many different projects resulting in large delays across the entire IT department.
So what’s the solution?
The reality is that this is a complex beast to manage but there are a set of guiding principles that can significantly enhance IT project delivery to increase the throughput of work to delivery more by doing less. These principles are;
- Identify common blockers on projects, and put in place measures to ensure that no longer becomes a blocker. Whether that is training and upskilling other staff, putting in place processes to ensure less experienced staff can still do work in this area as long as it is peer reviewed by an experienced member of staff etc.
- Significantly reduce parallel work streams, you can’t effectively split your workforce more than 25% across active projects, i.e. 100x active projects would require 500x staff. If you’ve only got 100x staff, you need to manage the active projects to around 25x projects at any point in time so you have 5x people per project so you can focus. The rest go into the backlog to be worked on in suitable priority. You will always find that you’ll need that 6th person at some point, and you want them to be available when you need them, not to delay the 5x people working full time on that project. It is not IT’s job to prioritise projects based on either opinion, seniority of who asked for it, or whoever shouts the loudest. Put in place a process where the business has a forum to collaborate with senior stakeholders so they can inform IT what the IT priorities are then IT can focus on getting things delivered. Also keep in mind that you should probably split this as 50% Projects, 25% Business-as-Usual (BAU) support and 25% Internal IT Improvement Projects (as often these underlying issues cause delays on all projects so they need to be resolved).
- Arrange staff into project delivery squads that can be focused on the delivery of a single project without distractions.
- Documented processes are absolutely key to getting this right, and making sure that staff are fully aware of the processes. Far too often processes are informal and/or misunderstood which causes confusion for staff. Basic governance is key.
- Tooling, training and peer review help to spread skills and knowledge throughout the delivery squads to reduce dependencies on single people and increase productivity. Build this into the processes.
by Michael Cropper | Dec 10, 2020 | Developer |
Ok, this is a bit of a play on words to help people understand how technology components are connected together. As the old song goes, the toe bone connected to the foot bone, etc. in the Dem Bones song. We’ll skip over the anatomical inaccuracies of those words… the point is, things are connected.
In the world of technology, things are more connected than you can ever imagine under the hood, it’s no wonder why people struggle to grasp the concepts of how the pieces of the puzzle fit together and why some things work in one area and the same thing doesn’t work in another area. It all comes down to connectivity and how technology components are ultimately built on top of other technology components to perform the features you see as a technical user.
{Insert Latest Technology Trend Here} is the Future – Implement it now!
Is it? Is it really? Is it really anything new under the hood? And if it truly is, can you draw a diagram to explain how and why it is better than the plethora of other options that are already available and have been available for years? If you can’t, you need to go back to the drawing board to start to understand how things plug in, work together and how the entire technology stack is built on the foundations of those technologies that have come before.
Take Docker as a prime example. I’m picking on Docker a little here as I’m getting a little bored of discussions about how Docker is the future of the universe. In reality, it’s not really that different than technology that has been around for over a decade other than the added ability to create cross-node Docker clusters through the likes of Kubernetes and some pre-packaged (aka. inflexible) ‘fake’ images – yeah, that’s pretty cool, but really? Is it actually necessary for the 95% of systems out there? In any real world situation, you’d just beef up a VM and ensure there is decent resources, proper failover and redundancy in place – job done. Unless you’re working for the likes of Google and Facebook, you should probably take a pragmatic approach and achieve the same result with 5% of the effort required.
Look, I’m not against these technologies, they’re great. But. You have to have the resource, technical capability in the specific software and technical understanding of the full technology stack to understand how everything fits together, and that comes with a cost. This isn’t something that comes overnight for anyone, so you’ve either got to be prepared to put in a lot of effort training and developing your staff, or get your cheque book open with your quill ink pen at hand ready to start writing some fairly hefty payments to get the staff/contractors in you need to develop this type of setup.
Your {Insert Latest Technology Trend Here} Bone is Connected To Your…
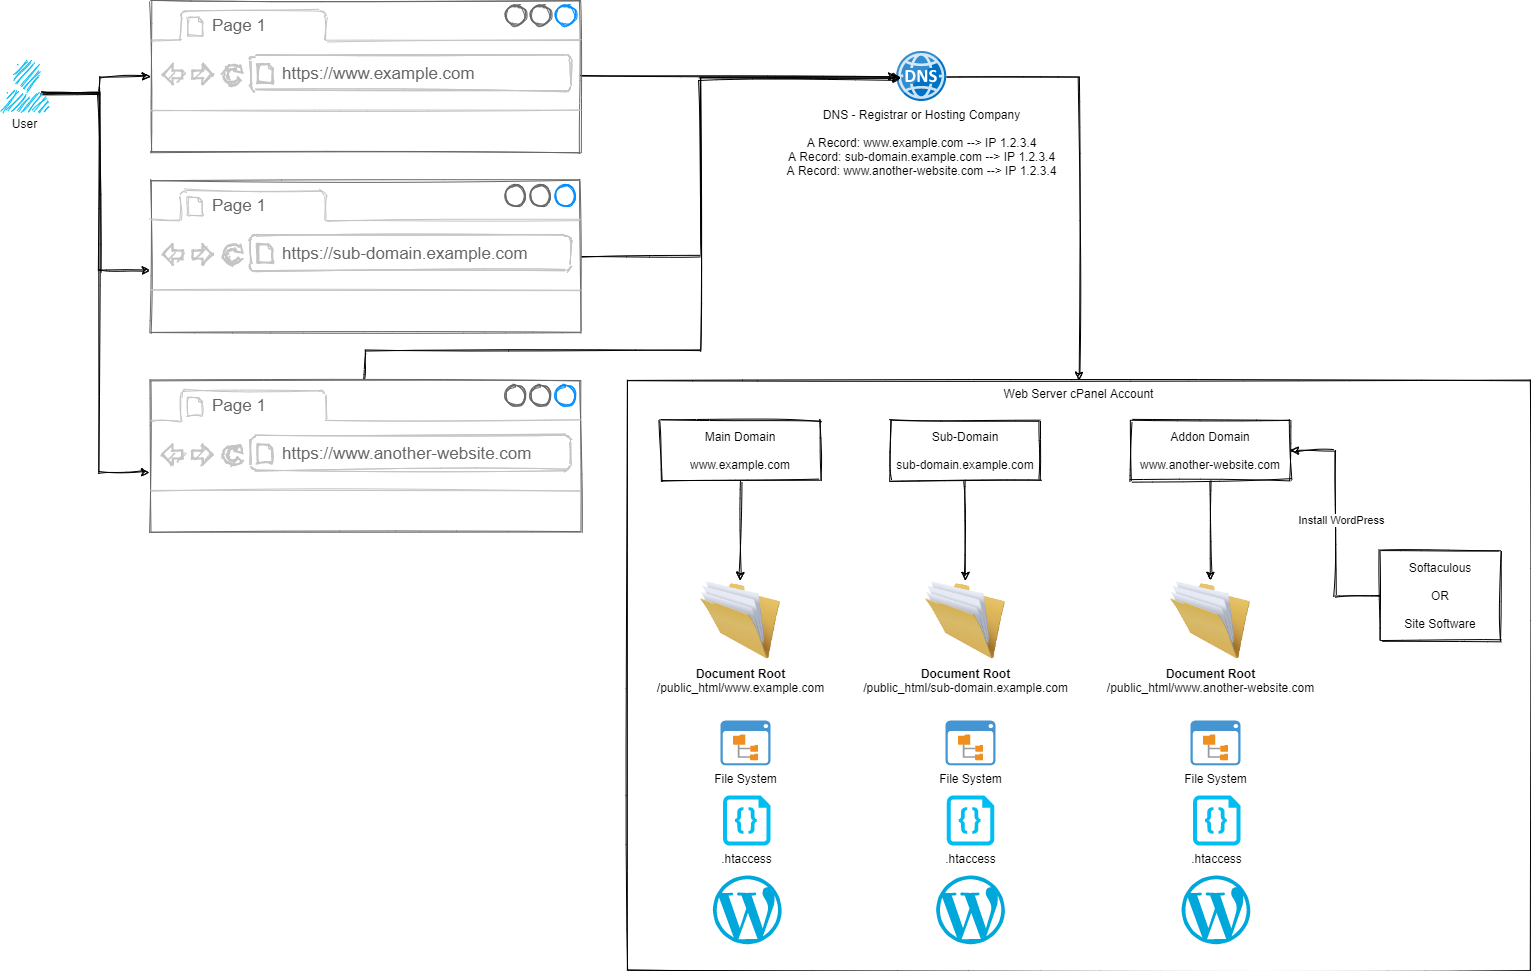
Taking a look at WordPress specifically as this came up in a recent conversation to help to illustrate how all this fits together. Basically this fairly large diagram below (click/right click and open in new tab, to open in full screen to view!) helps to highlight how the different types of technologies fit together in the technology stack. WordPress is simply the one that is highlighted throughout the diagram with the others less of a focus to help to illustrate the point.
What you will notice in the diagram below is how there are so many flavours of technology at the same technology stack layer that you need to understand how they are aligned. There is an enormous amount of similarity between a lot of the common technologies that are branded as {Insert Latest Technology Trend Here} – So when you get into the detail and discussions, you need to make sure your discussion point holds weight and this only comes with a solid understanding of how the technology stack works.

Basically at the simplest level…. Your Physical Hardware is connected to the Type 1 Hypervisor … is connected to the Type 2 Hypervisor … is connected to your application. Simple, right? Well, as you’ve probably realised when reading the docs from all the software providers at the different layers of the technology stack, it’s not always that clear what sits where.
The core concepts of the different layers are as follows…
Physical Hardware Virtualisation – Single Virtual Machines
This layer basically securely segregates your hardware resources into logical units that have defined boundaries. Think of this in the same concept of a piece of land with houses on. Once you’ve built one house (aka. a Virtual Machine) then that house cannot suddenly decide to take resources from the second house since it is not allowed to access that space.
Type 2 Hypervisor Technology –aka. Landlord / Owner Controlled
Imagine this as a property you own, whether you live in the property or rent it out. As the ultimate owner of the property, you decide what can or cannot be done within the physical space. You determine the boundaries of which the tenant can operate. You may decide that there can only be one tenant in this location, it may be your own organisation, or you may open this out to other organisations, either way – this is your choice. By this very definition, in technical terms, you get to decide what software can or cannot operate in this environment – aka. Shoes off in the house rules etc.
As you’ll see in the diagram, there is a wide variety of software that allows you to configure these Type 2 Hypervisor technologies to suit your needs – each with their own specific pieces of functionality.
Type 2 Hypervisor Technology – Account Specific
This is the next layer which determines what specific accounts can or cannot do. For example, taking the landlord example a little further, let’s say you have a house (aka. the Type 2 Hypervisor Technology) and you can then decide if Tenant 1 in Room X is allowed to ‘keep pets’ VS Tenant 2 in Room Y is not allowed to ‘keep pets’. That is the level of control that is capable with technology layers.
Hence why the security element is explained as such, anything within this layer is the security of the owner of this element. For example, imagine a tenant who is the owner of a rental room in a house. If this tenant decided host a dinner party of well-rounded guests, then all of a sudden decided to also invite around a rowdy crowd of guests (aka. bad actors in the web space, sending spam or receiving lots of spam traffic), then this is clearly going to interrupt the evening. The reality of web hosting is no different. Disruption results is lower performance for other websites hosted within this layer.
If you need the security of performance, you need to be moving to a service / subscription / plan with your provider that can accommodate you needs which will naturally come with an additional price tag. Hopefully that explains why – In summary, it’s because you are reserving an amount of hardware resources (CPU, RAM, HDD) to secure the performance needed of your server to keep the lights on for your end customers to do business with you.
Summary
Hopefully the diagram above helps to convey some of the common technologies and where they sit in the layers. When I say layers here, I’m not talking about the traditional OSI Layer Model as quite frankly that has been broken for years – Another blow post to follow on what I believe this should look like in the modern world.
It’s also important to understand these layers and how they blend with the cloud technology providers. A lot of the time this type of information is abstracted from you to “help” (but it rarely does from an understanding perspective…). Regardless of where the technology stack ultimately lives, it’s important to understand these building blocks.
Cloud is the Future!
As the saying goes, the cloud is just someone else’s computer. And that goes for the likes of Amazon Web Services (AWS), Microsoft Azure or Google Cloud Platform (GCP). All they have under the hood is some fancy bit of tech to easily create the different bits of the diagram above, and many more elements too that are not in that diagram. By the way, there are some pretty awesome open source versions of the cloud tech they are using, or derivatives of it – but I’ll leave that for another blog post!
When you get under the skin of the majority of cloud environments, they are often using open source technology in the background, branded as their own service. Don’t be fooled! It’s not magic, it’s marketing.
This blog post isn’t about cloud VS non-cloud, I’ll do a blog post in a while about how the cloud is doomed for failure in the next 5 – 10 years once people realise the true cost involved, but that’s for another time. This is when open source cloud platforms will really start to come into their own and usage really starts to grow in a hockey stick manner.
by Michael Cropper | Dec 9, 2020 | Developer |
Ok so this was an interesting question that came through recently when I was asked about why someone couldn’t access files via a nice URL that they could see on the cPanel File Explorer and what they needed to do so they could access the files. There was a couple of very interesting technical scenarios that had been done as a workaround, but fundamentally this was due to a lack of understanding of how routing works from Point A, the user in the web browser typing in a URL, through to Point Z, the technical gubbins deciding on what content to serve.
So we went back to the drawing board to show how the different parts of the process work.
Simple, right?
Ok, let’s break this out into the few core areas and let’s discuss how the different parts fit together.
Step 1 – User Accessing Domain / URL in Web Browser
Hopefully this bit is fairly self-explanatory, the user types in something into their web browser, and this magically returns the correct information.
Step 2 – DNS
This is often a step that a lot of people misunderstand, and with good reason – it’s not a straight forward topic to understand. I’ll to a more detailed blog post about DNS at some point in the future as it is a hugely misunderstood topic.
Ultimately though, the DNS translates the user friendly domain / URL from Step 1 into an IP address which is the server where your website(s) live.
Step 3 – cPanel Routing
Ok, this is a little over simplified as there are quite a few steps between Step 2 and Step 3, but for the purpose of the average user of cPanel, this is sufficient to explain how this works. If you are a more advanced user such as a user working with WHM cPanel or an infrastructure engineer working at the physical hardware layer you’ll understand there is a lot more in between. This blog post is not designed to cover those details as they don’t apply to the average cPanel user.
Ultimately all we care about as a standard cPanel user is that Step 1 and Step 2 magically route through to my cPanel account.
From here, this is where we have full control over how a website URL route through to the correct files on your cPanel account. It doesn’t matter if the site is categorised as a Main Domain, Sub-Domain or Addon Domain in cPanel terminology. All we really care about are two concepts;
Hopefully the Domain is obvious what we are talking about here, the www.example.com, sub-domain.example.com or www.another-website.com.
What confuses a lot of people is the concept of a Document Root. This is not just cPanel terminology, this is terminology used across a wide range of software and applications. In a nutshell, it simply means where the starting point is for documents related to this ‘thing’.
So let’s put that into context.
For a Main Domain such as www.example.com, the Document Root is likely set to /public_html/www.example.com/ by default.
For an Sub-Domain such as sub-domain.example.com, the Document Root is likely set to /public_html/sub-domain.example.com/
For an Addon Domain such as www.another-website.com, the Document Root is likely set to /public_html/www.another-website.com/
And it really is as simple as that. It’s all about how you’ve got things configured within cPanel which determines how these things actually work. There are configuration screens within cPanel where you can manage Addon Domains and Sub-Domains, so you can technically configure these however you want. It would always be recommended to keep things sensible when doing this as mis-configurations can result in a lot of unexpected results.
Word of Caution
While you can do this within cPanel, you probably shouldn’t for security reasons. You need to understand that in the scenario whereby a single website or sub-domain or addon domain contained within the single cPanel account gets hacked, this can spread with ease to every other website hosted within this single cPanel account.
If you are containing multiple websites within a single cPanel account, you need to accept this risk and be prepared for the worst case scenario. If these are all your own websites and you fully manage and control them, then this significantly reduces the risk – assuming you know what you are doing. But please, never host multiple websites within a single cPanel account where there are multiple website administrators such as hosting websites for clients, friends, family, contacts, charitable organisations etc. You need to ensure that each of those websites is as an absolute minimum set up as a separate cPanel account as you cannot trust the actions of other website administrators to meet your security standards.
by Michael Cropper | Nov 20, 2020 | Developer |
There are many reasons why you could want to transfer a WHM cPanel environment from one server to another server, whether you are migrating to a new web hosting company or simply upgrading the operating systems to the latest version. There are situations whereby certain Linux operating systems aren’t able to upgrade between major versions such as CentOS 6 to CentOS 7 just as one example. In this situation you have to spin up a brand new server or virtual machine running CentOS 7 with WHM cPanel then transfer everything over from the old CentOS 6 server running WHM cPanel.
We have previously covered off other topics such as How to Migrate a Web Server Seamlessly with Zero Downtime and How to Migrate an eCommerce Website Between Servers with Zero Downtime which are also worth reading through for some handy information. This blog post covers similar information but goes into a lot more detail around the steps involved with this when the migration is specific to cPanel and WHM.
This requires a little planning, good communication and a structured approach to the process to ensure there is no interruption to the websites and services that are being migrated – or as minimal as possible.
Step 1 – Spin up a New Virtual Machine
This step is highly likely to be managed by your web hosting company, so you probably don’t need to worry a great deal about this step. If you are doing this step yourself and you are reading this blog post, you could probably do with a chat with us to help guide you through the process.
Step 2 – Install WHM cPanel on New Server
This step is a bit of a pain since cPanel is a licenced piece of software, meaning you’ll need to have duplicate licence costs for a small amount of time throughout this process. Again, this step is highly likely to be managed by your web hosting company.
Step 3 – Use WHM Transfer Tool to Transfer Individual cPanel Accounts
This is where things get a little more nuanced. In theory, this should just work. In practice, it’s highly likely that you’ll have a few niggles along the way, so I’d recommend approaching this with caution and planning properly.
A WHM cPanel environment could have hundreds if not thousands of individual cPanel accounts that are being managed within that WHM environment. So there is no simple solution to getting this all migrated at the click of a button. You’ve also got to be very mindful of the applications/websites/systems that are running on the individual cPanel accounts that are being migrated as there is highly likely integrations running on those systems which may have whitelisted IP addresses.
Since the IP address will likely change on this migration from one virtual machine to another virtual machine, the IP address will change, so you will need to be very conscious that that this can be a disruptive migration for the individual cPanel accounts that are being migrated.
All that being said, let’s jump into the details of some of the hands on elements.
Step 4 – Create a Migration Template Tracker
You need a process to control the flow of the migration so you know where you are up to. Something basic in a spreadsheet is more than sufficient for this process. You need to define the steps you need to do for each cPanel account so you can be confident that the migration can be classified as successful both from a technical standpoint and also that of the client. Even better, get a dummy cPanel account created so you can iron out any critical issues before you start to look at the migration of any Live cPanel accounts.
Some considerations / steps you may like to consider as part of this process;
- cPanel Account
- What websites are hosted – We all know you shouldn’t host multiple websites under a single cPanel account for security reasons, but we all know that people do…
- Where is the DNS managed – Can you edit directly or do you need the client to do this, or their development partner?
- Checkbox to say if you have migrated the website to the new server
- Checkbox to say if you have migrated the A Record in the DNS to point to the new server
- Checkbox to say if you have regenerated or installed any SSL certificates on the new server
- Checkbox to say if the site is loading correctly over SSL
- Checkbox to say if you have contacted the client to confirm they are happy with the migration
The reality is, the above checklist if hugely dependent on the type of websites/systems hosted on the cPanel accounts and your understanding of what is on there. If you are a hands-off type of setup then you are going to need to treat this process significantly different. You may also need to take specific action for unresponsive owners of cPanel accounts such as providing cut-off dates for when the old server will be switched off to ensure people have enough time to act on the migration.
Step 5 – Understand the Process for WHM cPanel to WHM cPanel Migration
The process of migrating an entire WHM cPanel environment to another server can be challenging. So you need to understand the intricacies of how this works.
From a purely technical standpoint, the process is usually relatively straight forward to migrate cPanel accounts between servers as can be seen in the diagram below;
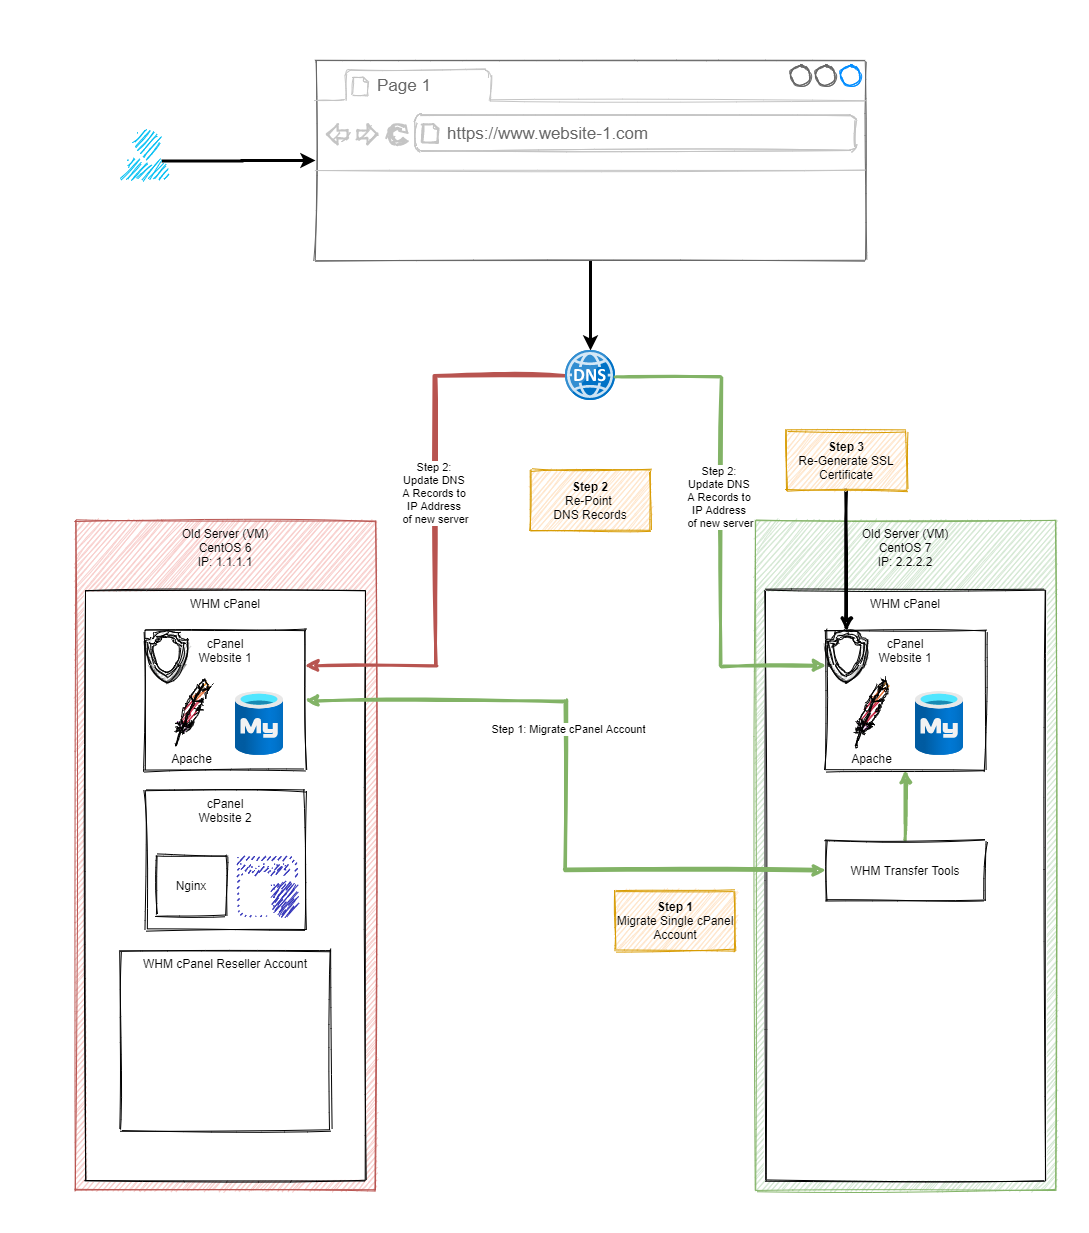
Migration Process
Once you’ve understood the steps involved in a migration, you need to see this in practice within your environment to see how this works. Below are a selection of screenshots of the process in action so you can see the types of things that happen when you are using the WHM cPanel Migration Tool.
Step 6 – On New Server, Connect to Old Server via WHM cPanel Transfer Tool
As you can see in the image below, the way this works it that you pull the cPanel account into your new environment, rather than the old environment pushing the cPanel account to your new environment.
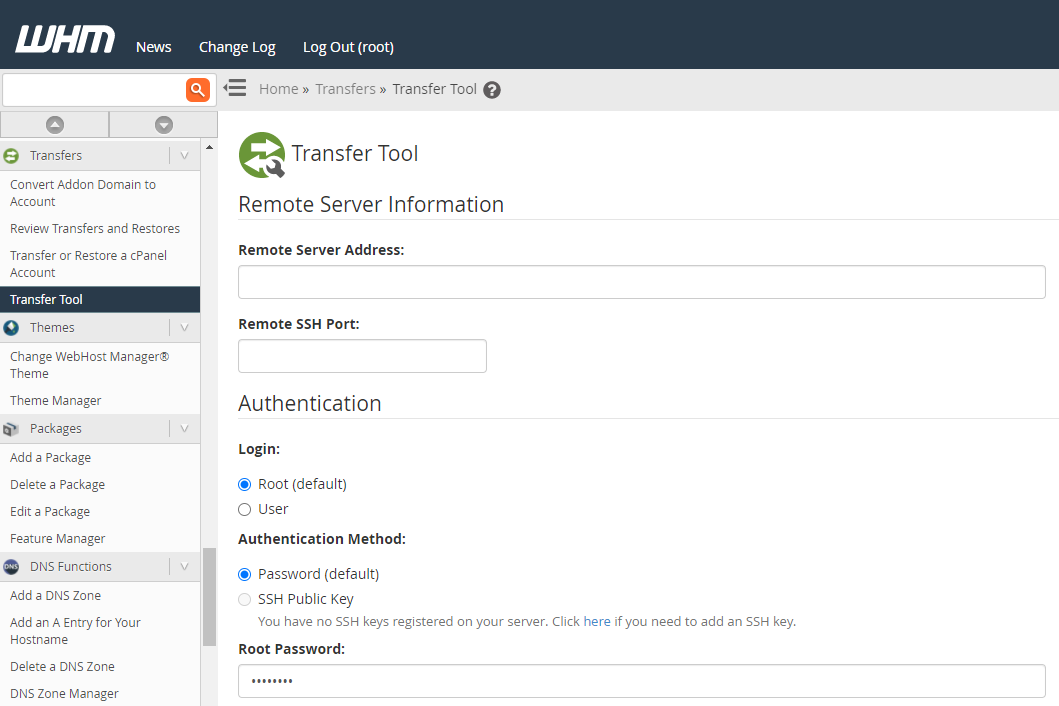
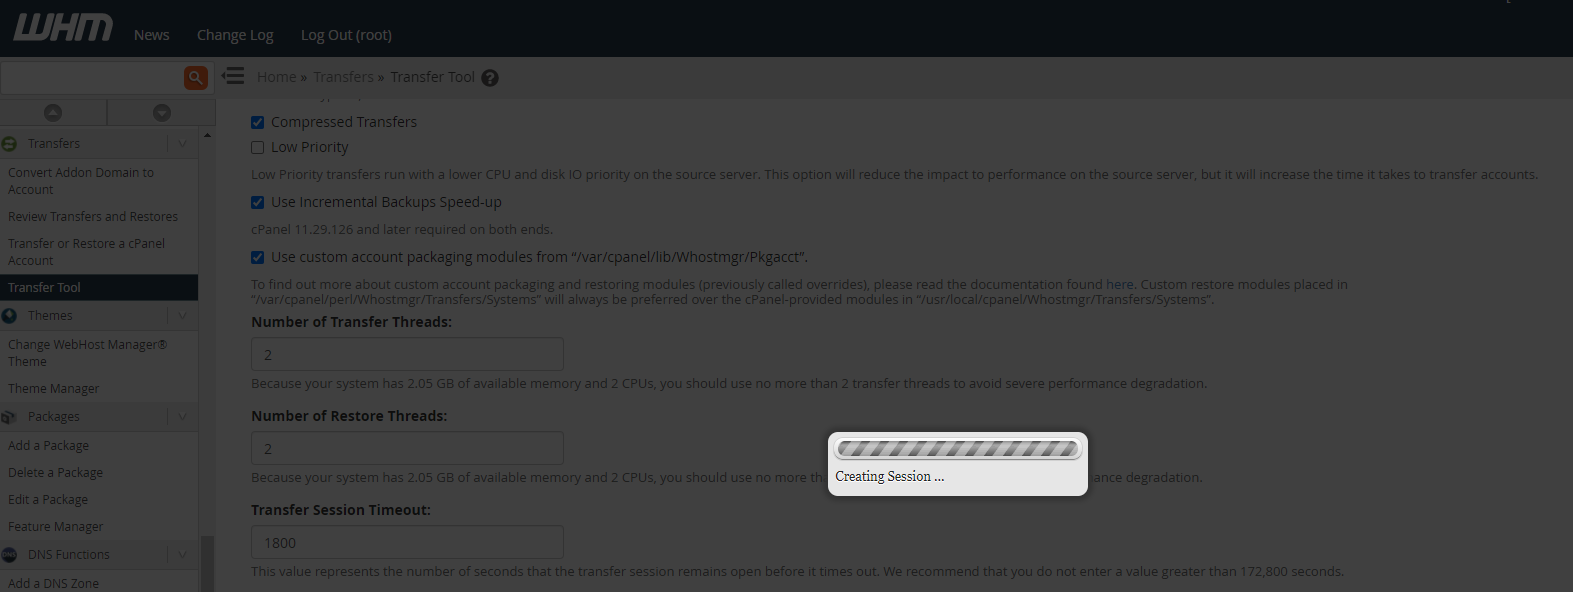
Once you click the button at the bottom of the page, you’ll notice a session starts to get created;
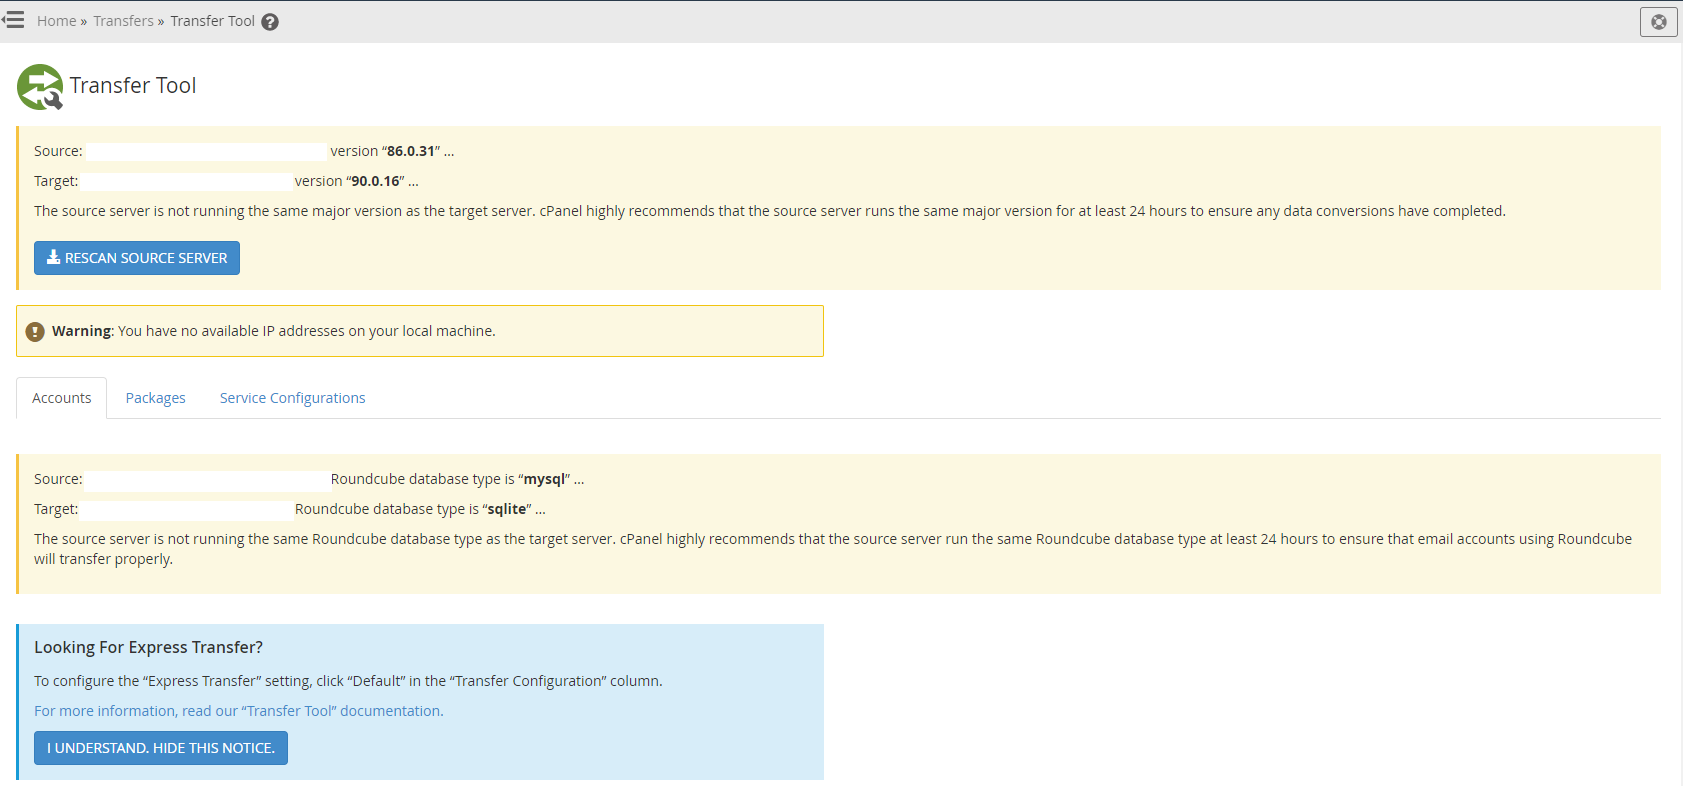
Step 7 – Review Source and Destination Configurations
This is where things can start to get “fun” in the sense that when the versions are significantly different this can cause problems. It’s always advisable to keep any kind of migrations relatively close together. Incremental migrations are significantly easier to manage than major version migrations.
Once you’ve connected the session, WHM cPanel will prompt you about some of the differences between your source and target virtual machines to help you assess the risk involved.
Step 6 – Select an Account to Migrate
I say account, because you are in a significantly better position to do this on a cPanel account by cPanel account basis rather than just transferring everything over.
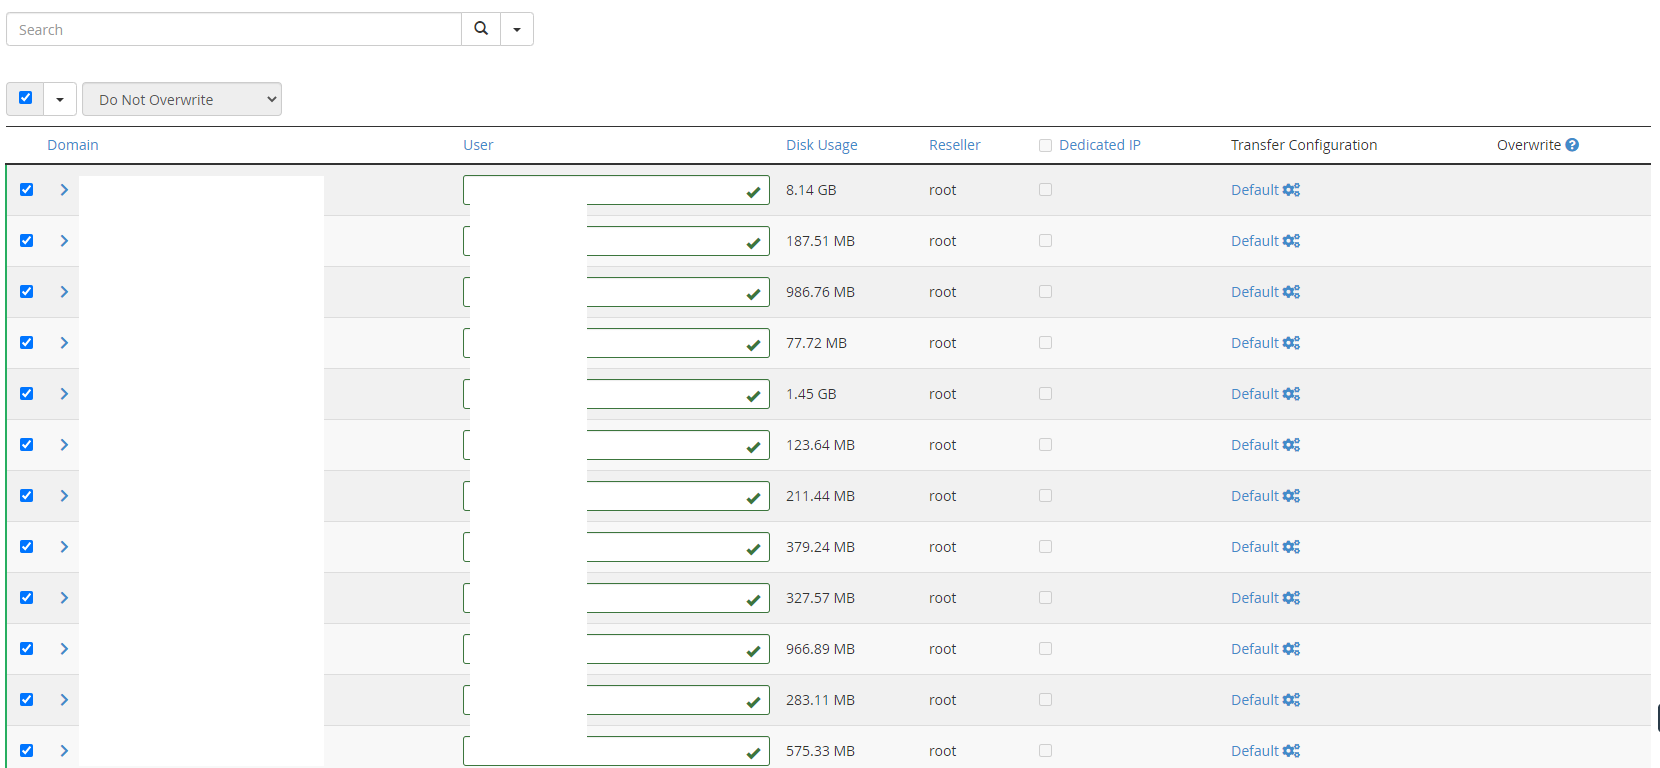
What you will notice in the right hand column is that there is an Overwrite section. In the scenario whereby you have to do multiple migrations for a single cPanel account to the new server such as when the initial migration fails, you have the option to overwrite the changes. In my experience though, this rarely works well. I’ve found it best to delete the cPanel account from the new server, then do a fresh migration of that cPanel account.
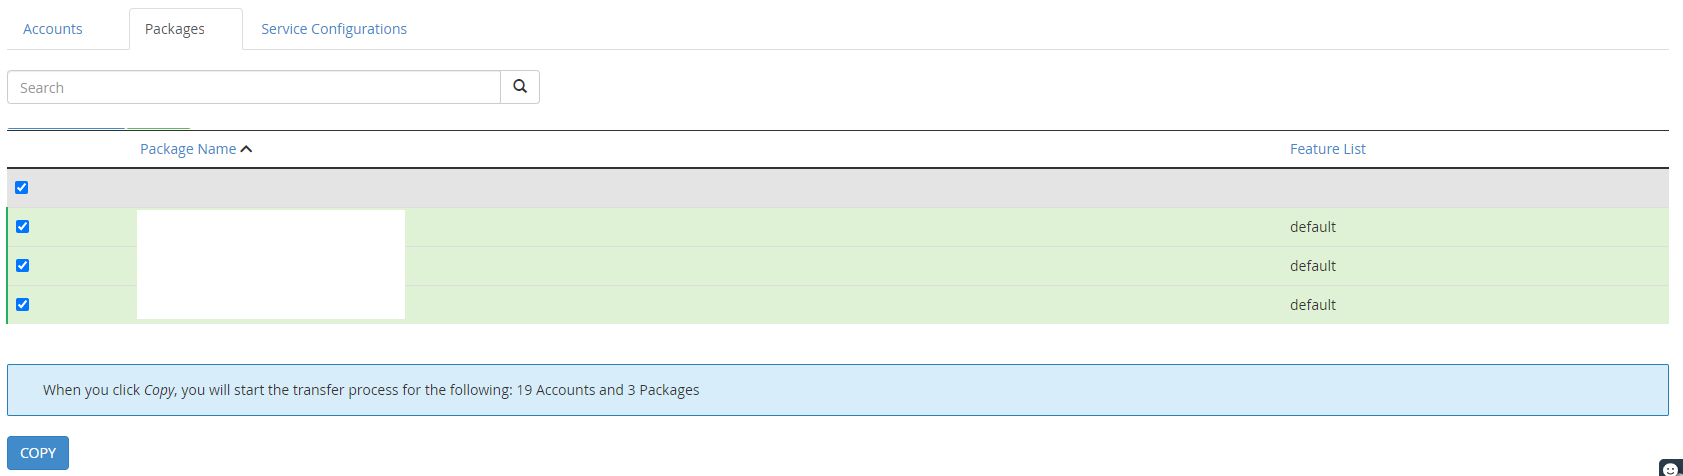
Step 7 – Select Packages to Transfer
Packages in this sense are for when you have created the type of bronze – silver – gold type packages which allow different cPanel users to access different sets of features based on the price point they are subscribed to. You may or may not use this method, but if you do, then make sure to transfer them across.
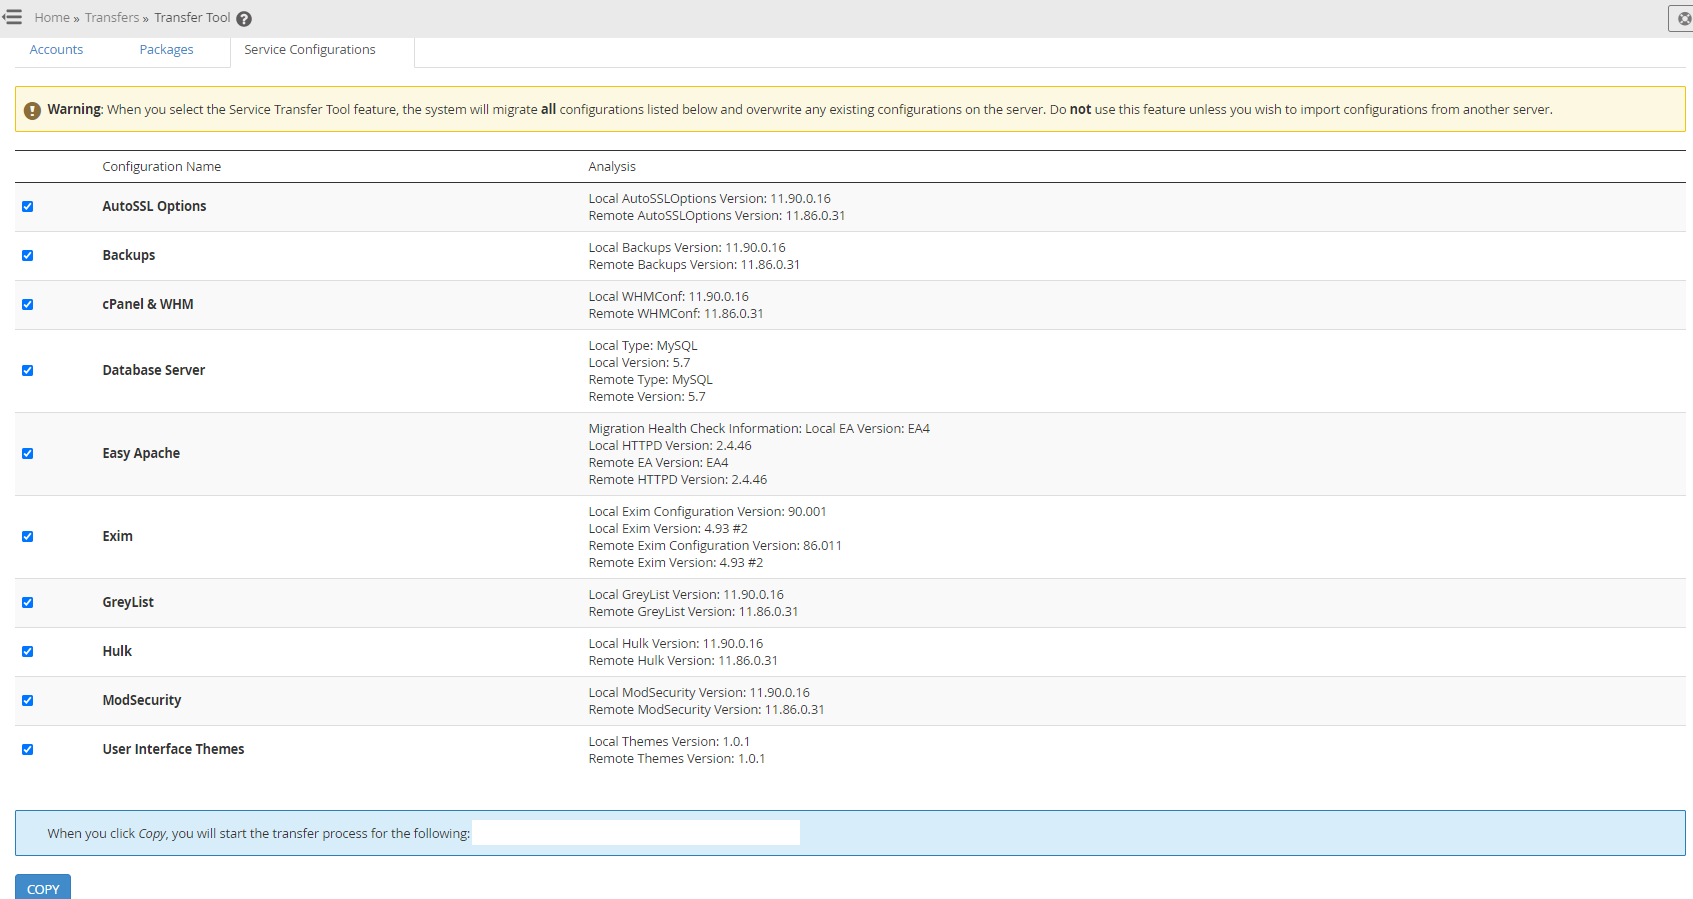
Step 8 – Select Service Configurations to Migrate
There are things that you have installed on WHM cPanel to manage your environment better. You may like to keep these types of tools and configurations migrated over to you new server to avoid having to re-create them.
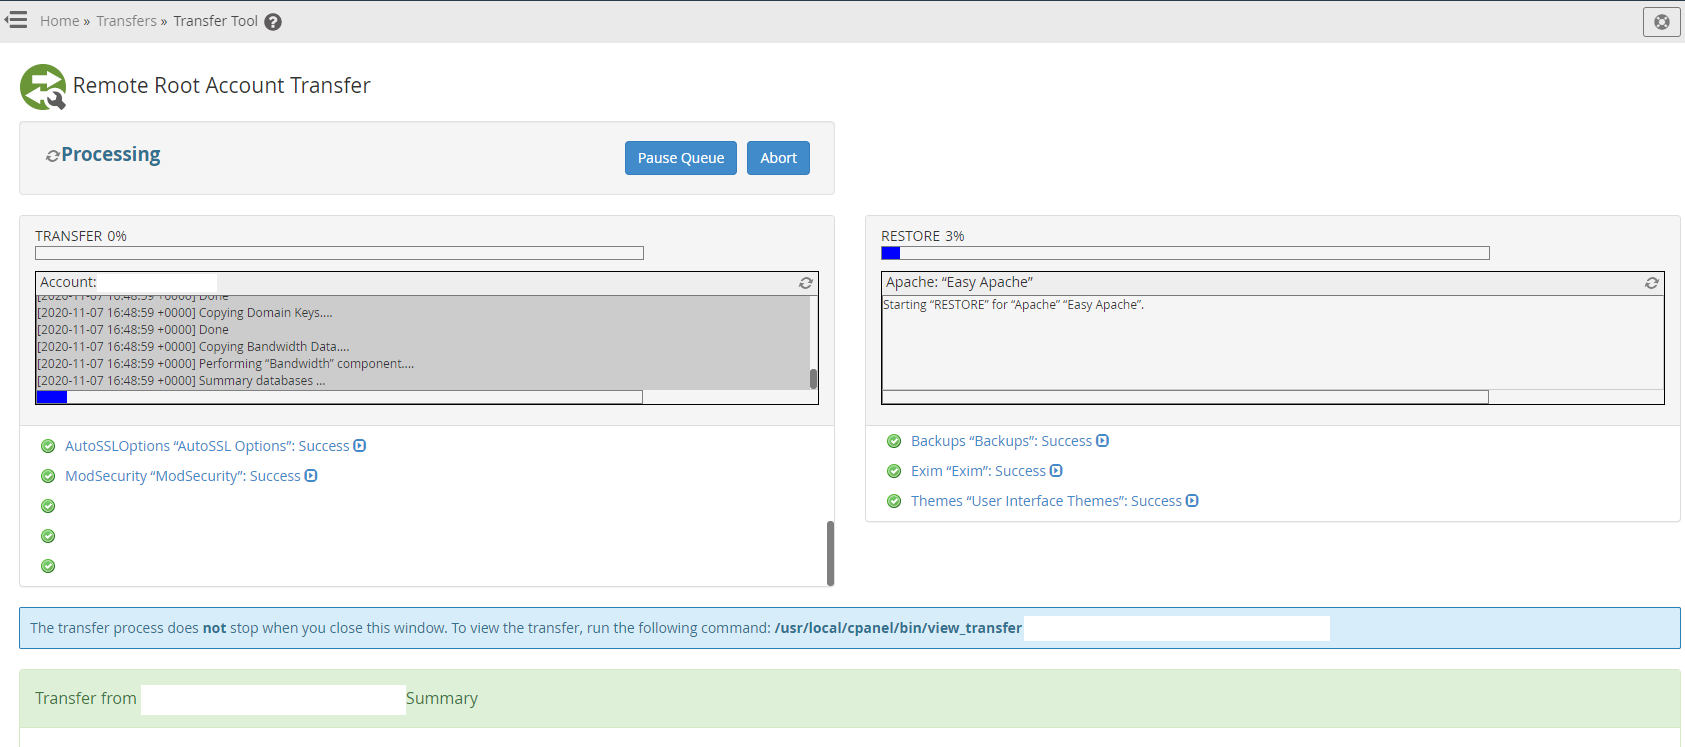
Step 9 – Migrate a Single cPanel Account
As you can see in the screenshot below, the process once you’ve selected a single cPanel account to be migrated you see a real time transfer process so you can be confident things are happening.
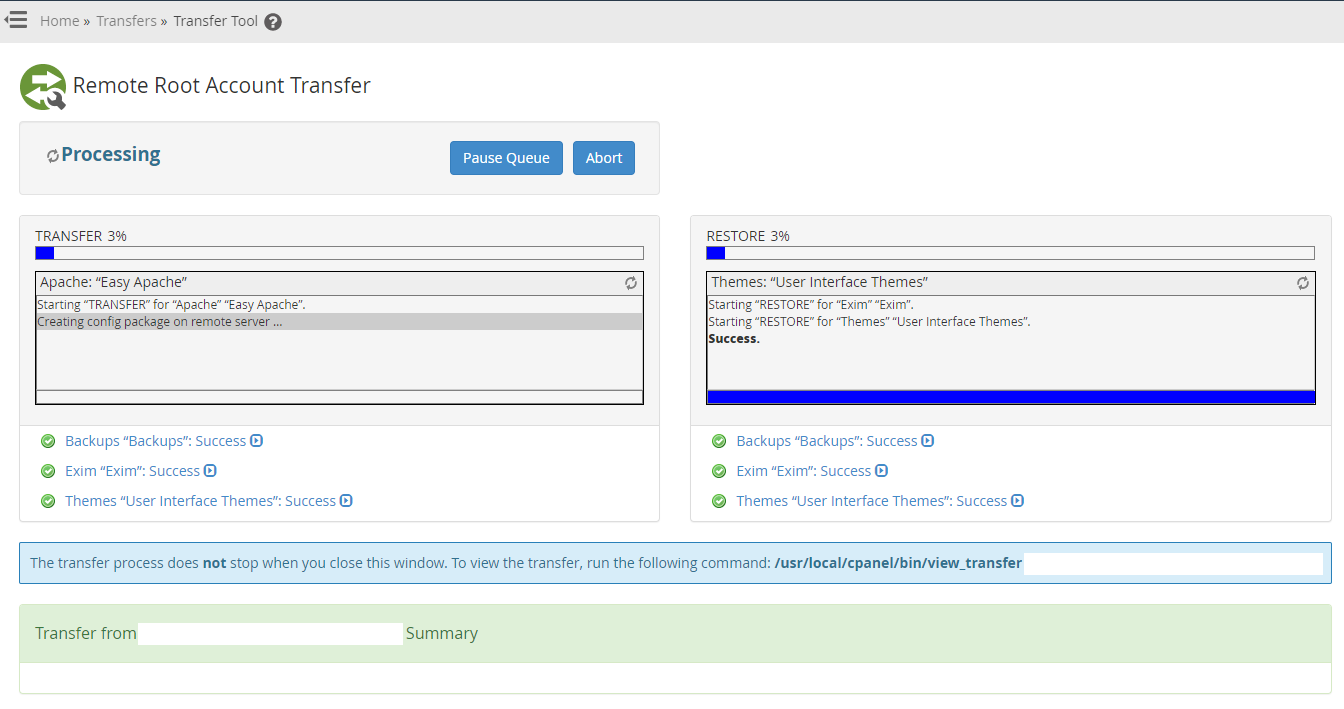
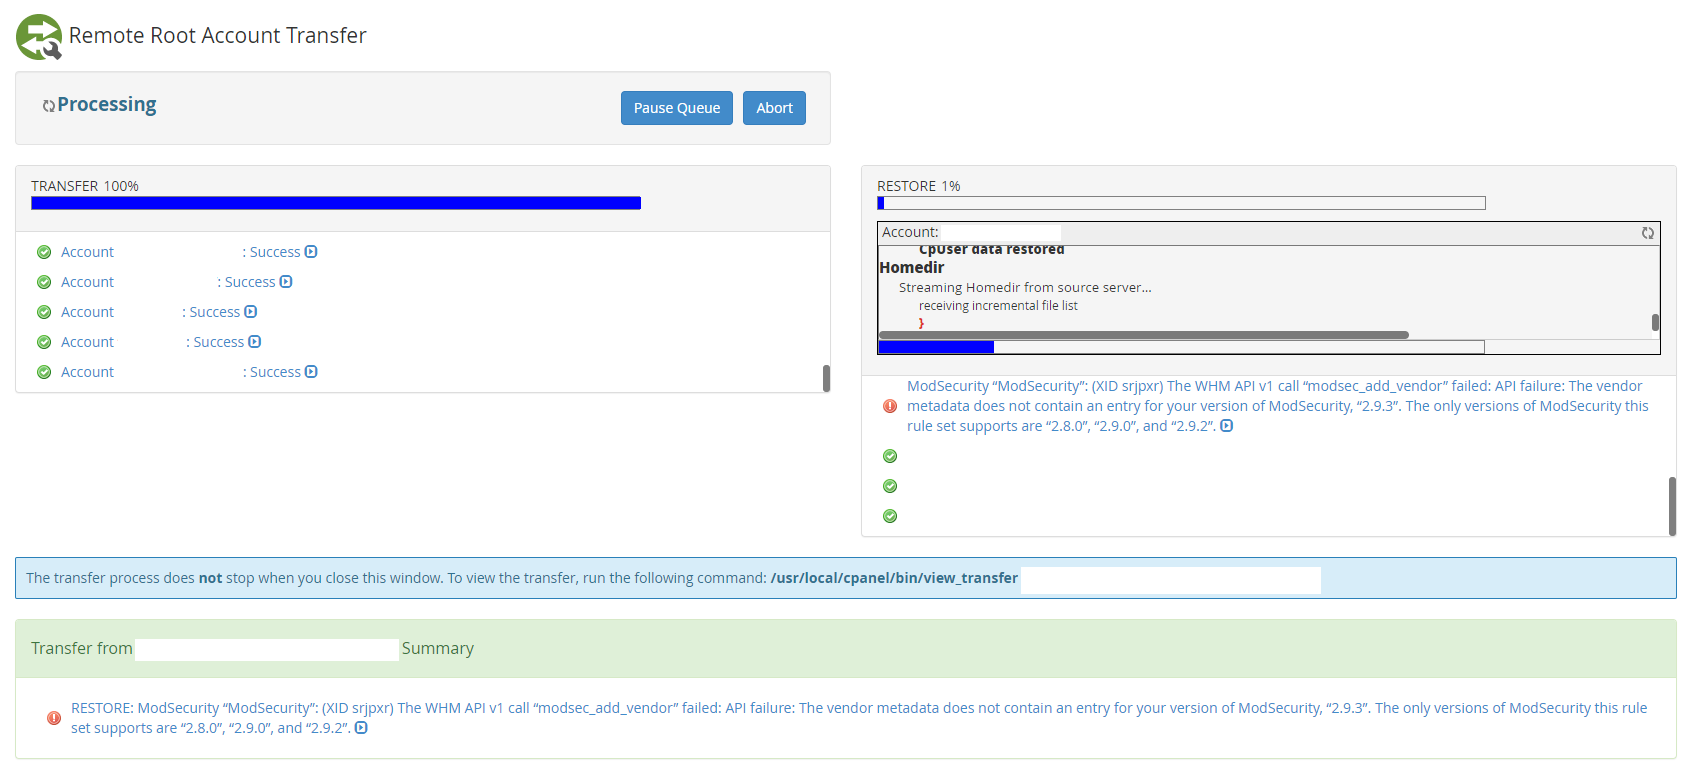
As the process is running along you’ll notice the progress;
Then once it’s transferred successfully you’ll notice it starts to restore fully;
Step 10 – Review PHP Versions
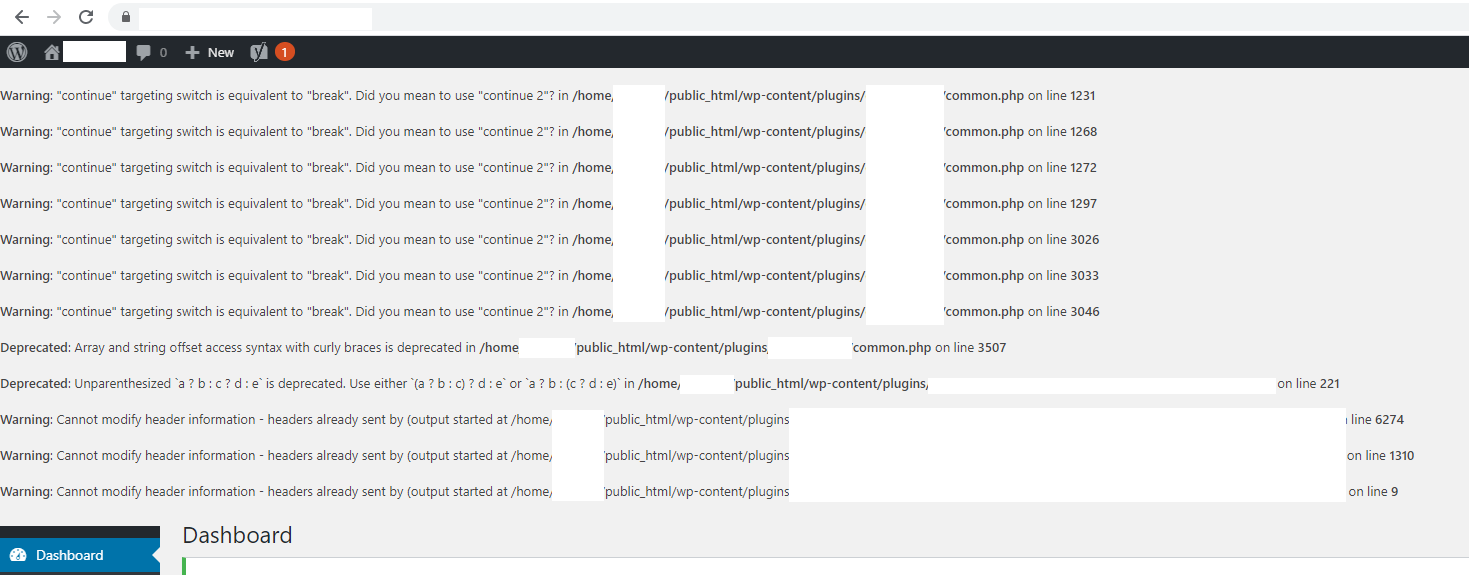
This is more just a point to note, if you are also upgrading the PHP versions at the same time, you may be testing how more recent PHP versions are compatible with your migration. You will likely come across issues related to PHP versions not being compatible with more recent versions. This is beyond the scope of this blog post, but it is being mentioned as a common reason for upgrading systems is to ensure new technology is being supported and there are a lot of considerations throughout the process. I’ll do another blog post on PHP versioning and WordPress as this is a complex topic.
The screenshot below shows you just the kind of errors you can get when you are upgrading PHP versions on a WordPress website.
Step 11 – Update DNS A Records to Point to new Server
This is very much website specific for where you need to this so I’m skipping over this point.
Step 12 – Confirm Migration is Successful
Once you’ve migrated the website and updated the DNS records, you need to validate that this has worked. Naturally there are a lot of nuances with this such as web browser caches, DNS TTL (Time to Live), application level caches, WordPress caches and more. You need to understand the tech stack you’re working with to ensure a successful migration. As always, if in doubt, try on a different browser, try on a different device, try on a different network etc.
Summary
Hopefully this has been a handy guide on how to transfer WHM cPanel accounts from one server to another server along with some of the common pitfalls along the way. While there is an official guide on how to do this, it doesn’t really go into the level of detail that is helpful when you’re actually doing this.
by Michael Cropper | Nov 6, 2020 | Developer |
If you’ve been testing XenServer or have been working with the free version for a while, you’ll soon realise that it is little limited in places due to the commercial licences required from Citrix to use some of the features that I would class as fairly basic features, things such as VLANs, automatic updates, SR-IOV and GPU virtualisation to name just a few of the feature limitations. Thankfully Citrix handed XenServer to the open source world which is where XCP-NG Server comes in, this is the open source full featured version of the Xen technology. Awesome.
So below talks you through how to upgrade your XenServer setup to XCP-NG Server.
Download XCP-NG Server
Firstly download the ISO for the latest XCP-NG Server from here, https://xcp-ng.org/#easy-to-install
Create a Bootable USB Containing the ISO
If you are unsure how to do this, follow our guide on how to create a bootable USB using Rufus.
Backup XenServer
It kind of goes without saying, but I’ll say it anyhow. Make sure you take a full backup of your XenServer via Xen Centre to ensure you can recover if the upgrade fails for whatever reason.
Boot Server from USB containing XCP-NG ISO
Plug the bootable USB drive into your physical server and make sure your BIOS settings are configured so you can boot from the device. Then you can start the upgrade process which it outlined below.
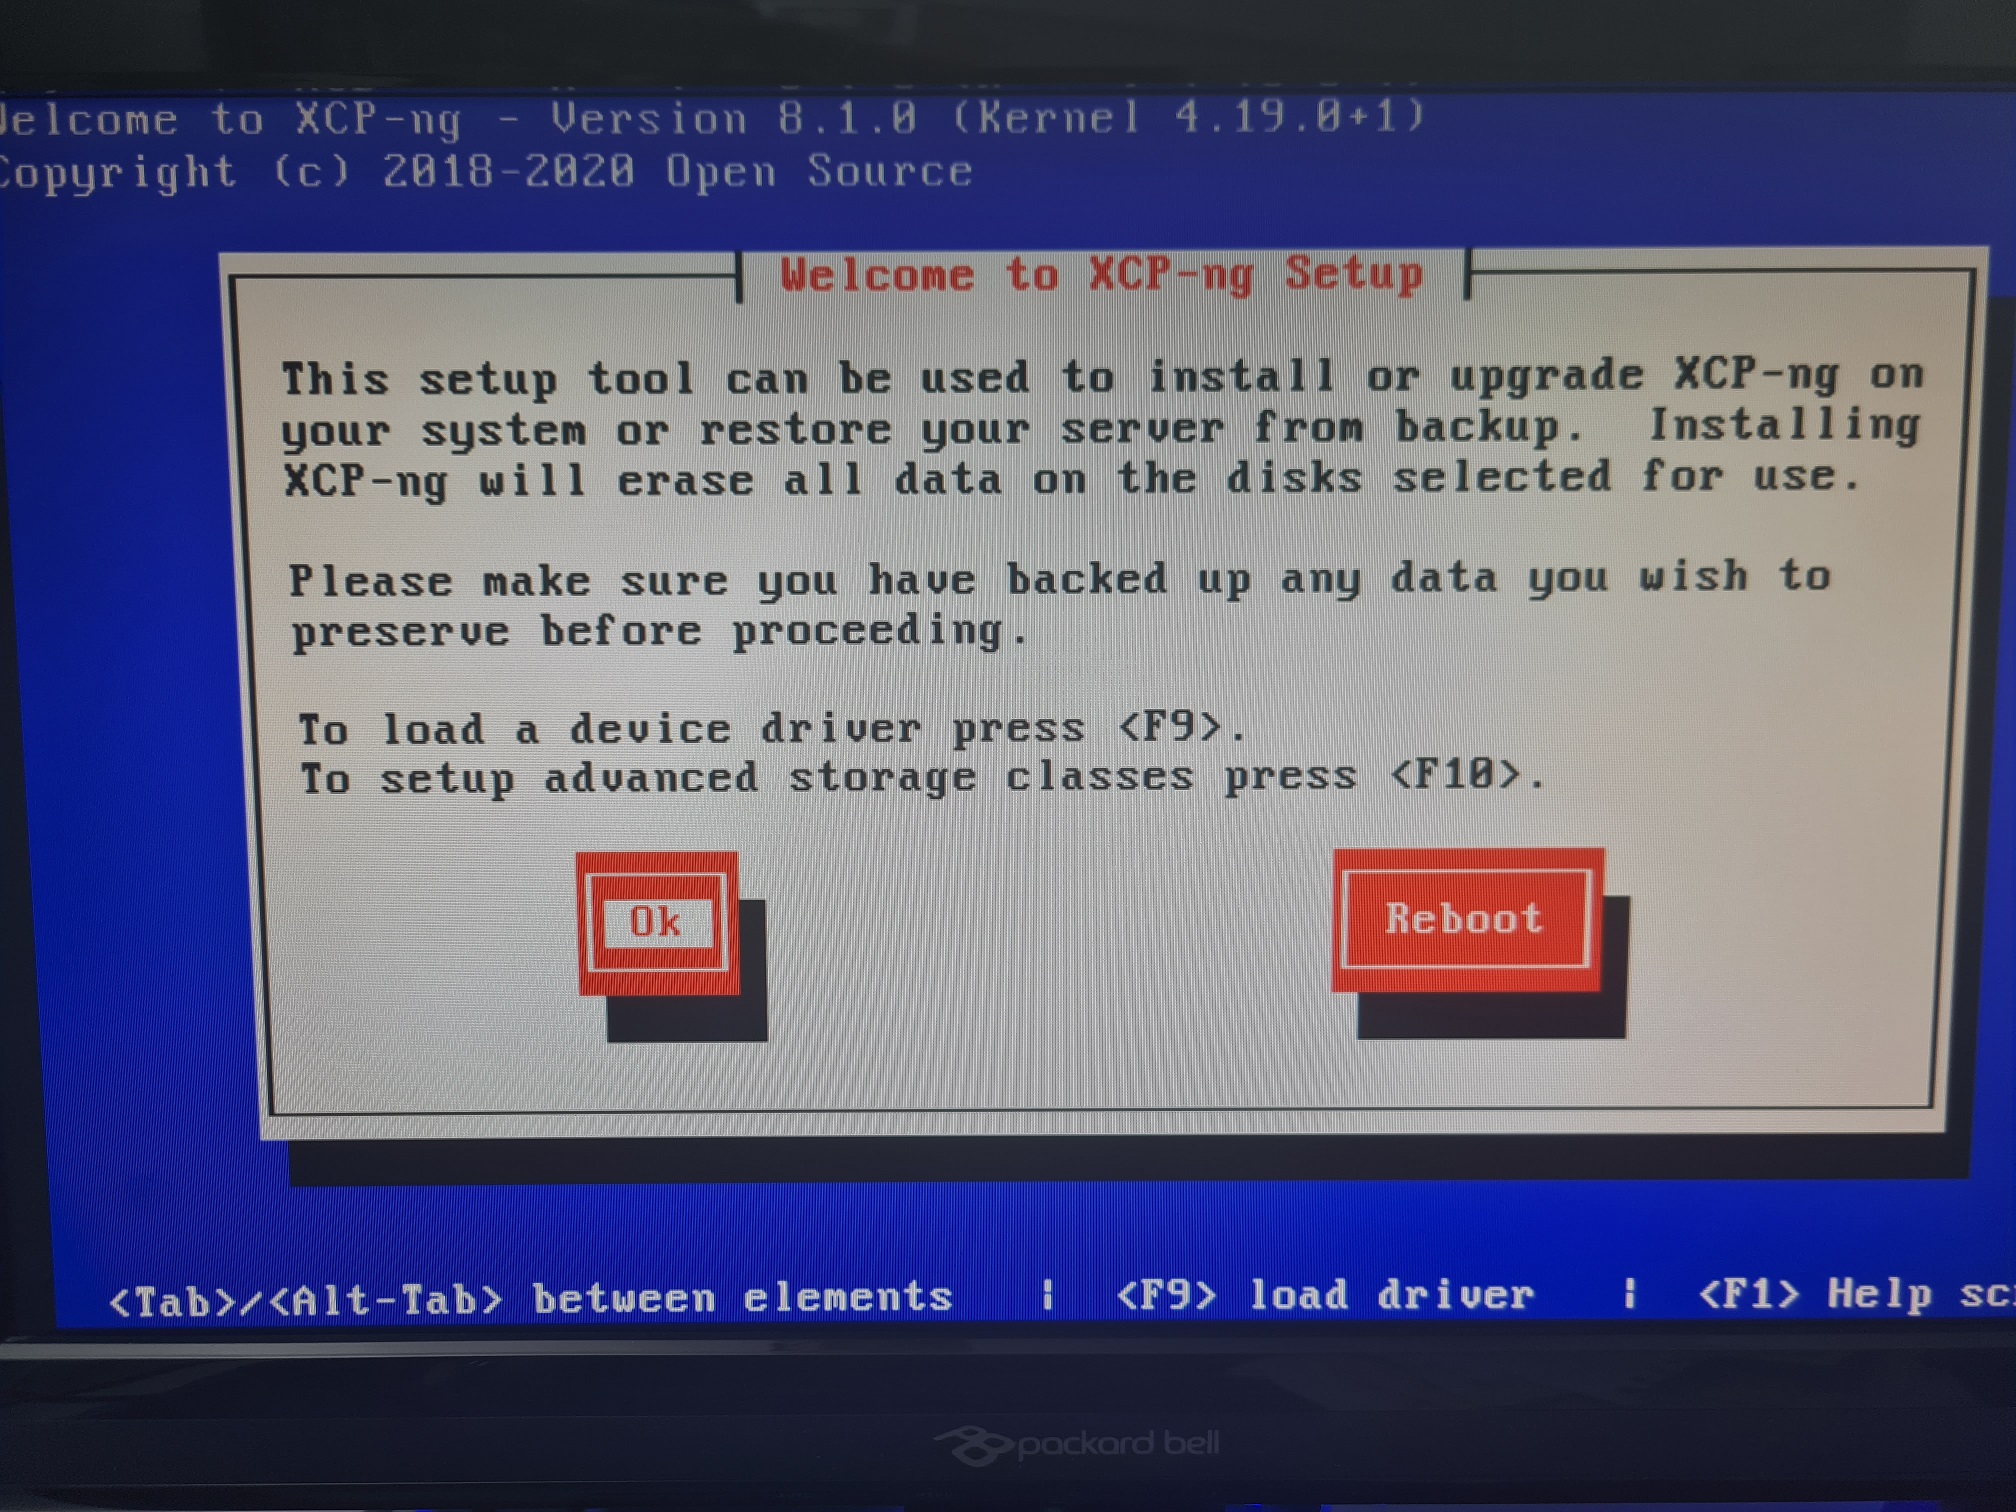
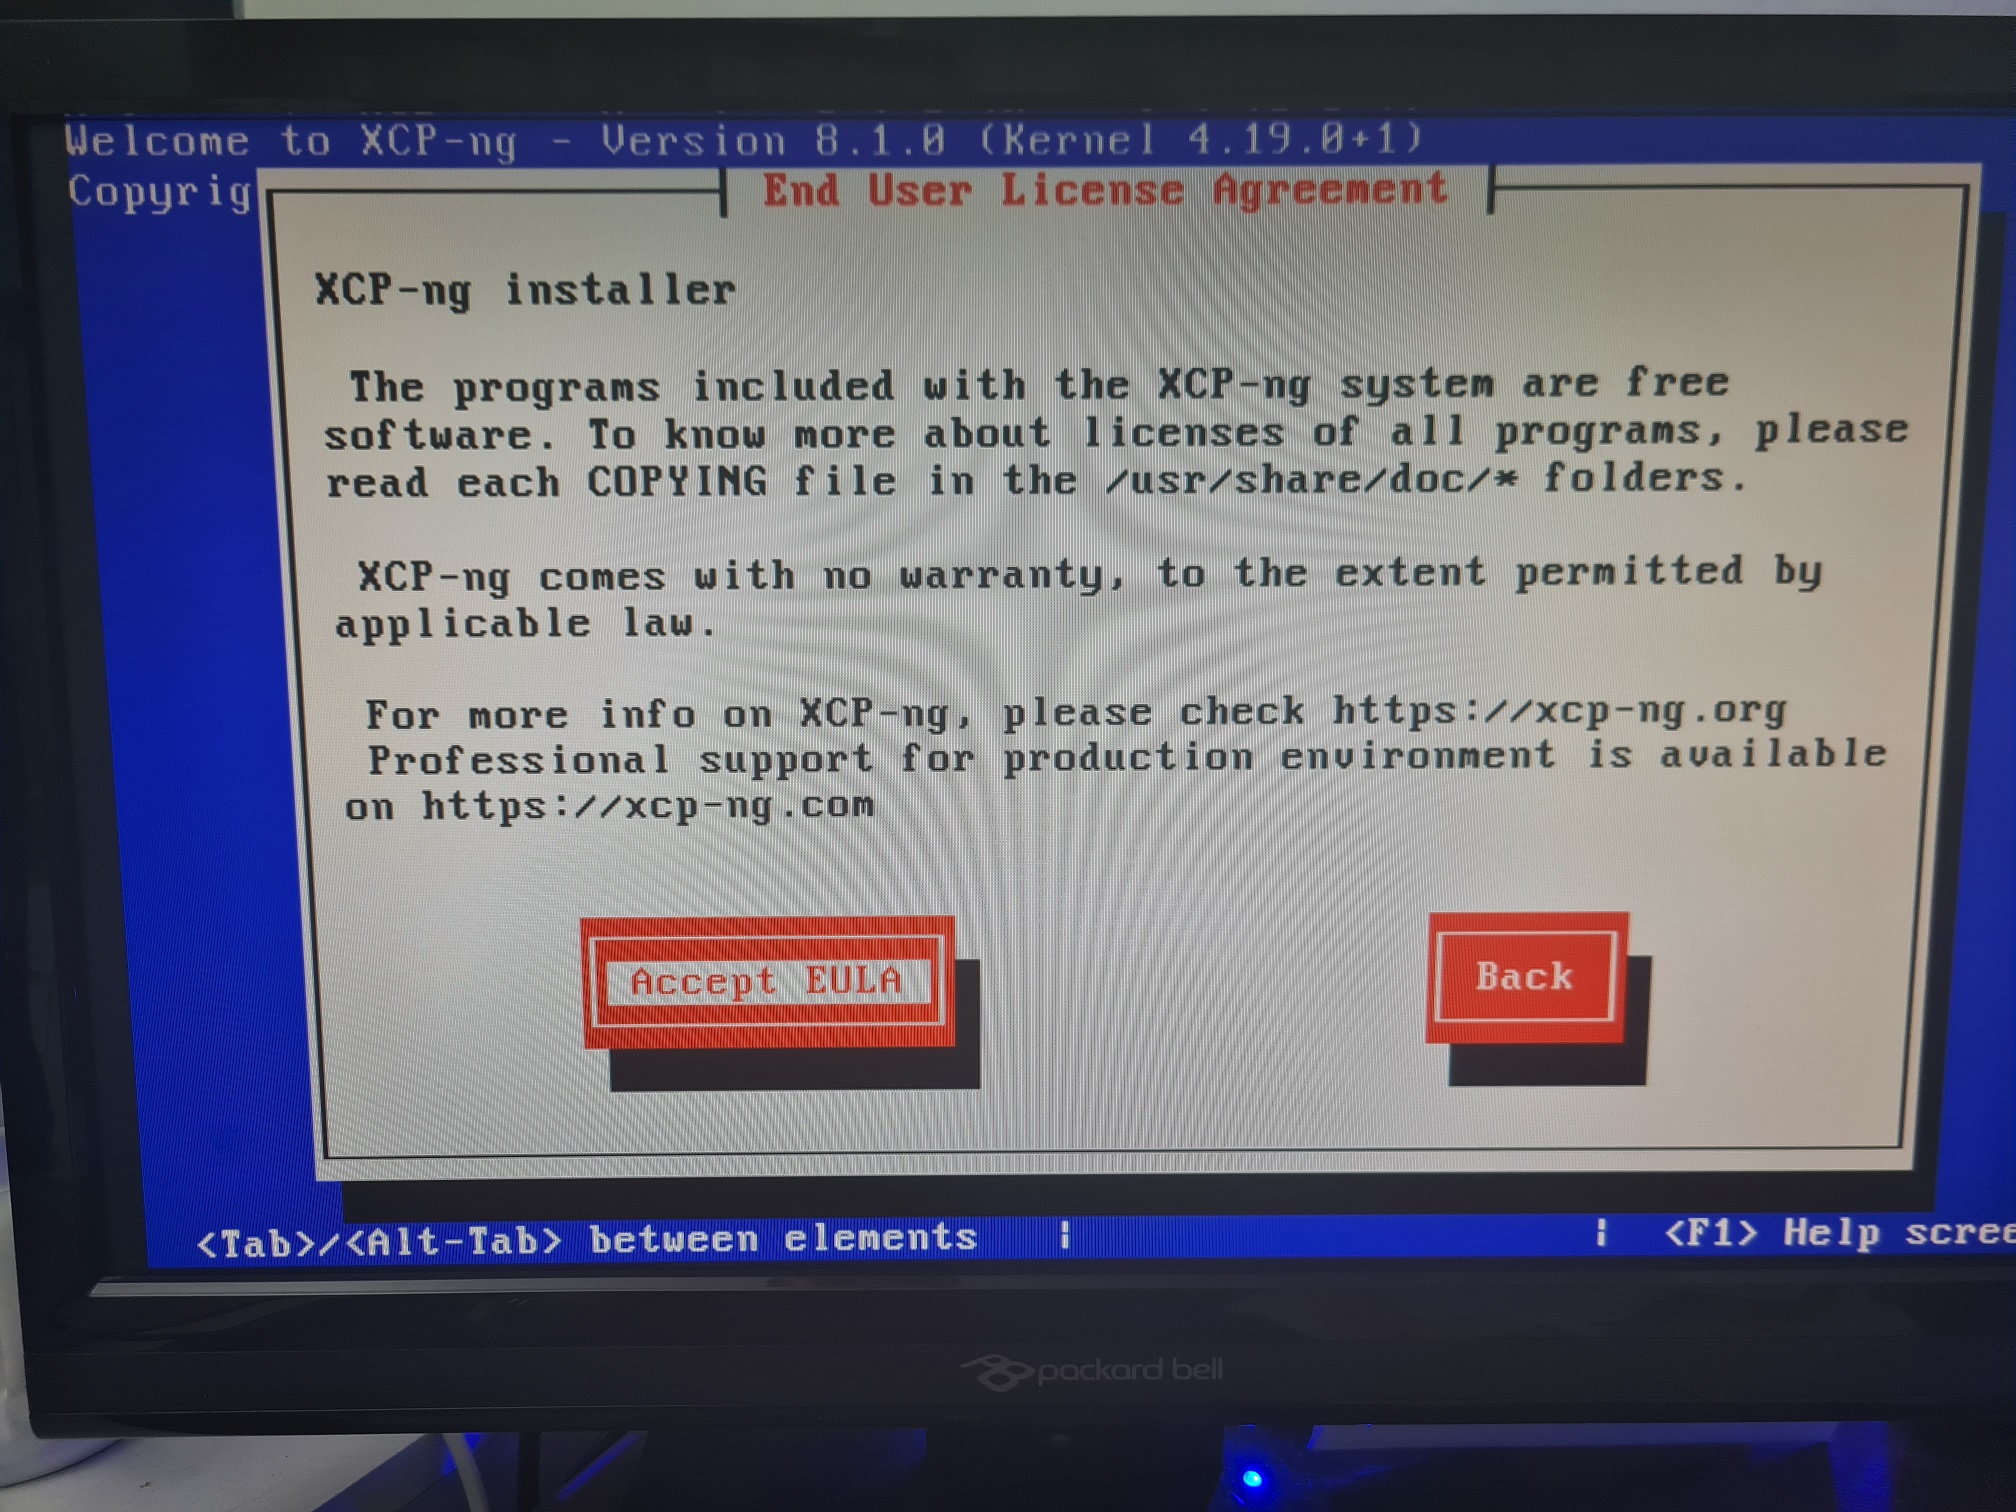
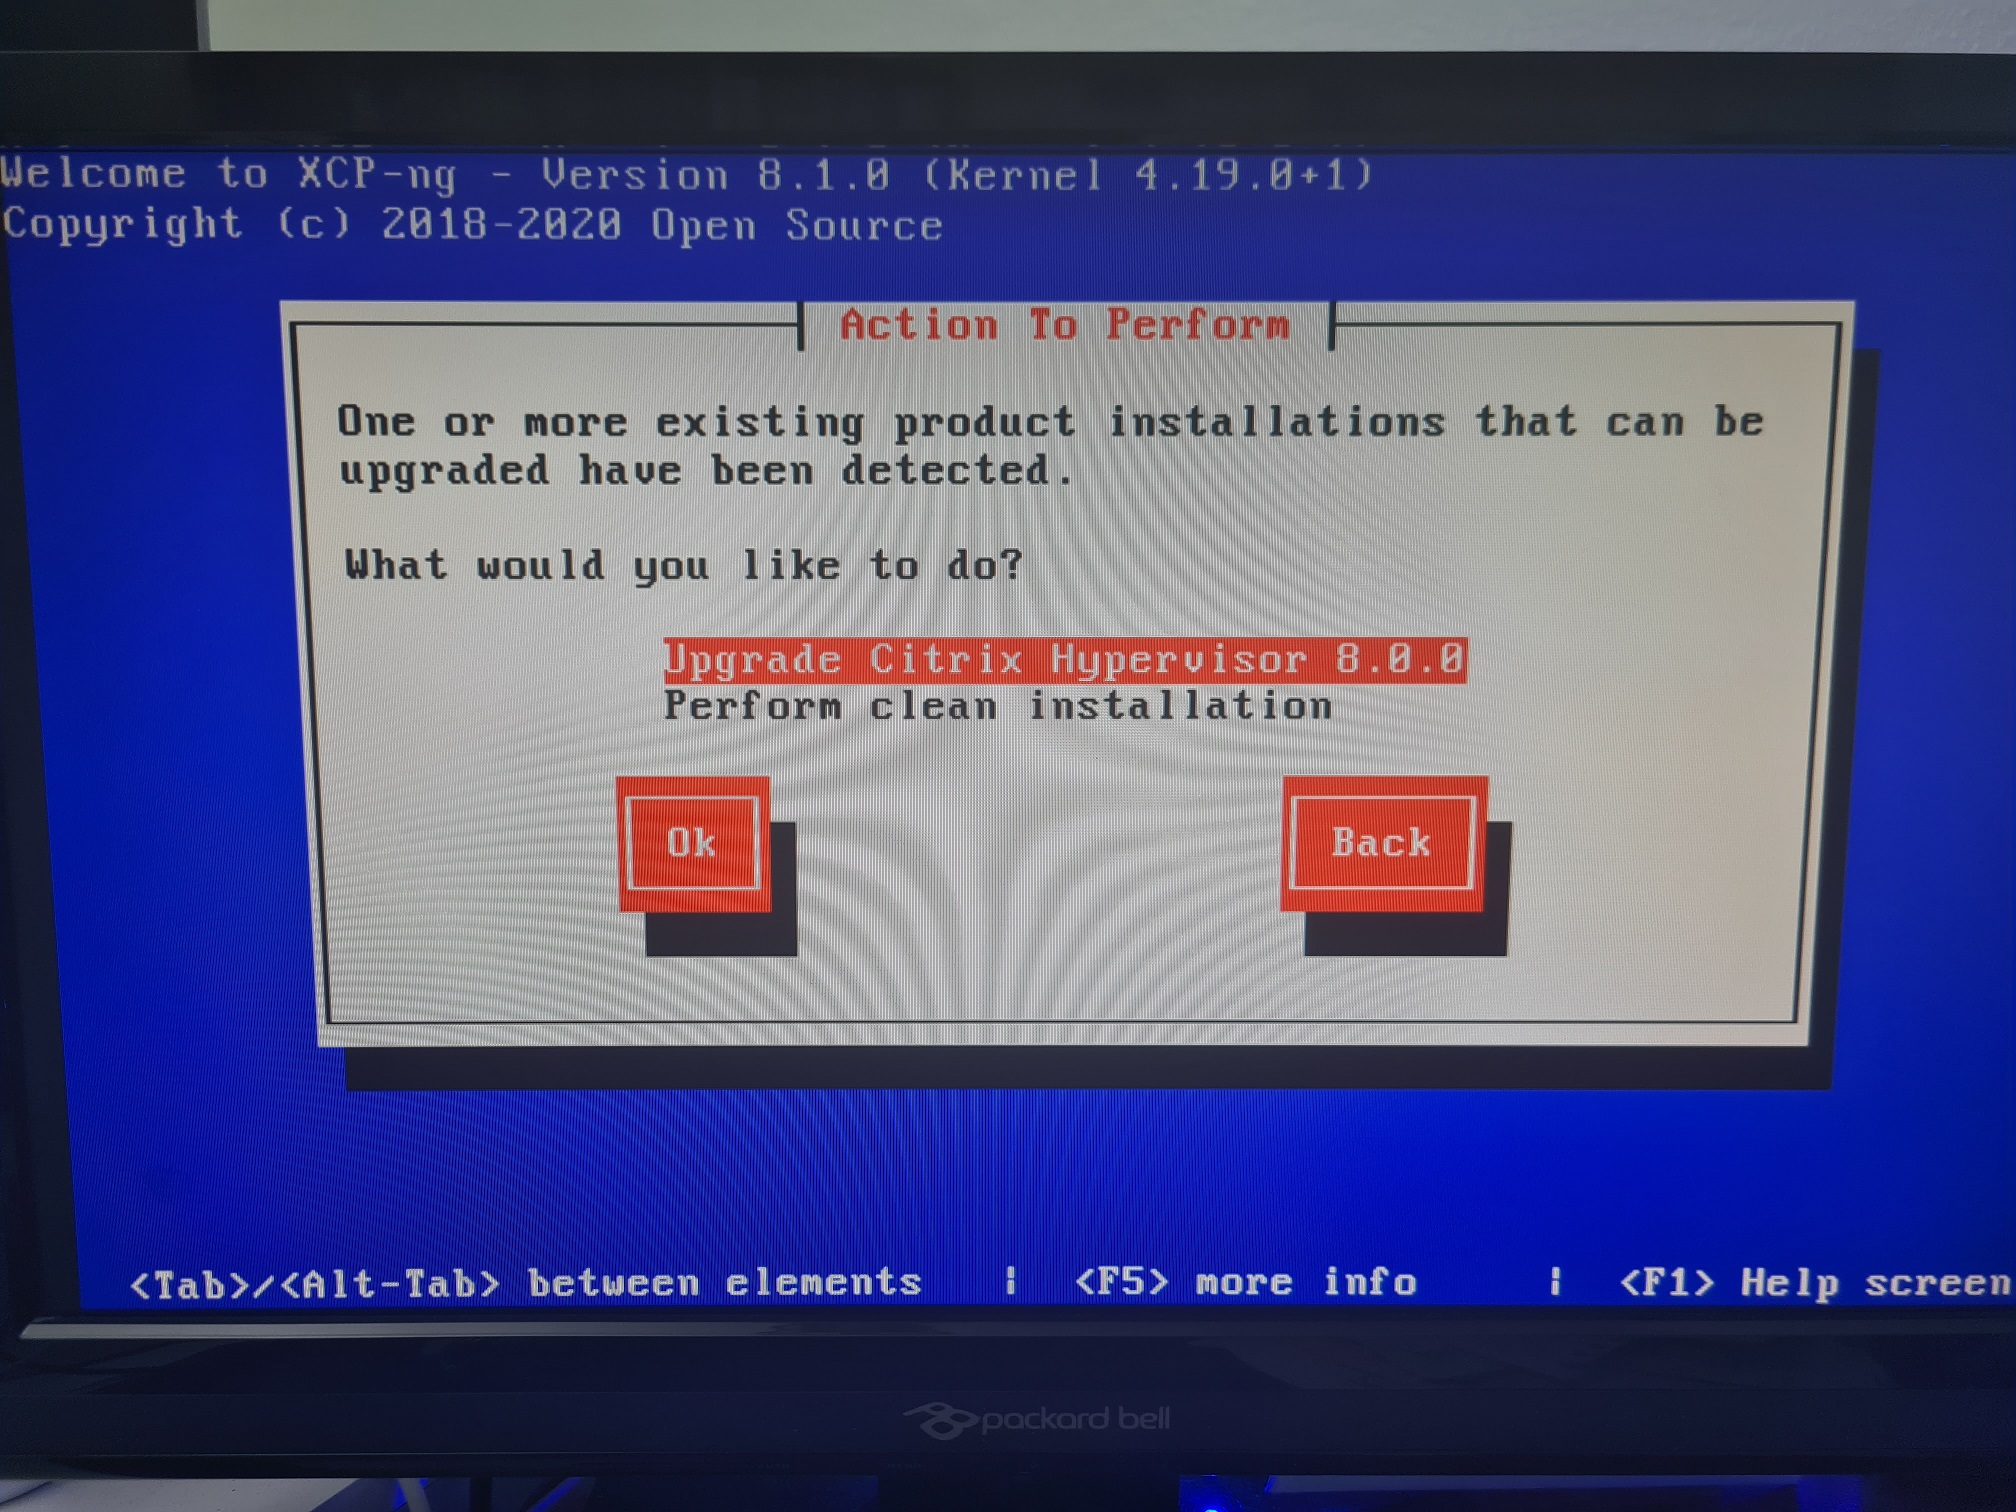
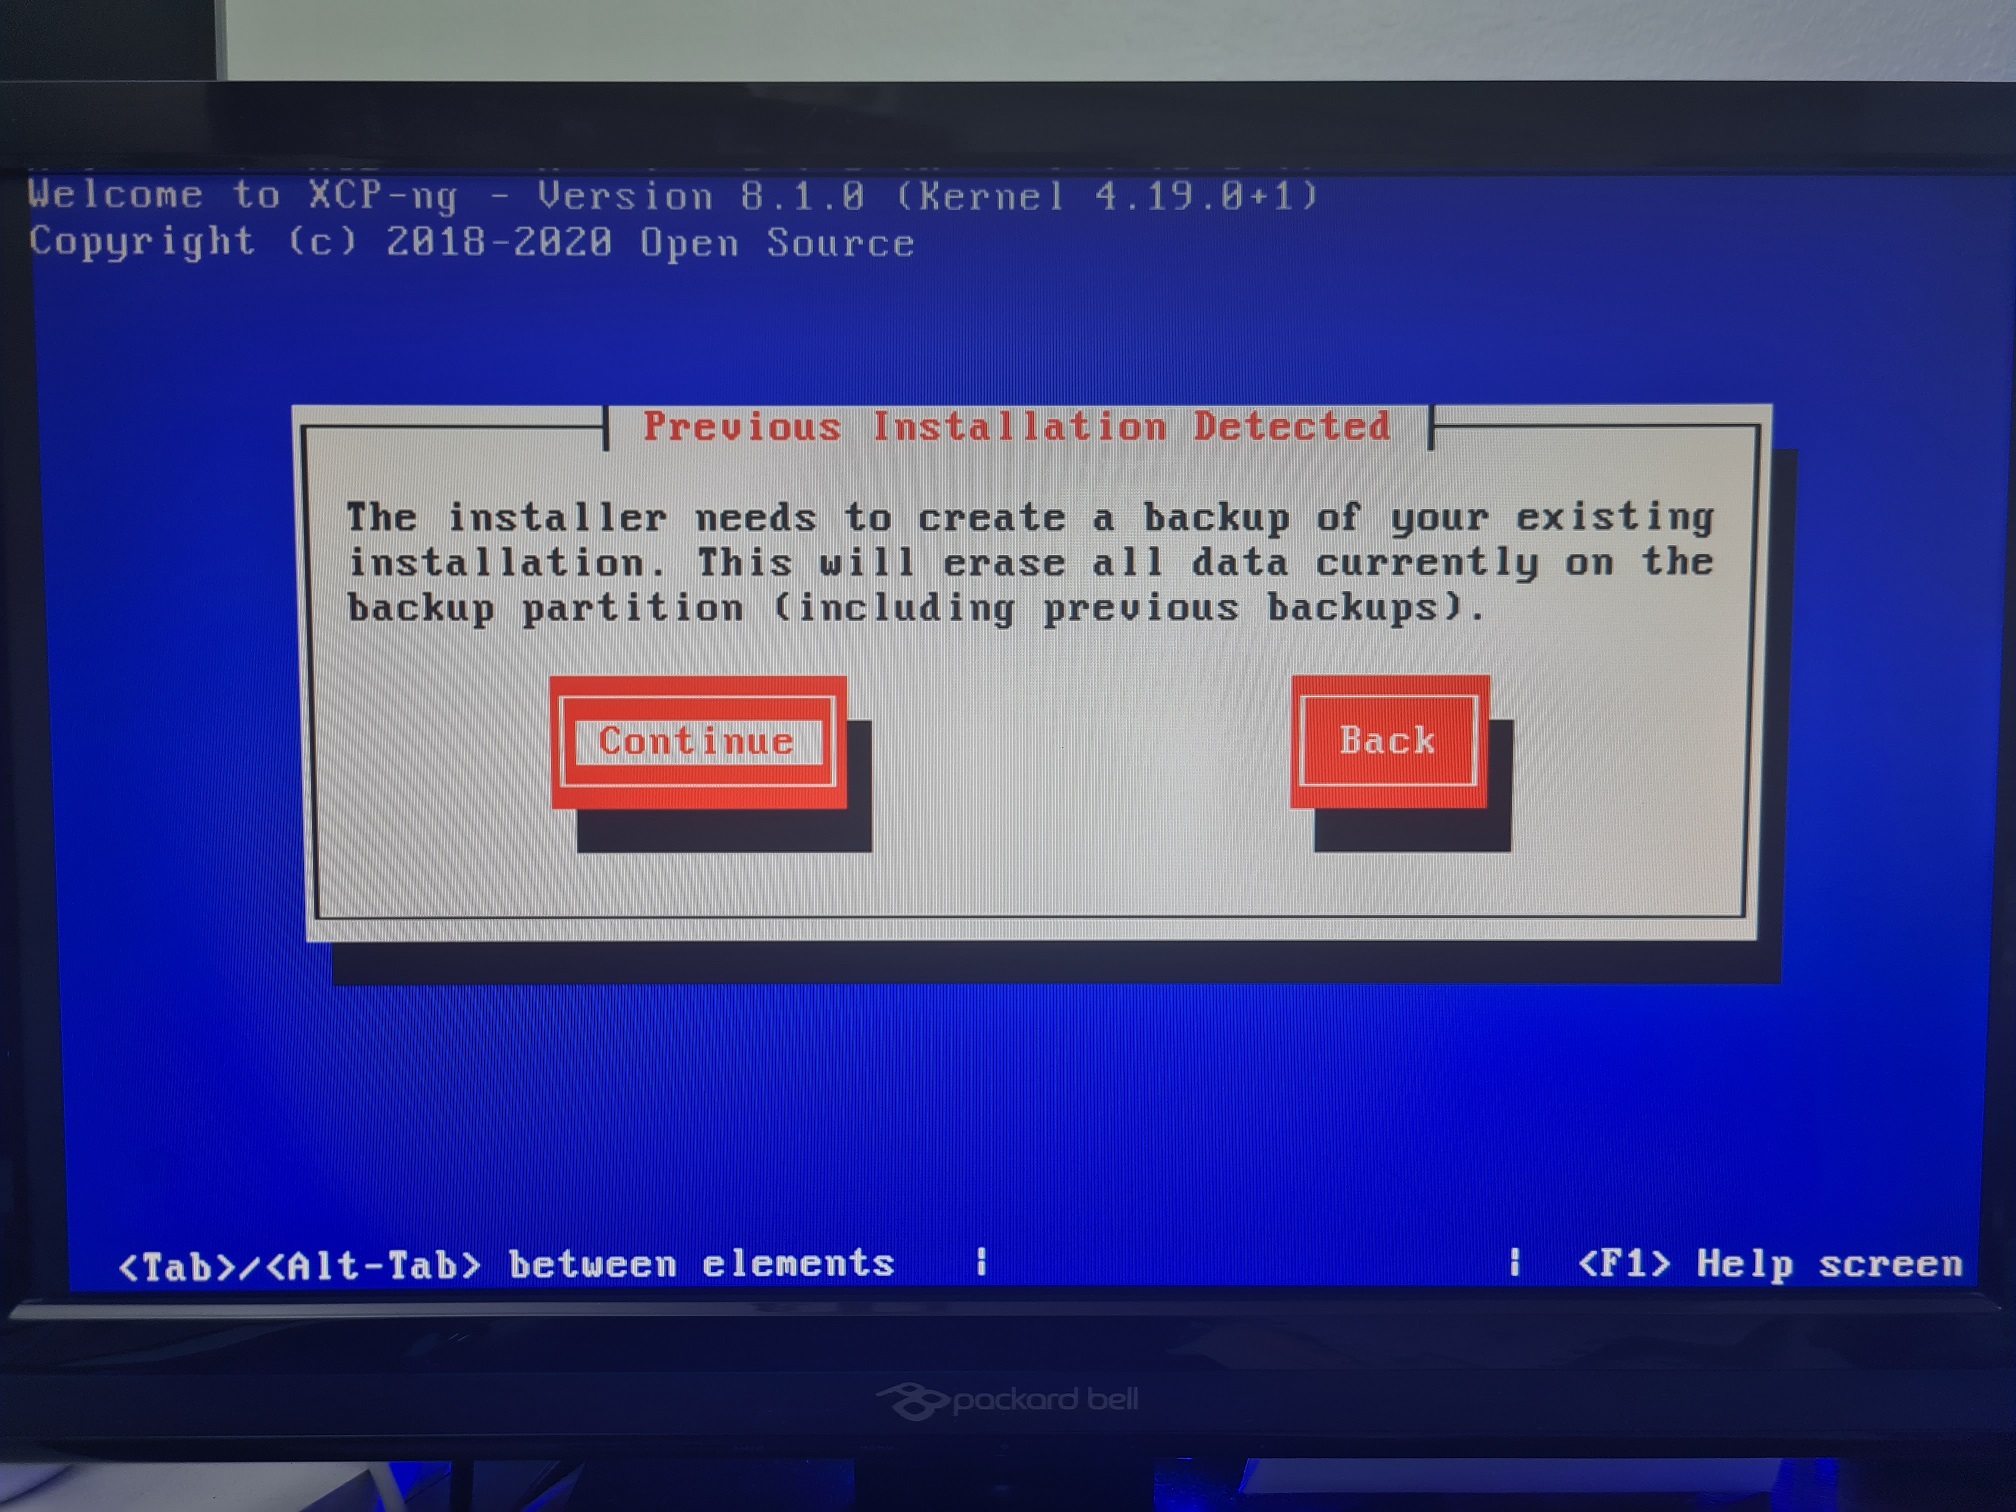
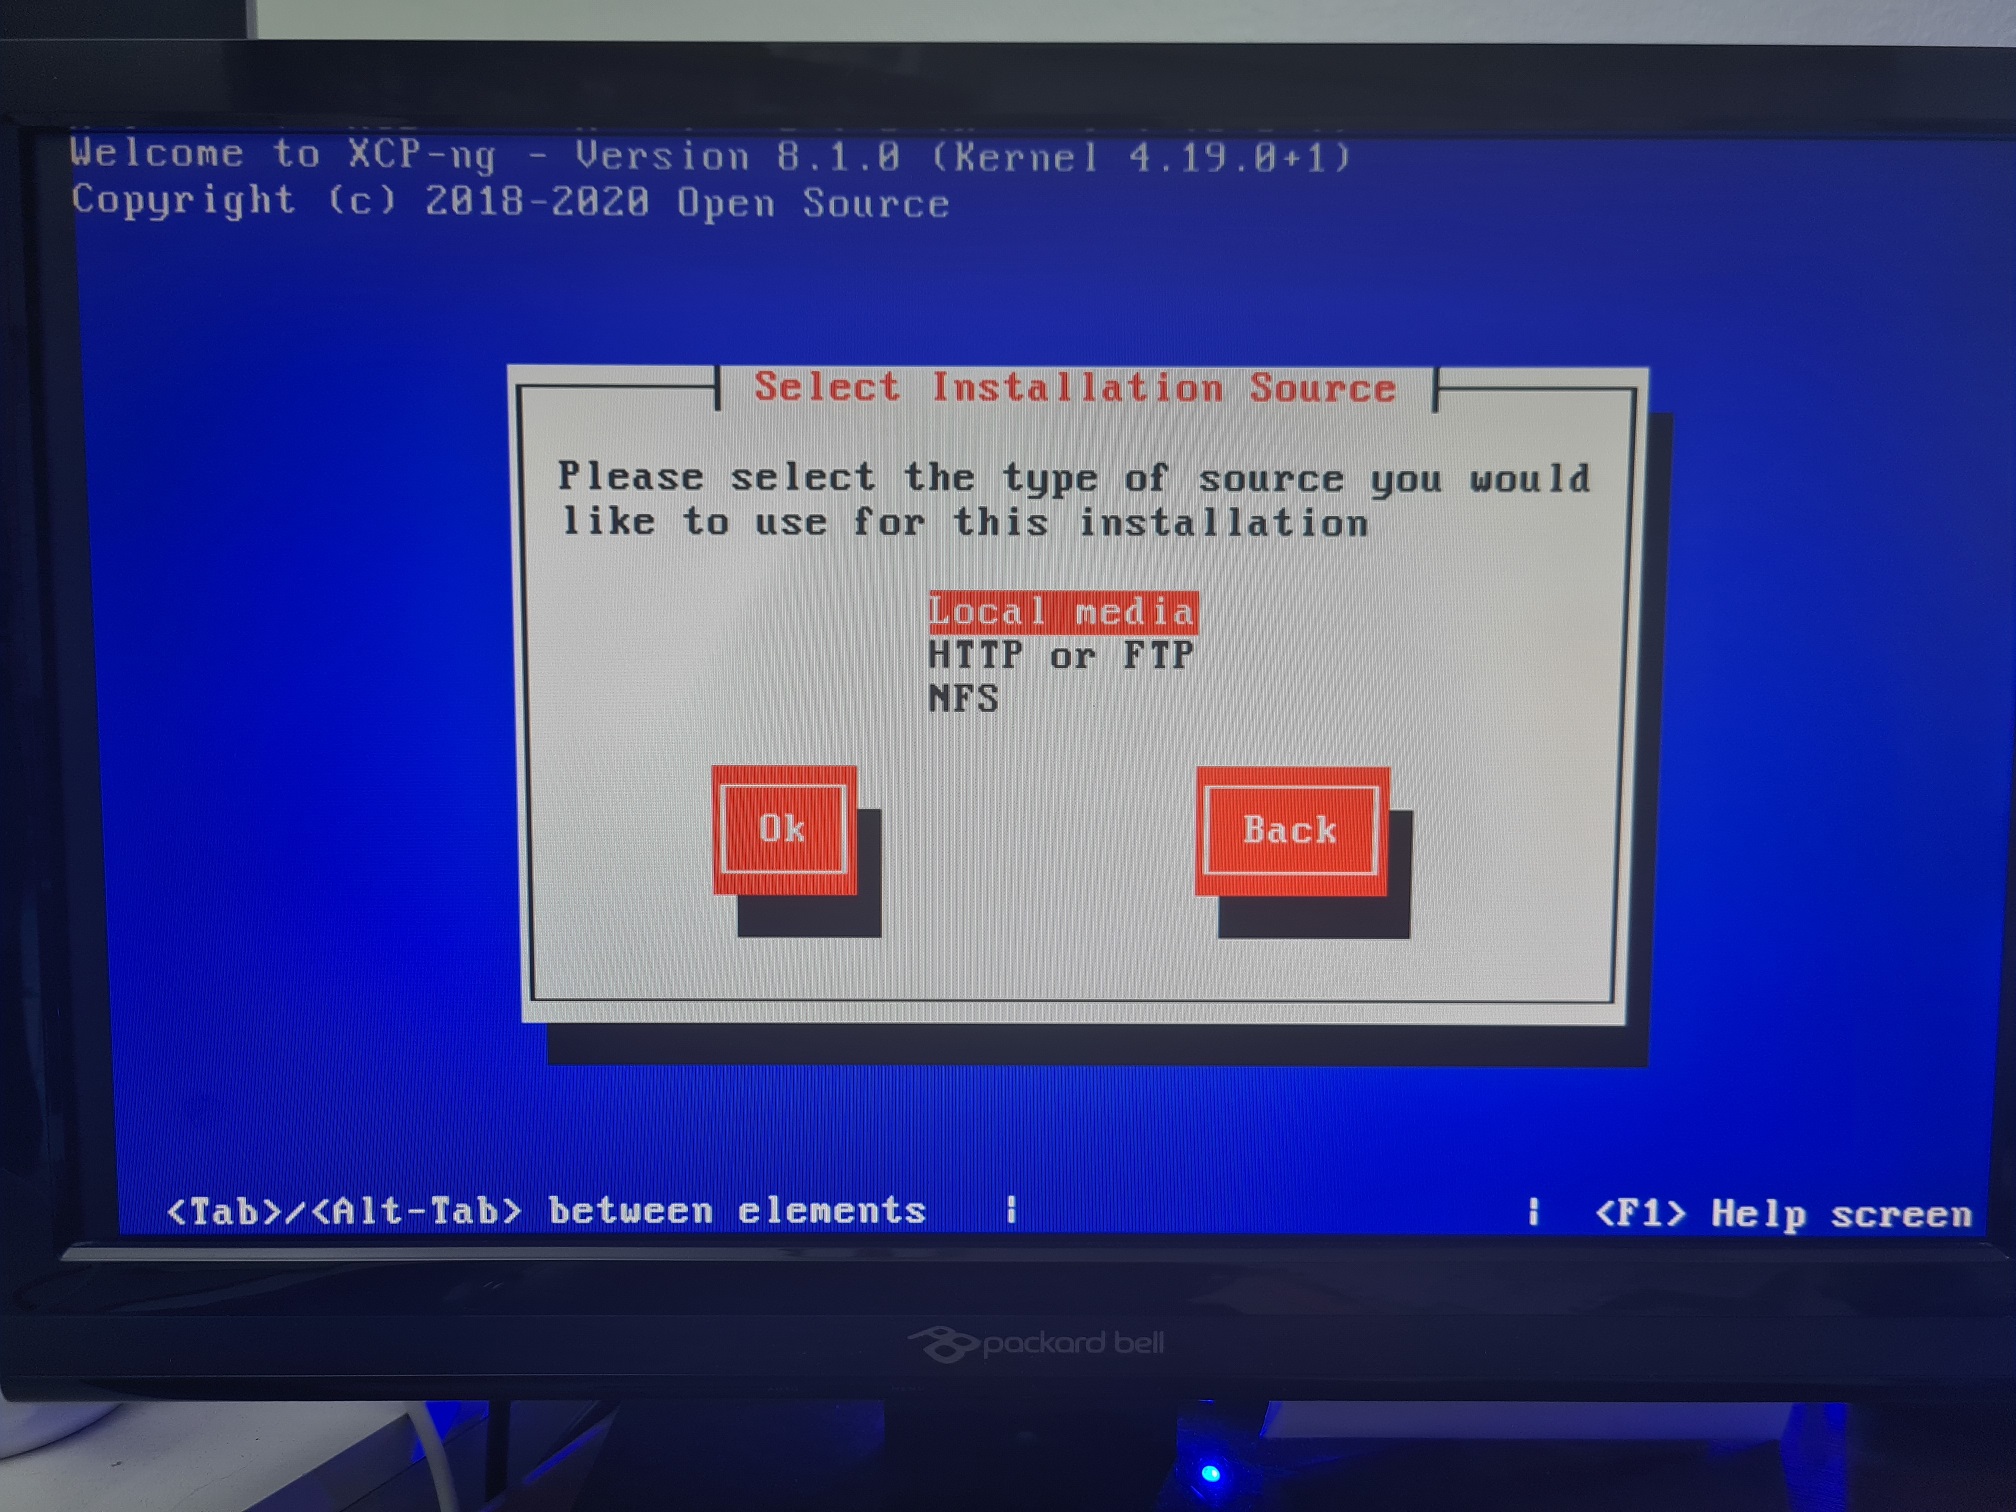
Upgrade XCP-NG Server via Installer
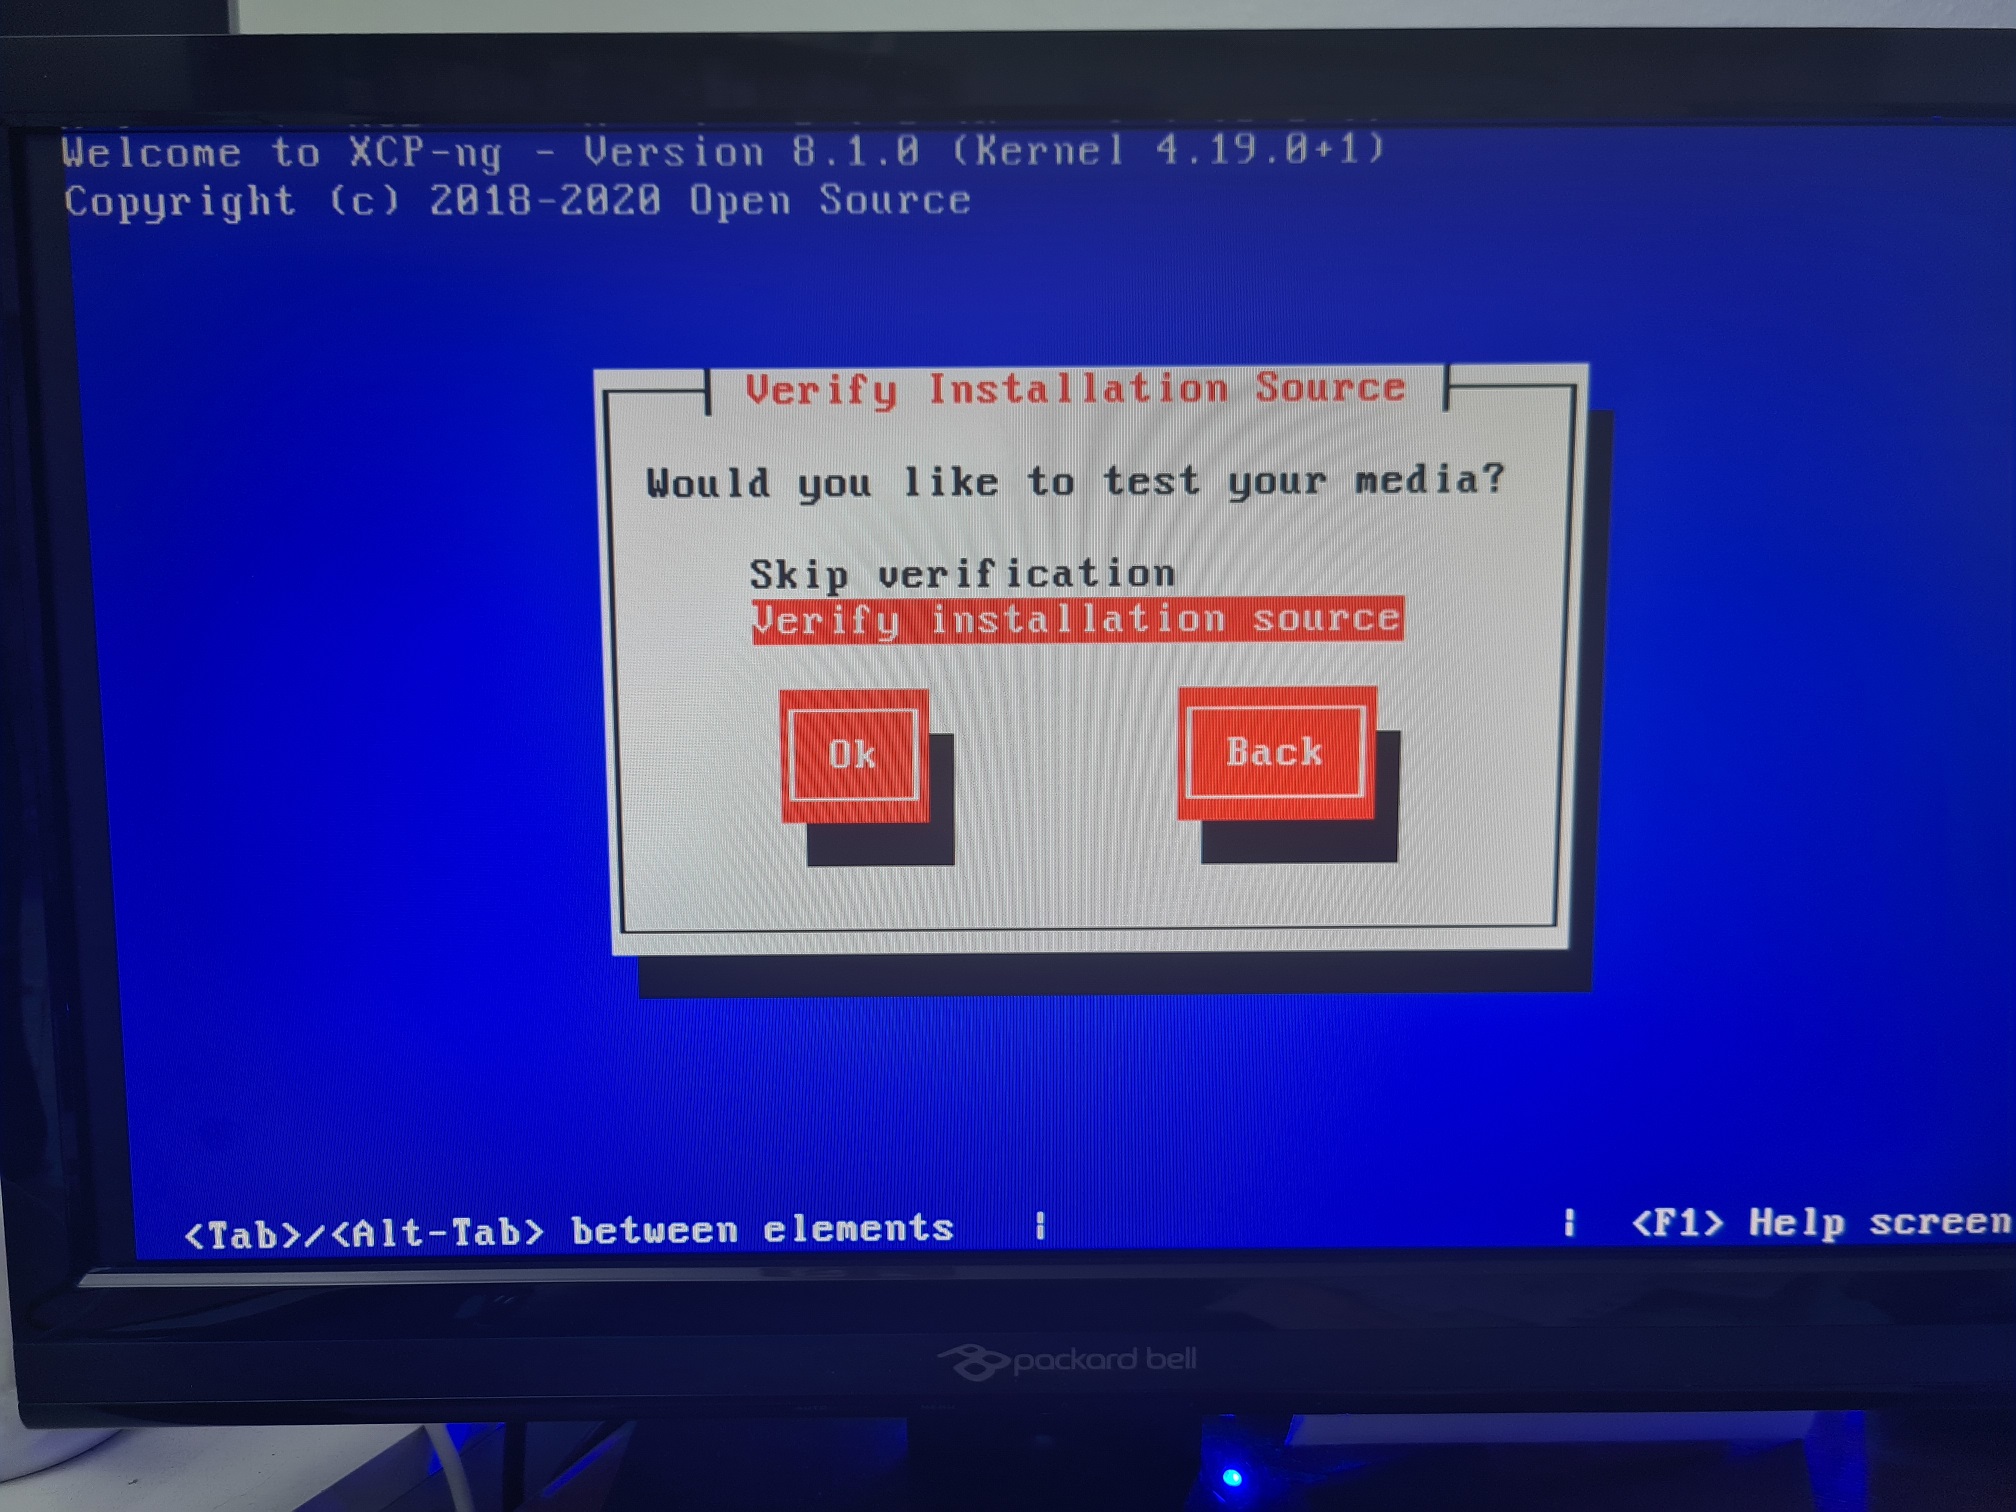
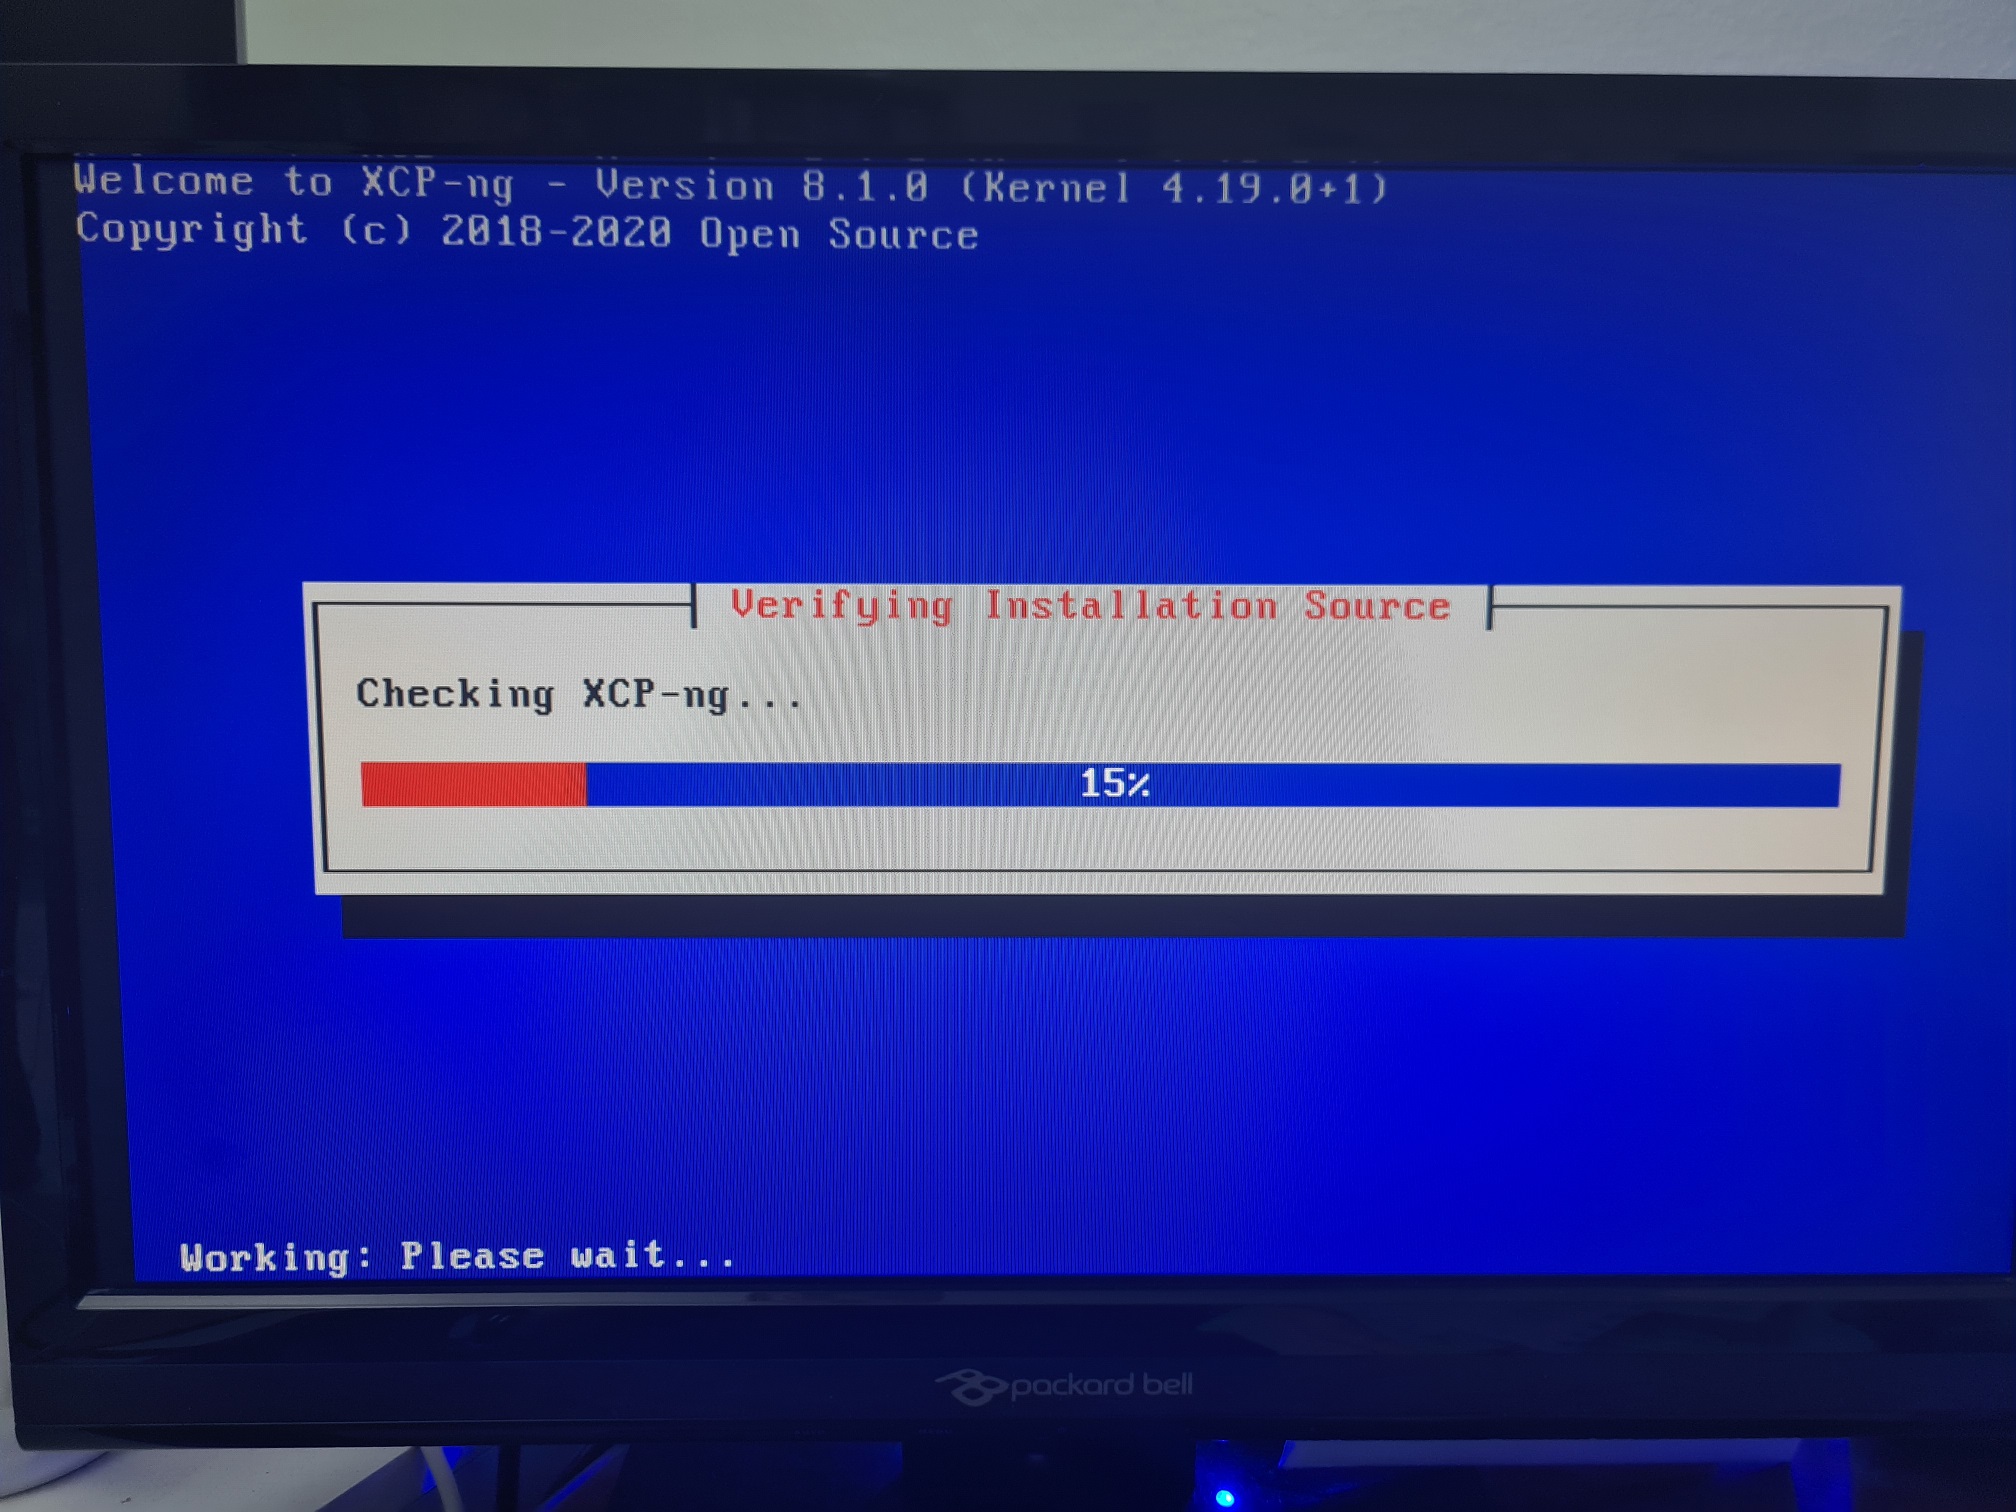
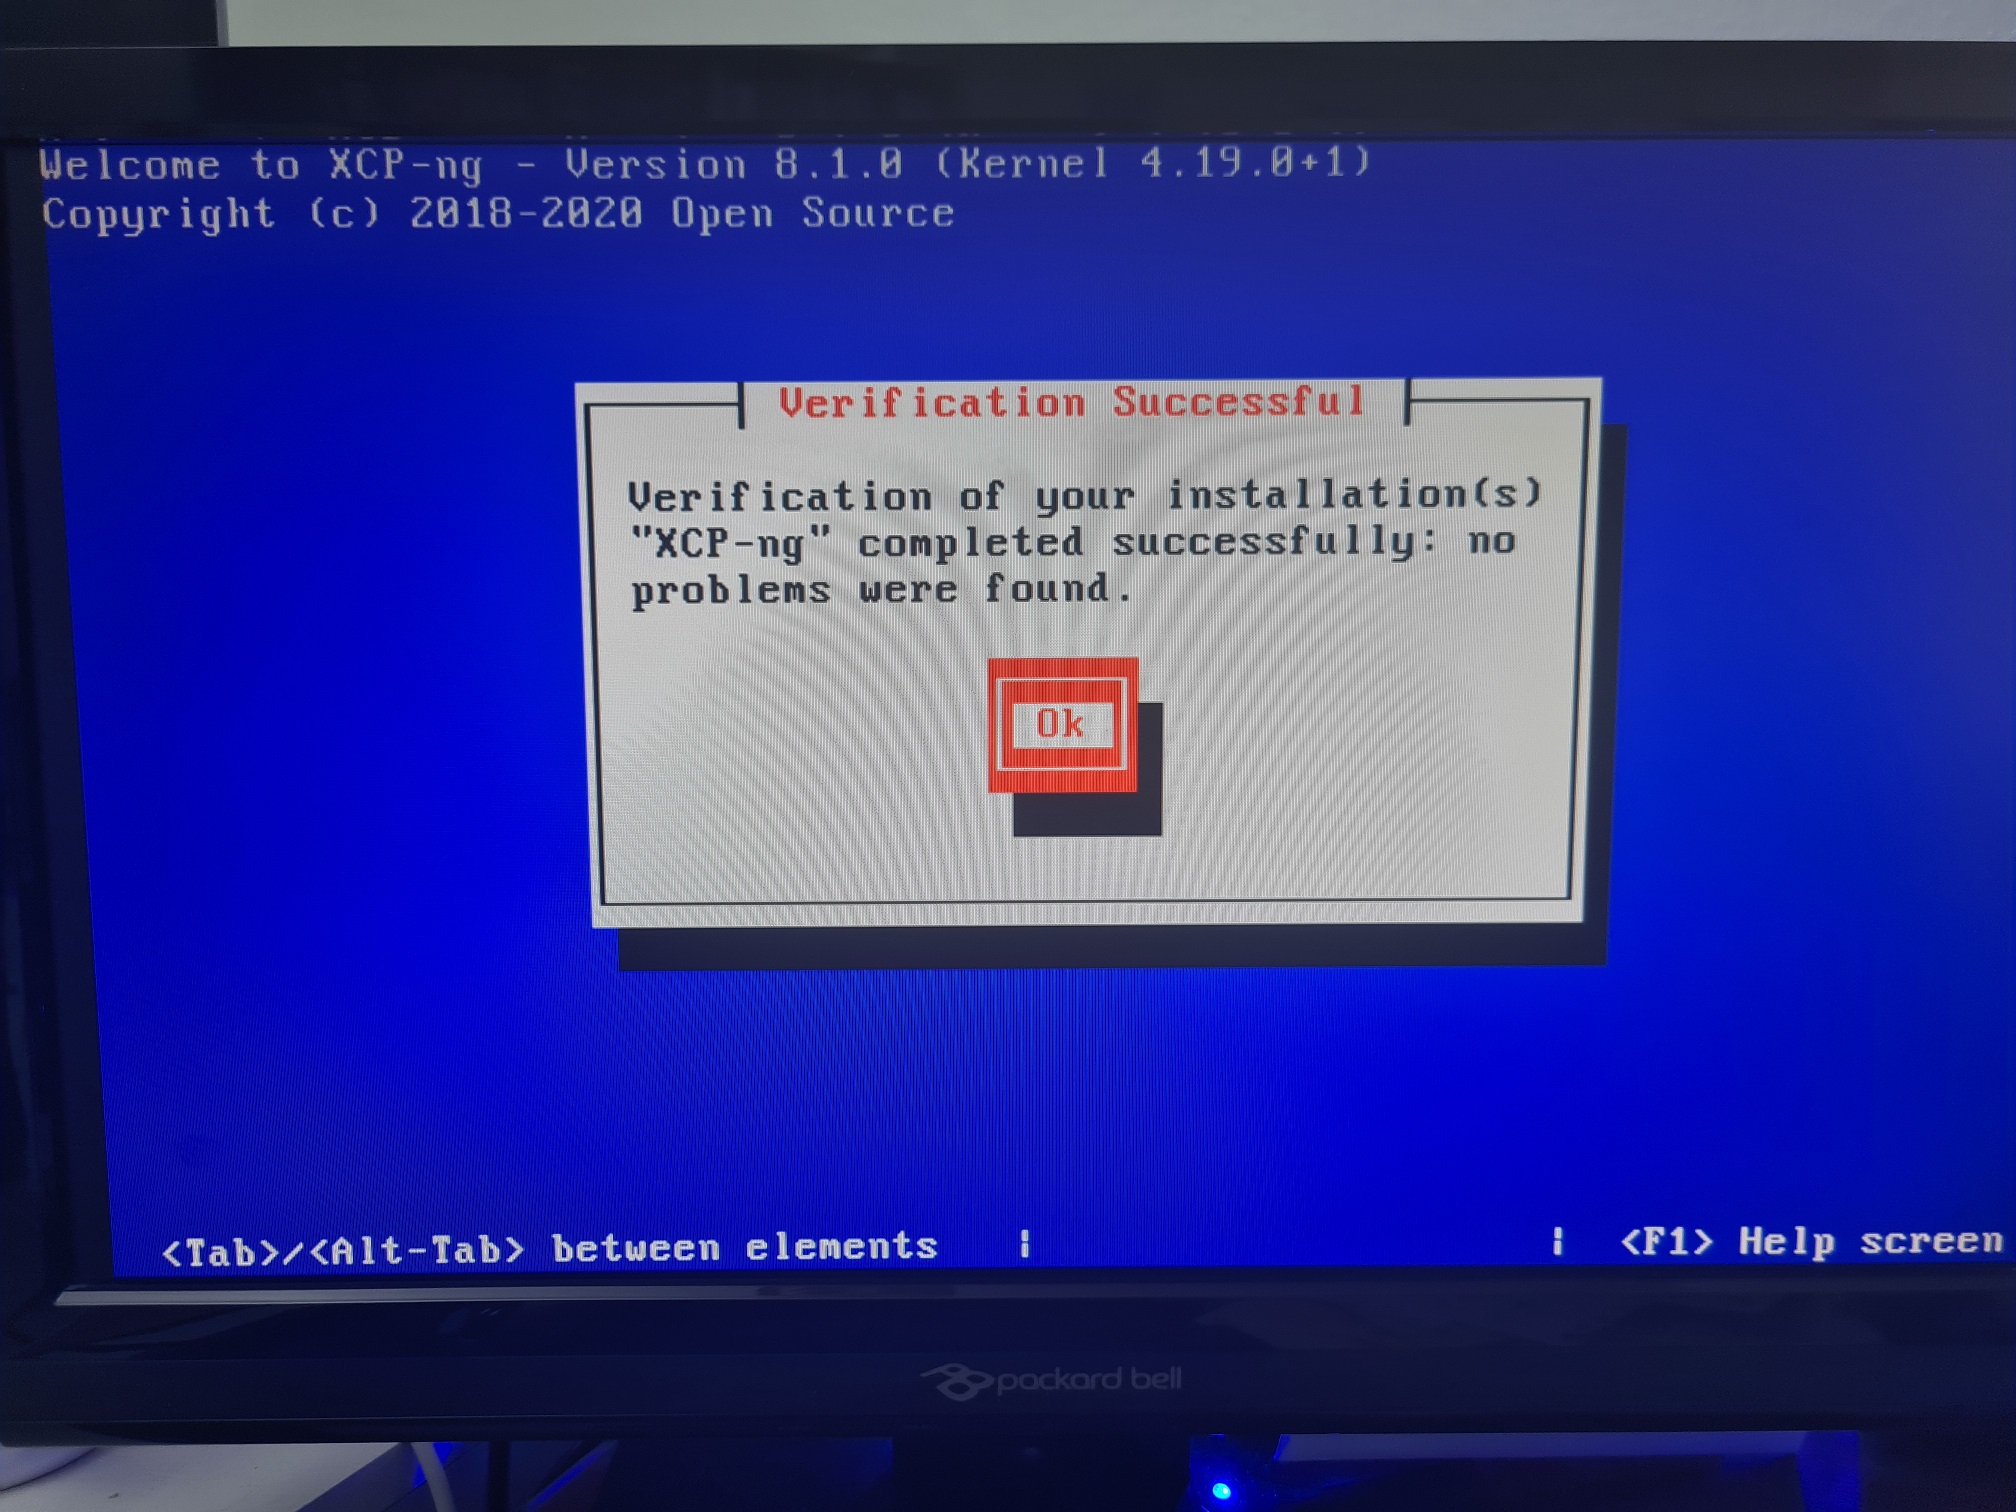
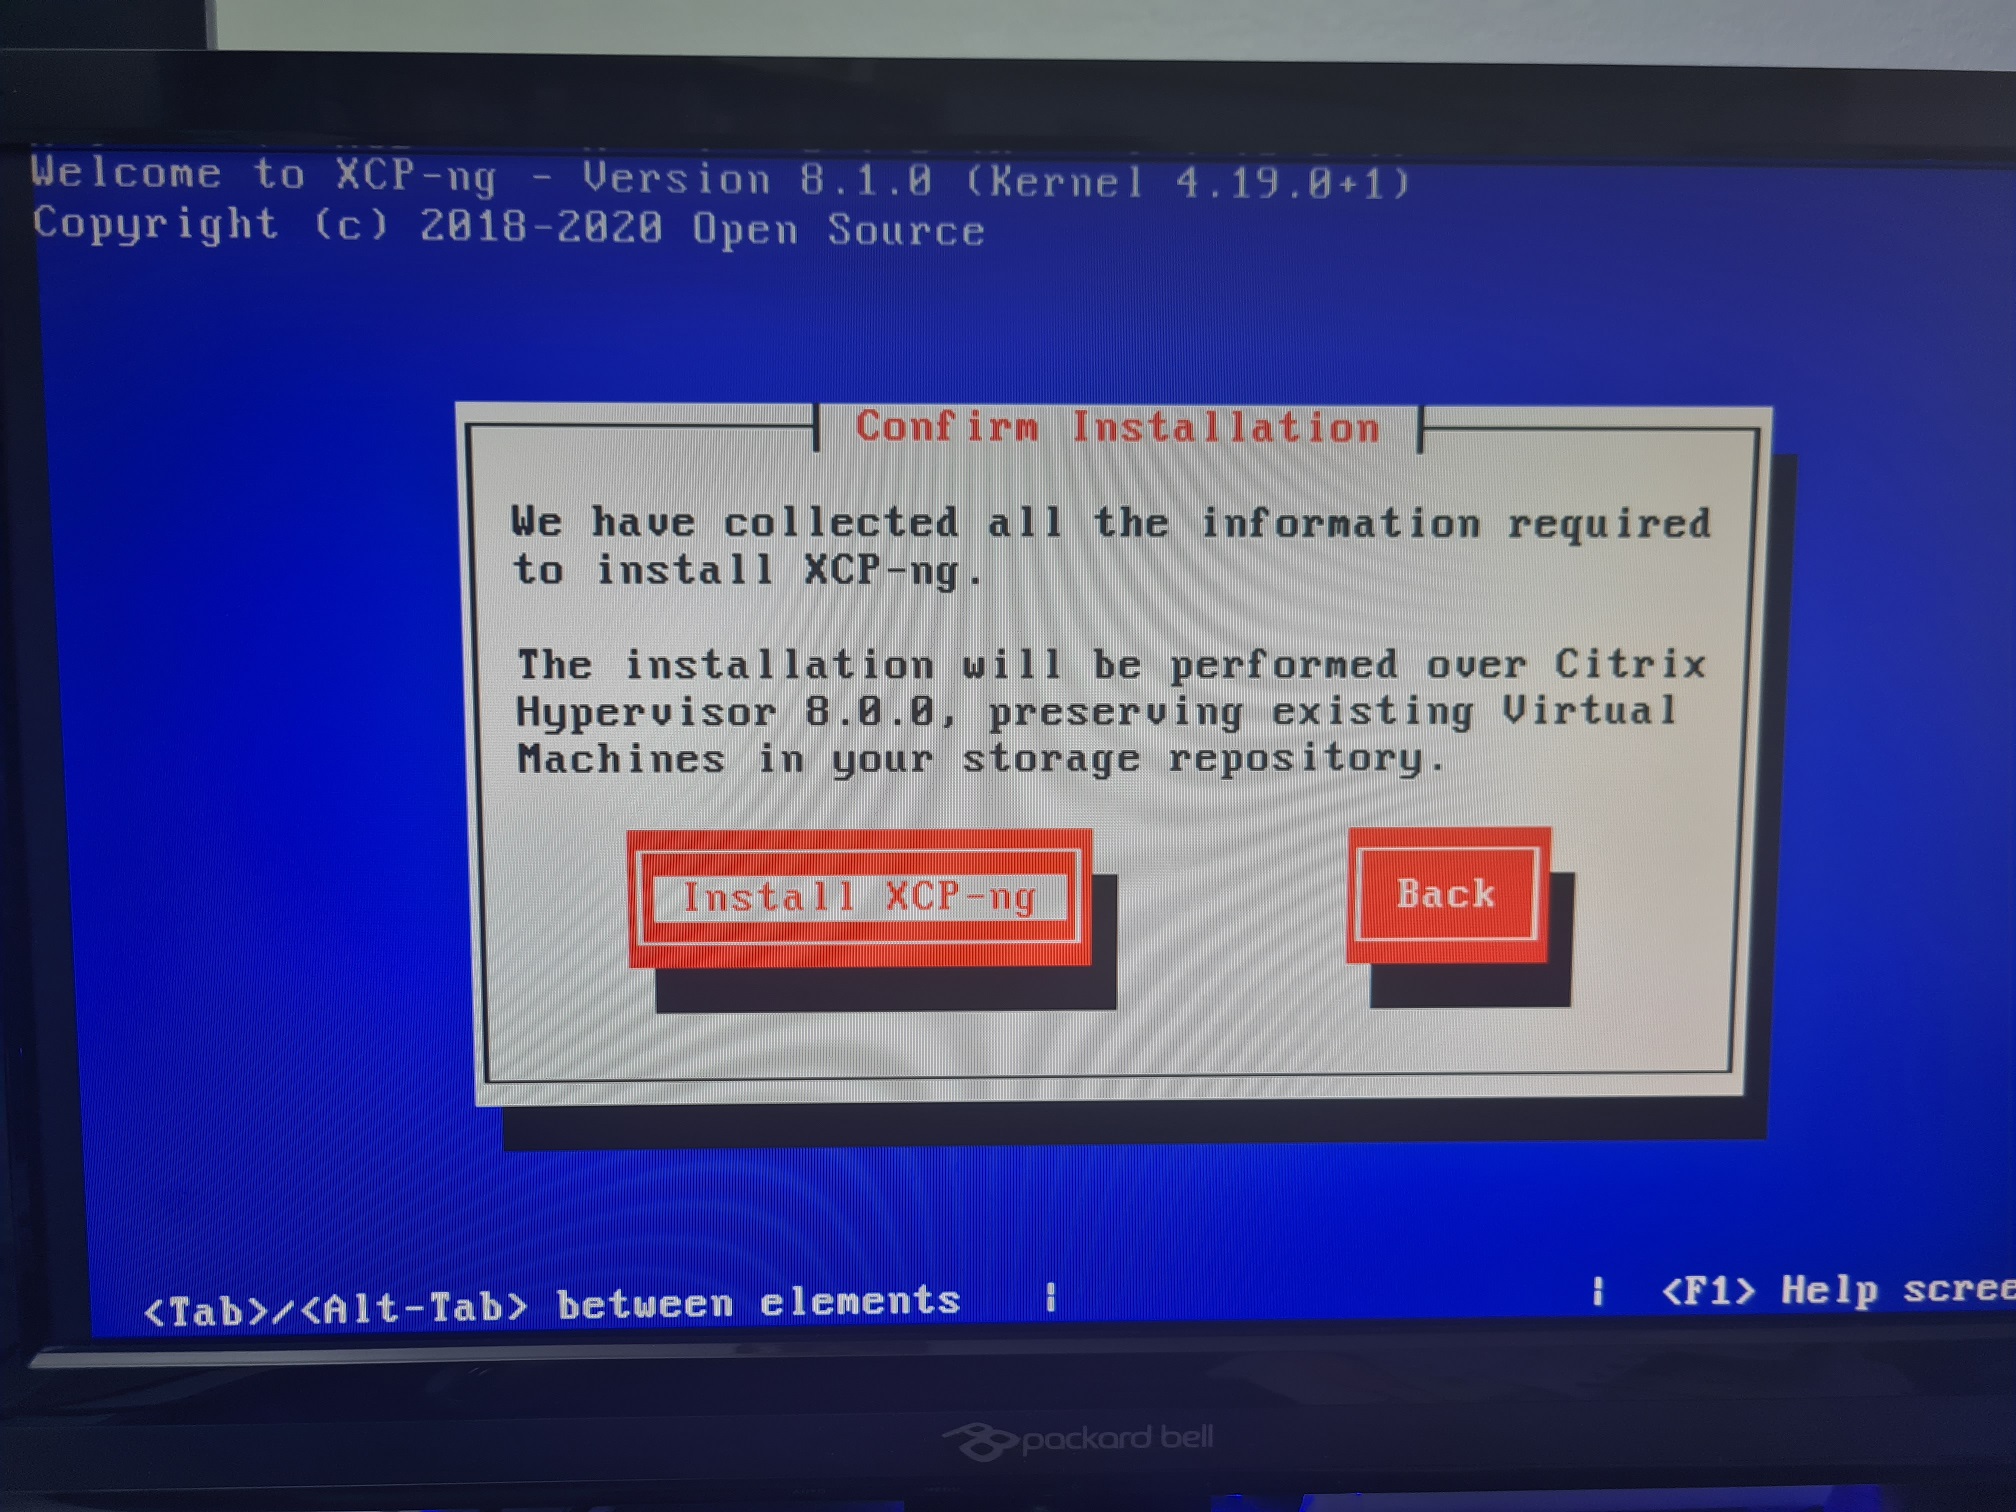
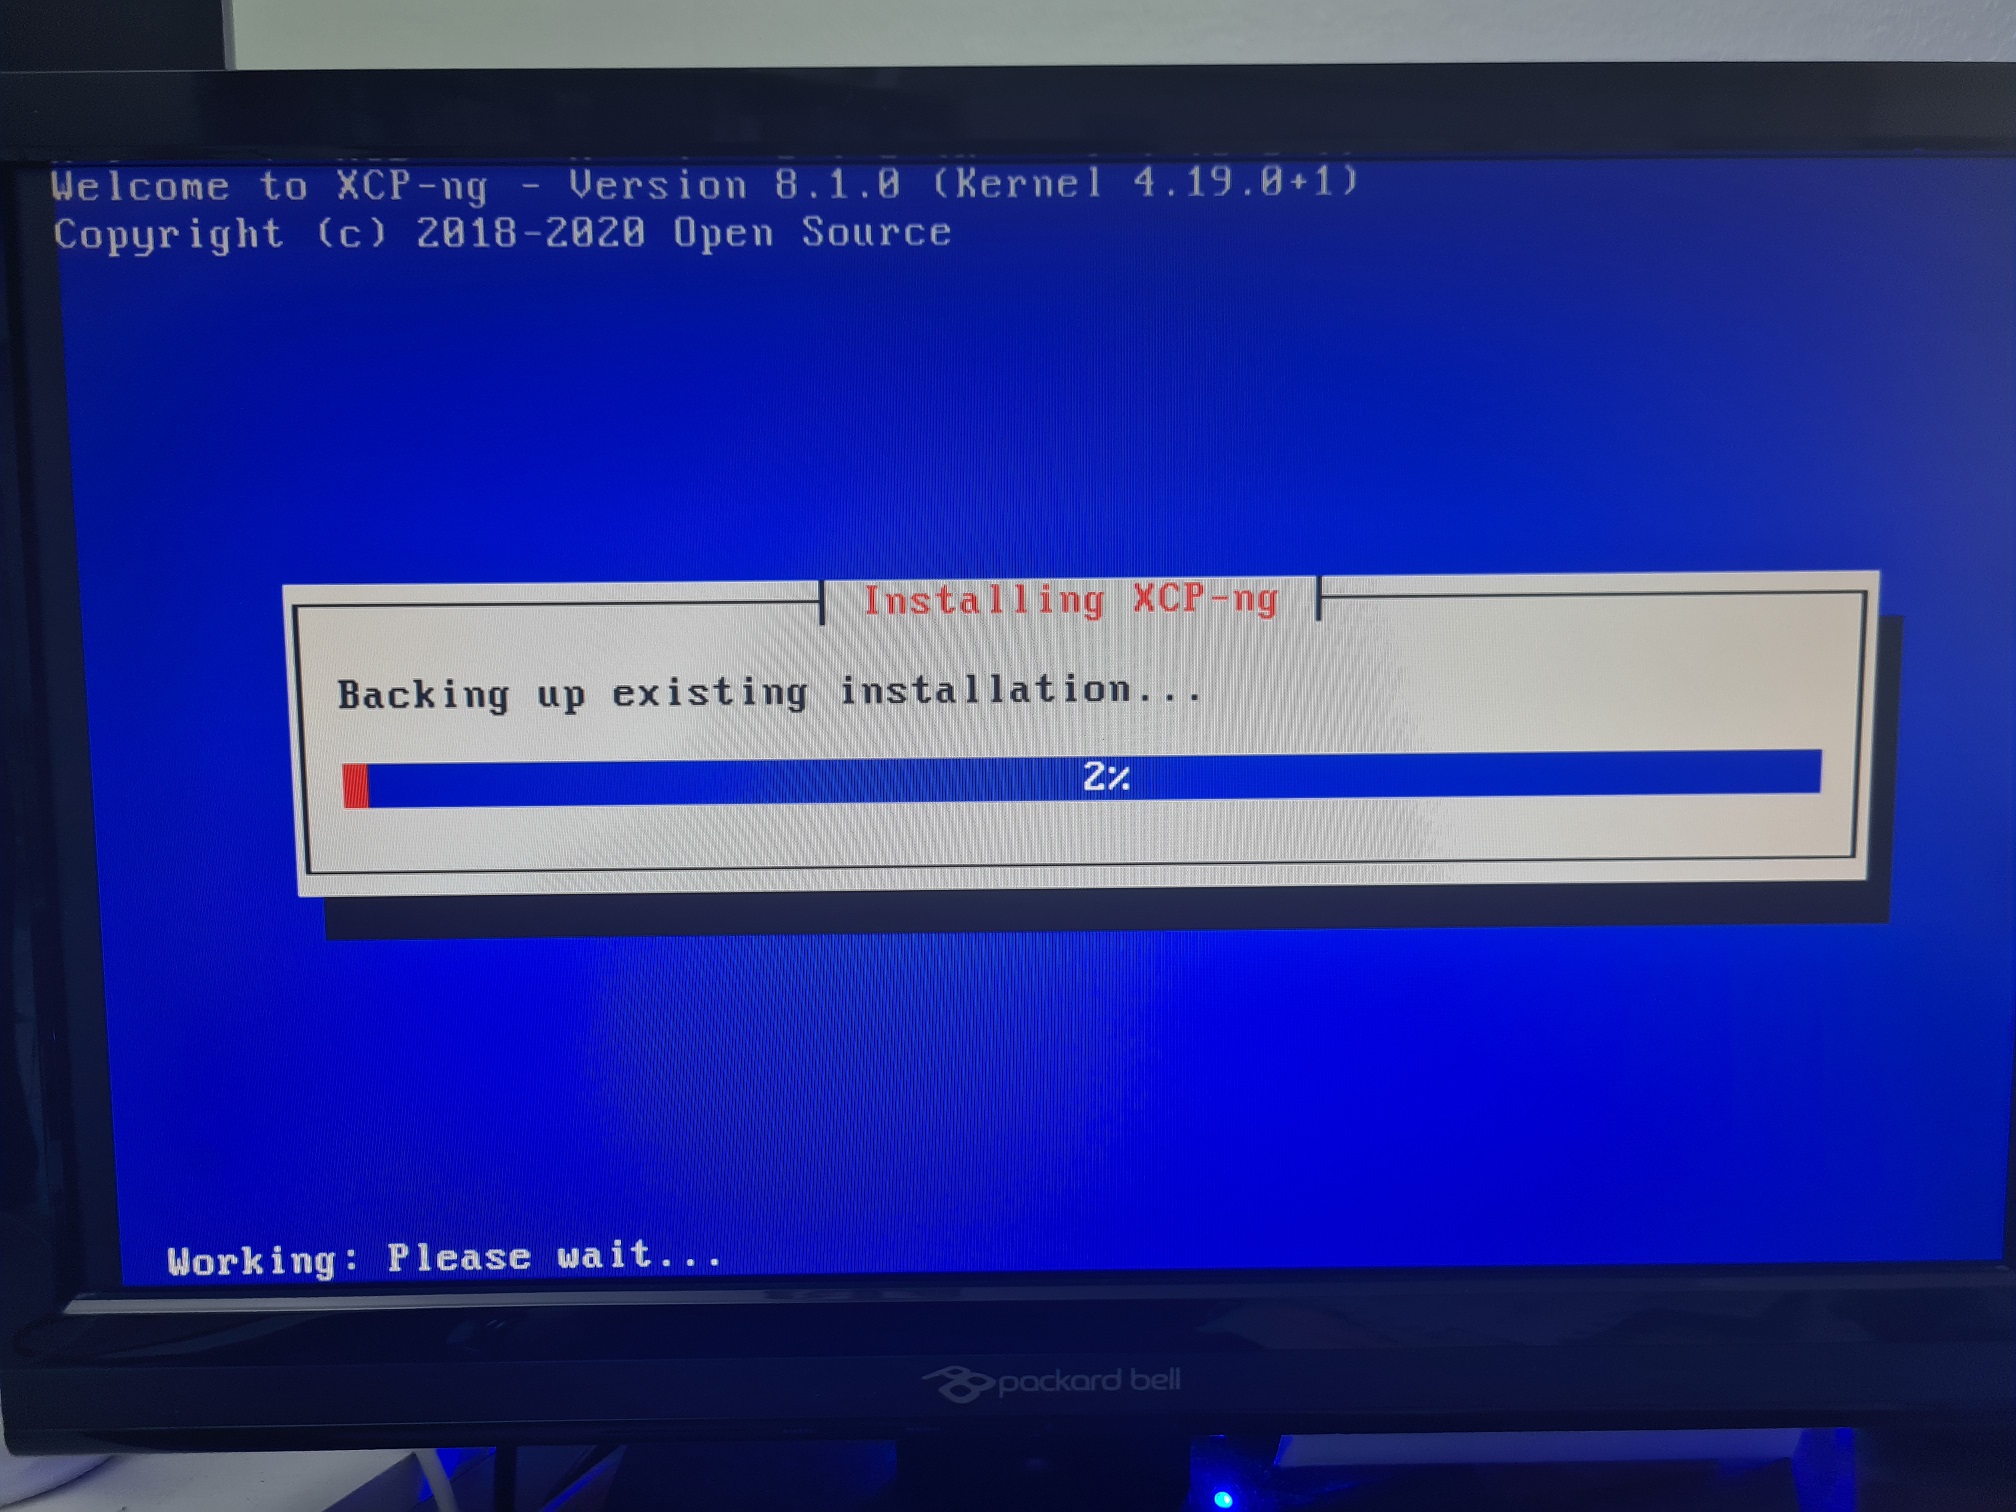
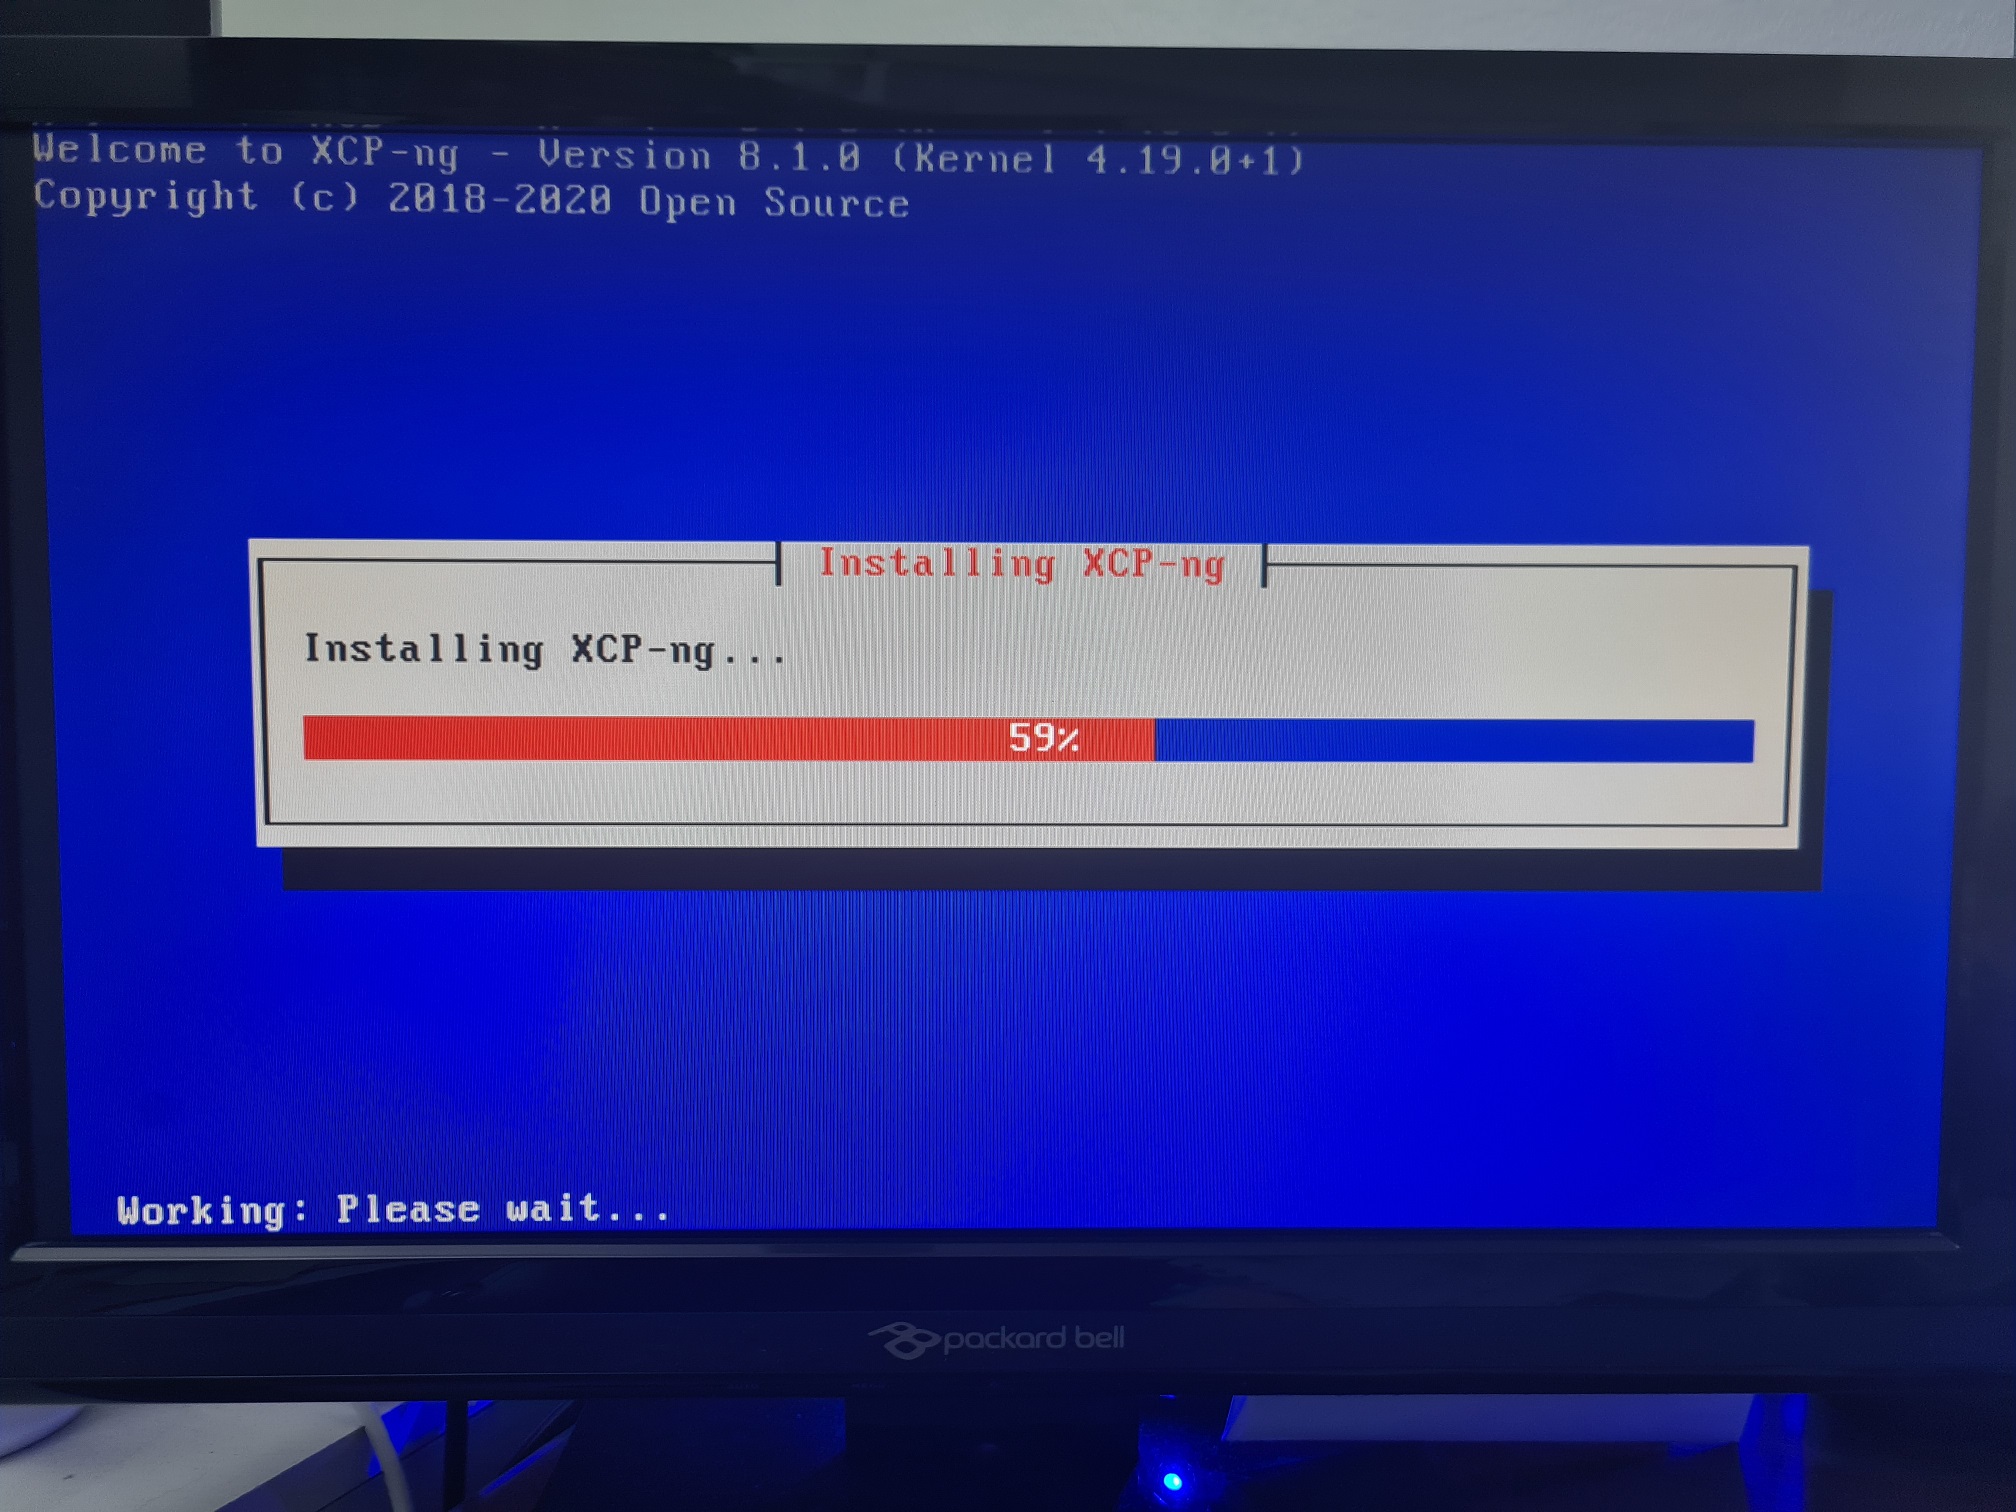
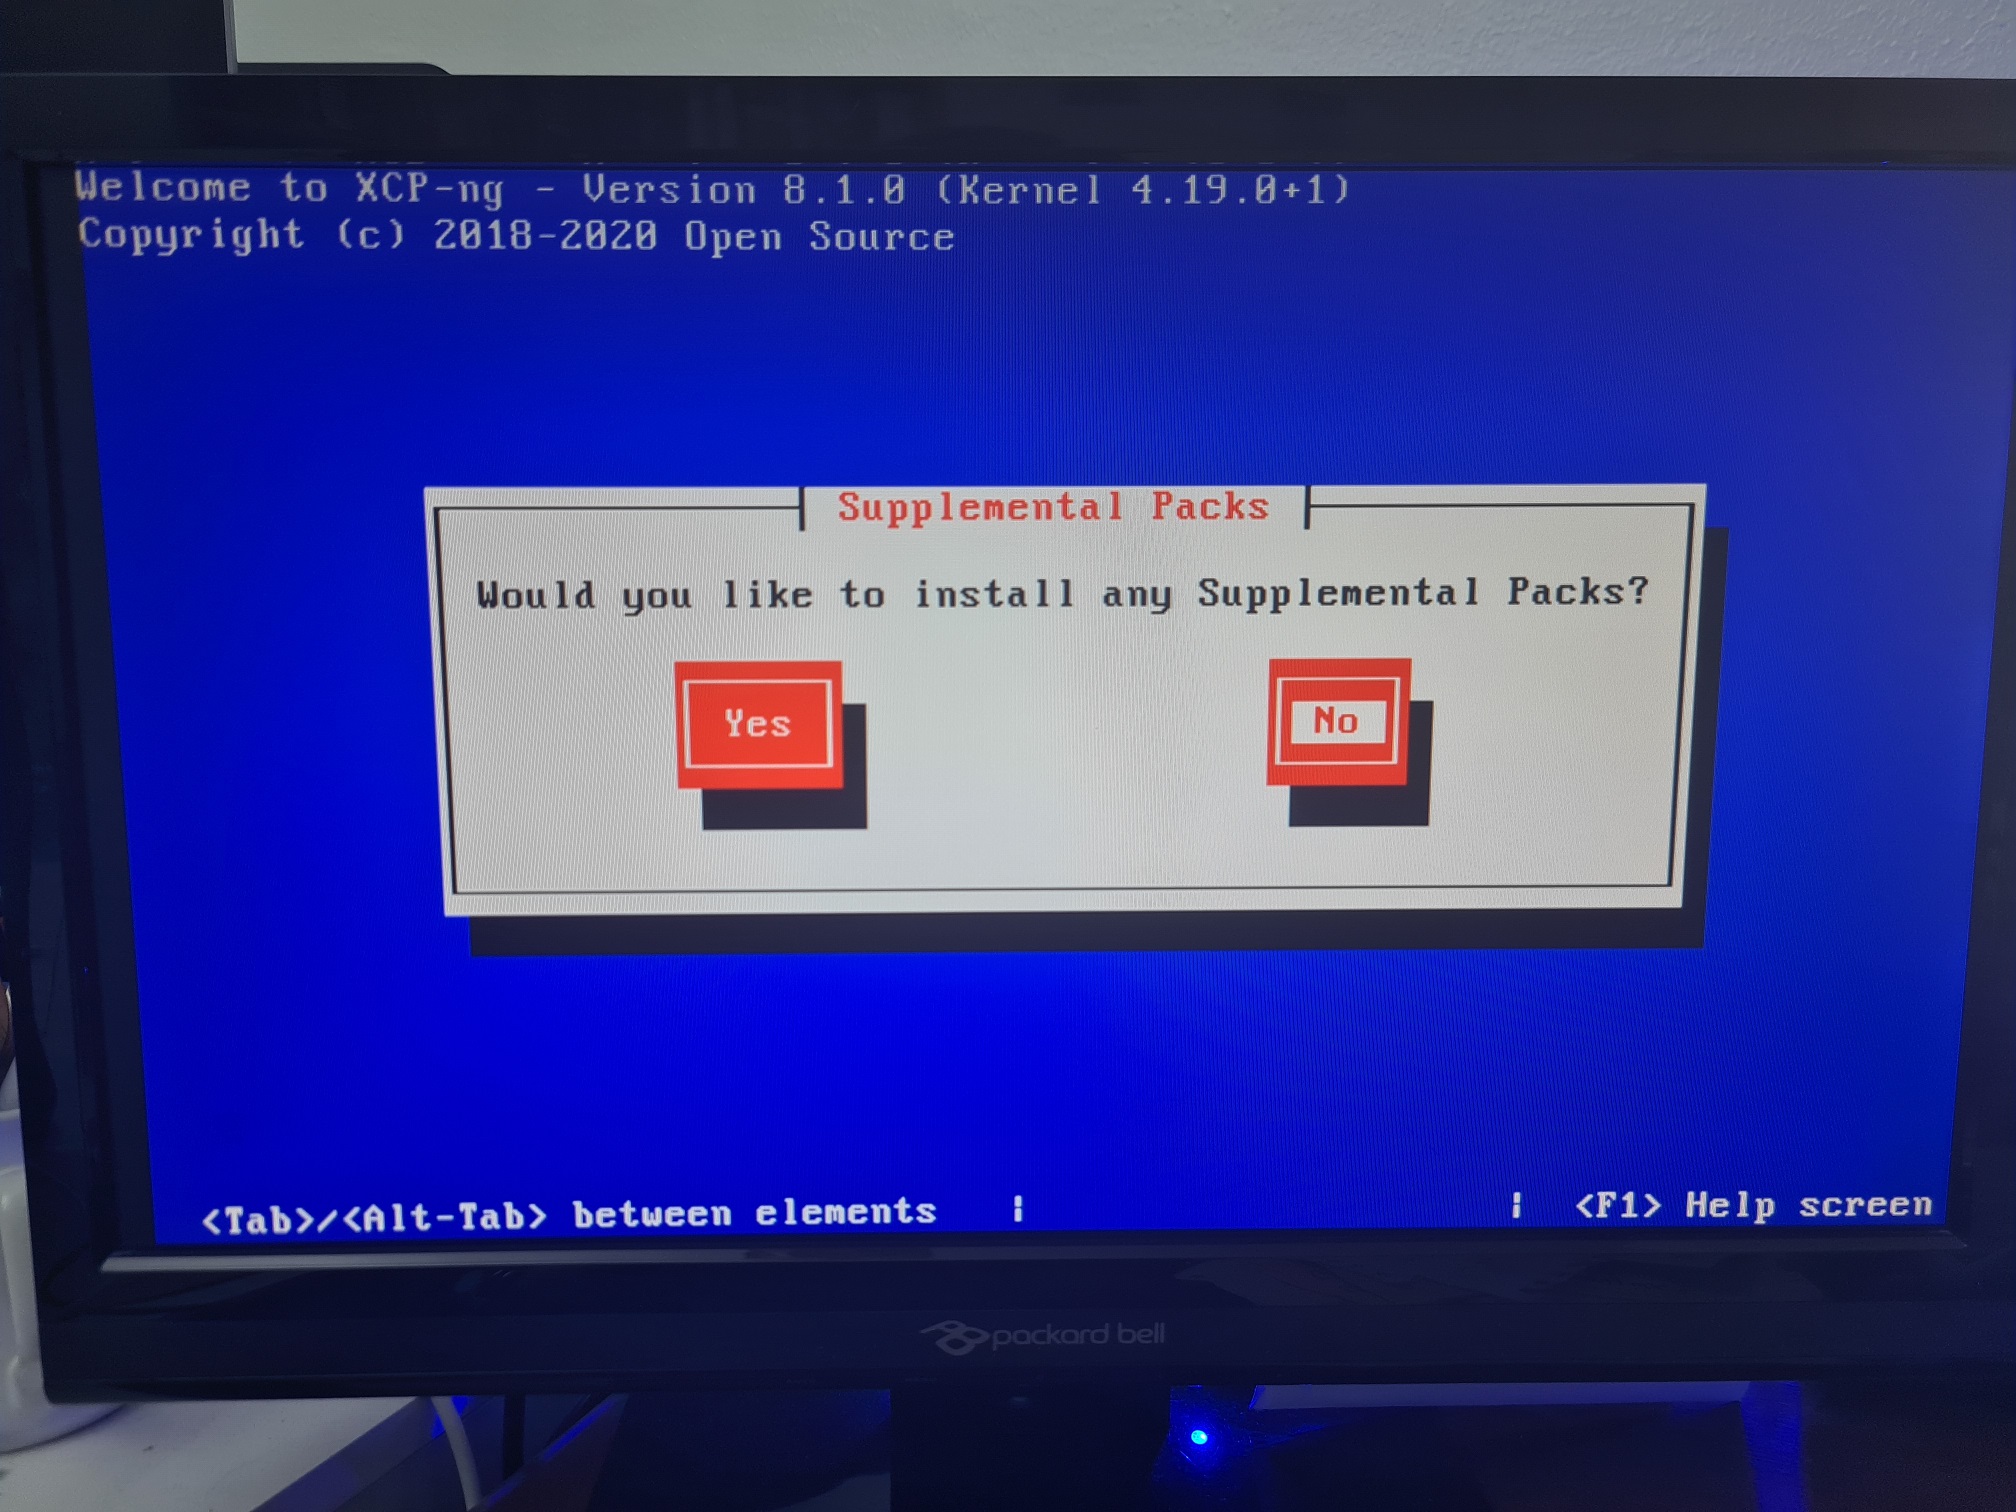

Install XCP-NG Centre
You can continue to use Xen Centre if you prefer, but personally I’d always make sure you’re keeping Xen Server paired with Xen Centre and XCP-NG Server paired with XCP-NG Centre to avoid any compatibility issues as XCP-NG Centre will always be ahead in terms of features and functionality when working with XCP-NG Server. The team supporting XCP-NG Centre are making upstream commits to the Xen Centre software project, but these aren’t guaranteed to be accepted by Citrix and released as a new version.
You can download the latest version of XCP-NG Centre from here, https://github.com/xcp-ng/xenadmin/releases/tag/v20.04.00.32 (at the time of writing), you can see the .msi Windows installer at the bottom of the page.

If in doubt, download this one, then if there is an update waiting you should see a notification in the Notifications part of XCP-NG Centre once you open it up. They don’t make it easy to find these download links and it’s made more confusing when XCP-NG Centre is also referred to as xenadmin on GitHub.