by Michael Cropper | Apr 27, 2021 | Client Friendly, Developer, Technical |
So this isn’t quite as straight forward as it probably should be and the documentation from AWS is the usual, not great. So let’s cut through the nonsense and take a look at what you need to do so that you can quickly and easily get your DNS Zone Files and DNS Records migrated.
Assess Your Current DNS Provider, Zone Files, Domains and Nameserver Configurations
The first things you want to do before you start any kind of migration of your DNS over to AWS Route53 is the plan. Plan, plan and plan some more. Some of the nuances I came across with a recent DNS migration piece of work from DNS Provider X to AWS Route53 included some niggles such as vanity nameservers. The old DNS provider had things configured to ns1.example.com and ns2.example.com, then domain1.com and domain2.com pointed their nameservers to ns1.example.com and ns2.example.com which was quite a nice touch. This doesn’t quite work on AWS Route53 and I’ll explain that in a bit more detail in a moment. Another niggle that we came across that you need to plan properly and that is to make sure you have absolutely everything documented, and documented correctly. This needs to include for every domain at an absolute minimum things such as;
- Domain name
- Sub-Domains
- Registrar (inc. login details, and any Two Factor Authentication 2FA steps required)
- Accurate Zone File
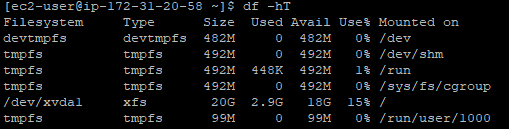
The vast majority of people just have a Live version of their DNS Zone Files, which in itself is risky because if you had an issue with the DNS Provider X and you had no backup of the files, you could be in for a whole world of pain trying to re-build things manually in the event of a critical failure.
How AWS Route53 Manages Hosted Zones
So back to the point I mentioned earlier around vanity nameservers and why this doesn’t quite work in the way the old DNS Provider X worked. When you create a new Hosted Zone within AWS Route53, Amazon automatically assigns 4x random nameservers of which you can see an example below;
- ns-63.awsdns-07.com
- ns-1037.awsdns-01.org
- ns-1779.awsdns-30.co.uk
- ns-726.awsdns-26.net
What you will instantly notice here is that there are a lot of numbers in those URLs which should give you an idea of the complexity of the nameserver infrastructure behind the scenes on the Route53 service. What this also means is that because these nameservers are automatically generated you can’t configure two Hosted Zones to use the exact same nameservers to get the similar vanity nameserver setup explained earlier.
The reality is, this approach while is fairly common for complex setups, the majority of standard setups this isn’t an issue for. If you want to get vanity nameservers set up on AWS for a single domain, i.e. ns1.domain1.com and ns1.domain2.com etc. then you can do this if you wish.
Export Zone Files from your Old DNS Provider
The first step of this process is to export your Zone Files from your old DNS provider. What you will find from this process is that ever provider will export these slightly differently, and this highly likely won’t be in the format that Route53 needs when you import the Zone Files.
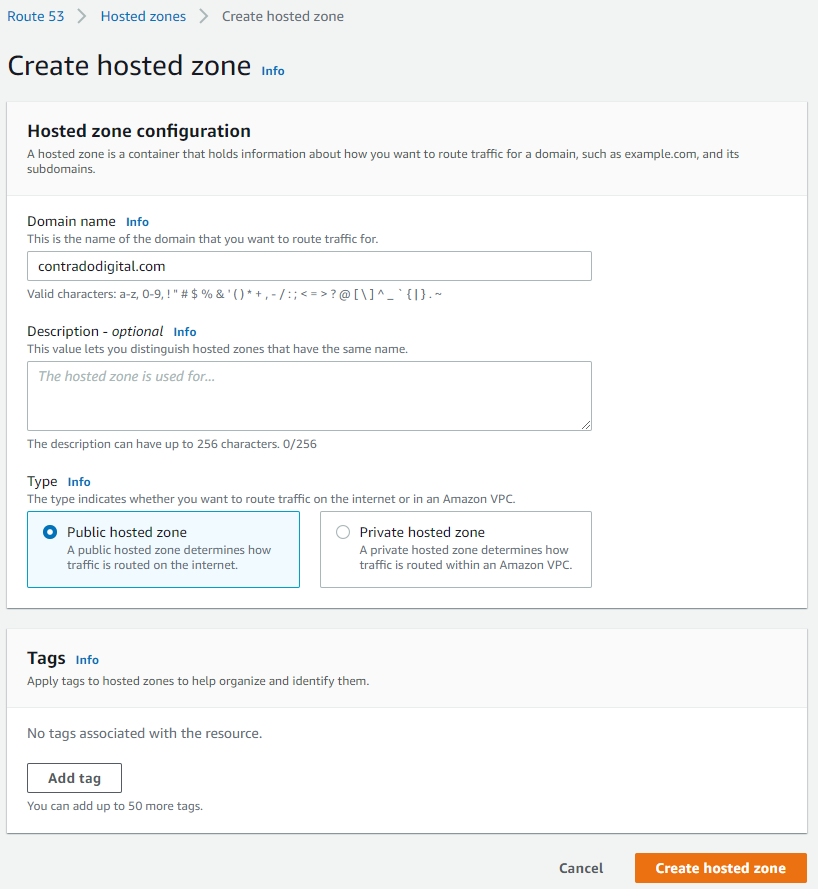
Create a Hosted Zone in Route53
This step is straight forward, just click the button.
Importing Zone Files to your Hosted Zone
As such, it’s time to prepare your Zone Files to be able to be imported into Route53 successfully. The format you need for your zone file import is as follows;
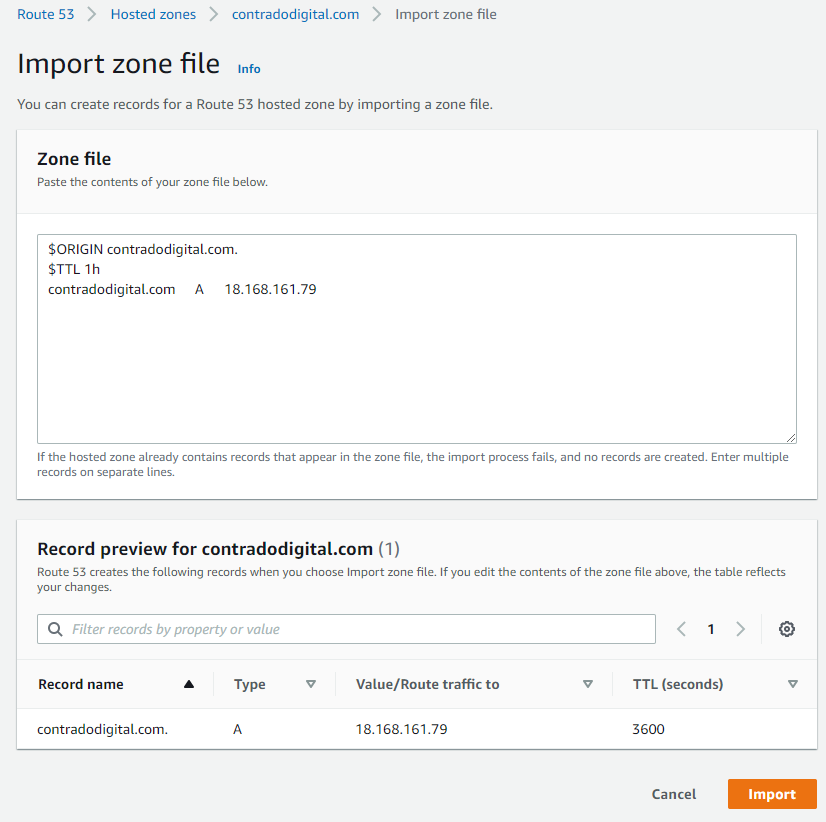
$ORIGIN contradodigital.com.
$TTL 1h
contradodigital.com A 18.168.161.79
Notice the couple of additional lines you need to add in which likely won’t be included from your export from your old provider. The above is just a very basic set of DNS entries. The reality is you will likely have 10 – 50+ DNS entries per domain depending on the complexity of your setup. One to keep an eye out on is that you may find certain record types don’t quite import seamlessly. Just a few niggles that I came across doing this included;
- MX records required a 10 included, i.e. contradodigital.com MX 10 contradodigital-com.mail.protection.outlook.com
- DKIM (TXT) and SPF (TXT) records had to be re-generated and imported manually as the format just didn’t quite work for the automatic import for some reason.
And I’m sure you’ll come across a few issues along the way that I haven’t mentioned here.
Summary
Hopefully this guide on how to import Zone Files into AWS Route53 helps to clarify some of the niggles around using the Zone File Import feature. To reiterate around this process when you are doing this in a real situation, make sure you plan this properly, have clear checklists and processes that you can methodically work through to ensure things are working as you do them. These types of changes can have a significant disruption to live systems if you don’t implement these things correctly.
by Michael Cropper | Apr 27, 2021 | Client Friendly, Developer, Technical |
We’ve got a lot of complex topics to cover here, so for the sake of simplicity we’re only going to touch on the really high level basics of these concepts to help you understand how all these different pieces of the puzzle are connected together. When you’re first getting started in the world of IT, it’s often a bit of a puzzle how all these things are plugged together under the hood which can cause a lot of confusion. By knowing how things are plugged together, i.e. how the internet works, you will have a significantly better chance of working with existing setups, debugging problems fast, and most importantly building new solutions to bring your creative ideas to life.
Firstly, let’s get some basic terminology understood;
- Registrar = This is where you purchased your domain name from, i.e. example.com
- Nameservers = This is the where the authority starts for your domain, i.e. it’s the equivalent of “tell me who I need to talk to who can point me in the right direction to get to where I want to go”. It’s the authority on the subject whose opinion on the matter is #1.
- DNS = This is the gate keeper to determine how traffic into your domain flows to where it needs to go. Think of your DNS like Heimdall from the Thor movies. You configure your nameservers to act in a way that you want, i.e. requests from www.example.com, should ultimately route to server IP address, 1.2.3.4, so that you don’t need to go remembering a bunch of IP addresses like a robot – or in the Heimdall world, “Heimdall…” as Thor screams in the movies, and he is magically transported from Earth to his home world of Asgard. Likewise, if Loki wants to visit a different planet, he just asks Heimdall to send him there and the magic happens. DNS can appear like magic at times, but it’s actually really simple once you understand it. DNS is a hard concept to explain simply, we’ll do another blog post on this topic in more detail another time. Hopefully this basic comparison helps you to at least grasp the topic at a high level.
- Servers = This is where things get fairly messy. This could be a physical piece of hardware that you can touch and feel, or could be a virtualised system, or visualised system within a virtualised system. There are multiple layers of virtualisation when you get down to this level. Although it’s not that important for the purpose of this blog post. Ultimately, all we care about is that the traffic from www.example.com, or something-else.example.com, gets to where it needs to when someone requests this in their web browser.
As mentioned, this is a difficult concept to explain simply in a blog post as there are so many different considerations that need to be made. But hey, let’s give it a go, with a basic diagram. There are elements of this diagram that have been simplified to help you understand how the different bits fit together.
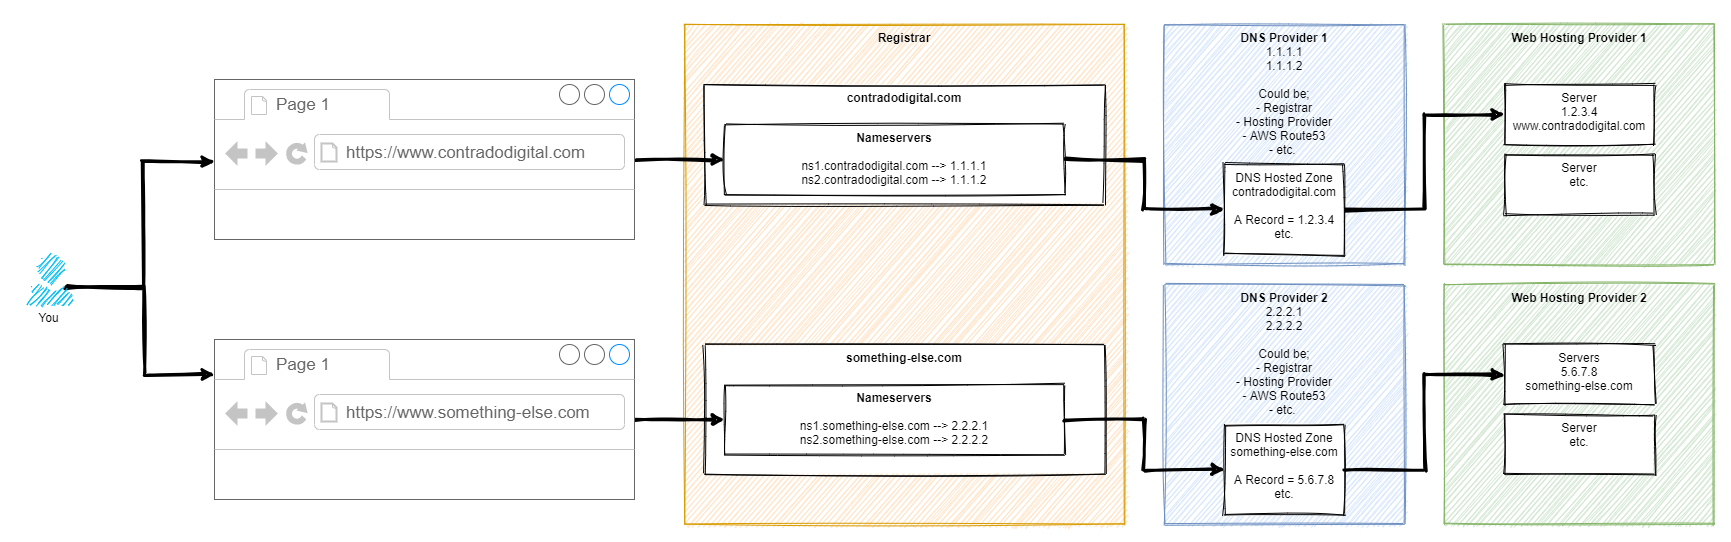
So here’s how it works step by step. For those of you who are more technical than this blog post is aimed at, yes there are a few steps in between things that have been cut out for simplicity.
Step 1 – Type Website Address into Web Browser
This step is fairly basic so we’ll skip over this one.
Step 2 – Web Browser Asks for Authoritative Nameserver for Website
This part is very complex in the background, so we’re not going to delve into these details. For the purpose of simplicity, ultimately your web browser says “Give me the name servers for contradodigital.com”, and ‘the internet’ responds with, “Hey, sure, this is what you’re looking for – ns1.contradodigital.com and ns2.contradodigital.com”.
As with all hostnames, they ultimately have an IP address behind them, so this is what then forwards the request onto the next step.
Step 3 – DNS Provider with Hosted Zones
A Hosted Zone is simple something such as contradodigital.com, or something-else.com. Within a Hosted Zone, you have different types of DNS Records such as A, AAAA, CNAME, MX, TXT, etc. (that last one isn’t an actual record, just to confirm 🙂 ). Each of these record types do different things and are required for different reasons. We’re not going to be covering this today, so for simplicity, the A Record is designed to forward the request to an IP Address.
So your DNS Provider translates your request for www.contradodigital.com into an IP address where you are then forwarded.
Step 4 – Web Hosting Provider Serves Content
Finally, once your web browser has got to where it needs to get to, it starts to download all the content you’ve asked for from the server on your web hosting provider to your web browser so you can visualise things.
This part of the diagram is so overly simplified, but it is fine for what we are discussing. The reality of this section is that this could quite easily be 10-20 layers deep of ‘things’ when you start to get into the low level detail. But that’s for another time.
If you want to get a feel for how complex just part of this area can be, we did a blog post recently explaining how Your Container Bone is Connected to Your Type 2 Hypervisor Bone.
Summary
Hopefully this blog post has given you a good understanding of how your Registrar, Nameservers, DNS and Servers are connected together under the hood. When you truly understand this simple approach, play around with a system that isn’t going to break any live environment, so you can start to test different types of configurations along the way to see how they behave. If you don’t know what you are doing, do not play around with these things on a Live system as you can do some real damage if you get things wrong which can result in your services being offline for a significant period of time.
by Michael Cropper | Apr 1, 2021 | Client Friendly, Developer |
This is one of those things you come across once every year or two and you can never remember exactly how to do it. The issue is when your Java WAR File that is compiled and packaged during your build process keeps growing in size over time as you are adding extra features and functionality to your Java web application. It’s a good problem to come across as it means that you are building things your customers love. We’ll not go into the discussion of large applications VS micro services, we’ll leave that for another blog post at some point.
We’re looking at Apache Tomcat 7 here since this is the default out of the box version of Tomcat that comes packaged with Amazon Linux 2 which many people will be using. We’re going to assume that you’ve got that all set up the way you need it, so again, we’ll not be covering that off today.
The issue you’ve likely faced when you have come to upload your WAR file is that it simply doesn’t upload and you may have noticed that uploading your WAR file gets to a certain percentage complete then just seems to stop uploading. Thankfully this is quite an easy fix to do, once you know what you’re looking for and how to find the file you need to edit.
By default on Amazon Linux 2, Apache Tomcat 7 creates a shared location where the configuration files for the Tomcat Manager live, this is within;
/usr/share/tomcat/webapps/manager/
So all you need to go and do is edit the web.xml file in the following location by running the command;
sudo nano /usr/share/tomcat/webapps/manager/WEB-INF/web.xml
And you’ll see a section of code in there that allows you to change the MaxFileSize configuration settings. If you’re more familiar with PHP, this is similar to the upload_max_filesize and post_max_size PHP directives in your php.ini configuration file.
    <multipart-config>
        <!-- 50MB max -->
        <!--<max-file-size>52428800</max-file-size>-->
        <!--<max-request-size>52428800</max-request-size>-->
        <!-- 100MB max -->
        <max-file-size>104857600</max-file-size>
        <max-request-size>104857600</max-request-size>
        <file-size-threshold>0</file-size-threshold>
    </multipart-config>
Simply change those details to whatever file size you need. The default for Apache Tomcat is a 50MB file size. So just configure that to whatever you need. As touched upon earlier, always consider when you’re doing this is you need to start thinking about breaking up the application into smaller components that work together in a micro services approach. But this comes with more challenges that you need to be considering at that point too.
Once you’ve got this configured, simply restart Apache Tomcat 7 and you’re good to go.
sudo service tomcat restart
You should now be able to upload your larger WAR file via the Tomcat Manager interface.
by Michael Cropper | Feb 25, 2021 | Client Friendly, Developer, Software Development, Technical |
In this guide we’re going to look at how to setup Selenium using Java and Apache NetBeans as an end to end guide so you can be up and running in no time. If you’ve not set this up before, there are a few nuances throughout the end to end process and other areas where the official documentation isn’t the best at times. So hopefully this guide can clear up some of the questions you likely have so you can start working on using Selenium to run automated browser based testing for your web applications.
Create a New Maven Java Application Project
Firstly we’re going to use Maven to simplify the installation process. If you aren’t familiar with Maven, it is essentially a package manager that allows you to easily import your project dependencies without having to manually download JAR files and add them to your libraries. You can manually install the JAR files if you like, it’s just a bit more time consuming to find all of the dependencies that you are going to need.
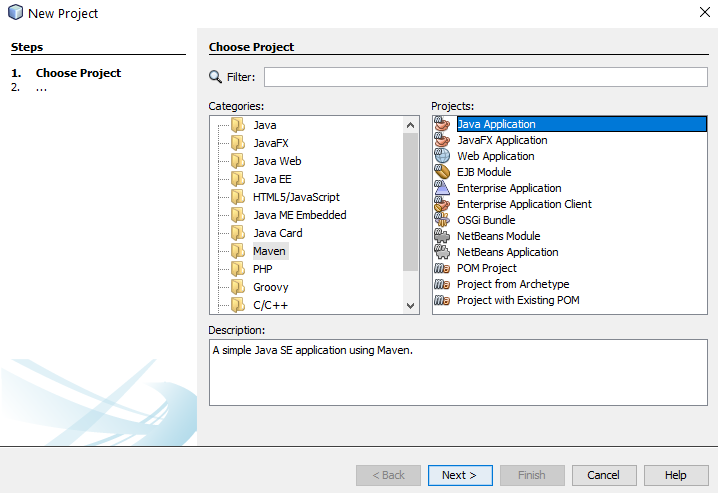
To create a new Maven project, click File > New Project and select Maven then Java Application;
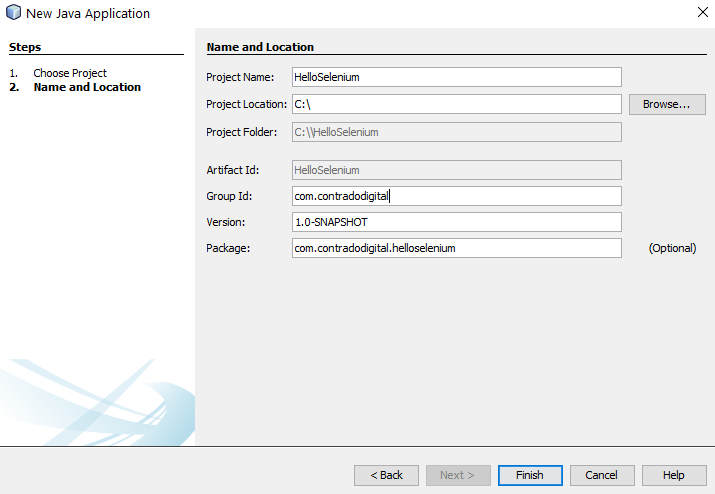
Configure Maven Project and Location
Next you need to configure some details for your project. For the purpose of simplicity we’re going to call this project HelloSelenium. And you’ll notice that when you enter the Group ID field, set this to the canonical name of your package which you generally want to set to your primary domain name in reverse, i.e. com.contradodigital, which will then automatically populate the Package name at the bottom to be com.contradodigital.helloselenium. This is industry best practice for naming your packages so that they have a unique reference.
Open Your Pom.xml File
Next we need to configure your pom.xml file which is used for Maven projects to manage your dependencies. Out of the box within NetBeans, when you create a Maven project, a very basic pom.xml file is created for you. Which sounds like it would be handy, but it doesn’t contain a great deal of information so can be more confusing than helpful for those less familiar with Maven.
When you open up the default pom.xml file, it will look similar to the following;
<?xml version="1.0" encoding="UTF-8"?>
<project xmlns="http://maven.apache.org/POM/4.0.0" xmlns:xsi="http://www.w3.org/2001/XMLSchema-instance" xsi:schemaLocation="http://maven.apache.org/POM/4.0.0 http://maven.apache.org/xsd/maven-4.0.0.xsd">
    <modelVersion>4.0.0</modelVersion>
    <groupId>com.contradodigital</groupId>
    <artifactId>HelloSelenium</artifactId>
    <version>1.0-SNAPSHOT</version>
    <packaging>jar</packaging>
    <properties>
        <project.build.sourceEncoding>UTF-8</project.build.sourceEncoding>
        <maven.compiler.source>1.8</maven.compiler.source>
        <maven.compiler.target>1.8</maven.compiler.target>
    </properties>
    <name>HelloSelenium</name>
</project>
Which looks like a good starting point, but is a long way for you to be able to simply add in the relevant dependencies and get this working. So let’s look next at what your pom.xml file needs to look like to get you up and running with Maven.
Configure Your Pom.xml File
Before we jump into what your pom.xml file needs to look like, let’s first take a look to see what the required primary libraries are that we need to get Selenium up and running. There are a fairly small number, but behind the scenes there are quite a few dependencies too which aren’t always obvious.
Just don’t ask me why you need all these and what the differences are. The Selenium documentation isn’t that great and it just seems that these are needed to get things working. If you fancy having a play with the combinations of the above to see what the absolute minimum set of libraries are, then please do comment below with your findings.
So now we know this, there are a few bits that we need to configure in your pom.xml file which include;
- Plugin Repositories – By default there are none configured. So we need to get the Maven Central Repository added in
- Repositories – As above
- Dependencies – We need to add the 6x project dependencies so that they can be imported directly into your NetBeans environment
So to do all the above, your pom.xml file needs to look like the following;
    <?xml version="1.0" encoding="UTF-8"?>
<project xmlns="https://maven.apache.org/POM/4.0.0" xmlns:xsi="http://www.w3.org/2001/XMLSchema-instance" xsi:schemaLocation="https://maven.apache.org/POM/4.0.0 http://maven.apache.org/xsd/maven-4.0.0.xsd">
    <modelVersion>4.0.0</modelVersion>
    <groupId>com.contradodigital</groupId>
    <artifactId>HelloSelenium</artifactId>
    <version>1.0-SNAPSHOT</version>
    <packaging>jar</packaging>
    <properties>
        <project.build.sourceEncoding>UTF-8</project.build.sourceEncoding>
        <maven.compiler.source>1.8</maven.compiler.source>
        <maven.compiler.target>1.8</maven.compiler.target>
    </properties>
    <pluginRepositories>
        <pluginRepository>
            <id>central</id>
            <name>Central Repository</name>
            <url>https://repo.maven.apache.org/maven2</url>
            <layout>default</layout>
            <snapshots>
                <enabled>false</enabled>
            </snapshots>
            <releases>
                <updatePolicy>never</updatePolicy>
            </releases>
        </pluginRepository>
    </pluginRepositories>
    <repositories>
        <repository>
            <id>central</id>
            <name>Central Repository</name>
            <url>https://repo.maven.apache.org/maven2</url>
            <layout>default</layout>
            <snapshots>
                <enabled>false</enabled>
            </snapshots>
        </repository>
    </repositories>
    <dependencies>
        <!-- https://mvnrepository.com/artifact/org.seleniumhq.selenium/selenium-java -->
        <dependency>
            <groupId>org.seleniumhq.selenium</groupId>
            <artifactId>selenium-java</artifactId>
            <version>3.141.59</version>
        </dependency>
        <!-- https://mvnrepository.com/artifact/org.seleniumhq.selenium/selenium-api -->
        <dependency>
            <groupId>org.seleniumhq.selenium</groupId>
            <artifactId>selenium-api</artifactId>
            <version>3.141.59</version>
        </dependency>
        <!-- https://mvnrepository.com/artifact/org.seleniumhq.selenium/selenium-server -->
        <dependency>
            <groupId>org.seleniumhq.selenium</groupId>
            <artifactId>selenium-server</artifactId>
            <version>3.141.59</version>
        </dependency>
        <!-- https://mvnrepository.com/artifact/org.seleniumhq.selenium/selenium-chrome-driver -->
        <dependency>
            <groupId>org.seleniumhq.selenium</groupId>
            <artifactId>selenium-chrome-driver</artifactId>
            <version>3.141.59</version>
        </dependency>
        <!-- https://mvnrepository.com/artifact/org.seleniumhq.selenium/selenium-remote-driver -->
        <dependency>
            <groupId>org.seleniumhq.selenium</groupId>
            <artifactId>selenium-remote-driver</artifactId>
            <version>3.141.59</version>
        </dependency>
        <!-- https://mvnrepository.com/artifact/junit/junit -->
        <dependency>
            <groupId>junit</groupId>
            <artifactId>junit</artifactId>
            <version>4.13.2</version>
            <scope>test</scope>
        </dependency>
    </dependencies>
</project>
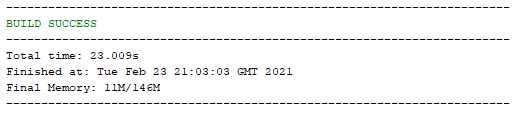
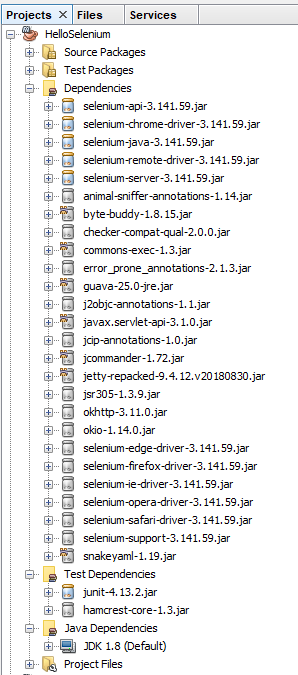
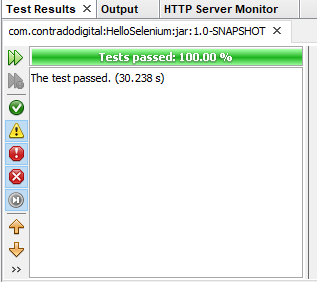
Once you’ve done this, save. Then Right Click on your project name and select ‘Build with Dependencies’ which will pull all of the dependencies into your NetBeans project. You should see a successful build message here;
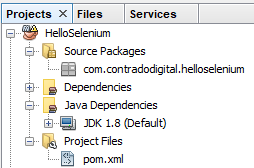
And you should also notice that within your NetBeans Project the total number of Dependencies and Test Dependencies that have now been imported have grown to significantly more than 6 JAR files that have been imported. This is one of the huge benefits of using a package dependency management system such as Maven as it just helps you get things working with ease. Can you imagine having to find all of the different libraries that have now been imported manually and keeping everything in sync? Here is what has now been imported for you automatically;
Note, if this is the first time you are getting Maven set up on your machine, you may find a few issues along the way. One of the common issues relates to an error that NetBeans throws which states;
“Cannot run program “cmd”, Malformed argument has embedded quote”
Thankfully to fix this you simply need to edit the file, C:\Program Files\NetBeans 8.2\etc\netbeans.conf and append some text to the line that contains netbeans_default_options;
-J-Djdk.lang.Process.allowAmbiguousCommands=true
So that the full line now reads;
netbeans_default_options=”-J-client -J-Xss2m -J-Xms32m -J-Dapple.laf.useScreenMenuBar=true -J-Dapple.awt.graphics.UseQuartz=true -J-Dsun.java2d.noddraw=true -J-Dsun.java2d.dpiaware=true -J-Dsun.zip.disableMemoryMapping=true -J-Djdk.lang.Process.allowAmbiguousCommands=true”
If you’re interested in why this is required, this release note outlines the issue in more detail.
You will find there will be the odd nuance like this depending on the version of NetBeans / Java / JDK / Maven etc. that you are running. Rarely do things seamlessly line up. So if you encounter any slightly different issues within your setup, then please do leave a comment below once you’ve found a solution to help others in the future.
Install Selenium IDE
Ok, so now we’ve got our NetBeans environment up and running. It’s time to make life as easy as possible. I’m assuming you don’t want to be writing everything manually for your web browser test scripts? I mean, if you do, enjoy yourself, but personally I prefer to make life as easy as possible by using the available tools at hand. This is where the Selenium IDE comes into play.
The Selenium IDE is a Google Chrome Extension that you can easily download and install at the click of a button;
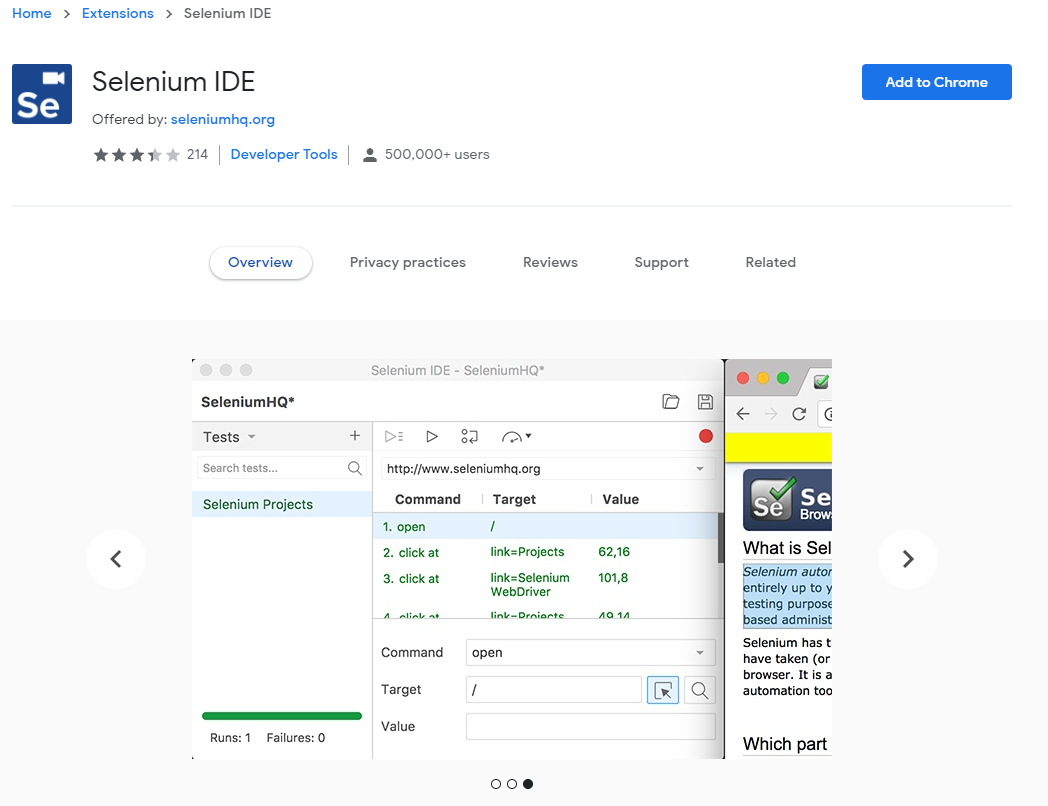
Once you’ve done this you will notice that the Extension has added a button at the top right of your Chrome browser that you can click on to open the Selenium IDE. If you’re from a tech heavy software development background, you’re probably expecting an installed desktop application whenever you hear the word IDE mentioned, but in this case it is nothing more than a Chrome Extension.
Click the Selenium IDE icon in Chrome to open it up. Once it is open for the first time you will notice a basic welcome screen;
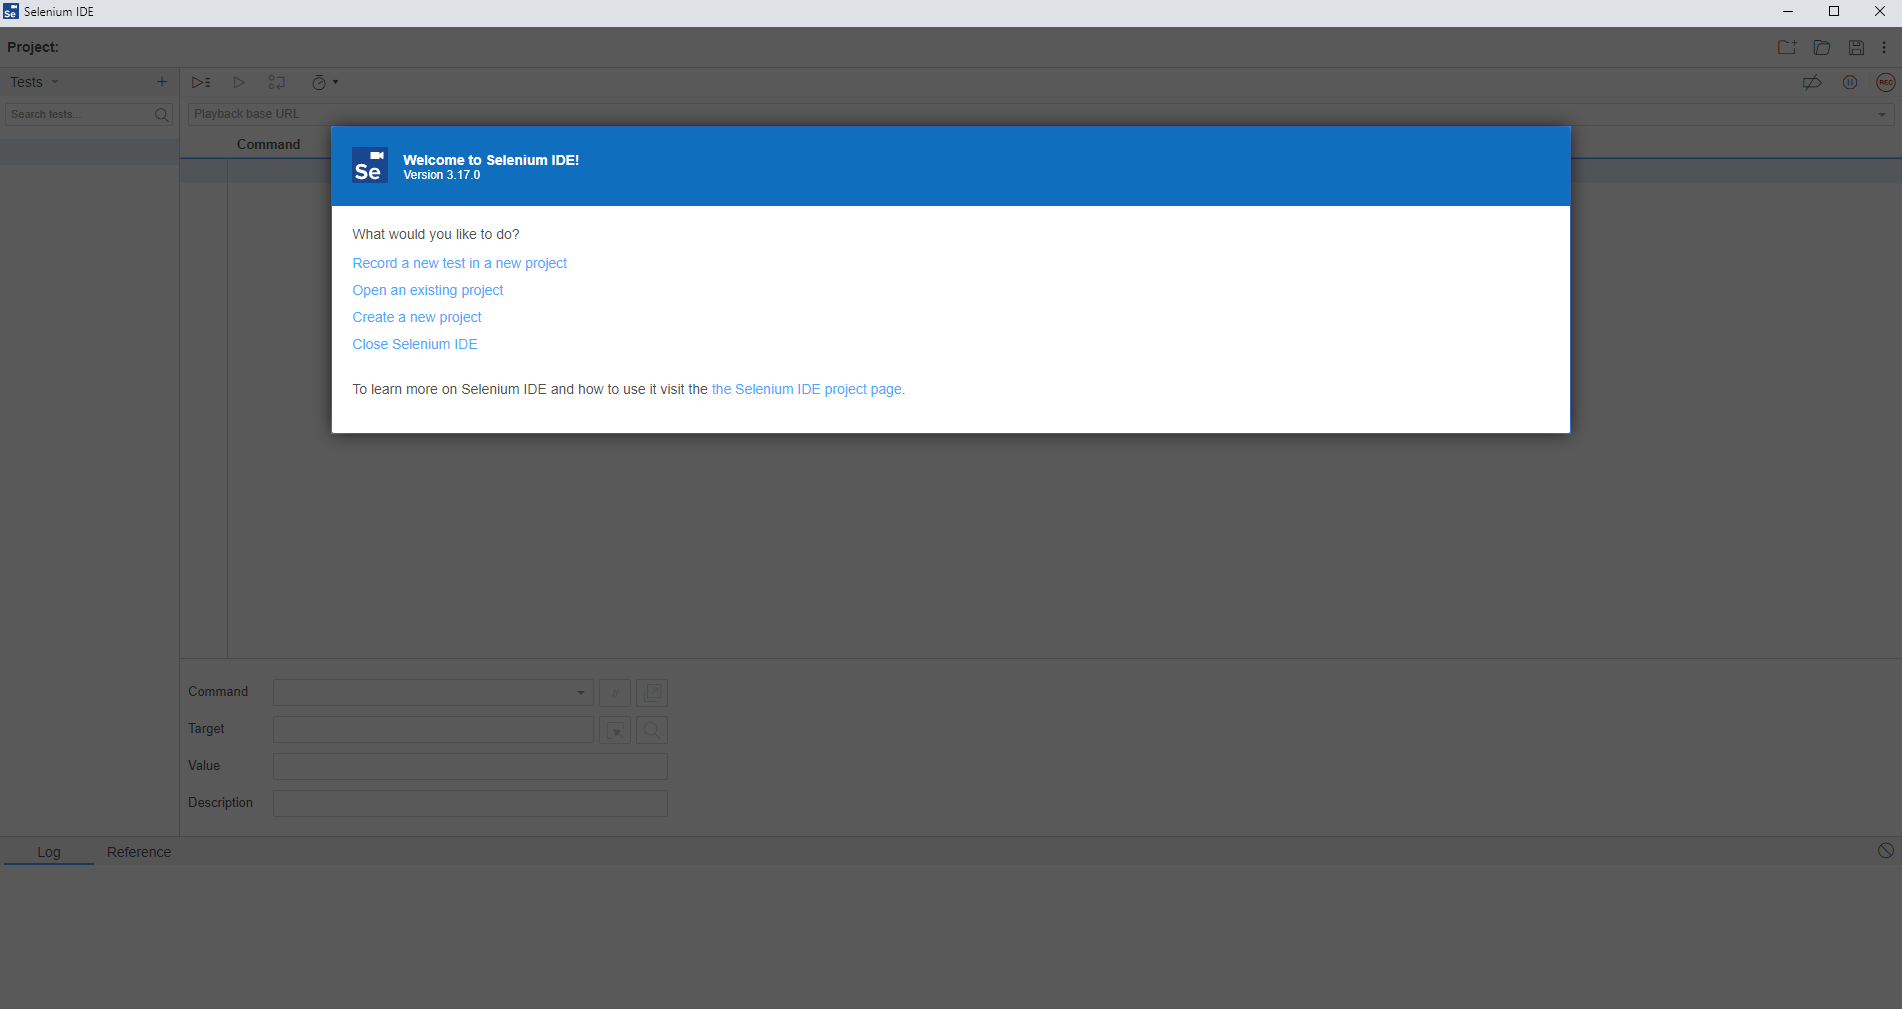
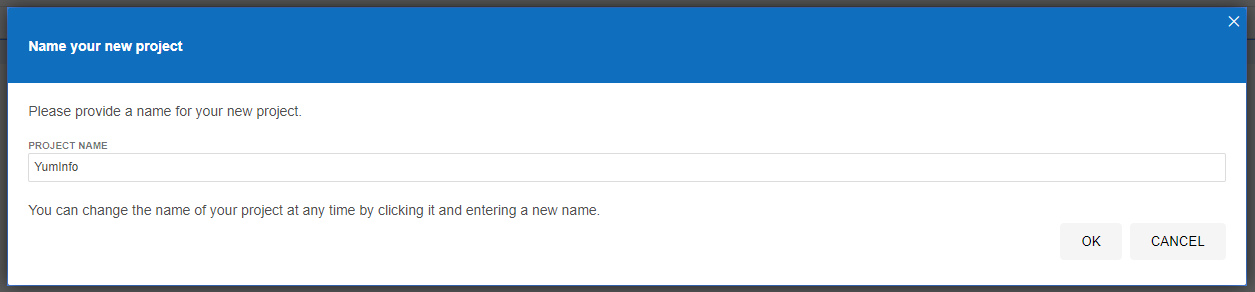
Click on Create a New Project to get started. Give your project a name so it’s clear what you are testing. In this example we’re going to be doing some testing on YumInfo which is an application we created to help software developers and infrastructure engineers easily search through the 20,000 packages that are contained within common Yum Repositories. Exactly like we have the Maven Central Repository for installing Java packages, it’s the same thing, just focused on Linux level software packages instead.
Create Your First Automated Web Browser Test in Selenium IDE
Ok, so now we’ve got Selenium installed and a new project created, let’s get onto creating your first automated browser test so you can get a feel for how all this works. It’s extremely simple to do so.
Firstly click on the + button to add a new test;
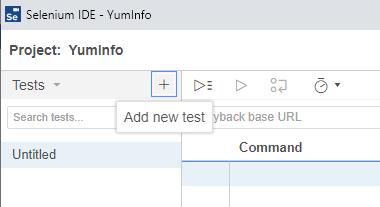
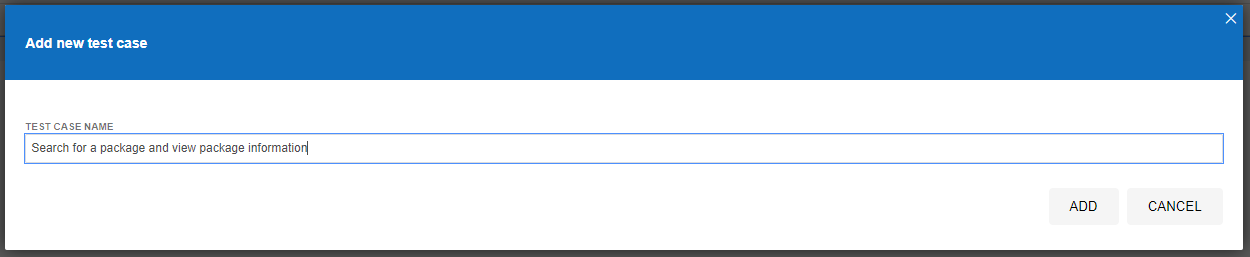
This will then open up the popup which allows you to give your new test a name. In this example, we’re going to test if we can use the search functionality on the YumInfo site to easily find a useful package.
Once you’ve done this, you’ll notice that a new Test Case has been created for you which is in the left section of the screenshot below, but you’ll notice there are no steps that have been created yet which is why the section on the right of the screenshot below is still all blank.

What you will notice in the above screenshot is there are two core sections that we are going to look at next;
- Playback base URL – This is the landing page that you are going to start your tests from. Generally speaking this is so you can test in the same way that your users would use the website.
- Record Button – This is in the top right coloured in red. This allows you to start the process running for recording your automated test scripts within Selenium IDE.
To get started, enter the base URL you want to work with. In our case we’re going to enter https://yum-info.contradodigital.com as that is the website we are doing the automated browser based testing on.
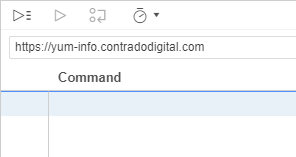
Then once you’ve done that. Click the red Record Button at the top right.
This step will open a brand new Chrome window and it will inform you that recording has started. It’s a very similar concept as you can record Macros in Excel if you have ever used those before.
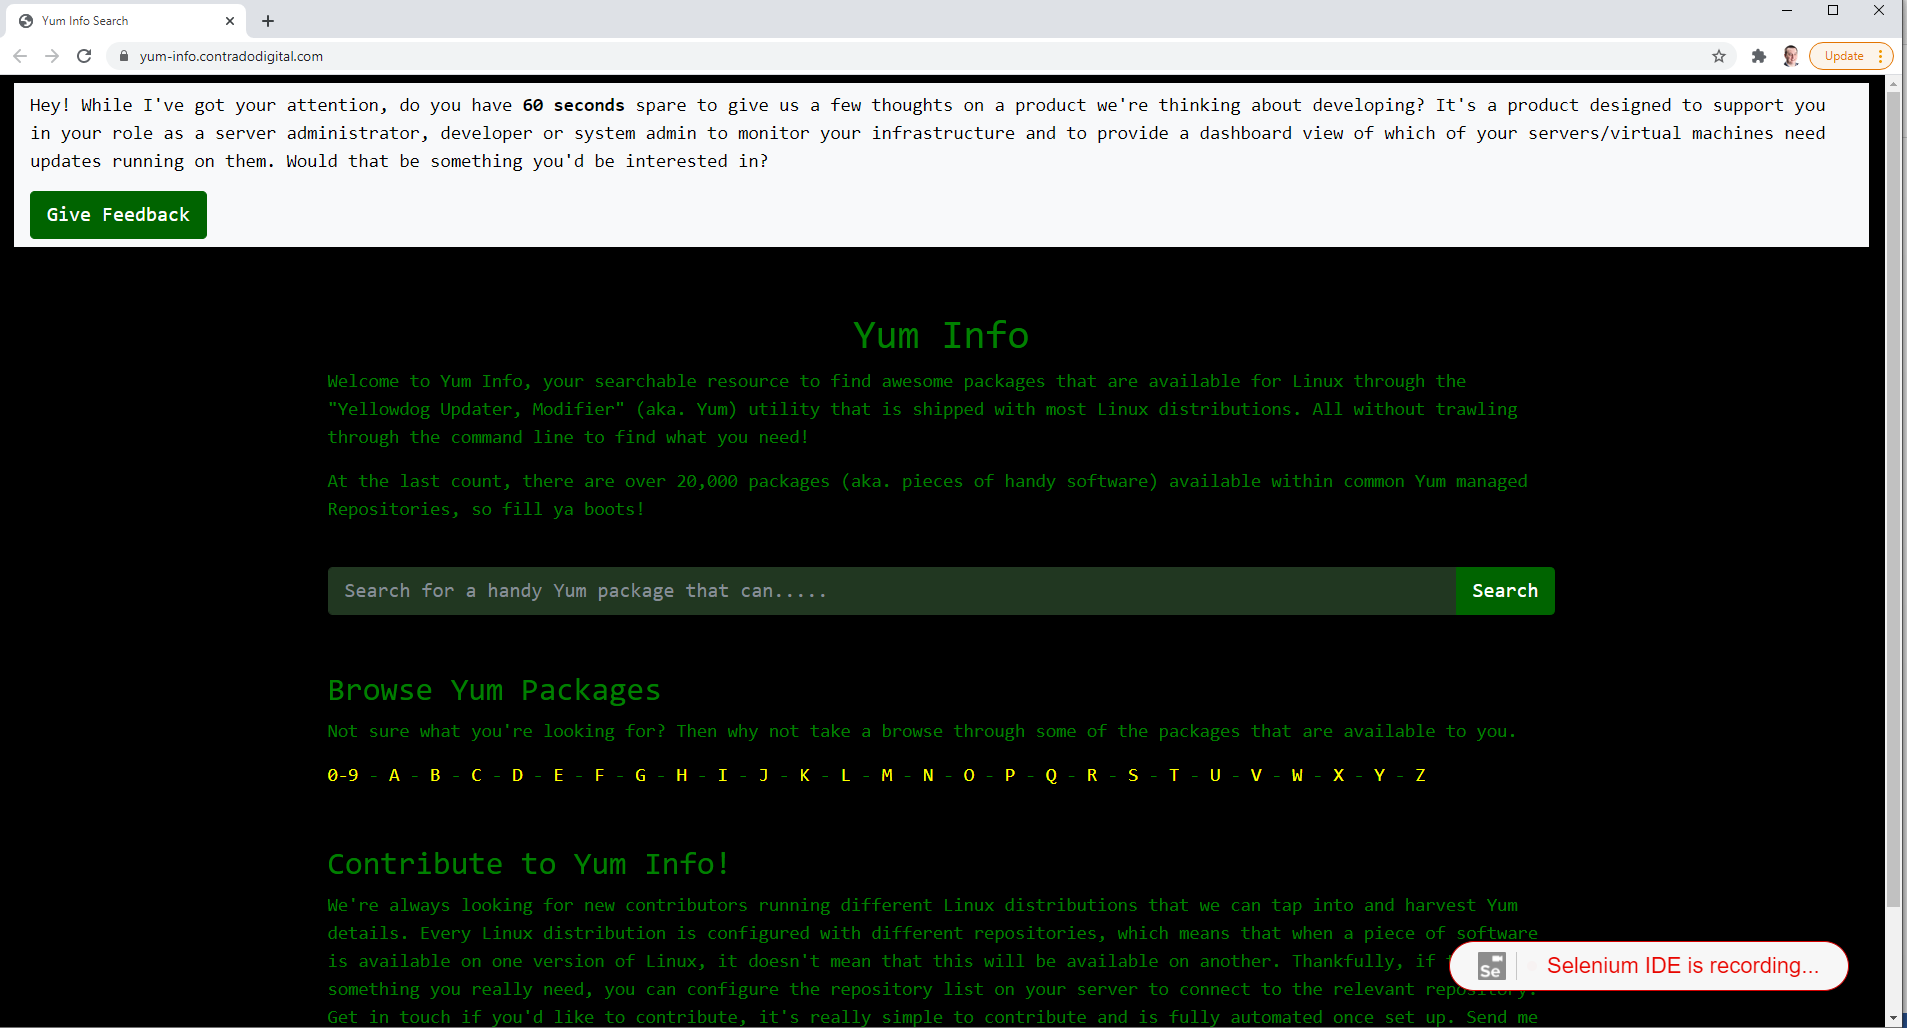
Now all you need to do is to click around your website and use it like a user would. In this case, as this specific Test Case we are looking to search for a package and then view the package information we’re going to do just that.
Once you are done clicking around, simply navigate back to your Selenium IDE that is open and click on Stop Recording. Once you have done that you will notice that the specific steps that you have just taken within the web browser have been recorded within Selenium IDE. Awesome!
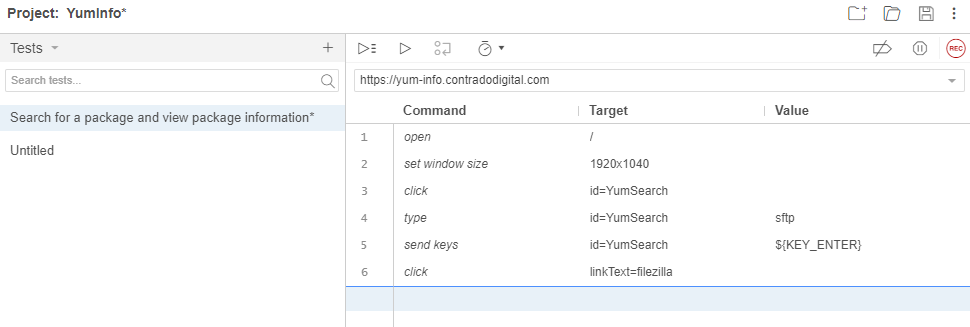
What the above steps are saying is that I followed these actions;
- Open the Base URL https://yum-info.contradodigital.com
- Set the browser window size to the default of your computer setup
- Click on the HTML Element that has an ID of ‘YumSearch’, which in this case is the search box that allows users to search for packages
- Type into the search box “sftp” without the quotes
- Then click Enter to trigger the search
- And finally, click on the link titled FileZilla which is a relevant package that can handle SFTP based communications
What all this has shown us is that as a user doing these steps, this all works as expected on the website. Hopefully this isn’t an unexpected result that basic functionality on your website is working. But this is just a simple example we are using to get you up and running.
Save this Test Case so you can reference back to it later down the line.
Re-Run Your First Automated Web Browser Test Case
Now that you have recorded your first test, you want to replay it so that you are confident that it has been recorded accurately. For traditionally built websites that use a single Request/Response you’ll find that these test generally record perfectly first time around. Whereas for websites build using more Single Page Applications / Front End Frameworks that load content dynamically into the page past the initial page load, you’ll find you will likely have a few issues with the default recordings and that the automated recording will need some manual intervention to get them to work properly.
To re-run the test you have just created, simply click on the Play button;
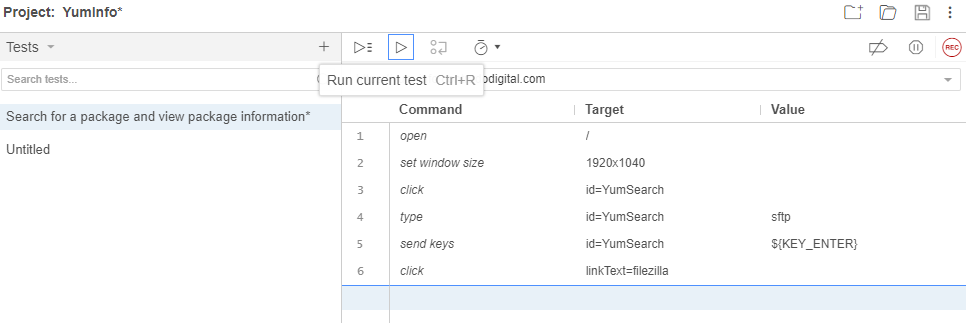
Once you click that button, you will notice that magic starts to happen. Your web browser will open and the exact steps that you just took will be replicated in real time right in front of your eyes. Most importantly, once it is complete, you will see that it has completed successfully.
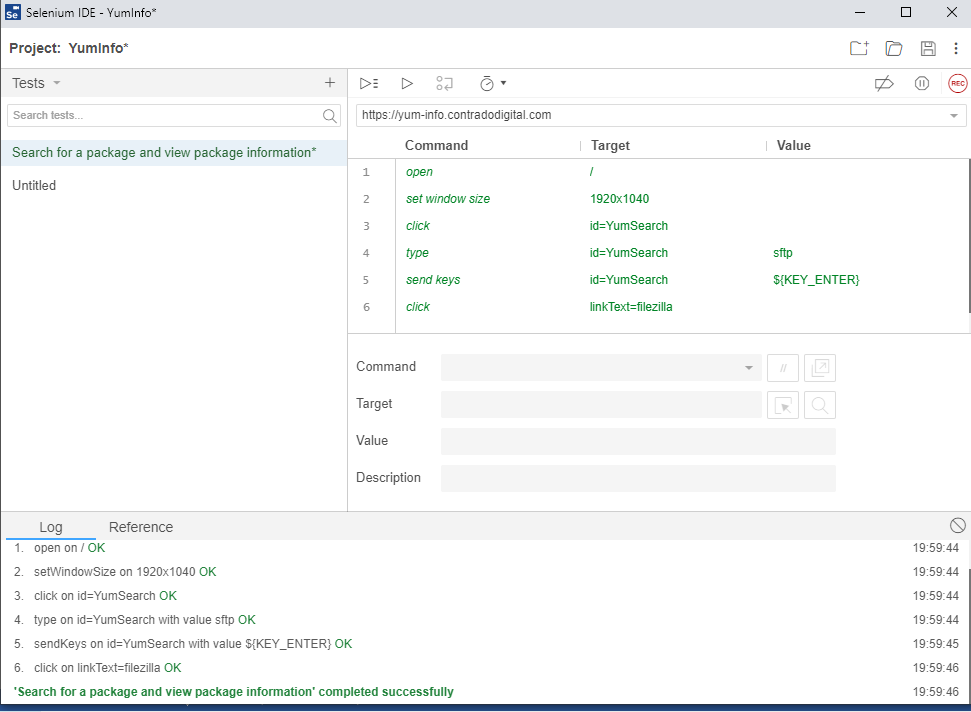
By doing this you have just proved that the Test Case has been recorded successfully and can run through to the end to confirm this end to end process works correctly. This is important as you build up your Test Cases as you will find many larger websites can have 1000s and even 10,000s of Test Cases created over time that ensure the stability of the platform.
Why Build a Library of Test Cases in Selenium IDE for Automated Web Browser Testing?
Just stepping back a little though, why are we even bothering to do this? Well quite frankly, that is a very good question – and one that you should genuinely be asking for any project that you are working on. Yes, many people say this is best practice to build automated web browser testing for web applications, and there is a very solid argument to this. Then on the other hand, if you are working with solid web application development principles, and you have awesome developers, and you have an extremely slick development process to fix forward, then you may find that Selenium automated web browser testing is just an added burden that adds very little value.
The reality is that most organisations, this isn’t the reality, so Selenium comes in extremely handy to mitigate any risk of pushing bad code through to the live environment and streamlines regression testing. Meaning that you can run a significant amount of automated tests without ever having to worry about getting users to manually test features and functionality every time you want to do a release.
Download Chrome Web Driver
Now we’ve utilised the power of the Selenium IDE to create our automated web browser for us, it’s time to take that and move it into a proper software development environment, aka. NetBeans. Before we jump into the details we’re going to need to download the Chrome Web Driver. This will allow you to make NetBeans, more specifically the Selenium and JUnit dependencies, interact with your Chrome web browser.
As with anything, versioning is important. So the first thing you need to do is understand what version of Google Chrome you are running. To do this, go into Google Chrome > Settings > About Chrome and you will see your version number there;
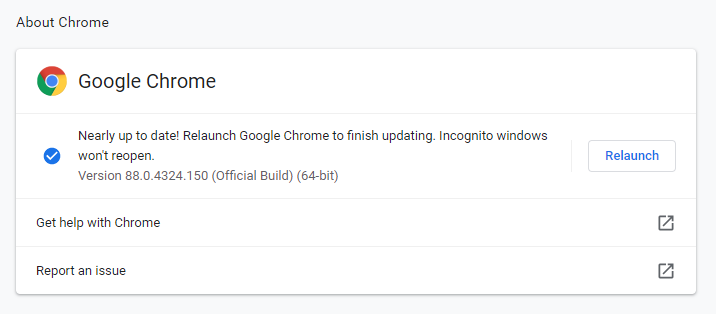
Now you know what version of Google Chrome you are using. Next you need to download the specific Google Chrome Driver that applies to your version of Google Chrome. Head over to the Chromium Chrome Driver Downloads page and find the version that applies to you.

Once you’ve downloaded the ChromeDriver and you have unzipped it, you have this on your system which we’ll reference a little later as we move your Selenium IDE generated Test Case into NetBeans.
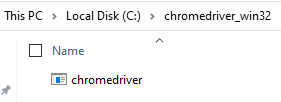
You want to put this file into a location that you aren’t going to change next week as your code will break. You need this in a handy reference location that suits how you personally organise your development environments.
Export Test Case from Selenium IDE to JUnit Format
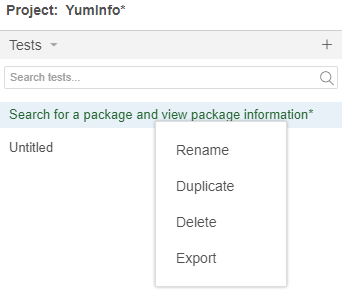
Next we need to export the Test Case that we created in Selenium IDE so that we can then import that into NetBeans. To do this go back to Selenium IDE and right click the Test Case you created then click on Export;
Then select the language we want to export the file to. The beauty of the Selenium IDE is that it is cross language compatible which means that you can import the Test Case into any number of your preferred automated web browser testing setups you use, in this case we’re using JUnit in Java, but you could quite easily use either NUnit or xUnit for C#, or Mocha for JavaScipt or pytest for Python or RSpec for Ruby. The choice is yours.

Once this has been exported, this will save a .java file in our example to your local file system which will look as follows;
// Generated by Selenium IDE
import org.junit.Test;
import org.junit.Before;
import org.junit.After;
import static org.junit.Assert.*;
import static org.hamcrest.CoreMatchers.is;
import static org.hamcrest.core.IsNot.not;
import org.openqa.selenium.By;
import org.openqa.selenium.WebDriver;
import org.openqa.selenium.firefox.FirefoxDriver;
import org.openqa.selenium.chrome.ChromeDriver;
import org.openqa.selenium.remote.RemoteWebDriver;
import org.openqa.selenium.remote.DesiredCapabilities;
import org.openqa.selenium.Dimension;
import org.openqa.selenium.WebElement;
import org.openqa.selenium.interactions.Actions;
import org.openqa.selenium.support.ui.ExpectedConditions;
import org.openqa.selenium.support.ui.WebDriverWait;
import org.openqa.selenium.JavascriptExecutor;
import org.openqa.selenium.Alert;
import org.openqa.selenium.Keys;
import java.util.*;
import java.net.MalformedURLException;
import java.net.URL;
public class SearchforapackageandviewpackageinformationTest {
  private WebDriver driver;
  private Map<String, Object> vars;
  JavascriptExecutor js;
  @Before
  public void setUp() {
    driver = new ChromeDriver();
    js = (JavascriptExecutor) driver;
    vars = new HashMap<String, Object>();
  }
  @After
  public void tearDown() {
    driver.quit();
  }
  @Test
  public void searchforapackageandviewpackageinformation() {
    // Test name: Search for a package and view package information
    // Step # | name | target | value
    // 1 | open | / |
    driver.get("https://yum-info.contradodigital.com/");
    // 2 | setWindowSize | 1920x1040 |
    driver.manage().window().setSize(new Dimension(1920, 1040));
    // 3 | click | id=YumSearch |
    driver.findElement(By.id("YumSearch")).click();
    // 4 | type | id=YumSearch | sftp
    driver.findElement(By.id("YumSearch")).sendKeys("sftp");
    // 5 | sendKeys | id=YumSearch | ${KEY_ENTER}
    driver.findElement(By.id("YumSearch")).sendKeys(Keys.ENTER);
    // 6 | click | linkText=filezilla |
    driver.findElement(By.linkText("filezilla")).click();
  }
}
The core bits of information that are relevant for this are the following;
  @Test
  public void searchforapackageandviewpackageinformation() {
    // Test name: Search for a package and view package information
    // Step # | name | target | value
    // 1 | open | / |
    driver.get("https://yum-info.contradodigital.com/");
    // 2 | setWindowSize | 1920x1040 |
    driver.manage().window().setSize(new Dimension(1920, 1040));
    // 3 | click | id=YumSearch |
    driver.findElement(By.id("YumSearch")).click();
    // 4 | type | id=YumSearch | sftp
    driver.findElement(By.id("YumSearch")).sendKeys("sftp");
    // 5 | sendKeys | id=YumSearch | ${KEY_ENTER}
    driver.findElement(By.id("YumSearch")).sendKeys(Keys.ENTER);
    // 6 | click | linkText=filezilla |
    driver.findElement(By.linkText("filezilla")).click();
  }
Here you can see the 6 steps that were in the original Selenium IDE which are visualised as code. This is extremely handy as this now gives you full control over every aspect of Selenium by using the power of the library to do what you need to do and more by using the power of JUnit too. Selenium by itself will only take you so far, you need to integrate Selenium with a proper testing framework such as JUnit to get the most from the technology. By exporting this code, this is the first step of the process to enhancing your automated web browser testing setup.
Create a New JUnit Test File in NetBeans
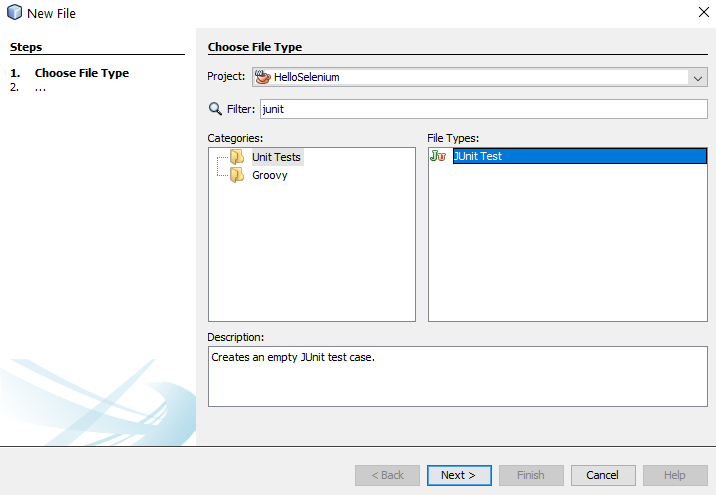
Ok, so back over to NetBeans. We want to import the Exported JUnit file from Selenium IDE into NetBeans so that we can manage the lifecycle of this Test Case better and work collaboratively with our colleagues. We’ll jump into more around the team collaboration elements of Selenium a little later. For now, let’s first jump in and get the JUnit Test added to NetBeans. To do this, right click on a folder in your project in NetBeans and select New File, then search for JUnit, then select JUnit Test and click Next.
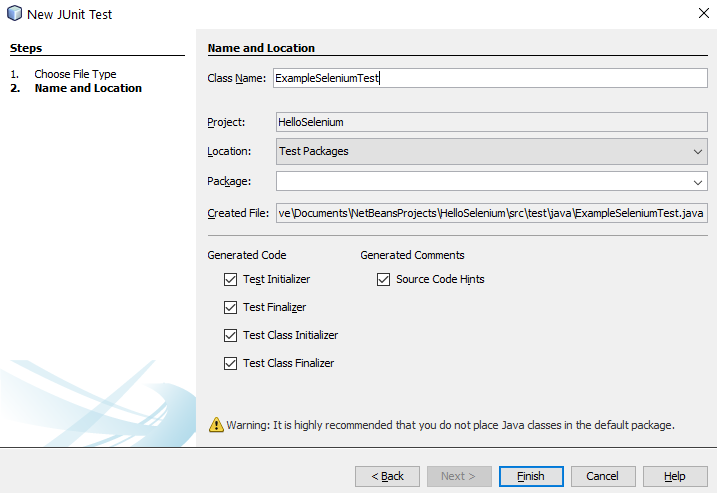
Once you’ve done that, give your new JUnit Test a Class Name and click Finish.
You will notice that this has generated a bunch of code for your automatically which is quite handy. This is great, but what you will also notice is that this doesn’t quite align 100% with the code that has been generated by the Selenium IDE. This is because here you have created a specific JUnit Test based on what NetBeans thinks a Test looks like, whereas the code that was generated in Selenium IDE was code that was a JUnit test that is specific to the test you created.
import org.junit.After;
import org.junit.AfterClass;
import org.junit.Before;
import org.junit.BeforeClass;
import org.junit.Test;
import static org.junit.Assert.*;
import org.openqa.selenium.By;
import org.openqa.selenium.WebDriver;
import org.openqa.selenium.WebElement;
import org.openqa.selenium.chrome.ChromeDriver;

/**
 *
 * @author Michael Cropper
 */
public class ExampleSeleniumTest {

    public ExampleSeleniumTest() {
    }

    @BeforeClass
    public static void setUpClass() {
    }

    @AfterClass
    public static void tearDownClass() {
    }

    @Before
    public void setUp() {
    }

    @After
    public void tearDown() {
    }

    // TODO add test methods here.
    // The methods must be annotated with annotation @Test. For example:
    //
    // @Test
    // public void hello() {}
}
Merge Your Exported Selenium IDE Test Case Into Your NetBeans JUnit Test Class
The next step is generally best to be done as a copy and paste to fit the automatically generated Selenium IDE Test Case code into the standardised approach you use for your JUnit Test Classes within NetBeans. Don’t just blindly copy and paste the code as while the automatically generated code is handy, you need to manage this code to fit with your specific needs and use cases.
In this example, here’s what the JUnit Test Class looks like now I’ve manually merged this code;
import org.junit.After;
import org.junit.AfterClass;
import org.junit.Before;
import org.junit.BeforeClass;
import org.junit.Test;
import static org.junit.Assert.*;
import org.openqa.selenium.By;
import org.openqa.selenium.Dimension;
import org.openqa.selenium.Keys;
import org.openqa.selenium.WebDriver;
import org.openqa.selenium.WebElement;
import org.openqa.selenium.chrome.ChromeDriver;

/**
 *
 * @author Michael Cropper
 */
public class ExampleSeleniumTest {

    public ExampleSeleniumTest() {
    }

    @BeforeClass
    public static void setUpClass() {
    }

    @AfterClass
    public static void tearDownClass() {
    }

    private WebDriver driver;

    @Before
    public void setUp() {
        System.setProperty("webdriver.chrome.driver", "C:/chromedriver_win32/chromedriver.exe");
        driver = new ChromeDriver();
    }

    @After
    public void tearDown() {
        driver.quit();
    }

    @Test
    public void searchforapackageandviewpackageinformation() {
        // Test name: Search for a package and view package information
        // Step # | name | target | value
        // 1 | open | / |
        driver.get("https://yum-info.contradodigital.com/");
        // 2 | setWindowSize | 1920x1040 |
        driver.manage().window().setSize(new Dimension(1920, 1040));
        // 3 | click | id=YumSearch |
        driver.findElement(By.id("YumSearch")).click();
        // 4 | type | id=YumSearch | sftp
        driver.findElement(By.id("YumSearch")).sendKeys("sftp");
        // 5 | sendKeys | id=YumSearch | ${KEY_ENTER}
        driver.findElement(By.id("YumSearch")).sendKeys(Keys.ENTER);
        // 6 | click | linkText=filezilla |
        driver.findElement(By.linkText("filezilla")).click();
    }
}
A couple of really important parts to be made aware of in the above code snippet are these;
private WebDriver driver;

    @Before
    public void setUp() {
        System.setProperty("webdriver.chrome.driver", "C:/chromedriver_win32/chromedriver.exe");
        driver = new ChromeDriver();
    }

    @After
    public void tearDown() {
        driver.quit();
    }
These are the following lines of code / methods;
- private WebDriver driver;
- This line of code is required to ensure you can easily open/close the WebDriver at the start and end of this Test Class. Over time you may have many Tests contained within a single Test Class, so by using this approach it is significantly more efficient and allows you to re-use the object without having to instantiate it every single time you run a Test within this Test Class.
- This then aligns with the contain within the setup() method and the teardown()
- setProperty(“webdriver.chrome.driver”, “C:/chromedriver_win32/chromedriver.exe”);
- This is what enables your JUnit code to communicate with your Google Chrome Web Browser and control it.
- public void searchforapackageandviewpackageinformation()
- Hopefully you recognise the contents of this method which is the automatically generated code produced by Selenium IDE that we have merged into this JUnit Test Class.
Run Your JUnit Test Class
Excellent, now we’re at a point that we can actually run our JUnit Test Class to confirm everything is still working as expected. To do this simply Right Click and select Test File within your JUnit Test Class. If everything has merged successfully you should see your Google Chrome Web Browser kick into action, run the test and the test should pass.
Collaborating with Colleagues
Finally we’re going to briefly touch on how you now collaborate with colleagues using Selenium and JUnit Test Classes. Everything we have done so far is excellent if you are working by yourself and just having a play around. But in any real world environment you are going to be working with a lot of colleagues that span different roles/responsibilities and even departments. This is where the collaboration element really kicks in. For the purpose of this blog post and to keep things fairly simplistic we’re going to highlight how this approach works when you are working between Developers and Quality Assurance (QA) or Test people.
One point to note is that this isn’t going to be a tutorial on how to use Git, so if you are unfamiliar with some of the concepts below then you are going to need to do a bit of background reading. To get up to speed with how to use Git and why it is important, then read the Git Book. Once you’ve read that about 10x from a standing start with zero knowledge you’ll probably understand it. We’ll do a write up on Git in a bit more detail at some point as it is a topic that is hugely misunderstood and often implemented incorrectly which can cause a lot of problems.
Below is a diagram of a generic process that can be handy to implement in organisations to show you how the different steps fit together along the Software Development Life Cycle, specifically focused around Selenium and team collaboration.

Summary
Hopefully this guide on how to setup Selenium using Java and Apache NetBeans has been helpful to get you up and running with Selenium in no time at all. This is very much the basics of automated web browser testing using a very specific set of technology, tooling and processes. There is an awful lot more that could be covered on this topic and that is perhaps one for another day. For now, this is just the very basics about getting up and running.
by Michael Cropper | Feb 15, 2021 | Client Friendly, Developer, IT |
Today we’re going to look at how to setup Let’s Encrypt on pfSense so that you can install, manage and automatically renew your SSL certificates completely free of charge with ease. If you don’t know about Let’s Encrypt, you really should. Go read up on it on the main Let’s Encrypt website, it’s awesome, it supports over 225,000,000 SSL certificates on websites around the globe and is supported by the biggest companies powering the internet.
Let’s Encrypt is part of the global movement to secure the internet free of charge to prevent the people between you, and the web servers you are visiting as a user from reading the traffic – people like governments, Internet Service Providers (ISPs) and other people snooping around. We’ve done a few blog posts on Let’s Encrypt over recent years including, How to Configure Let’s Encrypt on CentOS6 with cPanel and WHM, How to Use AutoSSL on WHM and cPanel for SSL Certificates and Claim Your Free SSL Certificates for HTTPS.
OK, so back to the main point of this blog post, how to get Let’s Encrypt setup on your pfSense hardware. For the purpose of this blog post we’re going to assume you’re running pfSense directly on one of the Netgate hardware devices as there are too many nuances to running pfSense virtually that make the setup too problematic in any real world environment. A virtual pfSense environment is great for playing around, but beyond that, personally I’ve had too many issues for that setup to be taken seriously for a production ready setup. If you have managed to get that working, then please do comment on the setup that you’ve got working!
For reference, ACME stands for Automated Certificate Management Environment. It has no link to the Acme Corporation in the Road Runner/Wile E. Coyote animated series.
Why Use Let’s Encrypt on pfSense
This is a very good question, and one that doesn’t have a straight forward answer. This comes down to two basic use cases, one of which is to manage SSL certificates at the edge of the network (i.e. your pfSense device), the other of which is to manage SSL certificates at the destination server. And as usual in the world of IT, the answer is that “it depends…” and it does. There is no hard and fast answer for a solution as it all depends on what you want to do. Both approaches have merits and drawbacks.
Personally speaking, I tend to lean towards utilizing SSL connections using Let’s Encrypt or otherwise on the destination devices rather than the edge network firewall. The reason behind this is because this approach gives significantly more flexibility to the portability of services as there is a more decoupled approach, meaning that it’s more pain free.
In the scenario whereby you need to move a virtual machine from an on-premises network to the cloud and you have a tight coupling via the SSL certification process to your on-premises network, the migration process will be more difficult. Whereas if you had everything contained within the single box, you could easily take a snapshot and migrate that to the cloud without ever worrying about the network firewall and any SSL certificates installed on there. Granted, there are many other considerations and this is an over simplification, but you get the gist.
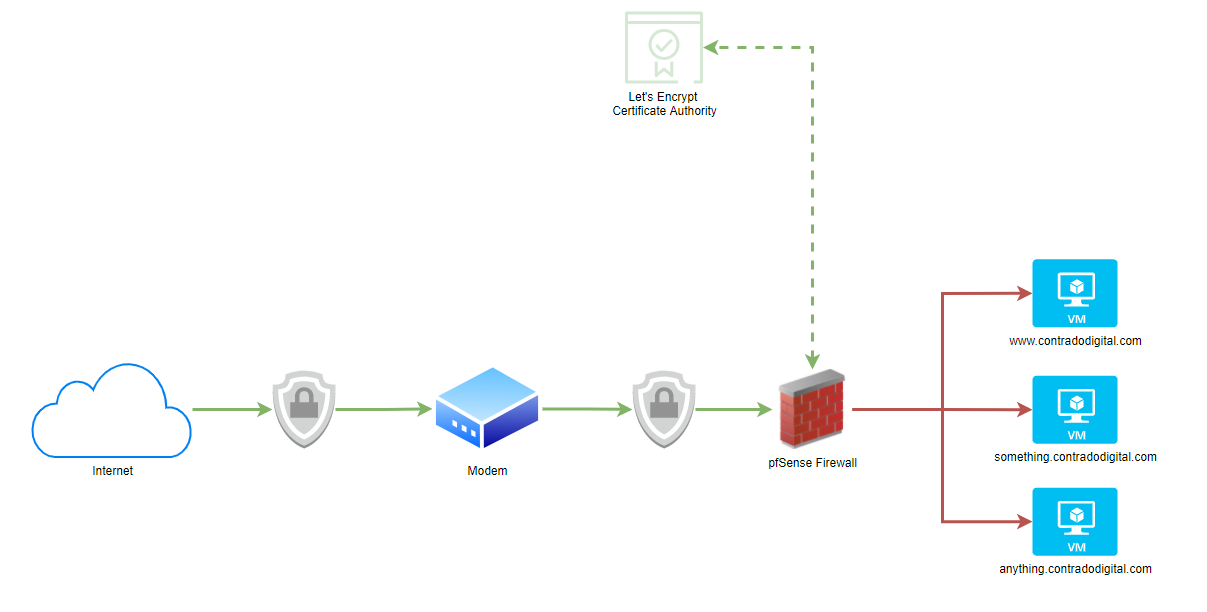
What this means pictorially. The whole point of setting up Let’s Encrypt on your pfSense hardware device fundamentally means that traffic from the Internet to your pfSense device is encrypted using SSL, which then means the traffic from your pfSense device to your destination computer/server/virtual machine is not encrypted.
As you can see in the image below, the lines highlighted in Green show where SSL encryption is present and the Red lines highlight where SSL encryption is not present. This is an overly simplified architecture as there are no notions of VLANs highlighted in this diagram to suggest if this is a safe or not safe space to be dealing with. Non the less, it highlights the main point around the approach for simplicity.
As mentioned previously, there are both pros and cons to this approach depending on your specific needs.
Step 1 – Install ACME Package
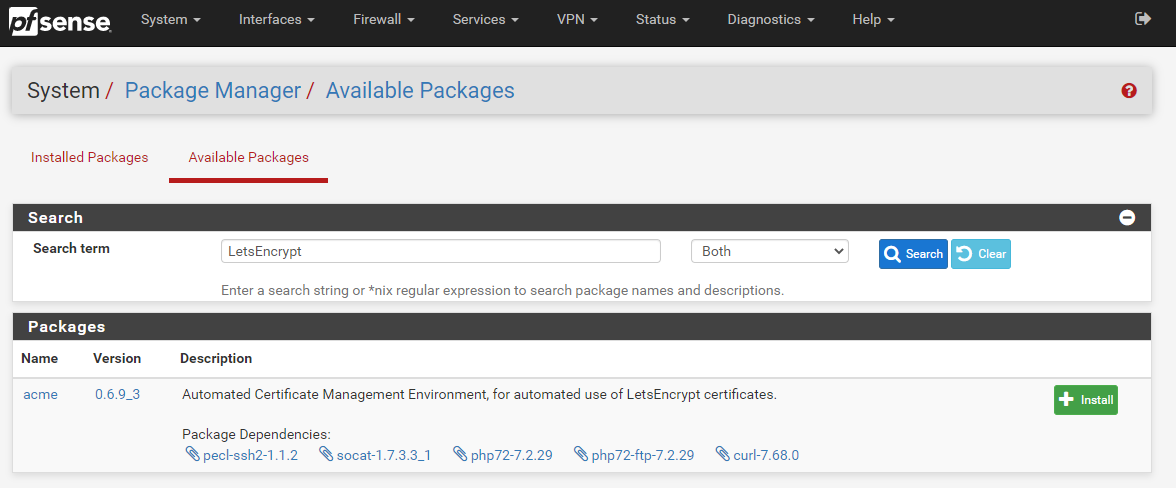
Thankfully pfSense comes with a list of available packages that you can install with ease. Very much in the same way to how Yum works for Linux, the only difference being that within pfSense you install the packages via a visual graphical user interface GUI to help you do this easily via the pfSense administrator console.
To install the Let’s Encrypt ACME Package onto your pfSense device it is actually extremely simple, simply navigate to, System > Package Manager > Available Packages;
Once the installation process has complete for Let’s Encrypt on your pfSense device you’ll see a nice message stating that “pfSense-pkg-acme installation successfully completed”.
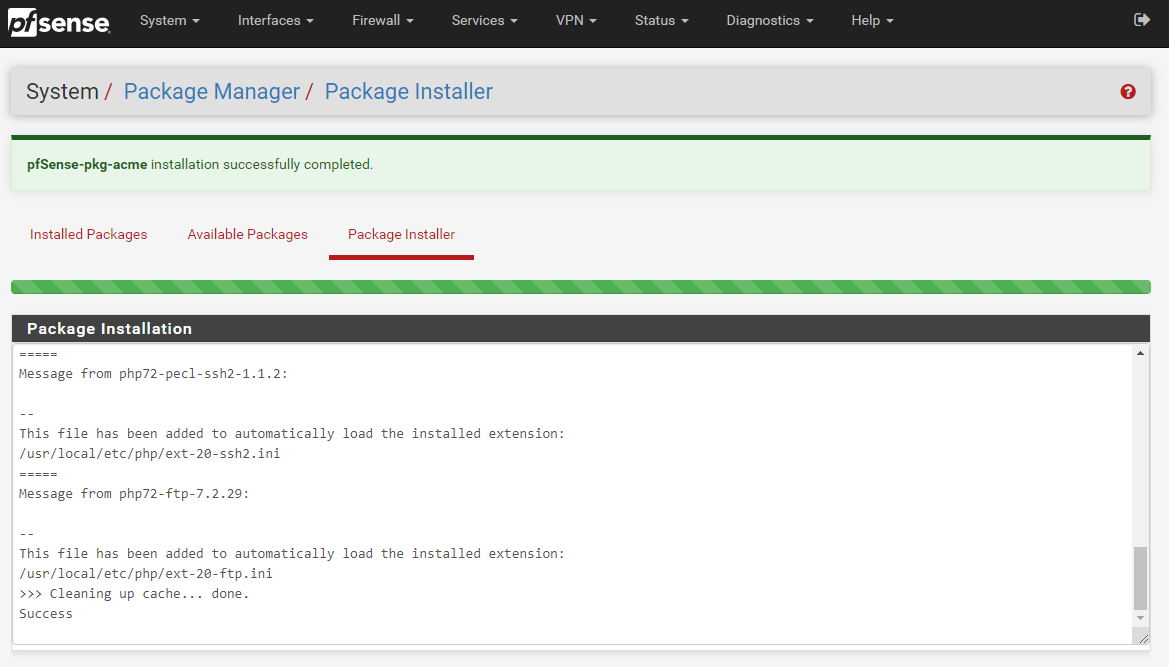
Excellent, now we’re onto configuring your Let’s Encrypt ACME package so that you can then install, manage and automatically renew your SSL certificates with ease.
Step 2 – Register an ACME Account
So next we need to get your system registered as an official ACME provider. This step is important as Let’s Encrypt controls the use of their system through basic rate limiting, meaning that once you reach the rate limit you will be blocked for a period of time. This helps to maintain the ecosystem for everyone. By registering your account, not only is this a required step to get Let’s Encrypt up and running on your pfSense hardware device, this also allows you to work within the rate limits of certificate renewals so that you can plan accordingly for your SSL certificates.
To get your Let’s Encrypt account registered first of all you need to create an Account Key by visiting, Services > ACME > Account Keys, then clicking ‘Create new account key’, which will generate the Account Key automatically.
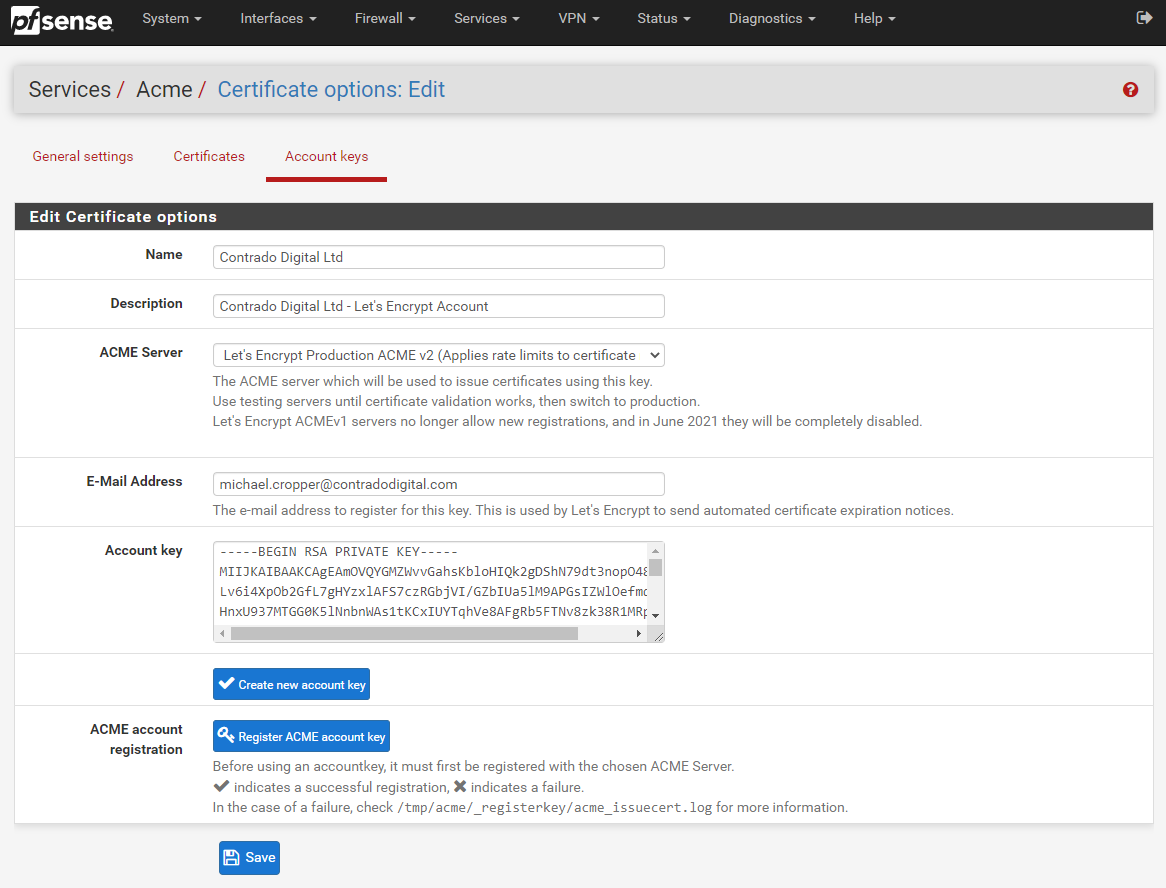
Now click ‘Register ACME account key’ and you should see the process complete with a tick;

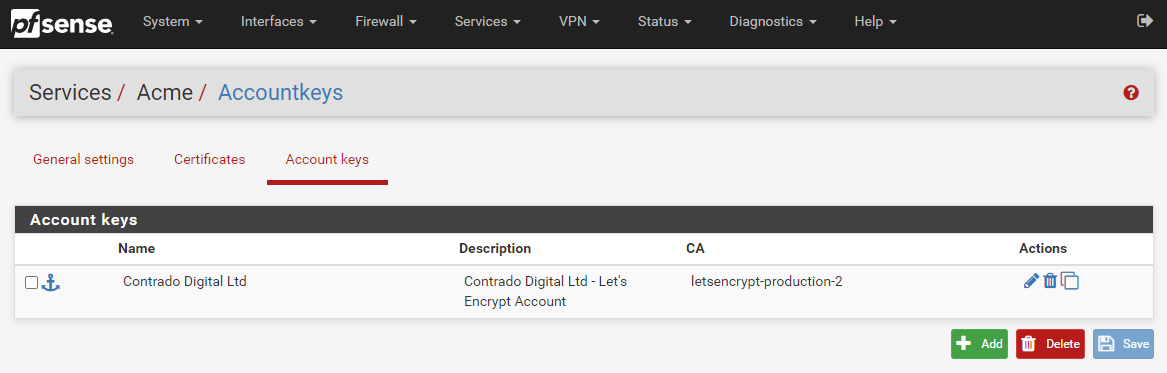
Now click ‘Save’ and you’re good to go. You will then see your Account Key registered within your pfSense settings;
Step 3 – Configure Automatic Renewal of SSL Certificates Using Let’s Encrypt ACME Plugin on pfSense
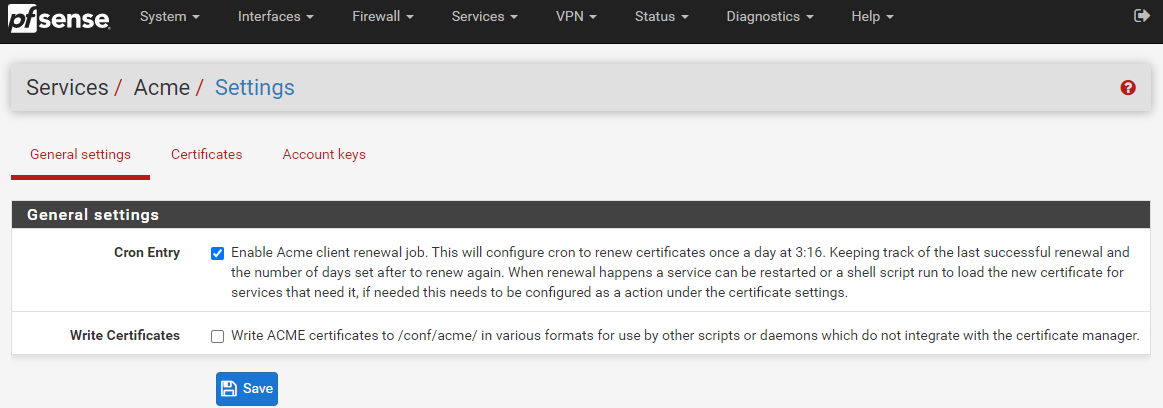
OK, so next we need to turn on the configuration settings so that your Let’s Encrypt SSL certificates are automatically renewed when they are due. Unlike commercial SSL certificates which are generally valid for a minimum of a 12 month period, Let’s Encrypt SSL certificates are valid for a 90 day (3 month) period, upon which you are required to regenerate the SSL certificate. Quite frankly, no-one is this dedicated to remember to do this every 90 days, which is where the automated renewal process comes in extremely handy.
To turn on the automatic SSL certificate renewal process, simple navigate to Services > ACME > General Settings and configure the CRON Entry as can be seen below;
For reference, a CRON Entry is more commonly referred to as the CRON or a CRON Job. For which CRON is a geeky term for how the Greek God of time Chronos is able to control things. An interesting point, but completely irrelevant to what you are reading about.
Summary
And that’s it, you’re done. You can now use Let’s Encrypt to secure the encryption between the users accessing the systems/websites/applications behind your pfSense hardware over a secure network.