by Michael Cropper | Aug 23, 2016 | Developer |
When you’re building a website from scratch implementing HTTPS is actually relatively straight forward in comparison to migrating a current website from HTTP to HTTPS. When migrating a WordPress website from HTTP to HTTPS there are multiple aspects you need to take into consideration to implement this successfully which are outlined below.
Get an SSL Certificate
This goes without saying, but I’m going to say it anyway. Make sure you have an SSL certificate installed on your domain. There are many options available including the free SSL certificates from Let’s Encrypt. Details outlined for how to get that set up on the linked post.
Update WordPress Address and Site Address in General Settings
Firstly you need to update the settings within Settings > General Settings to update the WordPress Address and Site Address from HTTP to HTTPS as can be seen below.
From HTTP

To HTTPS

This will tell WordPress to use HTTPS throughout the site.
Update Your wp-config.php File for SSL
Add the following line of code to your wp-config.php file which is often needed to ensure SSL works correctly;
if (isset($_SERVER['HTTP_X_FORWARDED_PROTO']) && $_SERVER['HTTP_X_FORWARDED_PROTO'] == 'https'){
$_SERVER['HTTPS'] = 'on';
}
This is required for when your website is behind a load balancer or reverse proxy. Full details about this can be found in the WordPress Codex.
Fix Mixed Content Warnings
Now you’ve successfully set up SSL on your WordPress website, although when you browse the website you may notice that you don’t get the nice green padlock showing in the browser bar. Instead you’ll see lots of mixed content warnings which causes the green padlock not to show;

The reason this is happening is because some of the assets in use on your page such as images, JavaScript files or CSS files are being loaded over HTTP when the page is HTTPS, meaning that the browser cannot be certain that nothing has been intercepted in transit and edited. Browse the Google Chrome Developer Tools window and you will see notices that look like the following;

This is not quite the desired impact that you had in mind when implementing SSL. Now, assuming that you have a well build website, tidying everything up should actually be relatively straight forward. If your website has been built badly then it’s likely going to be a lot more challenging to fix. For example if URLs have been hardcoded in any of your plugins or themes that are in use.
Update All Assets to Use HTTPS instead of HTTP
So now you need to run through the database and get everything updated. Thankfully there is a handy plugin which can automate a large amount of this work which is the Search and Replace plugin. Once this is installed go to Tools > Search & Replace > Replace Domain URL tab and enter in your details within here;

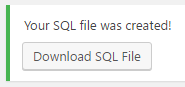
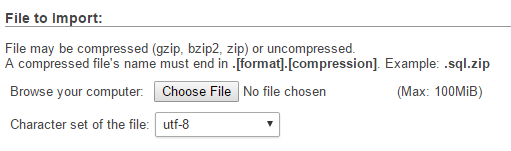
Then you will be able to download a .sql file which has been created for you now the Search and Replace has been completed. From here, login to your web server’s control panel, navigate to phpMyAdmin if you have this installed and upload the SQL file you have just downloaded. Make sure you are uploading this to the correct database if you have multiple databases in use. And as always, make sure you take a backup before you do anything in case you break anything by mistake.
SSL Now Fully Working
Now you have completed all the steps involved with migrating a WordPress website from HTTP to HTTPS and cleaned up all of the mixed content warnings. So when you browse your website now, you should see a nice green padlock when you browse the website. Make sure to have a browse around your website in case anything has been missed. So many WordPress websites have been built badly so you may need to do some additional cleaning up in various places.

301 Redirect HTTP Traffic to HTTPS
This is just good practice to do so that you are forcing the use of HTTPS on your website. Add the following code to your .htaccess file;
RewriteEngine On
RewriteCond %{SERVER_PORT} 80
RewriteRule ^(.*)$ https://www.example.com/$1 [R,L]
by Michael Cropper | Aug 12, 2016 | Developer |
The same questions come up time and time again online about how to debug WordPress problems. The challenge with WordPress and the web servers they live on is that there are an awful lot of moving parts, of which one or more of these moving parts can be the root cause of the problem. Unfortunately there is no handy traffic light system which says what is working well and what is causing problems as problems can be intermittent, appear random or only occur under specific circumstances. This being said, there is always a logical way to debug WordPress problems to identify what the root cause of the problem actually is.
Identify What is Actually Happening and When
This is extremely important as this will help you to understand where the problem actually lies. Is what you are experiencing really a WordPress problem or something web hosting related or something email related or something else completely?
Check your Server Raw Access Logs
See what is happening on your web server when you are experiencing the issues. This will help to identify if there are any other external items that could be the potential cause of the issues or if this is indeed an isolated incident.
Check your Server Error Logs
Has anything been resulting in a recorded error on your web server that can help you identify the problem that is happening? Have a good rummage around here to see if you can spot anything and tie this back to the times and dates when the problems are occurring.
Check your Server Monitoring Software
Tools such as Munin and New Relic are invaluable when debugging issues, they can help you identify what is currently happening on your web server. This enables you to see if the problem is indeed WordPress related or an issue that is being caused elsewhere.
Check your Server Firewall
Make sure your IP address isn’t being blocked for some reason. This can sometimes be triggered when you have entered an incorrect password on multiple occasions.
Check your Cloud Based Firewall
As above.
Check your WordPress Firewall
If you have a WordPress level firewall installed, then it is possible that your IP address / user account is being blocked here too. You’ll likely need to check via phpMyAdmin to view this data to see if you can find your IP address in the database for locked users or accounts. Depending on the plugin you are using for this, this data could be anywhere. Check the documents for the plugin you are using to figure out where this information could be. If your IP address is being blocked, it’s usually safe to delete this row and you should regain access. Again, make sure you know what you are doing before you go deleting things though as you may delete a whole host of incorrect things depending on how everything has been set up.
Check if the Problem is Just You
http://isup.me will tell you if your website is up or if it is just you experiencing the problem.
Check in Another Web Browser
Often issues can be browser specific, so check on a different web browser that you have installed.
Check on Another IP Address
Use your mobile phone, with WiFi turned off, to access the website. Is the issue still being caused now?
Check Google Analytics
Is there anything happening at the time when the issues are occurring? This could help you narrow down where the issue lies, for example if you suddenly receive a large spike in traffic which would show on the Real Time reports or on the hourly reports which could show out of the ordinary behaviour on the website.
Check Google Chrome Developer Tools
If the problem is occurring when you are either viewing a specific page or when you are logged in as a user or administrator, open the Google Chrome Developer Tools to see if any issues are being flagged in the console window. If there are any error being flagged here, this should give you an idea of where the problem may be coming from.
Compose Yourself
So far you have been gathering data about what is happening so you can make an informed decision about if you are certain the problem actually lies with WordPress or if it is somewhere else. Assuming you have identified that the problem is indeed WordPress related then continue reading.
Enable WP_Debug
Turn on wp_debug by adding the following line of code to your wp-config.php file;
define( 'WP_DEBUG', true );
Once turned on, this will flag any errors that are being caused by the themes, plugins or PHP files which need addressing. When you turn this setting on, both you and everyone using your website will be able to see the errors. So if you must do this on a live website, do it quickly and turn if off again by setting the value to false.
define( 'WP_DEBUG', false );
On poorly built WordPress websites with plugins purchased from theme market places and other less salubrious sources, this will flag up a whole host of errors. Take note of where these errors are being caused as this will help you to identify where the problem lies and ultimately what you need to do about resolving the issue.
While the WP_Debug option is great, it doesn’t do everything for you. Particularly on custom built systems with lots of custom code and functionality, you need something extra. This is the WordPress Debug Log. Firstly, add the following code to your functions.php file;
if (!function_exists('write_log')) {
function write_log ( $log )  {
if ( true === WP_DEBUG ) {
if ( is_array( $log ) || is_object( $log ) ) {
error_log( print_r( $log, true ) );
} else {
error_log( $log );
}
}
}
}
Then where ever in your code you feel that a problem lies, add the following code to check that this part of the code is actually being called;
write_log('THIS IS THE START OF MY CUSTOM DEBUG');
You’ll also need to make sure that you have the following settings turned on in your wp-config.php file;
define( 'WP_DEBUG', true );

define( 'WP_DEBUG_DISPLAY', false );

define( 'WP_DEBUG_LOG', true );
Then when you start running through your system to check which bits are and aren’t working, you can view the data that is output into the debug.log file which is added to your Document Root for your WordPress installation.
Backup Your Setup
A full backup including database and files. So you can restore the site to it’s current broken, but functional, state if the following debugging ends up breaking things even more. This can happen when WordPress websites haven’t been built particularly well, so make sure you have a full backup. Even better, use a backup plugin which allows you to easily restore everything should you need to. It is a lot easier to restore backups when part of the task is automated.
Update Everything
WordPress Core, Themes and Plugins. Make sure absolutely everything is running the latest versions. Often problems are caused by outdated plugins which are either using deprecated PHP functions or making calls to 3rd party systems which have been updated since they were installed, or even conflicts between other Plugins, Themes or WordPress core that needs resolving. When you have updated everything, at least you know that everything should in theory be working correctly, assuming you are using well respected Themes and Plugins for WordPress and not poorly developed ones.
Disable All Plugins and Themes
This one is the one that on-one ever wants to do, particularly when debugging issues that are only happening on a live website and not on a development server. Unfortunately this is a required step in the process as this will help to identify what is causing the problem.
Firstly switch your Theme back to the latest version of the core WordPress theme such as 2016 and soon to be 2017. These themes have been built as near perfect examples of how Themes should be build, meaning that there are no issues contained within these themes which could be causing the issue. If the issue disappears when you do this, the problem lies with your theme. Contact the theme author to get it resolved so they can push an update out. It is important to note that on occasions, if your website has been built or customised incorrectly then it is possible that any custom CSS (for example if you have stored this in the JetPack plugin Edit CSS area) or other customisations you have made can actually disappear completely, which if this is a large website, then it’s going to take either yourself a good amount of time to resolve, or it’s going to cost you a lot of money to resolve paying someone to re-implement the different aspects properly.
If this doesn’t solve the problem, next, disable all plugins on your website. See if this solves the problem. If so, then it is one of the plugins you’re using which is causing the problem. Systematically re-activate the plugins you are using and check to see when the problem starts to happen again. As mentioned previously, some plugins will delete and customisations when they are deactivated which is annoying and causes more problems to resolve which can often take some time to re-implement some of the customisations. Good plugins don’t do this, bad plugins often do.
Check Server PHP Settings
As part of the process outlined above, on occasions the error lies with the web server, specifically the php.ini settings and configurations. There are various settings which are often causing the problems which include;
- Max_execution_time
- Memory_limit
- Upload_max_filesize
- Post_max_size
Check your WordPress PHP Memory Limit
In addition to the server settings, it is also possible to configure memory limits within WordPress itself. Check within the wp-config.php file to see if any arbitrary memory limits have been added which could be causing scripts to time out and produce errors. The line will look like the example below, likely with a different number included;
define(‘WP_MEMORY_LIMIT’, ‘64M’)
WordPress Debugging Plugins
There are also a few handy WordPress debugging plugins which can provide additional information including WordPress Query Monitor and WordPress P3 Plugin Performance Profiler. When you install these there are various debugging tools included which can help to identify where the root cause of the problem lies.
Check your .htaccess File
Sometimes this can become corrupted, either by someone who has access to the site messing around without knowing what they are doing, or, a plugin may have altered the file which is then causing problems.
Check your Database is Correct
You will at some point when working with WordPress come across the “Error establishing database connection” error which can be caused by multiple things. One thing is clear though, it’s an error connecting with the database.
Firstly, check your database credentials within the wp-config.php file to make sure they are correct.
Secondly, make sure that the MySQL daemon is running on your web server. Sometimes this can get a bit tangled in a knot and need a restart.
Thirdly, sometimes your WordPress database gets corrupted and needs to be fixed. To fix this, when you visit yourwebsite.com/wp-admin, you will see a message that your database needs to be repaired. Sometimes, you can go ahead and implement this straight away. Other times, you need to add the following code to your wp-config.php file;
define('WP_ALLOW_REPAIR', true);
Then visit yoursite.com/wp-admin/maint/repair.php to start the repair process. Be sure to remove this line of code once you have completed the process to prevent others from accessing the URL.
Should none of this work, speak with your web hosting company. On occasions, the maximum size of the database may have been reached or there is something gone really wrong with your database that WordPress cannot restore. All kinds of crazy things can happen and they will be able to identify the root cause of the issue.
Check File Permissions
If your issue appears to be related to file permissions, i.e. you cannot upload a plugin maybe or you’re having trouble uploading an image for example. Then check the file permissions on your web server to make sure that they are set correctly. And make sure to check the owner of the files too. For example, if you have restored a backup via SSH using a root user account, then the files you copy to a cPanel account for example will belong to that user and not the cPanel account user, meaning that you technically don’t have permission to do anything with them when you are trying to do so via your WordPress interface. This is rare, but worth checking.
Check that Maintenance Mode Hasn’t Got Stuck
If you have been updating WordPress core, Plugins or Themes and your maintenance mode has got stuck, it is likely that it has timed out and not been able to complete. What this means is that you’ll first need to identify why this has happened in the first place, check your error logs for details.
To get you back up and running though, login to your server via FTP, make sure hidden files . [dot] files are showing and you’ll likely see a .maintainence file. This is the file that WordPress adds when it is doing maintenance, which is then deleted at the end of the process. So if the process timed out, it didn’t complete and the file is still there which causes the message to appear for everyone. Delete this file and you should be back up an running.
Re-Save your Permalinks
Bizarre things can happen related to permalinks which cause strange issues around the site such as 404 errors showing and more. Even when they look correct when you view them in the settings page, just re-save them. Often this can fix random errors which you haven’t been able to identify yet.
Check your PHP Version
WordPress websites are hosted on a variety of PHP versions. What this means is that with newer and older versions of PHP, certain functions are not available that your Plugins or Themes may be trying to use. There is no easy way of debugging issues like this and as such, this is a last record for identifying issues, so rebuild you web server with different versions of PHP to see if this solves the issue. One recently I came across related to email not being sent via a plugin due to a specific version of PHP that was being used. The lower version of PHP did work but broke something else, the newest version didn’t work but the other thing was fixed, the middle version broke something, etc. In the end the solution was to upgrade to a newer version and fix on of the bugs that was being caused elsewhere. No simple solution to these types of problems.
Check WordPress User Permissions
Sometimes issues can relate to what permissions a specific WordPress user has. Set up the Members WordPress plugin to see if the issue relates to a specific user group as to why they can or cannot do something.
Monitor What WordPress Users are Doing
When multiple administrators have access to the website, all with varying levels of skill, it is impossible to know what people are changing and when. Install a plugin such as Stream which can log all of this information which can come in handy for debugging issues next time around.
Summary
Following the above process systematically can identify the root cause of the majority of WordPress problems. Often identifying is a completely different thing than fixing the problem. Often during this process you will realise that your website has been built fairly poorly and requires a significant overhaul. Should you require any support debugging your WordPress problems, get in touch and we’ll happily help.
by Michael Cropper | Jul 5, 2016 | Developer, WordPress |
By default, WooCommerce displays Product Category content above the products which are listed. Which is fine in many cases, although when you want to add in more than a couple of hundred words here, the Product Category page on WooCommerce soon pushes all of the actual products below the fold which isn’t that useful for a user. As such, you may want to add more content beneath the product listings to allow you to add more content to the page for users.
Firstly, whenever you are editing WooCommerce template files, make sure you are doing this correctly via your Child Theme to override WooCommerce template files. The file you need to edit (at the time of writing, this may change…) is archive-product.php. Copy this file from your /Plugins/WooCommece/Templates/ folder into your /Theme-Child/woocommerce/ folder.
Add Custom Field
To start with, the first thing to do is to use the Advanced Custom Fields plugin to add a custom field which is triggered only when: Taxonomy Term, is equal to, Product Categories. See the ‘Location’ heading when adding the custom fields. Let’s assume you’ve added a WYSYWIG editor for the purposes of this guide. You can add any type of field you like here which is handy.
Once set this Custom Field up correctly, you will now see this field display in the Product Category admin screen where you can add additional content to this section. Once you have added content here, the next step is to display this content to the user on the front end of the website.
Display Custom Field Content – archive-product.php
Back to the archive-product.php file. Add the following piece of code beneath where you see the code;
<?php

/*** woocommerce_after_shop_loop hook.

** @hooked woocommerce_pagination - 10

*/

do_action( 'woocommerce_after_shop_loop' );

?>
Add this code to display the custom field;
<?php

$term_id = get_queried_object()->term_id;

$post_id = 'product_cat_'.$term_id;

$custom_field = get_field('woocommerce_product_category_page_bottom_description', $post_id); // My Advanced Custom Field Variable

?>

<br>

<div><?php echo $custom_field; ?> </div> <?php // Get Advanced Custom Field Value ?>
The ‘woocommerce_product_category_page_bottom_description’ text above is what your Custom Field is named as that you created previously. If you have used a different name, replace this here.
Display Custom Field Content – functions.php
Alternatively if you would prefer not to edit child-WooCommerce files, then you can add the following code to your function.php in your Child Theme which will add the following action onto the ‘woocommerce_after_shop_loop’ hook;
function action_woocommerce_after_shop_loop() {

$term_id = get_queried_object()->term_id;

$post_id = 'product_cat_'.$term_id;

$custom_field = get_field('woocommerce_product_category_page_bottom_description', $post_id); // My Advanced Custom Field Variable

echo $custom_field;

};

add_action( 'woocommerce_after_shop_loop', 'action_woocommerce_after_shop_loop', 10, 2 );
Display
View the Product Category page and you’ll soon have added this extra piece of information to your Product Category page which you can use as you like. This will display the content beneath the paginated links. Place the above content elsewhere to suit your needs if you want something different.
by Michael Cropper | May 23, 2016 | Developer |
If you’re a developer who likes to use the Windows platform when building software, you’ll no doubt be using MySQL at some point along the way and an IDE such as Eclipse, NetBeans or something else. For the more basic activities you’ll be doing within your application when interacting with your MySQL database, there will be nothing much to worry about. Whereas with other work you’ll be doing, it is essential to take a backup of your MySQL database with ease, to make sure that you don’t lose all of your test data in the database when you make a mistake in one of your SQL commands.
When you installed MySQL in the first place, you’ll likely have installed this somewhere such as;
C:\Program Files\MySQL\MySQL Server x.x
So open command prompt and navigate to the folder that your MySQL version is installed in, then inside the bin folder;
CD C:\Program Files\MySQL\MySQL Server x.x\bin
Next you need to run the following command. Make sure you personalise the details according to the database you created in the first instance;
Mysqldump –u yourusername –p databasename > C:\Users\YourUsername\databasebackup.sql
Note, if you try to save the file to C:\ for example, then this will result in an access denied error message. The reason for this is because you need Administrator privileges to do this, just like when you’re installing a new piece of software. So instead, make sure you save the file within your current user account that you are logged into Windows with.
Then if you ever need to restore the database, run the following command;
mysql -u yourusername -p databasename < C:\Users\YourUsername\databasebackup.sql
Simples. Yet often can be a little more challenging in practice depending on the details you have configured. Hope this is a useful starting point for when you need to do this.
by Michael Cropper | May 14, 2016 | Developer, Security, Technical, WordPress |
A web developer or digital agency has built our website, so surely they must have backed it up, right? Probably not. Well ok, we have a web hosting company, and surely they back things up, right? Probably not. Some of the many assumptions that business owners make about their website and backups. I can honestly say that for the average business, your backups are probably woefully inadequate for your needs and should anything go wrong, which again I can guarantee that it will do at some point, you will be left up ‘the’ creek without a paddle.
Going one step further there is no magic ‘backup’ solution, it’s not like buying a lemon from the supermarket. A lemon is a lemon, there is nothing else it can be. Instead, backups are a bit like Apples. You can have many different types of apples, all with their different purposes based on your requirements. You wouldn’t put a cooking apple in a lunch box unless is was baked into apple pie. Likewise you wouldn’t put a custard apple in an apple pie, seriously these things exist and have an interesting taste. I digress.
Back to backups. There are many different types of backup technologies which give you differing levels of security as a business and hence are either easier or harder to restore when something does go wrong. Again, it will go wrong at some point, trust me, it always does, this is technology we’re talking about. With unscrupulous cybercriminals targeting websites running certain technologies at scale, fully automated. Do not think that you are off someone’s radar.
So let’s take a look at a couple of the different website backup technologies and what they both mean. This is by no means a definitive list but hopefully this should get you thinking about what you need to be investing in as a business.
Server Level Backups
Surely my web host runs server level backups? Maybe, but are you paying them to do that? Backups use server resources, CPU, RAM, Hard Drive space and bandwidth on the network, which all cost money to run. Unless you are paying your web hosting company specifically for backups, it is unlikely that they will be running server level backups for you.
Server level backups are great and are essential to have in place for any business. If you are unsure if you have this in place, then contact your web hosting company to check or get in touch and we can have a quick check to see what you have or haven’t got and advise accordingly.
Your server level backups are designed for one thing, restoring the entire server should anything go wrong with the hardware or similar. They are often run daily and stored for a period of time with multiple restoration points for added levels of protection. This is great if you’re on your own dedicated web server with just your own website as this means that restoring a backup can be much faster than if you are on a shared web server of sorts.
If you are on any kind of shared web server, where there is multiple websites hosted on the server, then this is where things get tricky. The likelihood is that if you are on any kind of shared web server or similar, i.e. if you don’t have as a minimum your own Virtual Private Server (VPS), then this applies to you. What this means is that your website is on the same web server as other websites, then should anything go wrong with your individual website, then restoring just this part is much more time consuming and costly for you to do.
You see, the server level backups are designed to protect everything on the web server should anything go wrong at the web server level, they aren’t designed to protect against a single issue on a single website for example if your website was hacked into and deleted. This means that if this did happen, it is not easy to simply restore your individual website as the backups have to be combed through and reinstated which is a fiddly job for the technical team to do and hence costly.
Server level backups are designed for keeping backups of things like any server settings that have been implemented specific to the needs of the websites hosted along with any control panel settings which may be in place. They are designed to be used as a single setup which can then be restored as a whole, not parts of the whole.
So yes, server level backups are extremely important and if you don’t have these in place now, then you need to get these in place.
Website Level Backups
The next type of backup to make sure you have in place is a website level backup. This is where your website setup as a whole, which sits on your web server, is backed up in its entirety. Far too often, the website backup technologies that people have in place are woefully inadequate.
Your website level backups need to be fully automated, so if you have to manually set this running, then this is no good. Your website level backups need to include everything on your website, files and databases to ensure that the data can be easily restored. Your website backups also need to be stored in a remote location, so not on your web server. A backup sitting in the same place as the main system means that when the main system goes down, you have potentially lost your backup too.
WordPress makes the website level backups reasonably straight forward which means that when you invest in WordPress Security & Backups, the backups and security side of things are taken care of for you. This also means that when you have the right website level backups in place, when things do go wrong, as they always do, then restoring this backups is far faster and hence much cheaper for you. Make sure you have adequate levels of website level backups in place suitable for your needs. If you are in any doubt, then get in touch and we’ll happily review your current setup for free and advise accordingly.
Restoring a Backup and Responsibilities
Surely if anything happens it is the responsibility of your web developer, digital agency or web hosting company to restore any kinds of backups for free? No. Restoring any kind of backups takes time to implement, and depending on the level of backups you have chosen to invest in previously, this determines the ultimate cost involved for restoring any backups.
As explained previously, if you are on a shared web hosting environment of any kind, then this is going to cost you a lot more to restore the backups as they have to be unpicked form the whole server level backups and reinstated. Opposed to using website level backups alongside server level backups, these are far easier to restore and hence cheaper for you in the long run.
As a business owner you are responsible if your website is hacked, not the service provider, it will cost you either way. It’s your choice to pay a small amount every month or a large amount when things go pear shaped. We would always recommend regular maintenance, security updates and automated backup technologies being implemented as we have seen time and time again how this saves companies money in the long run.
If you are worried about the level of backups you have in place within your organisation for your website technologies, then get in touch and we’ll review your current setup and recommend relevant solutions that can be implemented.
by Michael Cropper | May 9, 2016 | Developer, Technical, WordPress |
Accelerated Mobile Pages, AMP for short, is an open source project designed to make the web faster. For people accessing web content on mobile devices, speed is a challenge for many users and with over 50% of content accessed on the web via mobile devices, this is more important now than ever.
The concept of Accelerated Mobile Pages is all about stripping out irrelevant styling and fancy JavaScript technologies to make the page load much faster, with the most important aspect, the content, loading virtually instantly.
If you’re interested in the finer details behind the project, have a read all about it here, https://www.ampproject.org/. The technical aspects behind the project are quite significant as are the underlying details about how your web browser loads content as standard.
Accelerated Mobile Pages AMP Speed Test
So we thought we’d put AMP to the test to see just how much faster it really is for WordPress in comparison to a rather bloated website which requires a bit of TLC, like most WordPress websites on the whole. The results below we repeated on the same website multiple times and cannot believe the performance increases we saw. The Accelerated Mobile Pages plugin for WordPress is available for download from the WordPress repository. A note on the plugin at the time of writing, it only supports Posts in WordPress, i.e. your blog posts. Pages and Ecommerce Products aren’t supported currently.
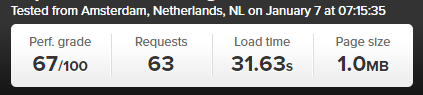
Blog Post Loaded As Normal
Blog Post Loaded with Accelerated Mobile Pages APM Technology
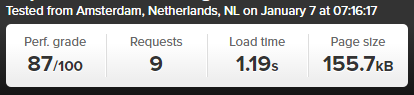
Awesome! Try loading this page you are viewing now as an Accelerated Mobile Page here to see how this looks: https://www.contradodigital.com/2016/05/09/wordpress-accelerated-mobile-pages-amp-speed-test/amp/
As a footnote. Yes, 30 seconds is darn slow for a website to fully load. Yes, tools like Pingdom are not perfect as many users are more interested in the time when the website appears to have completed to load opposed to when the last byte has arrived. And yes, this is only a single site as a comparison. Get involved and give this a go on your own website to see how this performs for you. Every website is significantly different and ever web server has been configured differently based on your individual needs.