One very common use case for using pfSense is to host a single website. So here we are going to show you how simple that is to do. As this is the very first step towards understanding how to host multiple websites behind your pfSense firewall, the reality is that the approach is very different to when you get to the point of hosting multiple websites behind your pfSense firewall. We’ll do a follow up blog post on that very shortly.
What is Port Forwarding?
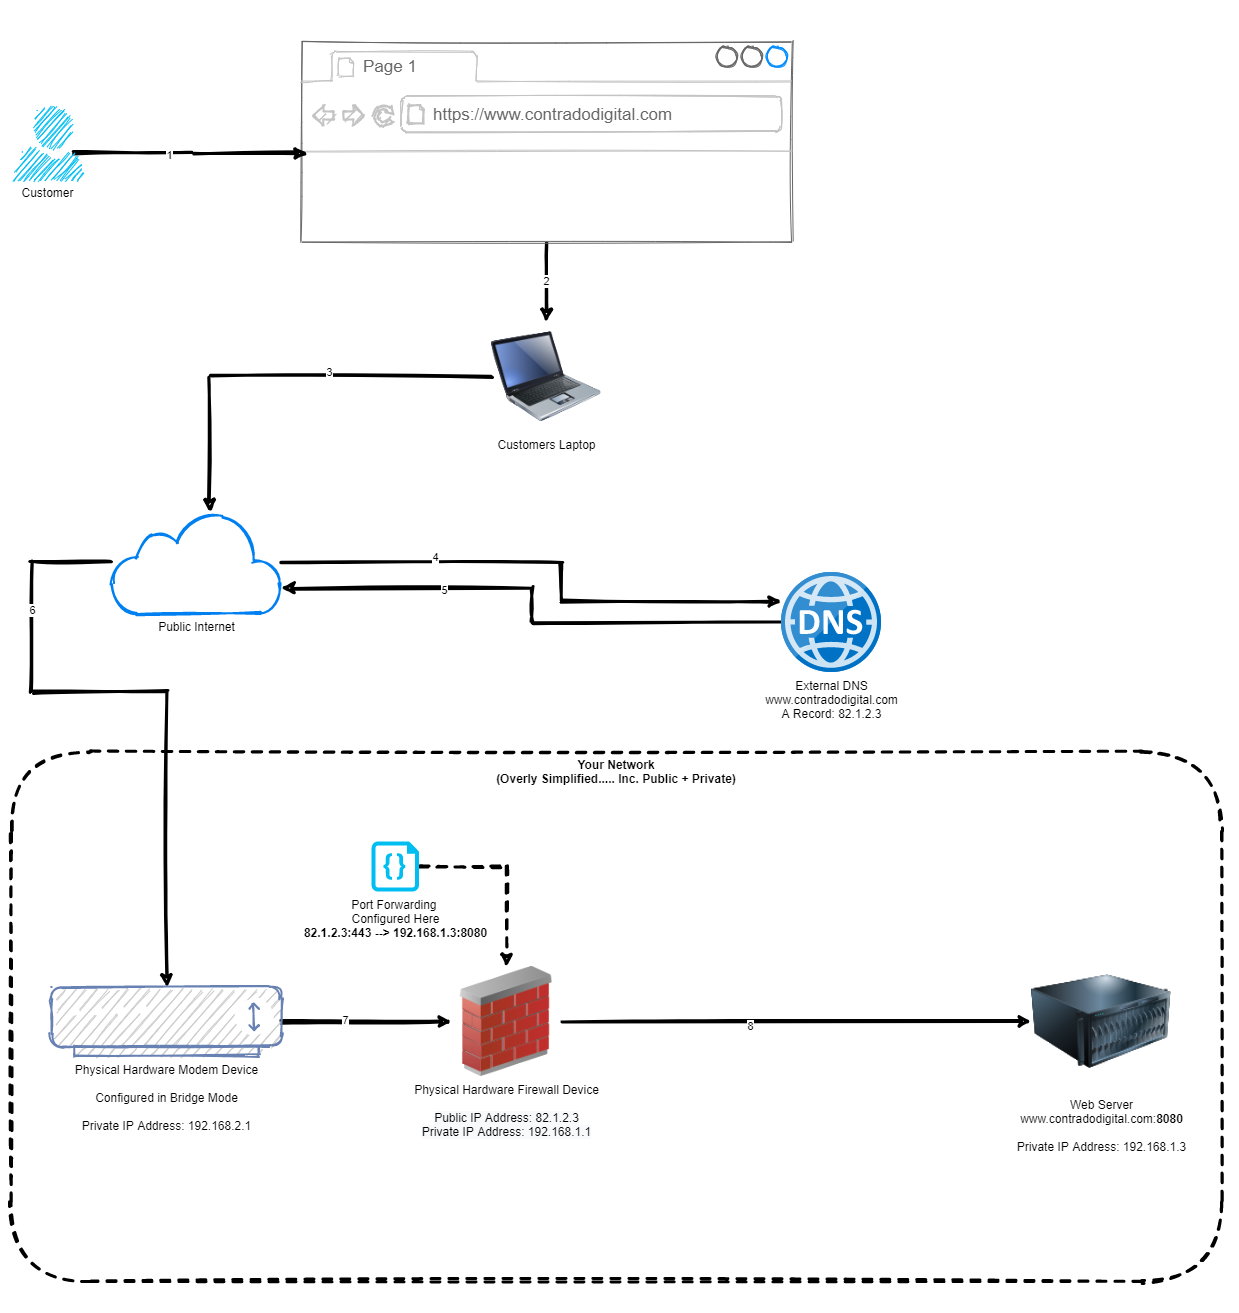
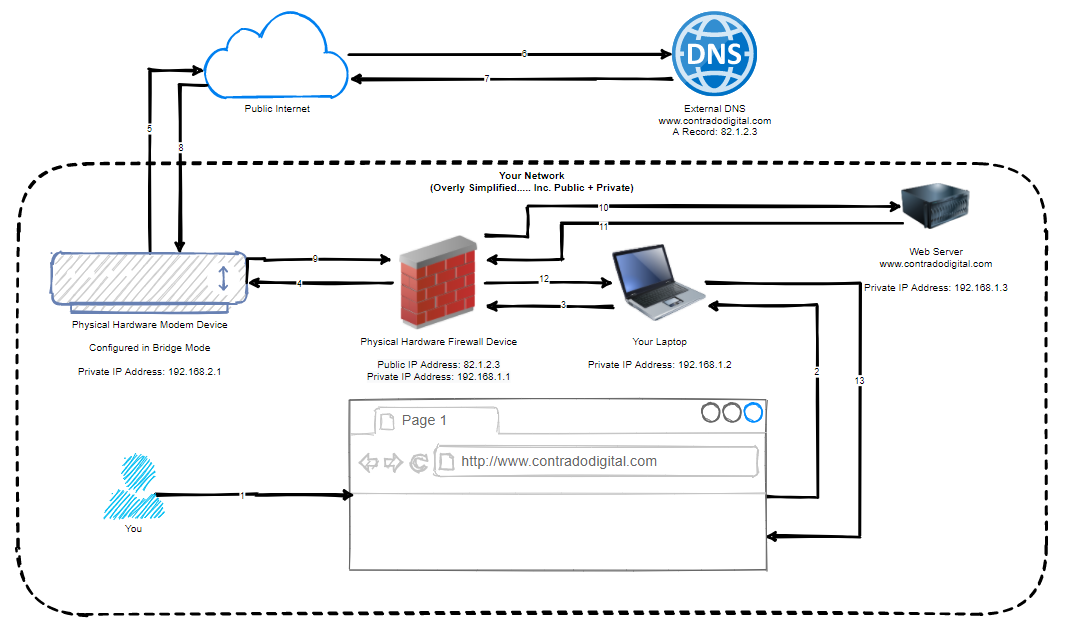
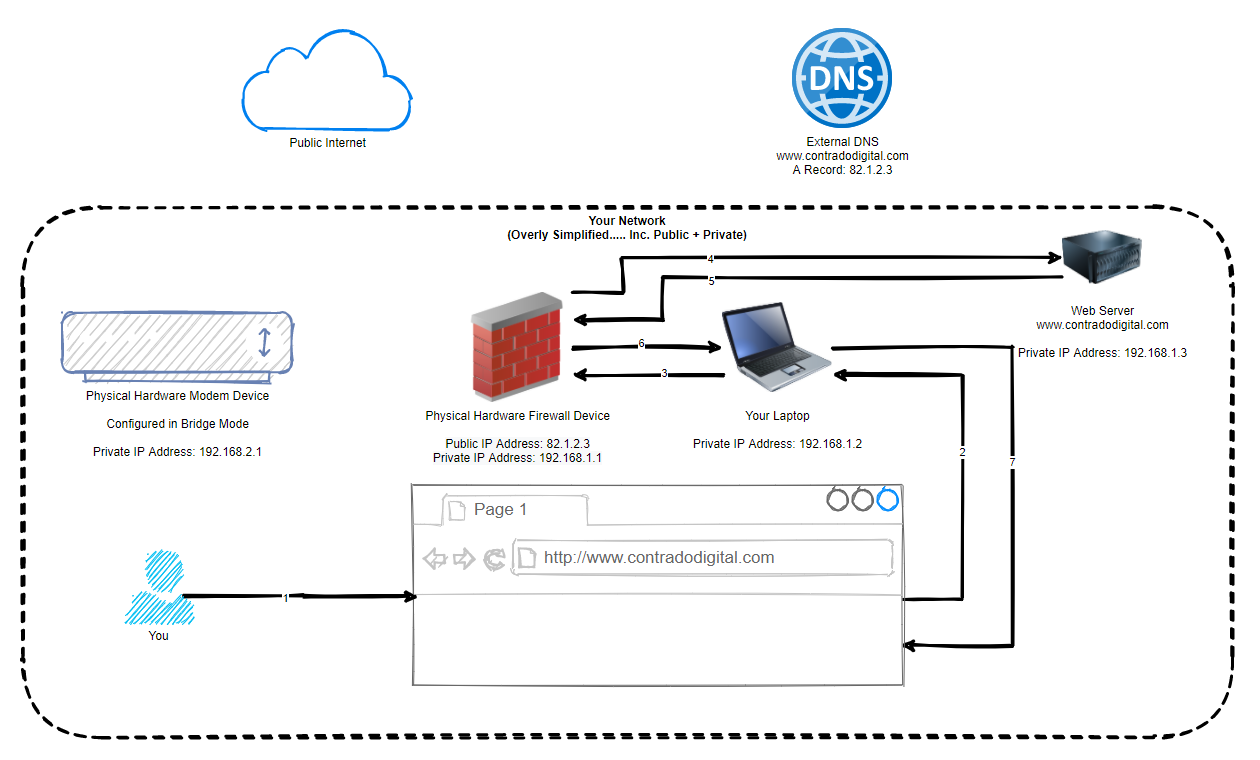
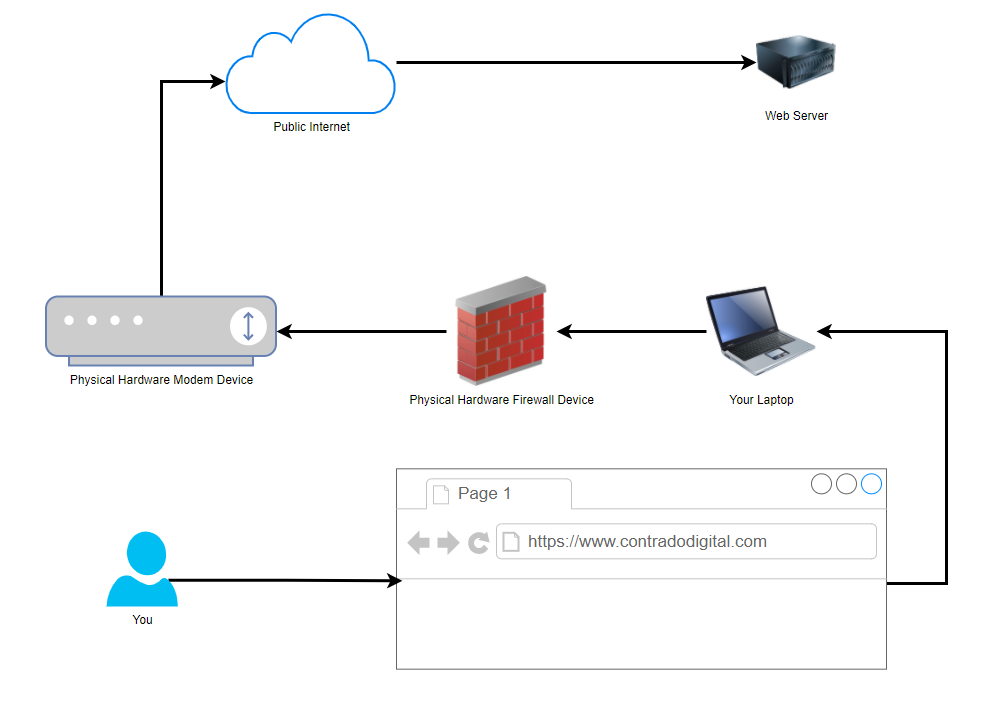
So the first step towards understanding how to host a single website behind your pfSense firewall is to understand the concept of Port Forwarding. Port Forwarding at the simplest level is to translate Port 1 Inbound on your WAN, to Port 2 on your LAN. To visualise what this means in an extremely basic setup, the diagram below looks at how Port Forwarding works.
As you can see from the diagram above, this basically translates www.contradodigital.com into the IP address 82.1.2.3, which is being accessed over HTTPS (aka. Port 443). Then the firewall translates this inbound request onto your web server that is sitting behind your pfSense firewall which is hosting your website, which is on the internal IP address of 192.168.1.3 and the web server software (in this case Apache Tomcat) is running on Port 8080 to handle the request.
One point to note is that depending on what server software you are running, this will depend on which port you need to forward the request onto. Generally speaking, you only want to allow inbound traffic for your website on Port 443 as this ensures a secure connection for your customers. There are many nuances and reasons to open more secure ports, but for the purpose of simplicity, let’s say that you only want to access the website as a customer.
Now let’s look at how to configure all this within pfSense.
How to Configure pfSense to Host a Single Website
Now we’ve run through what we are looking to achieve, let’s get into the pfSense config so we can see what we need to do. For the purpose of simplicity, we’re going to assume your web server is up and running and when you are on your internal network or the server itself, you can access 192.168.1.3:8080 in the web browser and that loads the website successfully. Again, there are a lot of nuances between different web servers, configurations and web application setups so this isn’t always as straight forward as this, but hopefully this information allows you to adapt this to your own specific use case. Hence why we’ve used a basic index.html in our example behind the scenes which is acting as a Hello World example.
Configure: Firewall > NAT > Port Forward
Navigate to the page, Firewall > NAT > Port Forward, then click ‘Add’.
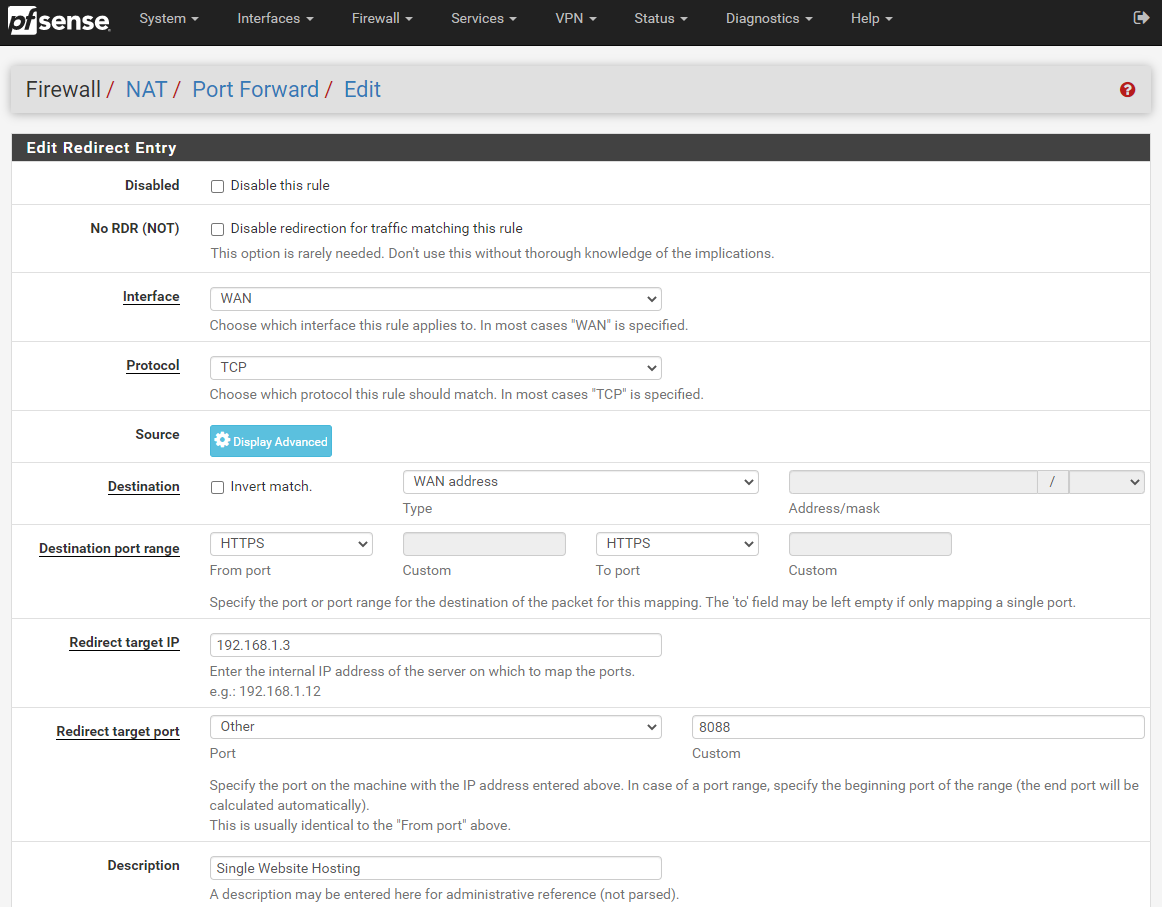
This will take you through to the page where you can configure your port forwarding rules. Enter the following information (tailored to your specific requirements);
The core settings that you need to look at in the above screenshot are;
Interface: WAN
This is telling pfSense that it should listen on the physical port on your firewall that is being used for the WAN traffic. This is the port that is connected to your modem using an Ethernet RJ45 cable.
Protocol: TCP
This is fine to keep as it is. For the vast majority of configuration, TCP is the protocol you want to be using.
Source: Ignore
For the purpose of hosting a website, you can ignore configuring the source as you want as many potential customers around the world to access you website and buy something. On the other hand, if you are wanting to public a website that only certain IP addresses should be able to access, you are probably going to want to configure this so that you can whitelist their IP addresses in here. For now though, we’re going to keep things simple in this blog post.
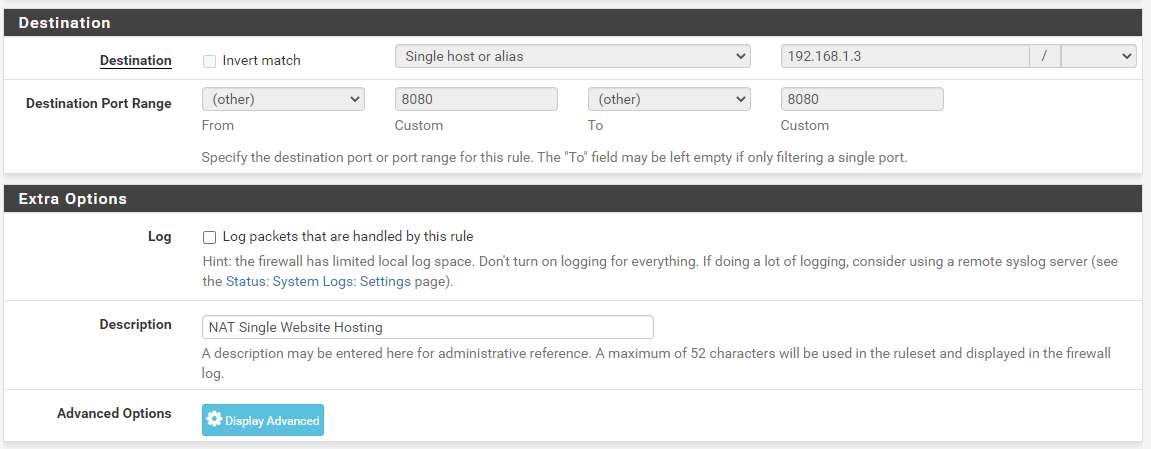
Destination: WAN Address
This is a bit of an odd one when you first look at it, as you would assume that this should be set to LAN Address. Weirdly though, on the whole with a standard pfSense setup, this needs to be set to WAN Address. You tend to set this to LAN Address when you want to access something on localhost 127.0.0.1, which is actually the pfSense device itself. So technically when you think about this a little more, a WAN address from the pfSense software on the pfSense hardware is actually anything that is not on the pfSense hardware. Makes sense?
Destination Port Range: HTTPS
For the purpose of this blog post, we’re going to assume that you’ve got Let’s Encrypt setup on pfSense, if you haven’t, then here is a guide on how to setup Let’s Encrypt on pfSense. If you just want to test getting a single website hosted behind your pfSense firewall initially, then by all means set this to HTTP then you can set up Let’s Encrypt later and update your configuration accordingly. Generally speaking you probably want to keep things simple so that there is only one port used, rather than a range of ports – although you can configure the From Port and To Port as a range of ports if you want to try something more advanced.
Redirect Target IP: 192.168.1.3
Naturally enter the LAN IP address of your web server here.
Redirect Target Port: Other – 8080
In this specific example, this is set to 8080 as this is the default port for Apache Tomcat. If you are using Apache or Nginx then the default port will likely be 80 for standard out of the box. Or you may be getting a little smarter by using Nginx as an Application Level Reverse Proxy so you can then further redirect so you can host multiple websites behind the scenes. This can be an approach to take, but in my opinion there can be better and more secure ways of doing this. Security in general as you have probably noticed has been completely emitted from this blog post as this is a whole topic in itself. Suffice to say, in a production setting, you may not want to use the IP ranges that have been listed throughout this blog post.
Description – Single Website Hosting
Give this a friendly name so you know what rule this is when you come back to it later down the line. If you are just getting started and playing around then this isn’t much of an issue, but trust me, as your setup grows, your future self is going to thank you for spending that little extra time on making sure your naming conventions and descriptions are helpful.
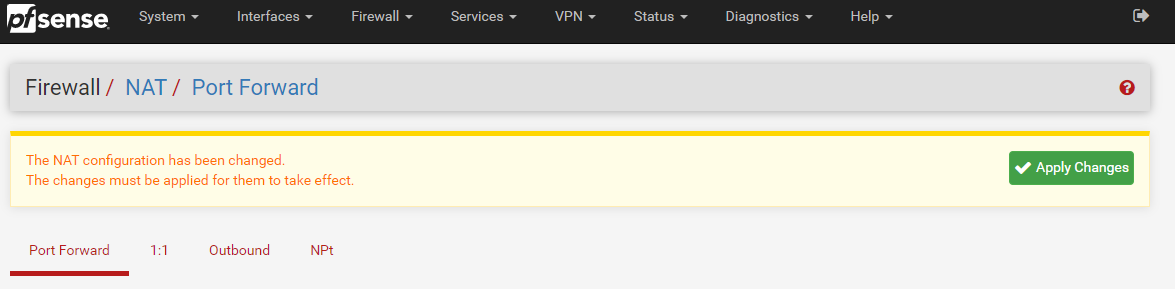
Done. Save this and you’re good to go. Once you’ve saved this, make sure you click Apply Changes;
Once you have clicked Apply Changes, you will notice a message appear that asks you if you want to view the status of the firewall rules being reloaded (and hence working…) which can be handy to double check that this has loaded correctly;
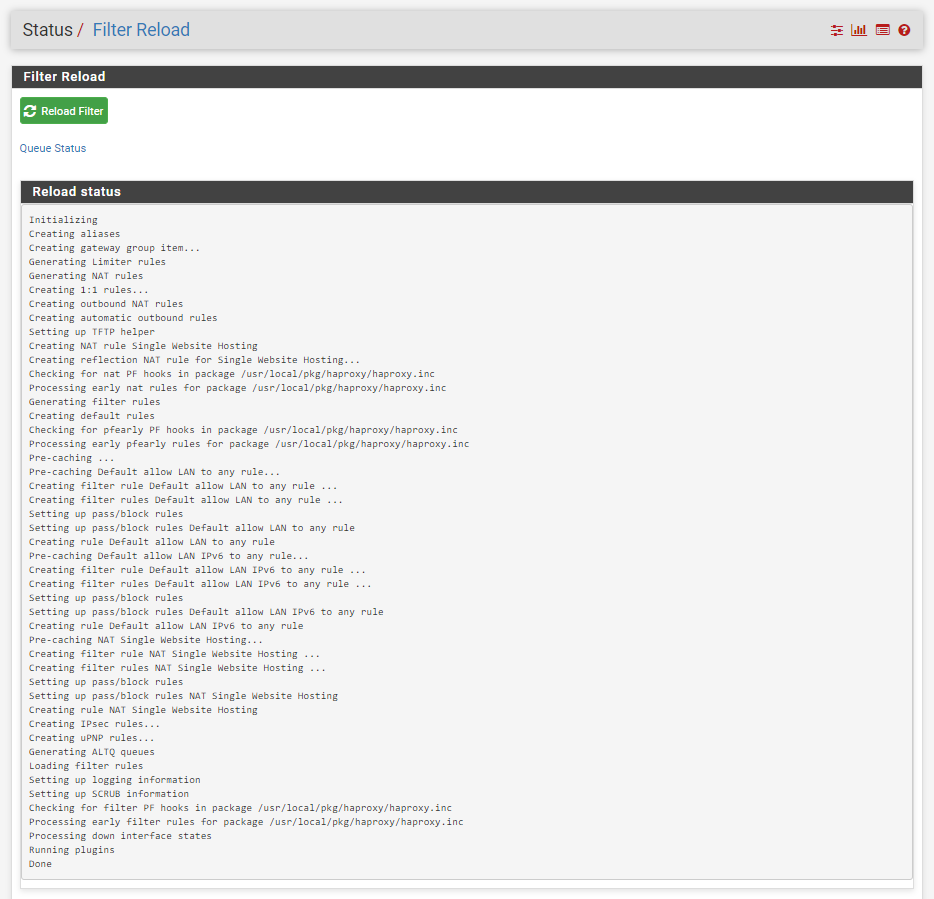
When you click on the Monitor link in the above image, this shows you the reload process in real time so you can make sure that it completes successfully.
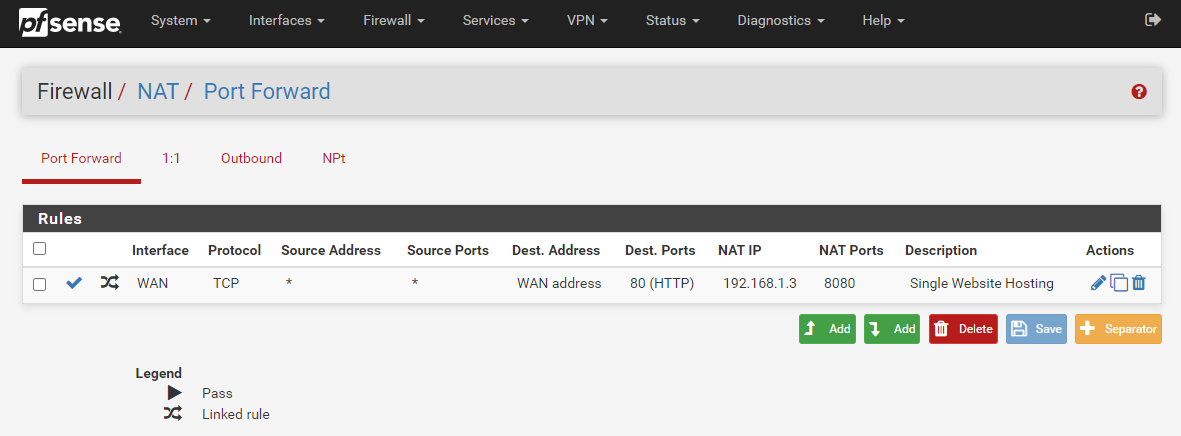
Once you have done this, you will notice that your Port Forwarding rules have now been applied;
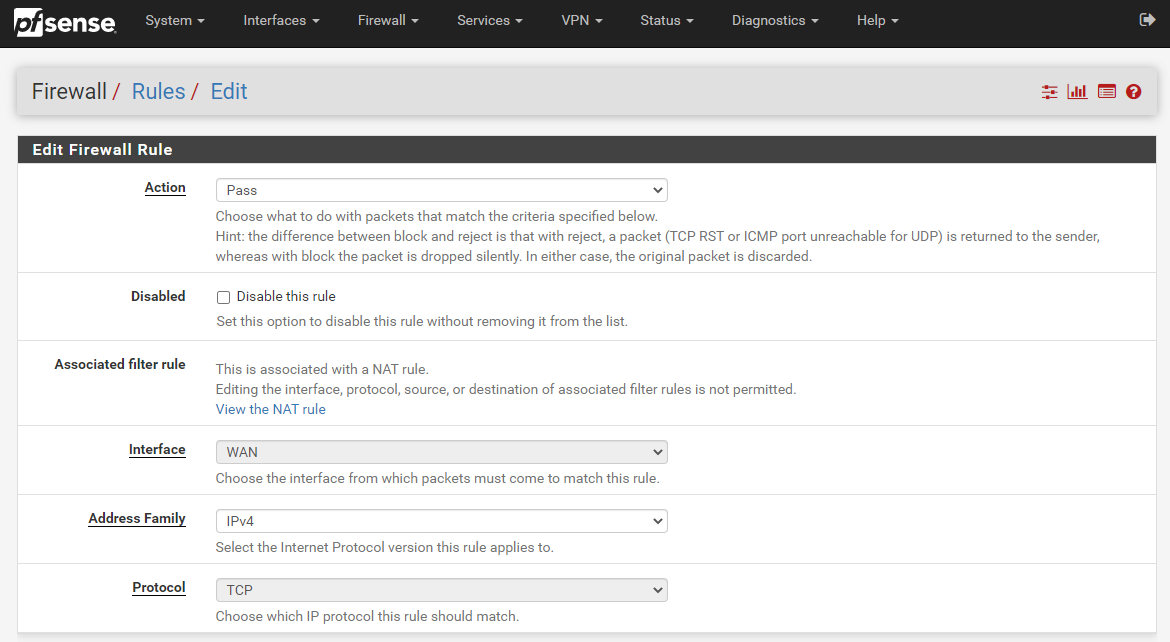
What is important to note here is that this action has actually done something automatically for you in the background. To see what this is, first, click back into that Port Forward rule you just created to edit it. You will notice towards the bottom of the page that this has automatically created a Filter Rule Association for you with the name “Rule NAT Single Website Hosting” which is the same name you used in your previous Description field.
If you click through into that, you’ll notice that it takes you through to the Firewall > Rules > Edit screen for this specific rule. You’ll notice that some of the fields are greyed out so you can’t edit them. This is because the rules are linked so it prevents you from accidentally breaking things. Well, more minimises that risk really.
What you’ll notice is that the Firewall Rule has been automatically populated with the information you entered in the previous screen we were looking at on Firewall > NAT > Port Forward. pfSense has even automatically generated the same name for you to make your life as easy as possible which is a great little feature.
Test Your Website
Now we’ve gone through the process of setting up all of the pfSense configuration, you should now be able to access your website easily via several different mechanisms.
Local IP: 192.168.1.3
WAN IP: 82.1.2.3
DNS Hostname: contradodigital.com (where the external DNS entry has the A Record pointed to 82.1.2.3)
Here we can see that the website is loading successfully over the WAN IP address on Port 80;
Next we can see the website loading successfully on the Local IP address on Port 8080;
And finally we can see the website loading successfully on the DNS Hostname www.contradodigital.com over Port 80;
Something to note about the above examples. This is when I’m accessing the website from a computer that is outside of the core network, just as any customer would be accessing the website. And the above examples are just that, examples, so this isn’t the actual setup in the background – but it could be quite easily.
So all of this is working from an external user perspective. This is great, but what if you are also within your own network and are wanting to access the website with ease. Well, this is where things get a little more nuanced in relation to how networks work and how traffic routes around them.
Accessing via the Local IP + Port works absolutely fine. But the second you try to access the website via with the WAN IP Address (82.1.2.3) or the DNS Hostname (www.contradodigital.com) this is where things don’t quite work as expected.
Before we jump into that, let’s just visualise the difference between this approach and the original diagram. Here is what we are trying to access now;
You might be thinking now, but why would you need to do that, why wouldn’t you just access the web server using it’s IP address directly, why wouldn’t you be using things such as Split DNS etc. Well, ok, all those things are valid discussion points, but for the purpose of simplicity, I’m going to completely ignore those points within this blog post. We can look at those topics separately another time.
The point is, you ultimately want to be able to access a single DNS Hostname, i.e. www.contradodigital.com, and get to the destination server easily, regardless of the matter if you are what is classified as “On Network” or if you are “Off Network”. Either way, you want a seamless user experience and something that just works.
Currently with the above setup we have worked through, if you use the DNS Hostname to access your website when you are On Network, then you will simply be presented with your pfSense Firewall Admin Login Screen. Handy, but not quite what we were expecting as the end result.
This is where we need to do a bit of NAT magic, officially known as NAT Reflection / Local Loopback / Hairpin NAT / NAT Hairpinning – it’s all the same thing. In essence, you turn on a feature within pfSense to allow the firewall to loop back on itself to get to where it needs to be. This is quite a handy feature and is easier to implement than Split DNS which takes a bit more effort to do.
How to Turn on NAT Reflection on pfSense
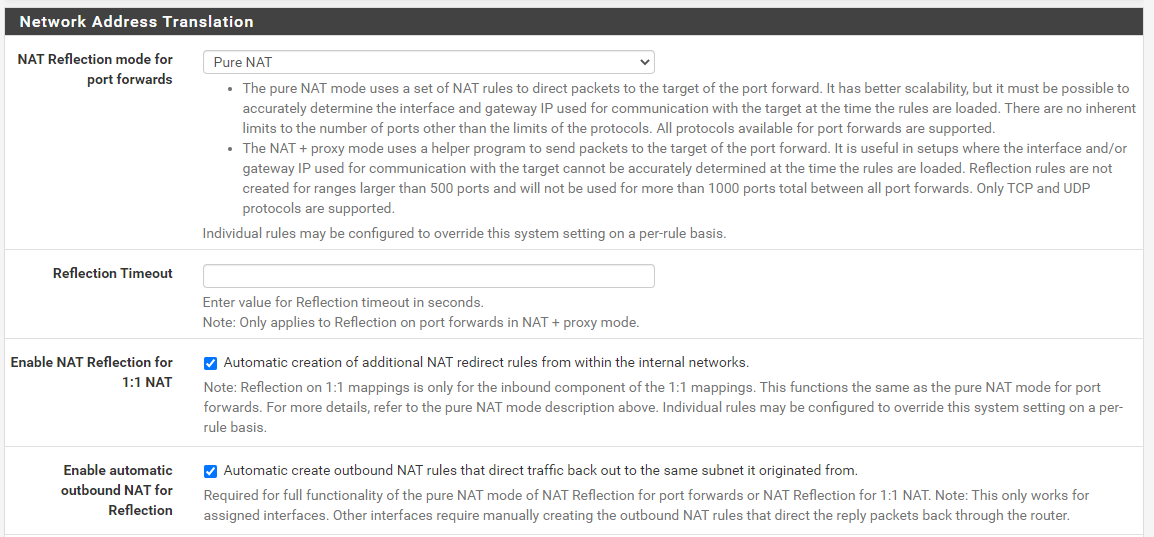
So let’s look at how we turn on NAT Reflection in the pfSense admin. It’s actually very straight forward to turn on, simply navigate to System > Advanced > Firewall & NAT.
Configure;
NAT Reflection Mode for Port Forwards: Pure NAT
Enable NAT Reflection for 1:1 NAT: Checked
Enable Automatic Outbound NAT for Reflection: Enabled
Save and you’re good to go. You’ll see your website loading correctly now.
So let’s have a look at NAT Reflection in a little more detail so we can understand what is actually happening under the hood and why you need this to get this setup working correctly. In summary, the main thing you need to understand in relation to NAT Reflection is this;
“NAT Reflection allows you to access local servers via your WAN Address, without leaving your LAN”
In a nutshell, if you compare an earlier diagram with the routing from your laptop on your LAN through to the web server also on your LAN, you can see the steps involved there. Compare this to what happens when you have NAT Reflection turned on (granted, the DNS is still external so this full end to end still has to happen periodically);
In the above image you can see that the traffic never leaves your local network, even though technically is should be doing. Awesome and this is all thanks to some smart routing within pfSense called NAT Reflection. Some people say this is a bit of a hack, I and most others say that it’s a very handy feature.
Re-Test Your Website
Ok so now we’ve got NAT Reflection turned on and we understand the basics of what it is doing. Reload your website and you should see it working correctly now;
Summary
Hopefully this guide has been a nice introduction on how to host a single website behind a pfSense firewall along with some of the nuances that come with doing so. As mentioned earlier, this only works for very simple setups as this approach here isn’t going to work without changes when you have two websites you are hosting, such as;
contradodigital.com –>192.168.1.3
contradodigital.com –>192.168.1.4
Since both websites are running on Port 80 or 443 so you can’t easily do this setup using purely pfSense. This is where other pieces of software come in handy such as HAProxy (a open source package that can be installed onto pfSense) which is one of the correct ways of allowing multiple websites to be hosted (along with multiple WAN IP addresses) or you can add an Nginx reverse proxy as the single destination where you can then control further redirection based on the hostname and port. This all comes down to your requirements.
And as a final note, we haven’t talked anything about security in this blog post really. So make sure you consider this so that you can achieve a secure setup with what you are looking to achieve.
Today we’re going to look at how to setup Let’s Encrypt on pfSense so that you can install, manage and automatically renew your SSL certificates completely free of charge with ease. If you don’t know about Let’s Encrypt, you really should. Go read up on it on the main Let’s Encrypt website, it’s awesome, it supports over 225,000,000 SSL certificates on websites around the globe and is supported by the biggest companies powering the internet.
OK, so back to the main point of this blog post, how to get Let’s Encrypt setup on your pfSense hardware. For the purpose of this blog post we’re going to assume you’re running pfSense directly on one of the Netgate hardware devices as there are too many nuances to running pfSense virtually that make the setup too problematic in any real world environment. A virtual pfSense environment is great for playing around, but beyond that, personally I’ve had too many issues for that setup to be taken seriously for a production ready setup. If you have managed to get that working, then please do comment on the setup that you’ve got working!
For reference, ACME stands for Automated Certificate Management Environment. It has no link to the Acme Corporation in the Road Runner/Wile E. Coyote animated series.
Why Use Let’s Encrypt on pfSense
This is a very good question, and one that doesn’t have a straight forward answer. This comes down to two basic use cases, one of which is to manage SSL certificates at the edge of the network (i.e. your pfSense device), the other of which is to manage SSL certificates at the destination server. And as usual in the world of IT, the answer is that “it depends…” and it does. There is no hard and fast answer for a solution as it all depends on what you want to do. Both approaches have merits and drawbacks.
Personally speaking, I tend to lean towards utilizing SSL connections using Let’s Encrypt or otherwise on the destination devices rather than the edge network firewall. The reason behind this is because this approach gives significantly more flexibility to the portability of services as there is a more decoupled approach, meaning that it’s more pain free.
In the scenario whereby you need to move a virtual machine from an on-premises network to the cloud and you have a tight coupling via the SSL certification process to your on-premises network, the migration process will be more difficult. Whereas if you had everything contained within the single box, you could easily take a snapshot and migrate that to the cloud without ever worrying about the network firewall and any SSL certificates installed on there. Granted, there are many other considerations and this is an over simplification, but you get the gist.
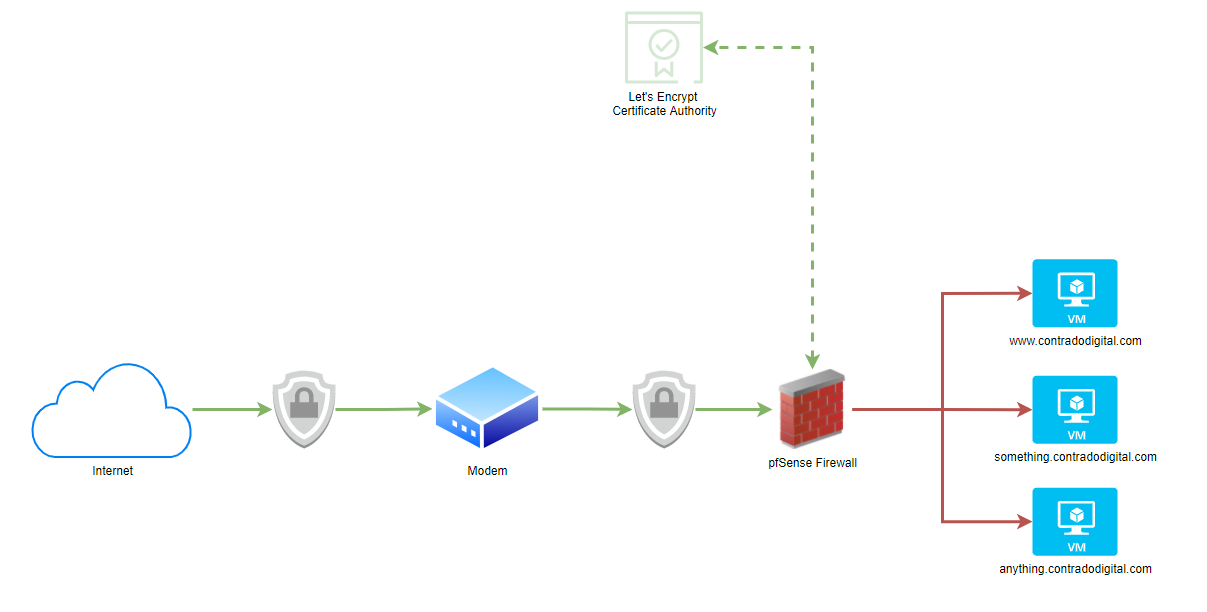
What this means pictorially. The whole point of setting up Let’s Encrypt on your pfSense hardware device fundamentally means that traffic from the Internet to your pfSense device is encrypted using SSL, which then means the traffic from your pfSense device to your destination computer/server/virtual machine is not encrypted.
As you can see in the image below, the lines highlighted in Green show where SSL encryption is present and the Red lines highlight where SSL encryption is not present. This is an overly simplified architecture as there are no notions of VLANs highlighted in this diagram to suggest if this is a safe or not safe space to be dealing with. Non the less, it highlights the main point around the approach for simplicity.
As mentioned previously, there are both pros and cons to this approach depending on your specific needs.
Step 1 – Install ACME Package
Thankfully pfSense comes with a list of available packages that you can install with ease. Very much in the same way to how Yum works for Linux, the only difference being that within pfSense you install the packages via a visual graphical user interface GUI to help you do this easily via the pfSense administrator console.
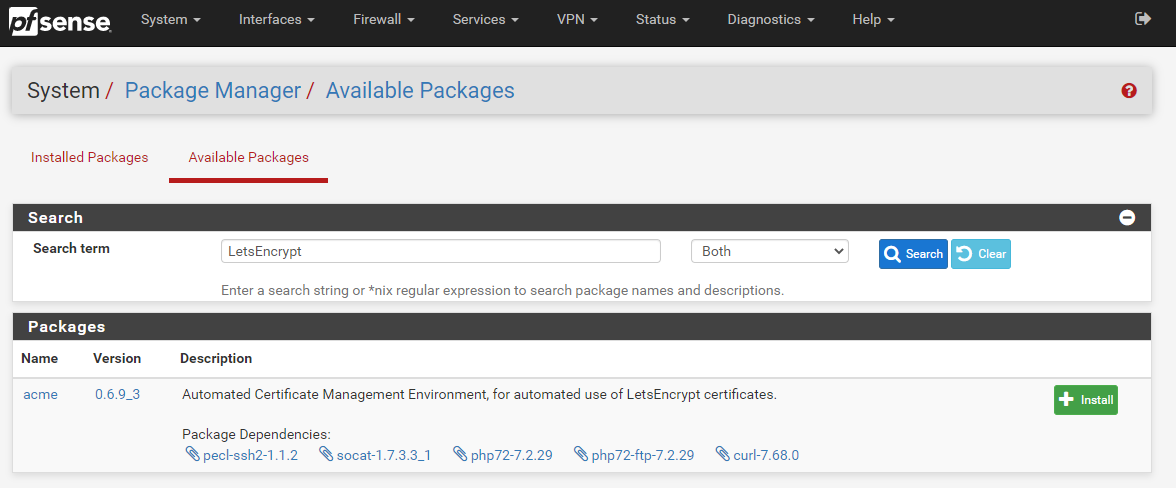
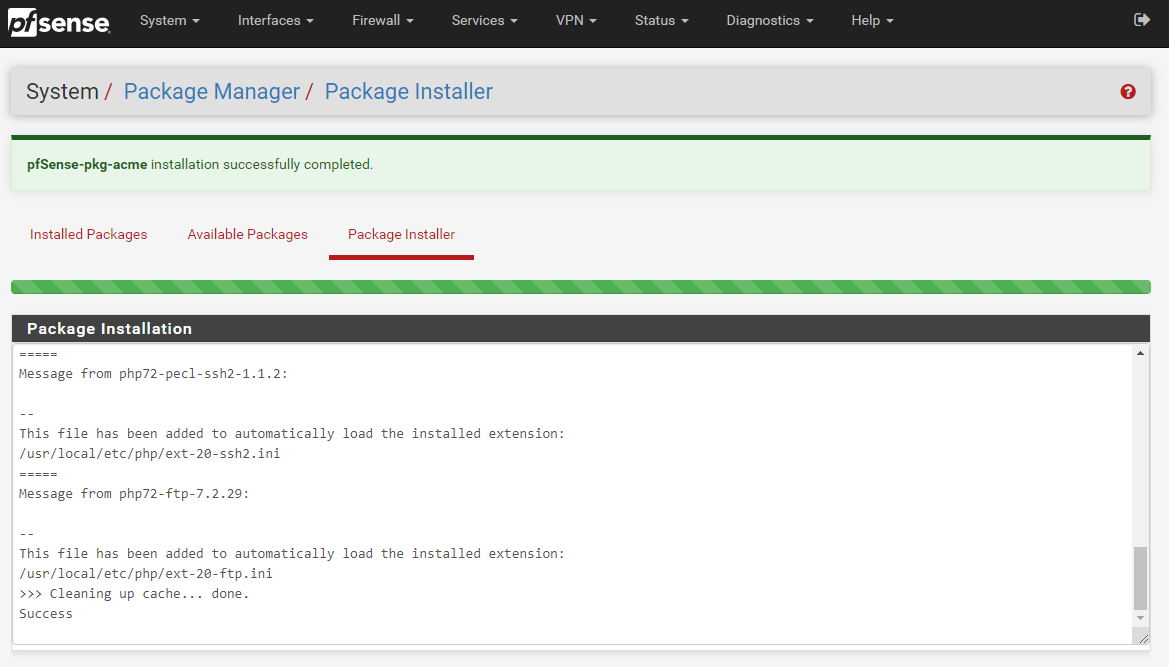
To install the Let’s Encrypt ACME Package onto your pfSense device it is actually extremely simple, simply navigate to, System > Package Manager > Available Packages;
Once the installation process has complete for Let’s Encrypt on your pfSense device you’ll see a nice message stating that “pfSense-pkg-acme installation successfully completed”.
Excellent, now we’re onto configuring your Let’s Encrypt ACME package so that you can then install, manage and automatically renew your SSL certificates with ease.
Step 2 – Register an ACME Account
So next we need to get your system registered as an official ACME provider. This step is important as Let’s Encrypt controls the use of their system through basic rate limiting, meaning that once you reach the rate limit you will be blocked for a period of time. This helps to maintain the ecosystem for everyone. By registering your account, not only is this a required step to get Let’s Encrypt up and running on your pfSense hardware device, this also allows you to work within the rate limits of certificate renewals so that you can plan accordingly for your SSL certificates.
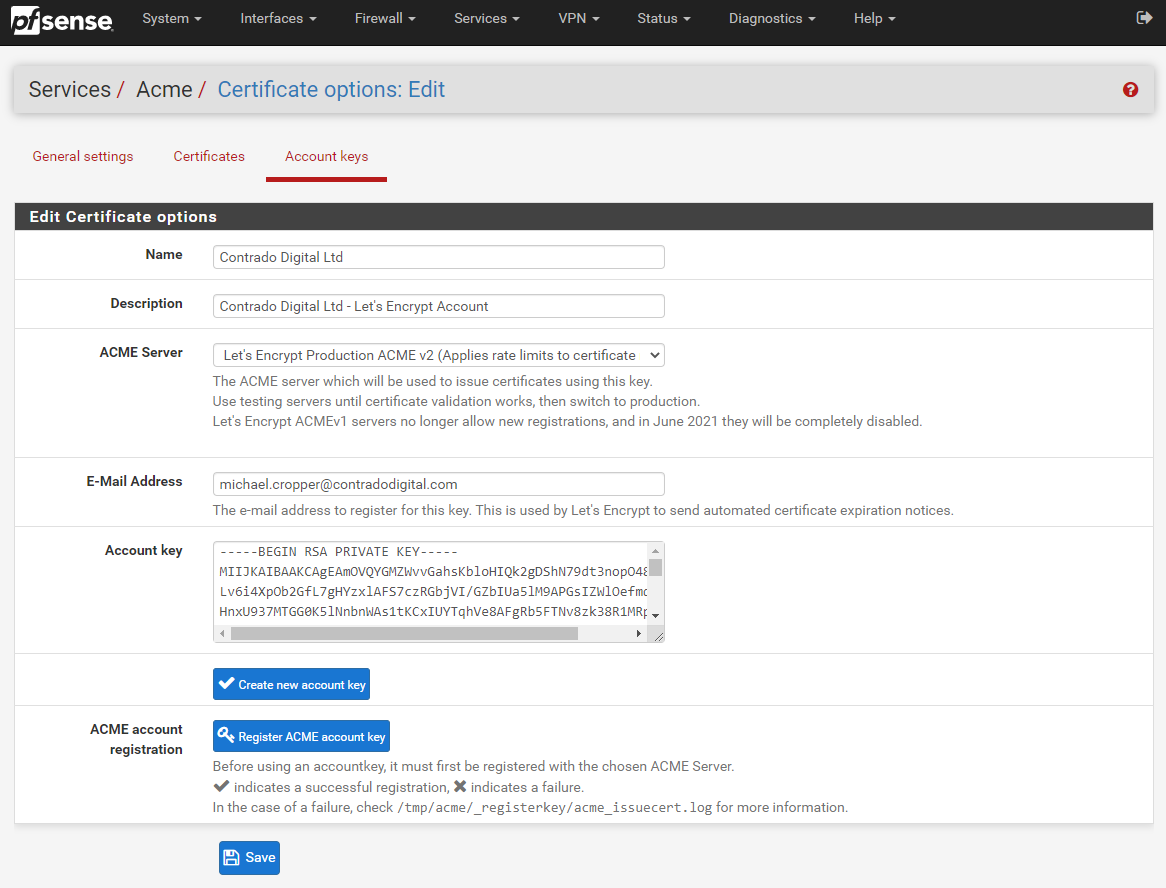
To get your Let’s Encrypt account registered first of all you need to create an Account Key by visiting, Services > ACME > Account Keys, then clicking ‘Create new account key’, which will generate the Account Key automatically.
Now click ‘Register ACME account key’ and you should see the process complete with a tick;
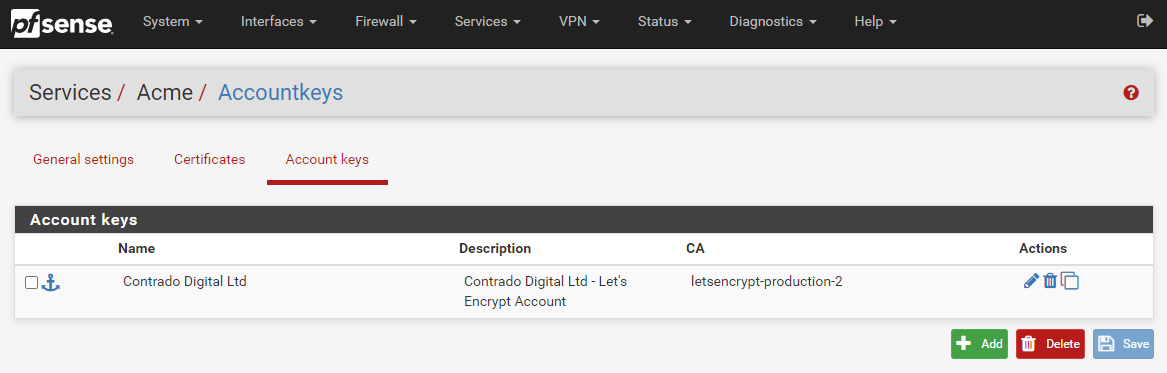
Now click ‘Save’ and you’re good to go. You will then see your Account Key registered within your pfSense settings;
Step 3 – Configure Automatic Renewal of SSL Certificates Using Let’s Encrypt ACME Plugin on pfSense
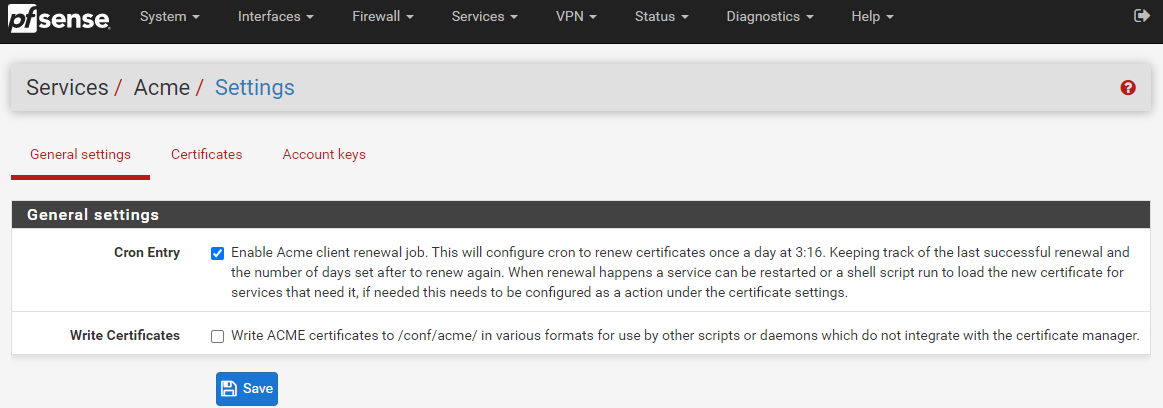
OK, so next we need to turn on the configuration settings so that your Let’s Encrypt SSL certificates are automatically renewed when they are due. Unlike commercial SSL certificates which are generally valid for a minimum of a 12 month period, Let’s Encrypt SSL certificates are valid for a 90 day (3 month) period, upon which you are required to regenerate the SSL certificate. Quite frankly, no-one is this dedicated to remember to do this every 90 days, which is where the automated renewal process comes in extremely handy.
To turn on the automatic SSL certificate renewal process, simple navigate to Services > ACME > General Settings and configure the CRON Entry as can be seen below;
For reference, a CRON Entry is more commonly referred to as the CRON or a CRON Job. For which CRON is a geeky term for how the Greek God of time Chronos is able to control things. An interesting point, but completely irrelevant to what you are reading about.
Summary
And that’s it, you’re done. You can now use Let’s Encrypt to secure the encryption between the users accessing the systems/websites/applications behind your pfSense hardware over a secure network.
The concept of a “Proxy” is often hugely misunderstood by people who know a little about these things, which results in a large amount of confusion for others who know less than those who know a little. It doesn’t help as the term “Proxy” is often used interchangeably with Reverse Proxy. While they have similar names, they serve completely different purposes. We’ll do another blog post soon on what a Reverse Proxy is. But before we do that, let’s take a look at a basic Network Firewall Proxy. What is it and why is it used?
Basic Network Physical Hardware Setup
Ok, so this is a hugely simplified diagram to illustrate the point. Let’s look at the physical hardware involved. It helps to get the point across about what a proxy is and most importantly how traffic is routed from A to Z when using these types of technologies.
You type the website into your web browser on your computer and that is how the traffic is ends up at the web server where the website lives. Some of underlying routing between the Public Internet and the Web Server have been omitted for simplicity in this diagram as we are focusing on the Network Firewall Proxy at the moment.
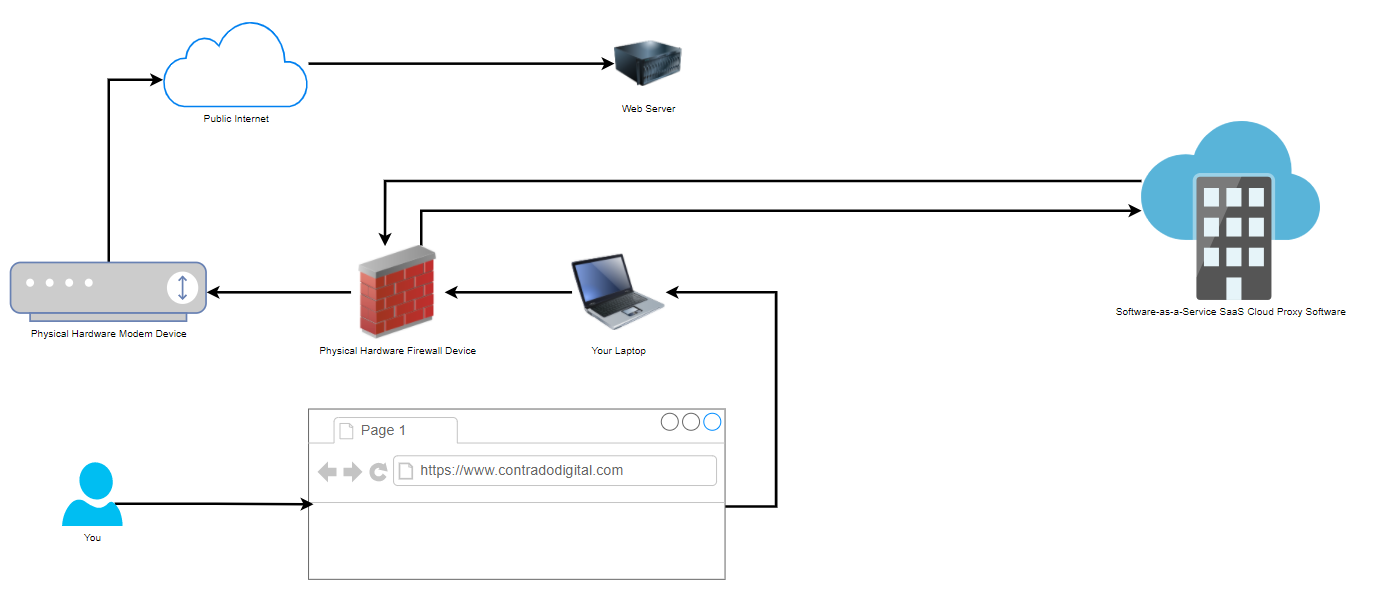
Physical Network Setup with Proxy Used
Now when we compare the above basic setup with the setup when you are using a Proxy, also known as a Proxy Server (generally something you manage) or Proxy Service (generally something you pay as a subscription fee for someone else to manage and you just plug into), you can see how there is just one additional step involved in the routing of how the network traffic gets from your computer to where it needs to get to on the internet.
That really is the only difference when you are using a Network Firewall Proxy VS not using one. As I mentioned at the start, don’t get this concept confused with things such as a Reverse Proxy which is completely different. Fundamentally, a Reverse Proxy does a similar ‘thing’, i.e. going via a middle man, but the architecture is significantly different and the tools used are significantly different. So despite their similar names, treat them as completely different things.
How to Configure a Network Firewall Proxy on your Hardware Firewall
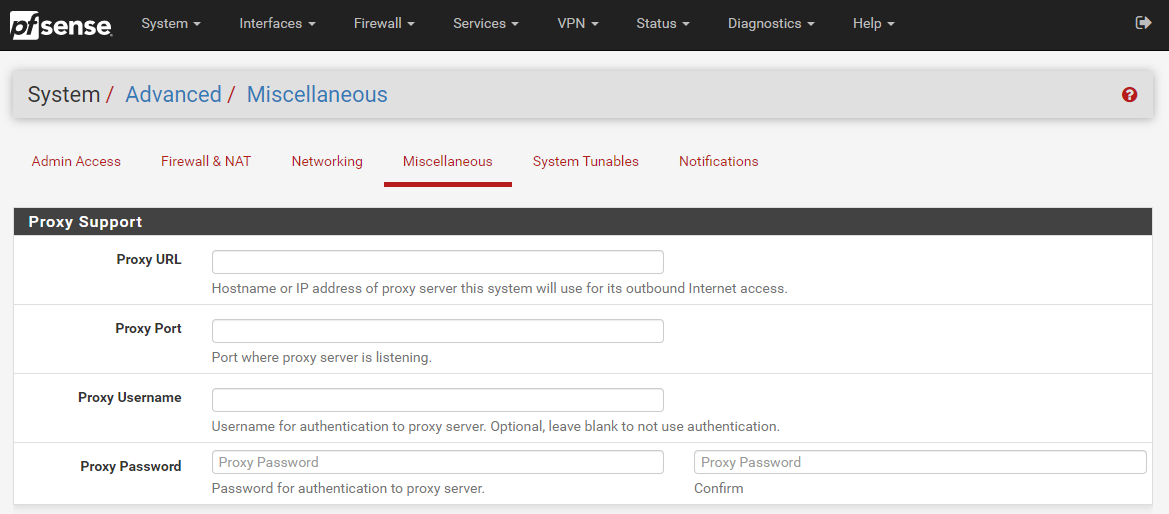
Well as the section heading kind of suggests, you do this on your hardware firewall. To help you visualise this, let’s look at a hardware based pfSense firewall device which is capable of configuring a Network Firewall Proxy, here is what that looks like in the settings;
The above image shows you how you can easily configure a Proxy within your pfSense Firewall so that you can achieve this middle man setup as outlined in an earlier diagram. This Proxy could be one that you host yourself or one that is an external Software-as-a-Service SaaS Cloud Proxy that you subscribe to. Either way, pfSense gives you the options you need.
Why Use a Network Firewall Proxy?
You may be asking yourself right now why we even bother to use a Network Firewall Proxy. Well, you tend to find that it is fairly common practice in large enterprises as they like to monitor the network traffic to see what people are doing on the network. The physical hardware firewall just isn’t capable of doing the job easily as this is purely at the hardware level which is very low level and hence low levels of user functionality.
To put it into context, while modern websites are often updated multiple times per day, you’ll tend to find the software on a physical firewall is updated once every few years, and even still this is really just to patch any critical security vulnerabilities that have been discovered, not to improve the user experience of people using this device. Hence why Software-as-a-Service SaaS Proxy Services have become so popular.
Generally in the enterprise world, Proxys are used as one type security mechanism to protect both users and the corporate network from attack. While there are positives to this there can be drawbacks too. For example, let’s say you are accessing a trusted source such as Microsoft Office 365 online platform, https://www.office.com, why on earth would you run that through a Proxy service as you know full well that this is a trusted source. Let’s be honest, if Microsoft has a security incident that relates to how users are accessing their cloud services, we’re all f****d, and using a Proxy or not using a Proxy is going to be the least of all our issues. So we have to be sensible about how we use Proxy services.
This extra leg in the network journey adds latency (aka. It’s slower) for users. Slowness results in lack of productivity and lack of profitability as a business. Which is where the next topic comes into play around a Proxy Bypass.
Proxy Bypass
Here is where things get a little more nuanced. The name Proxy Bypass does exactly that, it allows you to configure things which are required to run through your Proxy, and things that should not run through your Proxy. There are many valid reasons why you need to implement Proxy Bypass to filter some parts of your internet traffic to go through the Proxy and others to not go through the Proxy.
You’ll find that some Proxy services (internal or external) are quite frankly a bit rubbish and don’t perform properly. Take for example any modern technology that does SSL validation at the client side, some Proxy services actively strip out SSL certificates in-transit and replace them with their own on different legs of the journey. Naturally with modern technology, they can detect this interference, so when the final Request-Response comes back to the client machine, it distrusts the response and bins it off – and rightfully so. This can cause a lot of problems for software developers who are utilising modern development technologies to pull in packages and dependencies from remote sources as part of their systems using things such as Maven, Gradle, NPM, Git and more.
Corporate networks acting as a Man-in-the-Middle Attack is not great. While, yes, there are corporate security controls that need to be adhered to, but at the same time, this means that when SSL is being decrypted on-route, that things such as passwords and credit card details can be read in plain text if one were to wish to do so. This is a very fine line between corporate security and employee/user privacy.
Summary
Hopefully that is a good summary of what a Network Firewall Proxy is and now you know not to confuse it with a Reverse Proxy. There are many different types of Proxys out there, from large enterprise class systems to self-hosted open source systems too.
I wanted to write a quick blog post highlighting the importance of choosing the right IT hardware, in this example, the type of hard disk drive. It’s often difficult to find reliable information online around performance of IT hardware, and if you can find it, you probably find it near impossible to understand. You’re not alone, even people experienced in IT find this frustrating, so as an average user, this can be even more challenging.
What is a Solid State Drive SSD?
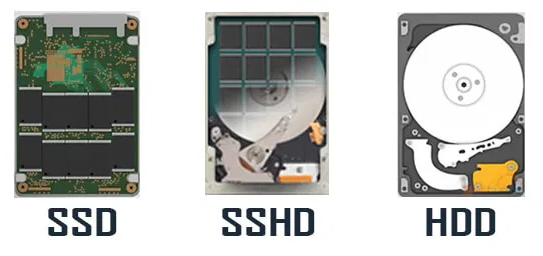
Before we jump in to look at the performance difference (and a little spoiler, its enormous), let’s take a look at what the physical differences are between a Solid State Drive SSD and a Standard Hard Drive HDD. They sound similar, but they are worlds apart.
Fundamentally the core difference is how the data is stored. Ignore the physical shape or connectors on the device as that isn’t important, both Solid State Drives SSDs and Standard Hard Drives HDDs come with the same variety of connectors (SATA, IDE, USB, PATA, etc.) and come in the same variety of sizes (3.5” and 2.5”) with varying availability depending on your use case and other hardware factors. Then you have Solid State Hybrid Drives SSHDs which are a halfway house so they contain in the physical device part Solid State Drive SSD and part Standard Hard Drive HDD.
As you can see on the right, the Standard Hard Disk HDD, this contains what looks like a CD/DVD, it’s made of different material but conceptually it’s a very similar thing. It spins, so is a mechanical device and has a little arm that moves backwards and forwards to position itself in the right place to read the data on the disk.
As this is mechanical it has a natural limit to how fast the moving arm and the spinning disk can actually move. It’s one of the reasons why Standard Hard Drives HDDs have a fairly short shelf life and why you’ll find these types of hard drives start making wearing noises and clunking noises as they start to reach the end of their life. In the exact same way your car does when the wheel bearings start to go.
Inside a Solid State Drive SSD
When you compare a Standard Hard Disk HDD to a Solid State Drive SSD, this is completely different. You’ll find no moving parts inside a Solid State Drive SSD. This is one of the reasons why they are so fast, the limitation comes down to how fast electricity flows through the electrical circuit. On top of this, Solid State Drives SSDs are made from the same material as your RAM (Random Access Memory) which is lightning fast.
All those little black chips, that’s where your data lives. As you can see, no spinning disk.
Inside a Solid State Hybrid Drive SSHD
And for completeness, the Solid State Hybrid Drive SSHD. As you can see, it’s basically a mixture of the two types of technology crammed into the same physical space.
Ok, we’ve gone a bit off topic here, but context is important to set the scene. Back to the main point of this blog post, the performance difference between Solid State Drives SSDs and Standard Hard Drives HDDs.
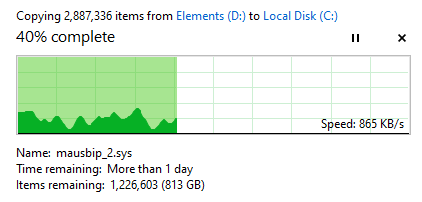
Working on a recent upgrade project which included some data migration I wanted to see the performance difference in actual numbers. We’re always told that Solid State Drives SSDs are faster than Standard Hard Drives HDDs, but what does that mean in number? Well, here’s what the performance difference looks like when transferring around 3,000,000 files from a Standard Hard Drive HDD over to a Solid State Drive SSD. I’ve included a few snapshots of the performance at different time points so you can see this isn’t a random performance spike.
Guess which row is the Solid State Drive SSD and which is the Standard Hard Drive HDD…..
But, why should you care? You aren’t moving 3,000,000 files on a daily basis. Does this really matter?
Well, yes, it does. And let’s put this into perspective. Everything you do on your computer on a daily basis and things that all your staff are doing every day is reliant on the performance of your IT hardware. Poor IT hardware performance results in wasted time for you and your staff. All those micro delays mount up. Everything from opening a Microsoft Word document, editing a Microsoft Excel document, creating a Microsoft PowerPoint presentation, reading your emails, having that Microsoft Teams video conference call and working in all of your business critical apps every day.
On top of this, what about all of your servers, web servers and core IT infrastructure. Are your customers accessing your website that is running on a Standard Hard Drive HDD which is significantly lower performance than a Solid State Drive SSD? This can directly influence your sales on your website if you are running an ecommerce website. All this matters.
Imagine two professional joiners and needing to fit a new staircase. One joiner only has in their toolbox a set of screwdrivers from a Christmas cracker;
Of the two joiners, who do you think is the best equipped to complete the job? Not only complete the job, but complete the job to a high quality and in the fastest time possible.
This comes down to performance not just of the hardware, this is performance of your business. And performance of your business is one factor that determines how competitive you are in your industry. Do you think companies like Google, Facebook and Apple are running on poor performing IT hardware?
This is what this looks like in practice. This is a great visualisation that I’ve been sent recently which highlights what this means for your business.
Summary of video for the time it takes to do the same activity;
Poor performance: 60 seconds
High performance: 4 seconds
That’s all for now. Hopefully this highlights the importance of investing in the right IT hardware. If you’d like any support with this for your business, drop us an email and we can be on hand to guide you through this process.
IT and project delivery rarely have a positive connection in peoples minds in companies both large and small. It’s almost the norm these days that IT projects always delivery late and over budget. But this doesn’t have to be the case. When you have the right people, processes and governance in place within your IT department, delivering projects becomes a breeze. One specific aspect we’re going to look at in this blog post is around achieving more by doing less. By that I mean how we can increase the throughput of delivery to deliver value to the business faster with the same amount of resource and the same amount of project demands.
Seems impossible, right? Well, no. It all comes down to process, communication and managing dependencies. Let’s dig into this a little more, firstly with an analogy for building a house.
Let’s say you are a housing developer and you have an estate of 100 houses to build. You know that you have 100 houses to build and you know the resources you have on your team for building those houses. Let’s say this breaks down as follows for 100x staff;
1x Site Manager
2x Quantity Surveyors
2x Project Managers / Construction Managers
15x Groundworks People
50x Brick layers
10x Electricians
10x Plumbers
5x Plasterers
4x Roofers
1x Carpet Fitters
So looking at that split, it sounds fairly sensible for a split of resources to enable delivery of 100x houses. For argument’s sake, let’s say that we have all materials on site at the start of the process to enable us to build the 100x houses without worrying around delivery timelines from suppliers. Before we set the team running ahead with building the units, we need to have a plan, and a plan isn’t purely to build the houses in the fastest time possible. A plan needs to understand resource dependencies, and in this case, this is people. The same as in IT.
Before jumping into the details of what this means. We have to think back to what this means for a business and why project delivery is so important. It comes down to two factors;
Capital tied up in Work-in-Progress, meaning that this is an opportunity cost as this limits what we can invest in elsewhere and often can result in having to source additional finance to support investments, when in fact with a change of approach that may not be needed.
Lost revenue for every day something is not delivered. In this case for houses, that is the profit that could be gained today by selling or renting a completed house VS waiting 3 or 6 months for that profit to be released.
The same is true in IT. All IT projects deliver value to the business, enabling the business to move faster, be more agile, and keep ahead of the competition. Delays in delivery in IT result in the company becoming a laggard in the industry.
So, let’s get back to the plan for building 100 houses. In a nut shell, we have three core approaches;
Delivery Plan 1 – Big Bang: We build all 100 houses, then start to sell them
Delivery Plan 2 – Phased Delivery: We build the houses in batches of 25 so we can release 4x lots for sale at one time. This tends to be how the majority of housing developments work.
Delivery Plan 3 – Agile Delivery: We build and sell the houses one by one as they become available.
Taking into account the considerations around having capital tied up and lost revenue, let’s visualize what this means in practice. For the purpose of illustration we’re going to assume;
Every property is rented
Every house takes 1 week to build end to end
Every house generates a rental income of £750 per month
The house is rented out the day it is completed
What this looks like in numbers;
As we can see from the above graph, the Agile delivery plan, selling 1 house at a time, results in a higher cumulative revenue by the end of the 110 weeks. But this is not just a small difference, this is a significant performance improvement.
Delivery Plan 2 – Phase is 341% more efficient than Delivery Plan 1 – Big Bang. Delivering £937,500 revenue and releasing that working capital to the business in the 12 months.
Delivery Plan 3 – Agile is 25% more efficient than Plan 2 – Phased. Delivering an additional £300,000 revenue and releasing that working capital to the business in the 12 months.
When compared to the least VS worst efficient delivery method for providing value, Delivery Plan 3 – Agile is 450% more efficient than Delivery Plan 1 – Big Bang. Delivering an additional £1,237,500 revenue and releasing that working capital to the business in the 12 months.
Meaning you can delivery 4.5x the value to the business without changing either budgets or people resources available.
Now we know things aren’t always as smooth as this in reality, there are a lot of nuances which get in the way of this perfect scenario. And this brings us onto the main point of this blog post around achieving more by doing less. It’s kind of a given these days that Agile is the way forward for the vast majority of IT projects, or a combination of a more Waterfall-Agile (aka. Wagile) delivery for hugely complex projects that have a lot of dependencies both in and outside of IT.
There are always blockers throughout any process, whether that is building houses or delivery IT projects. Taking the house building example, let’s say for arguments sake that it takes a carpet fitter 2 weeks to fit carpets throughout an entire house. Regardless of which delivery method you choose, you ultimately have a bottle neck and this bottle neck gets compounded the more efficient your overall delivery method is (Big Bang –> Agile). In the Agile example, you are already 1 week over estimate (100% over planned time for delivery) by the time you deliver your first property because of the bottle neck with the carpet fitter. Not great. But, that’s still more efficient than Deliver Plan 2 – Phased because you’ve still sold one house in 2 weeks rather than none.
So how does this apply to IT project delivery?
Hopefully the analogies above has put things into context and you can relate to the elements within IT. The reality for something like IT is that it gets even more complex from the overly simplified example above.
Imagine you have 100x IT projects that you need to deliver and 100x IT staff. The nuances of skills, specialties and experience of staff will hugely vary which can result in issues cropping up that should never have been an issue if the right processes were in place an dependency on a few key resources where they only know how a certain system or technology works. Rarely in IT are we building things from scratch, we’re often either extending or upgrading current functionality and/or integrating with these systems.
Imagine having to re-build a wall on a house because it was done wrong on the first attempt and because that work wasn’t managed properly and peer reviewed for quality. This is what happens in IT on a near daily basis in many organisations, albeit it’s not quite a visible as this. It’s more like having to rebuild a server, refactor poorly written and unsupportable code etc. Ultimately, it’s all waste that needs to be removed.
What this often results in is a situation whereby multiple projects that are running in parallel agile delivery methods end up stuck on the same bottle necks with resources who are either specialized in a specific technology or only have access to that system and this can add weeks and months onto the delivery of a project which is ineffective.
Take the simple example, if we have 21x staff and 4x projects to deliver. We could split this up as;
Parallel Projects: 4x Projects of 5x staff and 1x shared resources with specialist skills
Sequential Projects: 1x Project of 21x staff including the specialist resource
Let’s say that each project takes a total of 4 weeks to deliver.
Given that, in the Parallel Projects delivery method each of the 4x projects will be complete in 4 weeks, so we can deliver 4x projects in 4x weeks, but, only at the end of the 4 weeks.
When compared with the Sequential Projects delivery method, we’d deliver 1x project per week for each of the 4x weeks. Delivering value faster and without blockers. The reality is though that while the 20x staff working on these 4x projects are wanting to get them over the line, the specialist resource is likely working across 20x, 30x, 50x other projects too where they are required only for a small part of the project. So this person/area soon becomes a significant blocker on many different projects resulting in large delays across the entire IT department.
So what’s the solution?
The reality is that this is a complex beast to manage but there are a set of guiding principles that can significantly enhance IT project delivery to increase the throughput of work to delivery more by doing less. These principles are;
Identify common blockers on projects, and put in place measures to ensure that no longer becomes a blocker. Whether that is training and upskilling other staff, putting in place processes to ensure less experienced staff can still do work in this area as long as it is peer reviewed by an experienced member of staff etc.
Significantly reduce parallel work streams, you can’t effectively split your workforce more than 25% across active projects, i.e. 100x active projects would require 500x staff. If you’ve only got 100x staff, you need to manage the active projects to around 25x projects at any point in time so you have 5x people per project so you can focus. The rest go into the backlog to be worked on in suitable priority. You will always find that you’ll need that 6th person at some point, and you want them to be available when you need them, not to delay the 5x people working full time on that project. It is not IT’s job to prioritise projects based on either opinion, seniority of who asked for it, or whoever shouts the loudest. Put in place a process where the business has a forum to collaborate with senior stakeholders so they can inform IT what the IT priorities are then IT can focus on getting things delivered. Also keep in mind that you should probably split this as 50% Projects, 25% Business-as-Usual (BAU) support and 25% Internal IT Improvement Projects (as often these underlying issues cause delays on all projects so they need to be resolved).
Arrange staff into project delivery squads that can be focused on the delivery of a single project without distractions.
Documented processes are absolutely key to getting this right, and making sure that staff are fully aware of the processes. Far too often processes are informal and/or misunderstood which causes confusion for staff. Basic governance is key.
Tooling, training and peer review help to spread skills and knowledge throughout the delivery squads to reduce dependencies on single people and increase productivity. Build this into the processes.
So how do you assess the difference in web hosting from Company X to Company Y and with all the different terminology and packages available – particularly if you’re not a technical boffin?
Don’t worry, it’s confusing for a reason, and that reason is that it is so that it’s not easy to compare things between suppliers, you have to take them on good faith that they are covering off what you need. This is fine for basic personal usage and don’t mind when things go wrong, but for small and medium sized business use, this is not adequate, so you need to understand what you are paying for and ultimately who is responsible for the different aspects – you – or – your web hosting provider.
You may think that your web hosting provider is simply doing everything they should be doing for you, but that is rarely the case. As a general rule of thumb, the less you pay, the more you are responsible for. And that means that you need the skills, expertise and time to deal with situations as they arise, and they arise on a regular basis – someone has to take care of your infrastructure.
Below is a starter for 10 for the types of things that are common ‘things’ that need doing on web hosting infrastructure with a comparison of how cheaper providers generally manage things VS managed web hosting providers, like ourselves and many other quality providers out there too.
Hopefully this information below helps you to see as a non-technical person what is really happening behind the scenes and how the £ pricing for the different providers generally tilts the scales between where you are responsible for activities VS where your web hosting company is responsible for the activities.
Activity
Unmanaged (Cheaper)
Web Hosting
Who is Responsible For…
Managed (Expensive)
Web Hosting
Who is Responsible For…
Provisioning core server resources for creating your virtual server (Hard disk space, RAM, CPU, Networking, Security Groups, Containers etc… too much to cover here)
You
Provider
Installing and configuring the operating system
You
Provider
Installing and configuring core web server Control Panel software
You
Provider
Server level backups
You
Provider
Monitoring and managing Operating System level updates
You
Shared responsibility
Monitoring and managing web server software packages for updates and security patches
You
Shared responsibility
Monitoring and managing web server infrastructure and resource utilisation (Hard drive, CPU, RAM, IOPS, etc.) – i.e. when your hard disk fills up, your customers can’t place orders via your website
You
Shared responsibility
Installing and monitoring core infrastructure utilisation software and proactively respond to changes rather than reacting to catastrophes.
You
Shared responsibility
Designing and managing Networking and Security Groups to ensure you limit your exposure in the situation whereby security breaches happen
You
Shared responsibility
SSL Certificates for keeping your data safe during transit from your web server to your customers.
You
Shared responsibility
And a lot more…
You
Shared responsibility
Look, the above is a huge over simplification of the reality, and there are so many types of unmanaged and managed web hosting solutions that there are an awful lot of nuances in both categories so this is a very simplistic view of the world. Hopefully it helps to show some of the common differences between cheaper (unmanaged) web hosting and more expensive (managed) web hosting solutions.
At Contrado Digital we focus on things that “Just Work”, so as you can guess we tend to sit in the Managed Space, and more expensive. Although even still, we work across the board, for example with enterprise clients we can support through training and development where corporate organisations are wanting to self-manage their infrastructure with their internal staff. The joys are that there are endless options available, so let’s have a chat about your requirements and we can see what works best for you.
Ultimately if you’re reading this post, you probably fall into one of two categories;
A small to medium sized business who needs help? If so, you probably need support via a managed service, whether that is from a single virtual machine hosting one website to a more complex hosted or physical infrastructure that we manage on your behalf.
A large enterprise business who has staff internally who needs help with how to work with self-managed solutions? If so, you probably need some consultancy, training and coaching for staff to manage these solutions effectively through one of more of your cloud providers or on-premise providers.