by Michael Cropper | Oct 19, 2016 | Developer |
This question comes up a lot about how to redirect an entire website from HTTP to HTTPS on WordPress. It’s actually quite simple to do within the .htaccess file too. Before we jump into the solution, firstly, don’t go playing around with this unless you know what you are doing. Getting anything wrong in your .htaccess file can bring your entire website down. We’ve a whole host of guides on how to implement SSL yourself if you know what you are doing, so take a look at our guide on how to Claim your Free SSL Certificate. Ok, so let’s take a look at the simple task of redirecting your entire website from HTTP to HTTPS on WordPress.
Simply add the following two lines of code to your .htaccess file;
RewriteCond %{SERVER_PORT} 80

RewriteRule ^(.*)$ https://www.contradodigital.com/$1 [R=301,L]
Obviously make sure you change the domain name above to your own domain where you want to make the change.
Specifically add them here;
# BEGIN WordPress

<IfModule mod_rewrite.c>

RewriteEngine On

RewriteBase /

RewriteCond %{SERVER_PORT} 80

RewriteRule ^(.*)$ https://www.contradodigital.com/$1 [R=301,L]

RewriteRule ^index\.php$ - [L]

RewriteCond %{REQUEST_FILENAME} !-f

RewriteCond %{REQUEST_FILENAME} !-d

RewriteRule . /index.php [L]

</IfModule>

# END WordPress
The RewriteRule is redirecting anything on HTTP, i.e. Port 80, to HTTPS, i.e. Port 443. This will guarantee that should anyone access your website using HTTP then they will automatically be redirected to the secure version of your website on HTTPS which is the best practice thing to do.
Struggling with implementing HTTPS on your own website? Get in touch and I’m sure it’s something we can help with. As of January 2017, Google is going to be flagging websites as “insecure” that aren’t using HTTPS, so make sure you’ve implemented this in plenty of time to avoid any potential issues.
by Michael Cropper | Oct 6, 2016 | Developer, Thoughts |
Last night I gave a talk at a developer meetup group in Liverpool after being asked to speak at the event. The developer group was full of extremely amazing developers who are far more knowledgeable than myself about the finer workings of high end technology. Hats off to them.
After listening to another speaker at the event before me, it was extremely clear that I had just sat through a talk for an hour and I honestly couldn’t tell you anything about what I just listened to. It was very abstract and quite frankly, way over my head. This is not a criticism of the speaker, he was great and the audience loved it. Here’s the thing though, I like to classify myself as a very knowledgeable person working with various technologies on a daily basis, I’m certainly no-where near as smart at tech as many of the people in the room which is a great position to be in as you can learn from them.
So anyway, I jumped up to do my talk titled “Venturing into the Unknown Building TendoJobs.com” which was designed to be an overview of building a tech startup from scratch while bootstrapping everything from day 1. I do a lot of talks to businesses, companies, conferences, events and so on, I enjoy doing them and sharing my thoughts with those interested. This one was different though, it was clear that the audience was so unbelievably amazing at various technologies that for those in the audience listening to me the content of the presentation must have been similar to a University Professor attending nursery to learn about something. It was fun doing the talk that’s for sure and it was truly a baptism of fire. What struck me most though was the array of endless questions at the end of the presentation. Rarely do you end up answering questions for a good 15-20 minutes at the end of a presentation, but they kept coming, which was great as it got people thinking.
As the old saying goes, to a man with a hammer, the solution to every problem is a nail. And this couldn’t be truer than within the developer community across all platforms and languages. The problem I see time and time again from developers and technology startups that I speak to on a regular basis is that they keep adding technology to solve a problem when actually you don’t need to add technology. At the development level, technology adds complexity to every project which adds time and money to what is being done. It’s time as developers we step back a little and start to ask ourselves what we are really trying to do.
To put this into perspective, here are just a few of the questions that came from the bemused audience last night;
- So what tools / technology do you use for your release and deployment process?…. i.e. expecting the sophisticated answer for something like Jenkins…….We use SFTP (for the non-teckies reading this, picture the process being viewed as a stone age person using a flint bow and arrow to catch an animal. It’s functional and it works. )
- When you make a change within the code, how do you know that it doesn’t break anything else?….. i.e. expecting the ‘best practice’ answer that every single unit of code has unit tests wrapped around them and we run these tests before we push code live…… We just build the code well and remove virtually all dependencies throughout the various classes (for the non-teckies reading this, imagine that you’ve baked a cake. Wonderful. Now your unit tests can be loosely thought of as checks at the end to make sure what you’ve made is correct. So in this random example, you’d line up all the raw ingredients next to your baked cake and confirm that they are present within said cake. This needs you to buy two sets of ingredients to test that the cake contains them all. Thus doubling the cost of the cake baking project)
- When you added this form to the website in the first instance, why didn’t you build in validation checks at every step from the outset?…. i.e. expecting that it was something we simply forgot to do….. We actively avoided doing this because we would have been building features and functionality that people may or may not have needed. Instead, we let the data tell us what validation checks we needed to add in as and when people started using the platform (for the non-teckies, this is talking about the ‘you must enter your First Name’ type notifications that you see on websites)
- So what frameworks did you use to build the platform? ….. i.e. expecting a cool and sophisticated answer about one of the endless technology frameworks available to choose from today….. We didn’t use any. We just used solid Model View Controller design patterns to structure our code well so that it is maintainable, easy to manage and release changes. (For the non-teckies, think about this as following a recipe. When you have your raw ingredients in the kitchen, which cookbook do you choose and which recipe do you select from them? We simply threw it all in the pan and it turned out beautiful)
- Why aren’t you streaming your file uploads via Amazon S3 and automatically resizing images as needed within the applications? ….. I.e. expecting to hear that this is in the pipeline to do so….. Because that is simply too much work involved to do and virtually all employers can manage to upload their logo within the guidelines provided. It’s needless work.
Above is just a small selection of the questions that were asked and discussed after the presentation. It was really interesting discussing the whole tech startup process with a group of highly experienced developers. I was certainly the caveman in the room without a doubt when it comes to tech which was really interesting.
The key message from the presentation though was all around Keep It Simply Stupid. You see, when you add complexity into any project, is it any wonder the costs of said project goes up when you then have to spend 50%+ more time developing the project, and is it any wonder that you cannot find the right talent within your organisation who has 5 years experience using technology X. You’re adding complexity out of striving to continually improve development techniques. I’ve seen this on many occasions in very large organisations where the organisation simply revolves around the digital technology hamster wheel to keep rebuilding technology and adding new and different processes into the system instead of truly stopping and thinking about what they are actually doing. Ultimately achieving nothing while working at 150% of capacity continually wondering why nothing is being achieved.
Ultimately the product or service is here for the user of the end user, the customer. You have to ask yourself that when you are looking to implement technology X or process Y within your application, does the end customer really care and are they even going to notice? If the answer is no, then honestly, what are you wasting time even doing it? Seriously. Sure, if you’ve an endless budget and lots of free time to do this, great, you probably work at Facebook or Google. For the rest of us though, let’s bring these dreams down into the practicalities of the day to day.
To put this into perspective, let’s just take a look at one of the largest developer surveys that takes place each year from Stackoverflow, here are some of the most popular technologies in use today;
.NET, ABAP, Android, Android Studio, Angular, AngularJS, Arduino / Raspberry Pi, Arrays, ASP.NET, Atom, aurelia, Bash, C, C#, C++, Cassandra, Clojure, Cloud, Cloud (AWS, GAE, Azure, etc.), Coda, CoffeeScript, ColdFusion, Cordova, Count, CSS, D, Dart, Delphi, Django, Drupal, Eclipse, Elasticsearch, Elixir, Elm, Emacs, Erlang, F#, Fortran, Git, Go, Groovy, Hadoop, Haskell, HTML, HTML, CSS, IntelliJ, iOS, IPython / Jupyter, Java, JavaScript, JQuery, JSON, Julia, Komodo, Kotlin, LAMP, Lighttable, Linux, Lisp, Lua, Matlab, Meteor, MongoDB, MySQL, NetBeans, Node.js, Notepad++, Objective C, Objective-C, OCaml, Other, Perl, PHP, PhpStorm, PL/SQL, PostgreSQL, PowerShell, PyCharm, Python, R, Raspberry Pi, React, Redis, Regex, RStudio, Ruby, Ruby on Rails, RubyMine, Rust, Salesforce, Scala, Sharepoint, Smalltalk, Spark, SQL, SQL (or SQL Server), SQL Server, SQL Server & SQL, String, Sublime Text, Swift, TextMate, TypeScript, Unity, VBA, Vim, Visual Basic, Visual Studio, Visual Studio Code, Windows Phone, WordPress, Xamarin, Xcode, Zend.
The above really is just the tip of the iceberg when it comes to technology choices. Within each of the technologies above, there are equally as many variations, technologies, frameworks and best practice ways of doing things. Technology quite simply is a minefield. I work with technology on a daily basis and I’ve only ever heard of around 50% of these technologies, let alone had the time and inclination to explore them.
Look, I’m not saying that all of these best practice things aren’t something to work towards. They all have their benefits. But let’s be realistic here, every single project is limited based on time and money which ultimately determines the output at the end. You cannot, and I’d argue should not, implement best practice from day 1 for anything, unless that thing is as simple to implement best practice as it is not to. Keep things simple, use solid continual development and agile processes to build on solid functional foundations.
Adding complexity to any project is a risky route to go down and one that I’d always recommend steering away from. Keep your projects as simple as possible instead of keep trying to add in new technologies into the system endlessly just because you can.
A couple of comments from the questions on the evening put this into perspective which include “You had some balls to stand up and do a talk like that in front of a group of specialist developers” and “Your ideas are certainly…. Interesting”, which is a polity way of saying they are a bit “out there”.
One final thought I’d like to leave you with. Technology projects, systems and organisations are as complex as you make them. You cannot then wonder how you’ve got into this position and complain about how difficult things are. Take a staged approach with developing and continually improving any technology system instead of simply bolting on as many pieces of technology as you can just because they are cool to do or are deemed best practice. Save yourself endless hours, weeks and months of time building things that ultimately adds no value to the project, adds cost and makes everything difficult to maintain.
Great talk, great group of people, great discussions. Food for thought from a different perspective. See everyone at a future event.

by Michael Cropper | Sep 30, 2016 | Developer, Digital Marketing, Tracking, WordPress |
We recently wrote about how awesome the new Accelerated Mobile Pages (AMP) technology is for improving page load times on your website. Well, yes it is, but something to bear in mind that we’ve just come across. Google recently wrote a blog post about how to set up Analytics on your AMP pages only 4 days ago, which quite frankly is a little slow since we’ve been using AMP technology for well over 4 months now and it has never been on our radar that this wouldn’t be tracked by default out of the box. Anyway, we’ll let this one slip.
The crooks of it though is that you’re probably not including tracking on any of these AMP pages that you’ve implemented which is a tad annoying. From a WordPress perspective, make sure you’re using the AMP Analytics plugin which will add Google Analytics tracking to your AMP pages when they are loaded by web browsers and Google. You could be missing out on a significant amount of tracking data when tracking the performance of your campaigns. For anything non-WordPress related, you’ll have to get into the tech to implement this manually within your web application which is certainly going to be a tad more time consuming. Drop us an email if you need any help with getting this set up on your own websites and web applications.

by Michael Cropper | Sep 22, 2016 | Client Friendly, Developer, WordPress |
Something which has been on our own to-do list for far too long than I’d care to admit, we’ve finally got around to automating our email marketing campaigns. Firstly, if you aren’t on our mailing list yet, why, it’s awesome and we share some amazing content like this you’re reading now. Secondly, get signed up at the bottom of this page by entering in your email address.
Now let’s look at what we’ve recently got set up and how we’ve automated our entire email marketing campaigns so we can spend more time focusing on writing great content, running events and training courses and generally connecting with businesses and people much more efficiently. Why spend time doing something manually if you don’t need to, right?
What’s Wrong with Manually Sending Email Marketing Campaigns?
Ok, so let’s quickly cover this one. Firstly, if you are sending email marketing campaigns through something like Outlook, you are doing it all wrong. Head over to our Really Simple Guide to Email Marketing to understand why.
Now, we’re assuming you’re using an email marketing tool such as MailChimp. And do you know what, sending email marketing campaigns manually is absolutely fine. There is nothing wrong with doing this at all. But. If you are sending email marketing campaigns manually to share content such as Blog Posts or Events that you are running, you are wasting time doing this manually when you could automate the entire process. It’s all about saving time so you can be more productive in what you are doing.
So let’s look at how you can automate your email marketing campaigns with WordPress and MailChimp.
WordPress RSS Feeds
If you didn’t already know, virtually every type of content on your WordPress website has an automatically generated RSS Feed URL that can be accessed when you know where you are looking. Take a look through the WordPress RSS Feeds List for information on where to look.
For example, here is our main Blog’s RSS Feed URL if you want to take a look what this looks like;
https://www.contradodigital.com/blog/feed/
Find the relevant RSS feed that you want to use to send email marketing campaigns to your audience as you’ll need this shortly.
MailChimp Groups
Within MailChimp you can segment your Lists into different Groups based on what people have subscribed to. There are many way of organising your MailChimp subscribers, so we’re not going to cover that right now. For the purpose of this blog post, we’re going to use Groups to segment a single List based on what people are interested in which helps to keep everything easy to manage to avoid duplication.
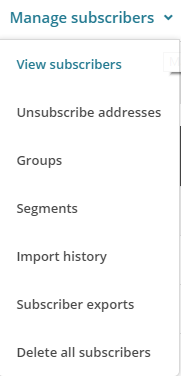
To create a Group in MailChimp you navigate to your List, then click on Manage Subscribers then Groups which will allow you to enter in specific information about how you want to group people together.
The reason you want to create a new Group is so that you can allow your audience to subscribe to multiple different groups from the same Newsletter. This allows you to send emails to specific groups of people within your mailing list. Simply configure the relevant settings for yourself as this information will display when a user is updating their subscription preferences;
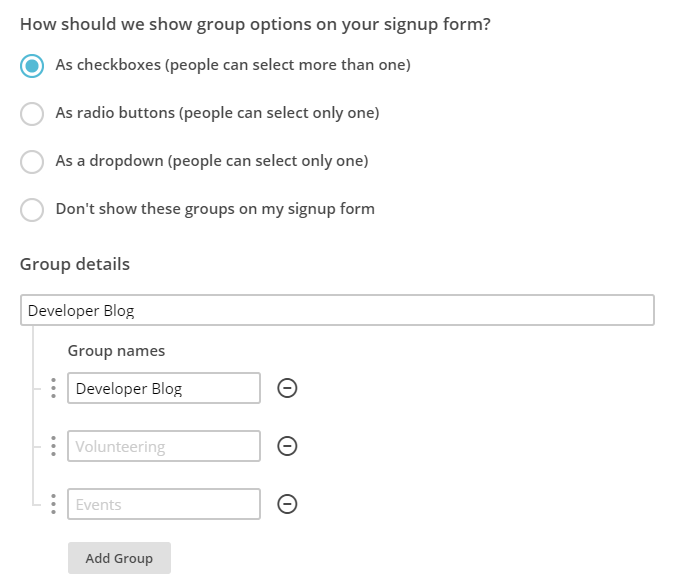
Ok, so now you’ve created a group, let’s start to join everything together. In the first instance you can even migrate people into specific groups should you wish.
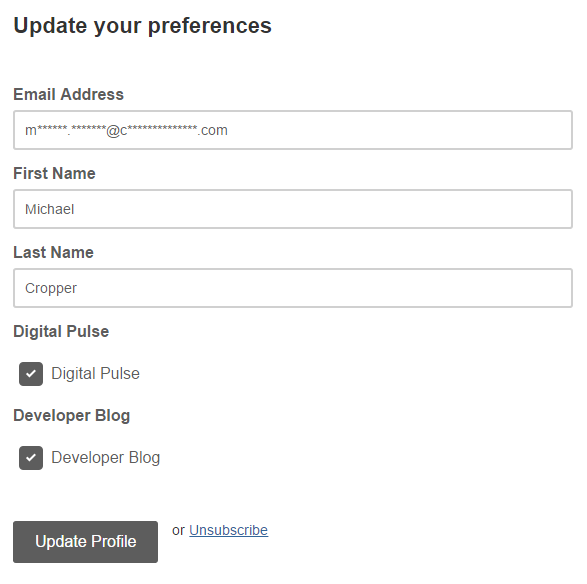
Here is how the data you enter in this section will display when the user is managing their profile on your newsletter.
MailChimp RSS Campaigns
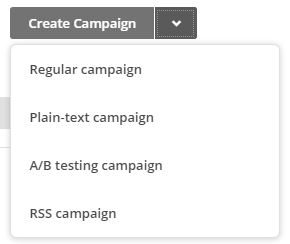
Create a Campaign
Firstly, create a new campaign in MailChimp but be sure to select an RSS Campaign as the campaign type as this comes with a few handy settings that have been automatically built in for you.
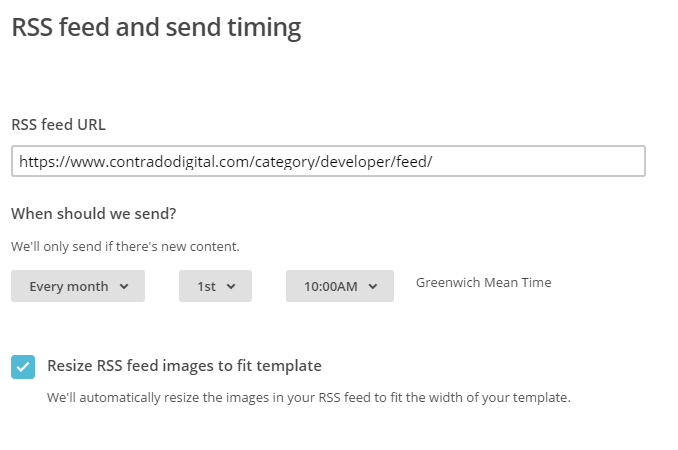
Confirm your RSS Feed Settings
Enter in all of the settings related to when you want to be sending your campaigns and where the data is coming from. In this example, we’re looking to send out content from the Developer Blog so we enter in this information here.
Select Your Recipients
Next you need to select who you are sending the emails to. Here you are going to want to send emails to a Group of users you have just created earlier. This could be for a specific set of content on your website or even a specific interest if your website has multiple interests on there.
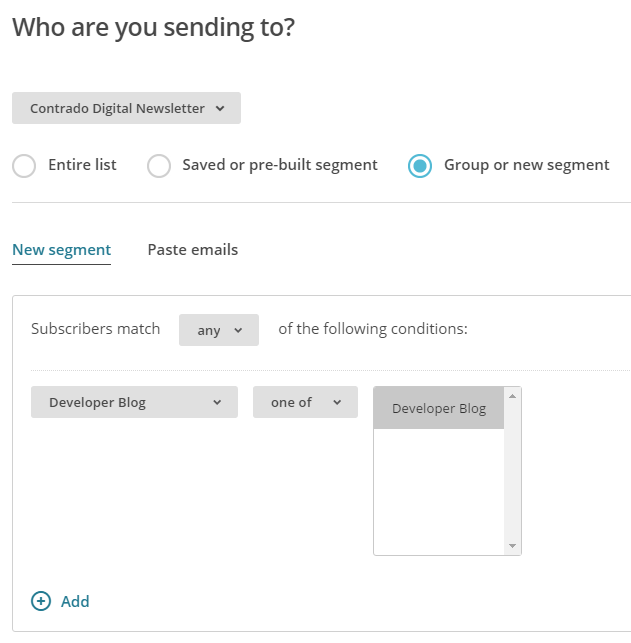
There are a lot of options here so we’re not going to cover everything. Use the options that are best suited for your individual needs.
Personalise your Campaign Information as Usual
If you are reading this blog post, you’ll already be used to creating your campaigns as normal and personalising the relevant information so we’ll skip over this bit here. Just make sure you do this when you are creating the campaign.
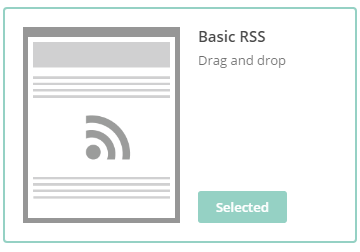
Choose an RSS Template
Simplicity is key here which is why you should choose one of the default RSS templates which you can select. This will automatically include lots of handy information for you which will speed up your development for sending RSS campaigns.
Design your Email Template as Usual
Again, we’re not going to cover this part here. All of the pre-populated fields have been created for you when using an RSS template, so you’re all good to go. Simply personalise the look and feel of your campaign as you see fit.
Preview & Test
The next step is to preview and test your campaign. This is so important to do as you can really annoy people when you mess up a campaign and send it out with missing information and or incorrect information.
Start RSS Campaign
Then you’re good to go, start your RSS campaign running and you will never have to worry about manually sending email marketing campaigns again.

This really is just the starting point about what you can do when you start to automate your email marketing campaigns. Take the time to think through what you are doing, why you are doing is and what you are looking to get out of it. Automation can save you so much time when you think strategically about what you are doing.
by Michael Cropper | Aug 24, 2016 | Developer |
In the latest release of WHM comes a seriously handy tool which allows domains within one cPanel account to be migrated to their own cPanel account. In an ideal and perfect world, every domain would be contained under its own cPanel account as this allows much more granular reporting when using tools such as New Relic or command line resource usage commands such as atop. In reality though when dealing with many different web servers which have a lot of history and often non-optimal configurations, often you find that multiple domain names are contained within a single cPanel account. This is bad for a whole host of security reasons, primarily because if one website gets hacked into, it’s possible to access all of the websites under the single cPanel account which is an inherent risk. And if those websites are WordPress, if they get hacked into after then have been built badly or aren’t maintained securely then a quick install of a certain plugin allows the hacker to gain access to absolutely every file under this cPanel account. So it’s really important to structure your web servers for optimal security.
So now that’s clear, here’s how to use the Convert Addon Domain to Account tool within WHM.
Convert Addon Domain to Account within WHM
Open WHM and navigate to Home > Transfers > Convert Addon Domain to Account. This will list all Addon Domains listed within all cPanel accounts on the server. Select the one you wish to migrate to its own account and press “Convert”;

Here you will then be presented with a list of options. Make sure you check through everything and make a note of what the new settings are.
Create an account name for the new cPanel account;
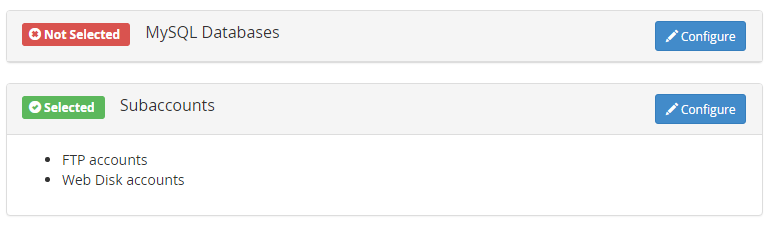
Check through your settings which have been automatically selected;
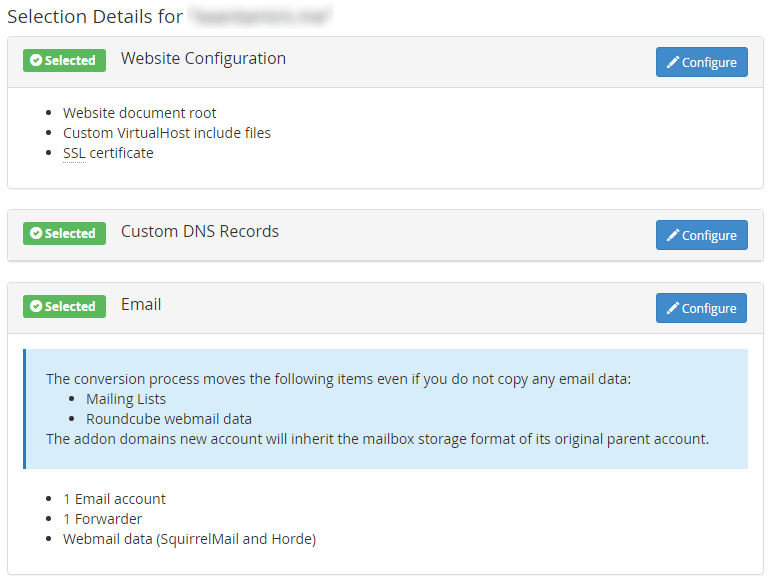
What likely hasn’t been picked up by default is your database table(s) so make sure you click on the Configure option and select which databases belong to the website being transferred to its new account.
Then let it do its thing by clicking on the Start Conversion button. Depending on the size of your website will depend on how quickly, or slowly, this transfer happens. Once everything is completed you’ll see a completion message along the lines of;
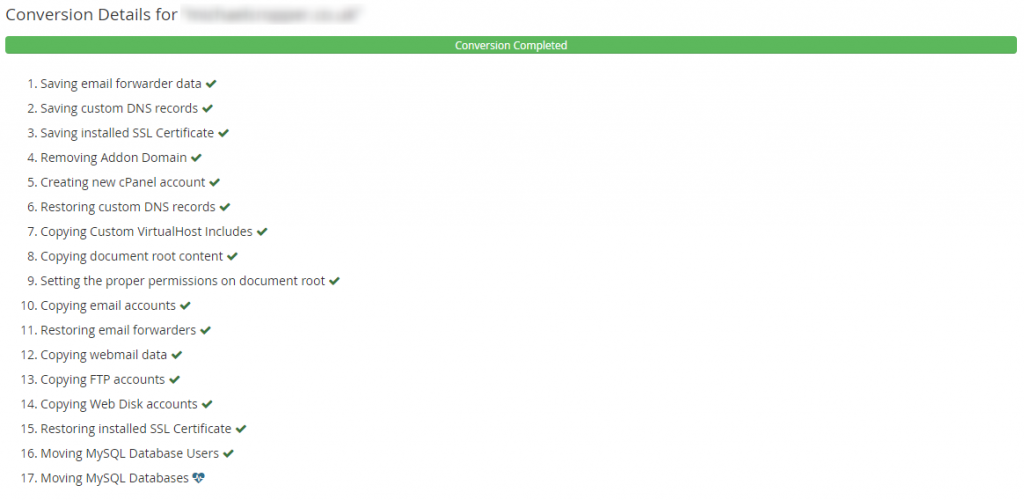
Transfer Complete
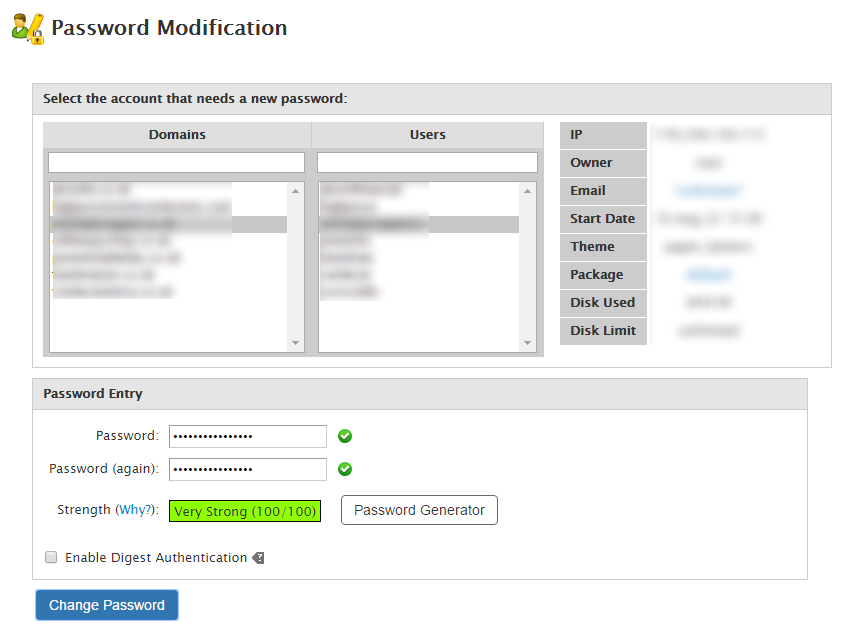
It really is as simple as that to use. Once the migration is complete you’ll need to modify the password for the account via WHM;
Performance Challenges
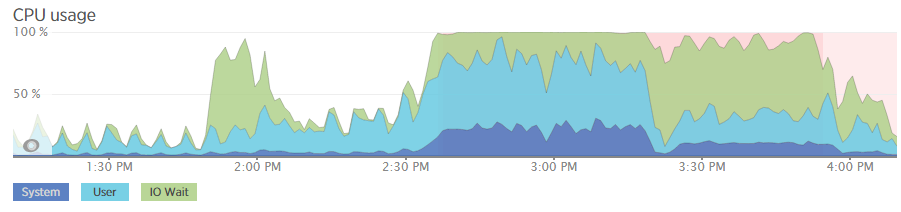
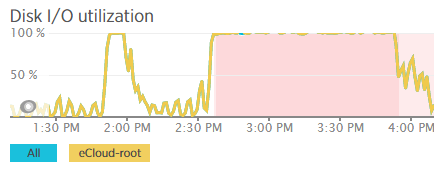
While this is a great tool, something to mention is around performance. Performance wise for one project we were working on, the resources completely maxed out on one web server and took a total of 90 minutes to migrate a small website of around 10GB in size for files and databases. This is something to bear in mind and it’s probably best that you run these kinds of migrations at low points during the day to prevent issues impacting people using the websites in question. Below are a select of screenshots which clearly shows the performance difference at a normal point in time compared to when the process was running to put this into perspective.


Summary
All domains should be under their own cPanel account for security reasons. If you have multiple domains contained under a single cPanel account, start to get things set up properly as they should be. Recovering one hacked website is time consuming and costly enough for you as a business, recovering multiple just multiples the problem. Do not leave this until it is too late. If you are unsure how your web server infrastructure should be set up then get in touch and we can help you with getting things set up correctly.
by Michael Cropper | Aug 24, 2016 | Developer |
For those of you using cPanel and WHM as a system, you’ll be as glad as I am to hear about the latest release of AutoSSL which enables SSL certificates to be set up across accounts much easier than ever before. In summary, it’s possible to generate and install SSL certificates for individual cPanel accounts all via the WHM interface which is super useful when managing web servers with multiple accounts and domains hosted. All of which is powered by Let’s Encrypt which traditionally would have required quite a bit of command line set up via SSH.
To get this up and running is actually relatively straight forward.
Set up Let’s Encrypt for AutoSSL via SSH
This is the only part that you need to do via SSH and it is only required once. Simply login to SSH and run the following command;
/scripts/install_lets_encrypt_autossl_provider
Let everything install and configure, all automatically.
Configure AutoSSL in WHM to Use Let’s Encrypt
Navigate to the following page within WHM, Home > SSL/TSL > Manage AutoSSL. Now update the settings to use Let’s Encrypt instead of any other providers that you may have installed as can be seen below.
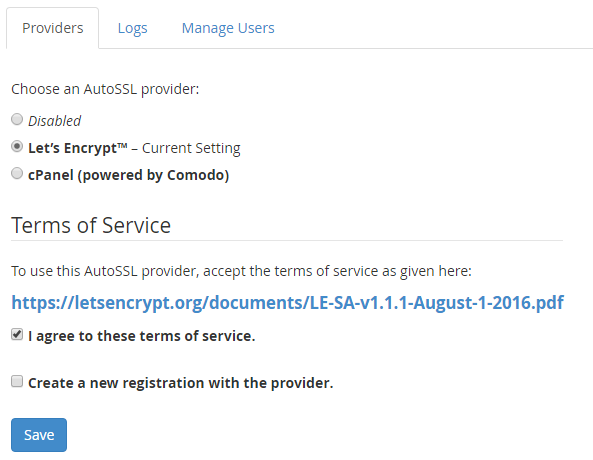
Once this is set up, when you use the AutoSSL feature Let’s Encrypt will be the certificate authority which manages this.
Run AutoSSL for cPanel Accounts
Now everything is set up to run AutoSSL, it’s time to start running it. While you can simply run this for all domains, it is recommended to take a more structured approach so you can be sure that you are updating everything correctly. Particularly when migrating WordPress websites from HTTP to HTTPS, there are a lot of additional tweaks to make to ensure everything works correctly.
To run AutoSSL on a specific cPanel account, simply click on the “Check” button next to the account you want to run this for. This will run AutoSSL for all Addon Domains associated within this cPanel account. There are a few restrictions currently for what will work here, so be sure to check the official cPanel documentation.

SSH Now Setup
Now access the HTTPS version of your website and everything should be set up and working. As mentioned previously, there will likely be other items to clean up to ensure the green padlock shows in your browser bar. From an AutoSSL standpoint, everything is complete. Simple.
Check within the individual cPanel account you have just updated and you should see that the certificate has been installed on the domains that are listed. This is super useful and saves a lot of time manually generating and implementing SSL certificates.

Caveats
If this doesn’t work for some reason then check the error logs for AutoSSL within WHM. This will provide you a lot of information about what has gone wrong. Particularly if you are using cloud based CDNs or firewalls such as Sucuri, then you’ll need to disable this to get AutoSSL working correctly. Be sure to check your .htaccess files too as sometimes you may have restrictions in here which only allows traffic to the website from the cloud based CDNs or firewalls such as Sucuri.
As with everything, make sure you know what you are doing before playing around with these types of things and make sure you fully understand your technical stack and setup. Just because this works for us, does not mean that this will be as seamless for you. Get in touch should you have any support requirements for getting this set up on your websites and web servers.