by Michael Cropper | Jun 16, 2018 | Developer |
The maximum number of connections that Apache Tomcat can handle is defined within the Tomcat settings. In essence, this setting determines the number of concurrent connections that can be handled by Apache Tomcat.
Out of the box, Apache Tomcat is configured to handle around 200 simultaneous connections (kind of…), which for most web servers and projects is more than adequate. But when you get into the realms of millions of monthly active users and concurrent connections, you’ll soon need to optimise Tomcat to suit your needs accordingly.
Ultimately though, the number of simultaneous connections that the Apache Tomcat software on your web server is capable is handling is determined by the physical limitations of your web server. The bigger your hardware, the bigger the number of connections that Apache Tomcat is capable of handling. This being said, the 200 maximum connections as a default is merely an arbitrary number, so you’ll need to assess this in relation to the hardware you are running on. The bigger the server hardware you’re running on, the higher the number of maximum connections on Apache Tomcat your server will be able to handle. As always, this can change depending on what you are doing. For example, if you have a process on your really fast server that is calling a third party dog slow server, then this soon becomes the limiting factor in the chain.
Max connections from an Apache Tomcat perspective is calculated based on a number of factors such as the number of simultaneous connections multiplied by the maximum execution time that each thread is capable of handling. Under normal circumstances this can appear to be behaving correctly, so keep in mind exceptional circumstances when things don’t quite perform as you wish. What you’ll soon spot (via the Tomcat Manager) is that the Max Connections soon starts to creep up and eat up all the resources on your server. This can be caused by many factors, from long running processes on your own server, or code on that is calling third party servers which may be running slow and causing problems.
With all this in mind, let’s take a look at how to increase the maximum connections on Apache Tomcat. It’s actually quite simple to do.
Run the command;
sudo nano /usr/share/tomcat8/conf/server.xml
This command will open the editor to edit the file Server.xml which controls many of the settings required for configuring Apache Tomcat. You’ll note that it is Apache Tomcat 8 that is being used in this example, so edit this accordingly for the version of Apache Tomcat that you are using. Again, depending on your individual configuration of your server, this file may live in a different file path. So to easily find the file if the above command doesn’t work, then run the command below;
find / -type f -name server.xml
The above command will search for a File (f) called “server.xml”
What you’re looking for within this file is the setting for “maxConnections” which will have a value set. You may not have this variable set so look out for the core settings for the port that your Tomcat instance is listening on, for example;
<Connector port=”8080” protocol=”HTTP/1.1” maxConnections=”200”/>
The maximum number of connections that the server will accept and process at any given time. When this number has been reached, the server will accept, but not process, one further connection. This additional connection be blocked until the number of connections being processed falls below maxConnections at which point the server will start accepting and processing new connections again.
Depending on your specific requirements, you may also need to increase the maxThreads setting too. Hope that helps getting you started with tuning Apache Tomcat for your specific needs.
by Michael Cropper | May 12, 2018 | Developer |
If you’re looking for a quick answer and you’re running a common version of Linux, just type this when you are SSH’d into your server;
sudo chkconfig httpd on
Now for a bit more technical details about what this all does.
What is chkconfig?
The Chkconfig command in Linux is used to setup, view, or change services that are configured to start automatically during the system startup which abstracts some of the underlying settings that are stored within the /etc/rc.d/init.d/ directory. Chkconfig basically helps you to easily make service start or not when your system reboots.
Some handy chkconfig commands that you’ll find handy;
- chkconfig –list (dash dash)
- This will list the details of all services that are running on startup
- chkconfig –list httpd (dash dash)
- This allows you to list specifically the details of the service you care about, to avoid you having to trawl through the entire list. Simply change ‘httpd’ to whatever service name you are interested in looking at.
When you start to look through the outputs from the above commands, it may be a little confusing seeing 7 levels, some with a status of on and some with a status of off, but what do they all mean? The different levels are what is known as Linux Runlevels. Generally speaking, you probably don’t need to worry about those at all. But if you do need some fine grain control over what happens and when, when that may be covered in a future blog post.
by Michael Cropper | Jan 27, 2018 | Developer |
I thought it was handy to do a bit of performance testing with MySQL Fulltext Search to quantify how much benefit a MySQL Index has while querying large data sets using MySQL Fulltext Search. The reason this came about was due to the performance of SQL queries running against the dataset powering the search engine behind https://www.tendojobs.com/. While there is a lot of complex technology behind the scenes powering the search functionality of Tendo Jobs, one piece of this technology mix is the MySQL Fulltext Search functionality. It was noticed that for certain queries the time to run the queries was sub-optimal. Hence, I decided to do a bit of performance testing on this.
MySQL Fulltext Indexes are essential when querying large datasets, although MySQL Fulltext Search doesn’t work on all data types, which is rather annoying. According to the official MySQL documentation on MySQL Fulltext Search, https://dev.mysql.com/doc/refman/5.7/en/fulltext-search.html, the only options for using MySQL Fulltext Search are on columns with the datatype of Char, Varchar, or Text. Which is kind of limiting as datatypes such as Blob can be extremely valuable for storing larger data sets, but hey. This the limit, so for MySQL Fulltext Search, that is what you’ve got to work with. So, onto the performance side.
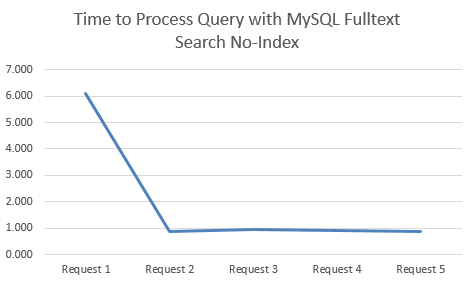
I started with the dataset of searches run by users of Tendo Jobs to gather some real search data. From this I tested the performance of the queries when using both Indexes and No-Indexes. What was clear on both approaches was that the first query always took significantly longer than the subsequent queries for the same search term, so to avoid any potential discrepancies, this is highlighted below.
Time to Process Query with MySQL Fulltext Search No-Index
This is when there is no MySQL Fulltext Search Index on the relevant column;
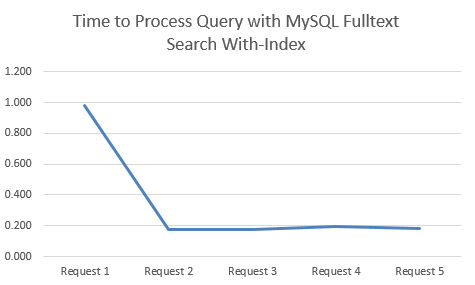
Time to Process Query with MySQL Fulltext Search With-Index
This is when there a MySQL Fulltext Search Index on the relevant columns;
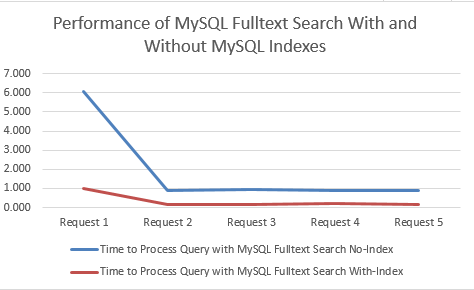
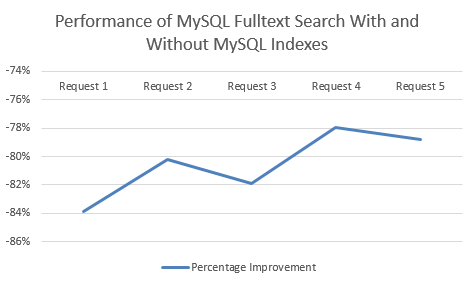
Comparison for Performance in Seconds
MySQL Fulltext Search with an Index clearly performs significantly better. Between 78% – 84% improvement by using an Index when querying datasets using MySQL Fulltext Search!
Summary
Just use Indexes, they are awesome. But it’s great to quantify this in terms of performance improvement on larger data sets, along with the limitations of MySQL Fulltext Search. As a final note, MySQL Fulltext Search is not designed to be a search engine, so bear this in mind. It is good up-until a point, so always keep an eye on performance when querying large datasets.
by Michael Cropper | Jan 25, 2018 | Developer |
When developing through Netbeans in Java (my personal favourite) you may come across the annoying error now and again which is telling you that Tomcat cannot start due to the port being in use already. Often this is Port 8005 but it could be something else depending on how you have things configured. Either way, this ‘feature’ is rather annoying and requires a couple of steps to kill this off and get you back on track. Unfortunately the traditional IT solution doesn’t work in this scenario, turning Netbeans off and back on again, the issue persists.
This issue is caused when you are trying to run multiple applications simultaneously and something has got in a bit of a mess in the background.
Thankfully, the solution is rather simple when you know where to look on Windows, there are a few steps involved.
Find the PID (Process ID) that is hogging the Port 8005 that you need
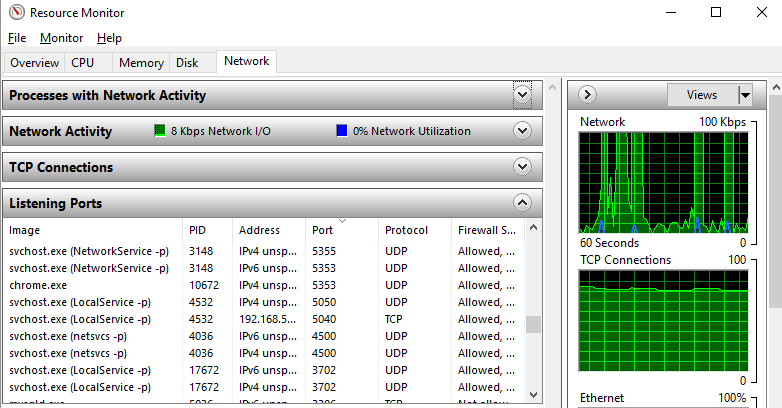
To do this, either search for “Resource Monitor” in the Windows start menu, or, type at the command prompt, resmon.exe. Either way will open the resource monitor as you can see in the screenshot below. Look through the list of Ports and find the port that is being blocked, then look across to the PID column to find the Process ID, you’ll need this in the next step.
For those of you more familiar with the command line, just run the following command;
Netstat –a –o –n | findstr 8005
Netstat is a command-line tool for displaying network statistics including displaying connections using the TCP/IP protocol, i.e. your application.
The –a flag displays all connections and listening ports
The –o flag displays the owning process ID associated with each connection
The –n flag displays addresses and port numbers in numerical form
The | pipes the output of the first command to the next command, findstr
findstr is the Windows equivalent of grep on Linux, a command line CTRL + F search facility.
Simple.
Next Force Kill the Process
To do this, you need to run Command Prompt as an Administrator. This will not work as a standard Windows user, you need to be an Administrator. Simply type;
Taskkill /F /PID 12345 (replace the process ID that you found earlier)
Done. You’re good to go again.
by Michael Cropper | Jan 6, 2018 | Developer |
If you’ve come across this blog post, you’ve likely experienced the requirement that often crops up when paginating results while querying a MySQL database via Java. As a user, the user generally wants to see the first 10 results on one query, i.e. page 1, then the second 10 results on the next query, i.e. page 2, and so on. But what happens in the situation when the part of the application that displays information to the user wants to know the total number of results from the entire results set that without pagination? For example, to create a visual indication of some sort for the total number of results that are available to look through which could be used to display the total number of pages.
Traditionally you would create two completely separate queries against the database, one which includes the LIMIT and OFFSET parameters in the query and another that does not include these parameters. That’s two database connections, running two independent queries such as;
-- Get paginated results for query
SELECT * FROM table_name LIMIT 10 OFFSET 30;
Then running;
-- Get total number of results for query, excluding pagination
SELECT COUNT(*) AS NumberOfResultsFound FROM table_name;
And you know what, this is a perfectly good approach to take in a lot of scenarios and especially for simple – medium complexity level MySQL queries. Although where this approach soon falls down is when the SQL queries grow and grow, either due to database structure complexities through many table joins or over time as requirements expand. What you’ll soon find yourself doing is replicating the same complex (and time consuming to create/manage at the coding level…) SQL queries that need updating in two places and keeping in sync with zero discrepancies. And this isn’t ideal, lots of duplicated effort and open to errors with the two queries becoming out of sync.
Thankfully, there is a solution to this within MySQL itself, yet if you’ve come across this blog post you’ve probably realised after much searching around that this isn’t particularly well documented either at the MySQL level or at the Java and JDBC level. Hence the reason for writing this up, partially for others, but mainly so I also don’t forget how to do this in the future…
This is where SQL_CALC_FOUND_ROWS and FOUND_ROWS() parts to the queries come in handy.
For those of you reading this as a traditional database administration type person, you’ll likely be rather familiar with MySQL Workbench for administrating a MySQL database. So if you want to do this within MySQL Workbench, you can simply run the two commands sequentially;
-- Option 1
SELECT * FROM table_name;
SELECT FOUND_ROWS() AS NumberOfRowsFound;
-- OR
-- Option 2
SELECT SQL_CALC_FOUND_ROWS * FROM table_name; -- Yes, no comma, that’s correct
SELECT FOUND_ROWS() AS NumberOfRowsFound;
Then this will produce the results you desire;
— Option 1;
150 Rows
— Option 2;
150 Rows
Yes, that’s the same information. Great. But you’ll notice that we haven’t added in the pagination aspects to the SQL query yet via the LIMIT and OFFSET query parameters. So let’s take a look at what happens when we do that;
-- Option 1
SELECT * FROM table_name LIMIT 10 OFFSET 30;
SELECT FOUND_ROWS() AS NumberOfRowsFound;
-- OR
-- Option 2
SELECT SQL_CALC_FOUND_ROWS * FROM table_name LIMIT 10 OFFSET 30; -- Yes, no comma, that’s correct
SELECT FOUND_ROWS() AS NumberOfRowsFound;
Then this will produce the results you desire;
— Option 1;
40 Rows
— Option 2;
150 Rows
What you’ll notice here is the clear difference in the way MySQL handles the data when you add in the SQL_CALC_FOUND_ROWS into the second set of queries that is run. On the first query, when the SQL_CALC_FOUND_ROWS part is not present in the query, the NumberOfRowsFound is the total number of results that takes into account the LIMIT and OFFSET parameters, resulting in 40 rows, i.e. 10 + 30 = 40. Whereas the second query which includes the SQL_CALC_FOUND_ROWS as part of the query, then this completely ignores the LIMIT and OFFSET parameters, resulting in the desired behaviour for calculating the total number of rows within a MySQL query while ignoring the LIMIT and OFFSET parameters within the query. This is nice as this avoids having to run two duplicate queries as mentioned earlier.
But we’ve just done all of the above within MySQL Workbench which is designed specifically to manage MySQL sessions as needed with ease. Now try taking the same approach within your preferred Integrated Development Environment (IDE) via the SQL editor that is in there and you’ll soon see that this no longer works. Why? Well, quite simply IDEs aren’t dedicated MySQL environments, so they have likely cut corners when it comes to implementing the entire functionalities for MySQL within your preferred IDE. If yours works, great, leave a comment letting others know what you use, I’m sure others reading this would also be interested to know what you are using.
Then we move onto the Java level. Taking the traditional approach for a database connection which roughly follows the logic;
- Create JDBC Connection using MySQL Driver
- Create SQLQuery
- Create PreparedStatement object based on the SQLQuery
- Add in the relevant information to the PreparedStatment, replacing the ?s with the actual data
- Execute the PreparedStatement
- Read the ResultsSet and do what you need to do
- Close the ResultsSet
- Close the JDBC Connection
So taking the initial logic from earlier. We first need to run one query, then run a second query that returns the total number of results that doesn’t take into account pagination aspects of the query. Yet if we took the simple approach with Java, which is to run steps 1 – 8 above twice, then you’ll soon notice that the second query returns 0 for the NumberOfFoundRows on the second query, which is not the correct behaviour we are looking for. The reason behind this is because you are running the query as two distinct JDBC Connections, hence, the second query that is run is a new connection to the MySQL database and hence has no reference to what was run on the previous query.
Makes sense? No? Don’t worry. To test this yourself, give it a go. Create 2x pieces of code that replicates the pseudo code for steps 1 – 8 above, with the first query being the SELECT * FROM table_name LIMIT 10 OFFSET 30; and the second query being SELECT FOUND_ROWS(); and you’ll see that the second database query returns 0, which is clearly incorrect.
The reason for this is due to how MySQL handles sessions. And this is where this gets a little bit unclear in the official MySQL documentation, so if anyone has any specific details on this, again, please comment. Based on my own testing, it appears that MySQL has some form of session management, whereby a session is managed when a connection happens to the database. Meaning that we can take advantage of that at the Java level to utilise this.
So instead of steps 1 – 8 above, we take a slightly different approach to exploit MySQL and the SQL_CALC_FOUND_ROWS and FOUND_ROWS() functionality. In a nutshell, we do this by opening a connection, running two SELECT queries, then closing the connection. This allows us to achieve the desired result that we need.
- Create JDBC Connection using MySQL Driver (aka. MySQL Session)
- Create SQLQuery1 – SELECT SQL_CALC_FOUND_ROWS * FROM table_name LIMIT 10 OFFSET 30;
- Create PreparedStatement1 object based on the SQLQuery1
- Add in the relevant information to the PreparedStatment1, replacing the ?s with the actual data
- Execute the PreparedStatement1
- Read the ResultsSet1 and do what you need to do
- Close the ResultsSet1
- //then do the same again
- Create SQLQuery2 – SELECT FOUND_ROWS() AS NumberOfRowsFound;
- Create PreparedStatement2 object based on the SQLQuery2
- Add in the relevant information to the PreparedStatment2, replacing the ?s with the actual data
- Execute the PreparedStatement2
- Read the ResultsSet2 and do what you need to do
- Close the ResultsSet2
- Close the JDBC Connection (aka. MySQL Session)
What you’ll notice when you take this approach in your Java code is that your database queries to achieve this will return exactly what you are looking for. i.e.;
- Rows X – Y (based on pagination controlled by LIMIT and OFFSET MySQL parameters)
- NumberOfRowsFound (Total number of rows, ignoring the LIMIT and OFFSET MySQL parameters)
Pretty neat really and this can save a hell of a lot of time when managing SQL queries at the Java and JDBC level when dealing with paginated data.
Still confused? I’m not surprised. Re-read again about 5x times and do some testing at the MySQL (via MySQL Workbench and via your preferred Java IDE) and Java levels. Still confused? Leave a comment J This is so poorly documented on the web, the above is simply from what I have found through extensive testing based on extremely minimal information. Hope this helps J
For completeness, here’s the not so useful official MySQL information on the FOUND_ROWS() option, https://dev.mysql.com/doc/refman/5.7/en/information-functions.html#function_found-rows.
And finally. It is not 100% clear how MySQL manages sessions at the moment looking at the official documentation. I’ll update this blog post as I find more information on the topic. i.e. What happens when multiple users do the same thing that is overlapping;
- User 1 – SELECT * FROM table_name LIMIT 10 OFFSET 20;
- User 2 – SELECT * FROM table_name LIMIT 2 OFFSET 30;
- User 1 – SELECT FOUND_ROWS(); — Does this bring back #1 or #2?
- User 2 – SELECT FOUND_ROWS();– Does this bring back #1 or #2?
For my tests, I have replicated the above scenario by adding in an artificial delay in between the two queries run by User 1, so I could then run the first query against a different table to produce a different number of results. What I found when running this test, is that MySQL is indeed rather smart in this area and manages the data correctly through some form of session management. This means that even when 1 – 4 above are run in this order, the second query for User 1, returns the number of FOUND_ROWS() from the first query for User 1, not the first query for User 2, which is the correct behaviour.
Hope this is of use to others who also come across this challenge.
by Michael Cropper | Aug 10, 2017 | Developer |
Ok, this is one that had been bugging me for a while and I’ve finally got around to spending some time to figure out how to do this. Quite boringly, this is actually for creating a WordCloud from Google Analytics data, but hey. It has nice visuals and is a great way of visualising data. Firstly, hats off to people like Jason Davies for creating awesome tools like this for people to use. What a lot of the better WordCloud tools available online allow you to do is to create WordClouds with phrases, not simply just single words. Single word WordClouds can be handy, but they can often lose the context. So personally I was looking for something that could keep things grouped by phrases. Specifically I was looking to turn Google Analytics data, which is in the format of Data | Number of Times, into a WordCloud. On smaller data sets, this is relatively straight forward as you can simply manipulate the data in Excel and copy and paste data a number of times to get the required result. When data sets get large though, this solution soon becomes difficult. And here comes more Excel magic that allows you to manipulate Excel data into the format you need, in this case….
Data from;
- Name | Number of Times (i.e. Web Developer Job in Manchester | 50
Data into;
- Web Developer Job in Manchester
- Web Developer Job in Manchester
- Web Developer Job in Manchester
- Etc.
And the beauty of Excel, this is possible with a carefully crafted formula! Whoop!
The simple answer for how to do this is, with A1 being the ‘Name’ in the example above and B1 being the ‘Number of Times’ in the example above;
=REPT(CONCATENATE(A1, CHAR(10)), B1)
Then to break this down a little for those who aren’t too familiar with Excel, here’s what all this means;
- REPT: This function quite simply is for repetition whereby the function is, REPT(text, number_times).
- CONCATENATE: This is simply joining two or more things together, i.e. CONCATENATE(“This”, “With”, “This”), which would result in, This With This
- CHAR(10): This is the formula for inserting a specific character into a formula, in this case a New Line Break character
And that is it. This magical formula formats all of the data into what is required. When you are viewing this data in Excel, it won’t add the data into a new Cell, so simply copy and paste the whole data into another text document and you’ll see the data on new lines as you expect.
Pretty cool! Well I thought so anyhow 🙂
by Michael Cropper | May 24, 2017 | Developer |
If you have come across this blog post, then like me, you have probably already spent quite a considerable amount of time trying to get this working and scratching your head about why this isn’t working like it should be doing. After finding virtually zero useful and understandable information online about how to do this, I decided to write this blog post to hopefully point you in the right direction now that I’ve managed to figure this out.
A caveat as all technology stacks are completely different. On this example I was running on the following technology stack;
- CentOS6
- Apache Tomcat 7
- cPanel Web Host Manager (WHM)
- cPanel
What I wanted to do is to run servlets on https://sub-domain.example.com.
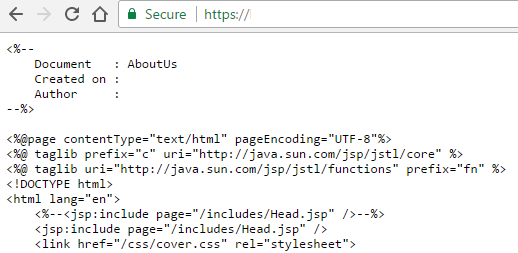
As a quick pointer. If you are looking to setup servlet technologies on a new account, you’ll notice that you can’t simply upload your servlets and JSP files on to a new cPanel account and for it to automatically work. What you’ll find if you have done this is that your JSP files will be accessible directly within the URL and the JSP files will show the JSP information rather than rendering the page correctly;
Usually when adding servlet support to a domain, particularly through WHM, this is a relatively straight forward process where you simply navigate to the following settings page within WHM and install servlets on the domain or account you require that is present within one of the individual cPanel accounts on the server, Home > Account Functions > Install Servlets. Unfortunately this doesn’t work for sub-domains which is a rather annoying ‘feature’ within cPanel WHM which is highlighted in the hidden place within the cPanel Tomcat FAQ which specifically states that;
“You cannot add servlet support to subdomains via WHM. Use the command line to add servlet support to subdomains.”
Ok. Now we know that, let’s get onto how to actually do that. Unfortunately, cPanel haven’t been that useful in actually saying how to go about doing this. In essence though, you need to run the following command at the command line;
cd /usr/local/cpanel/scripts/
And then…
./addservlets2 –domain:sub-domain.example.com
And obviously replacing with the correct domain and sub-domain for where you want to install servlet support, which has been taken from this guide from cPanel, which is also a good reference point should you ever need to remove servlet support for a sub-domain too. What this script does is add the relevant information to the server.xml file which controls what websites on the server can use servlet technology from the single Tomcat instance that is running. Unfortunately yet again, this script doesn’t quite work perfectly. It actually adds in the wrong information in one part of the server.xml file which causes your now should-be-working servlets and JSP pages to throw a 404 error and display a blank screen when you try loading them directly within the browser.
Thankfully, this is relatively simple to fix when you know where to look. First you need to find where your server.xml file is located which will be within either of the following file locations; ${catalina.home}/conf/server.xml or tomcat_installation/conf/server.xml. Again, depending on how everything has been configured, your catalina.home environment variable could be pointing anywhere. So if you run the following command to find the location of catalina.home in the first instance;
ps aux | grep catalina
Often on cPanel setups Catalina home is located at: /usr/local/easy/share/easy-tomcat7/
For those of you who aren’t familiar. The ps command in Linux stands for Process Status and the aux part of the command is actually three commands including a: process all users on the system, u: provide detailed information about each process and x: include processes that have no controlling terminal such as daemons. This handy guide about the ps command is worth a read over. Then by joining this with the grep command which is designed to search the server for specific patterns, this will output the information that you need at the command line. This handy guide covers the grep command for reference.
Once you have run the command above, the output at the command line will tell you where the information has been found. Take a good look through this information and you should be able to spot the directory for catalina.home. In the example I was working on, this ended up being within the following file location;
/usr/local/easy/share/easy-tomcat7/
So next you need to simply navigate to the correct location using the command;
cd /usr/local/easy/share/easy-tomcat7/conf
Where you can then view and edit the server.xml file using the command;
pico server.xml
Find the part of this file where the script you ran earlier has added in this additional information for the sub-domain and you will notice that the data within the <alias> section is wrong, it includes www.sub-domain.example.com rather than sub-domain.example.com. Simply remove the www. part, save the file, restart tomcat in your usual way and you’re good to go. Everything should be working as expected now.
For reference, here is an example. Various data has been blurred out as I can’t show this for obvious reasons, so explainers are below the image.
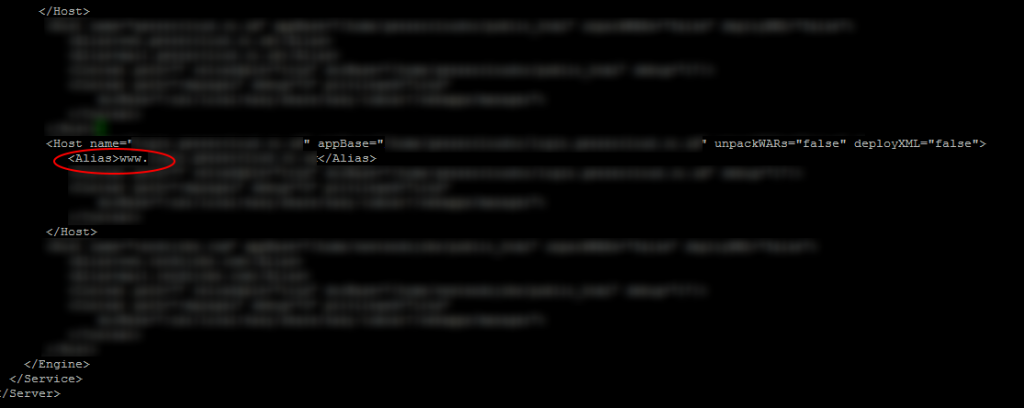
- Host – name: sub-domain.example.com
- Host – appBase: /home/{cPanel User}/{Document Root for Sub Domain}
- Alias – sub-domain.example.com
Next you need to tell Apache to direct requests through Tomcat rather than handling the files itself first. To do this, within your Document Root for the sub-domain, you need to create a .htaccess file if one doesn’t exist already and add the following code to the .htaccess file;
RewriteEngine on

SetHandler jakarta-servlet

SetEnv JK_WORKER_NAME ajp13
All the code above within the .htaccess file relates to Apache Tomcat Connectors. In essence, the two commands mean;
- SetHandler jakarta-servlet forces requests to be handled by mod_jk. If you neither specify any workers via JkMount and the related directives, not via the environment variable described below, the first worker in the list of all worker will be chosen. You can use SetHandler for example in Location blocks or with Apache 2.2 and later also in RewriteRule.
- SetEnv JK_WORKER_NAME ajp13 relates to the Apache Tomcat Connectors AJP Protocol
In essence, this handy guide from cPanel with regards to adding Servlet support which summarises the above .htaccess rules as;
“When war files extract, they extract only in the Tomcat folder and not the user’s /home/username/public_html folder. Because they aren’t extracted there, Apache does not recognize the folder and the application will then only load at http://domain.com:8080/hello (using our prior example) and not at http://domain.com/hello
There has been some confusion that these are not automatically set to extract using our default entry in /usr/local/jakarta/tomcat/conf/server.xml but this is not the case. Our default setup does have these extract into /usr/local/jakarta/tomcat/work/Catalina/domain.com path.
Conversely, they will not show up on Apache under port 80 by default. Revising the server.xml also does not work for these to auto extract nor is that even necessary to do. The way to add servlet support and to get all extracted war files showing up under Apache is by adding these two lines to /home/username/public_html/.htaccess file: (see above)”
So there we have it. That’s how to install servlet support on a subdomain on Apache Tomcat 7 using the command line when you can’t easily do this using cPanel Web Host Manager (WHM). Naturally, don’t go playing round with these kinds of settings if you don’t know what you’re doing and most importantly only use this information as a point of reference for how this solution worked for this specific project. Every server configuration is completely different, so you need to understand your own setup before making high level configuration changes like this as one wrong character where it shouldn’t be can bring down entire websites.
Hope that helps for anyone coming across this similar problem!
by Michael Cropper | Apr 13, 2017 | Client Friendly, Developer |
Blogging, content marketing, SEO, Google, brand building and more – We’re all told that blogging helps with all of these things, and it really does. But what if we want to turn blogging into a lead generating machine that you can highly target to your key audiences with different messages, all automatically? Imagine a mini-website-footer, that is fully customised to each of your target sectors and audiences that is filled with the key information to drive them to take the action you want on top of simply reading the blog post. Sounds pretty cool right? Well, yes, it is. And most importantly, it’s not actually that difficult to implement.
How WordPress Works
So, I’m going to assume you’re using WordPress for your blogging activities. If you’re not, have a word with yourself and get onto WordPress, seriously. There is rarely a reason to use anything other than WordPress for blogging activities in this day and age.
WordPress works in a very, well, WordPress way. So it is important to understand this in the first instance so you can understand what is actually possible. In essence, the end result for what we’re looking for is to add a bit of content at the end of every blog post, or every blog post within a specific category, or even every page on yourself. The options are virtually endless and allows you to customise what is important to you.
To get a feeling for the end result for what I’m about to show you, take a look at this blog post about How Travel Companies Can Stand Out on Googles Search Results Using Review Rich Snippets and most importantly, what you’ll notice at the end of the blog post is a small lead generation area that is designed to turn blog post readers into engaged people and potential customers at some point in the future.

Specifically what you’re seeing above, is the last paragraph of the blog post, followed by the lead generation section, followed by the author section. And you’ll also notice that this section is not present on this blog post you’re reading right now, because this post belongs to a different target market, primarily developers like yourself reading this.
So, back to WordPress. WordPress works in sections. What you see is not simply a full page of content that is being generated in a single go, what is actually happening in the background when a blog posts loads for a user is that WordPress goes away and gets the header, the main navigation, the blog post content, the author information, the footer and many more things. In the background WordPress then pieces all of this information together which is then presented to the user in what they see as just another blog post on the website.
What is important to understand here is that you can interrupt this process and do additional things which is super handy. This is when you can listen out for Hooks and apply Actions and Filters to these Hooks. In essence, an Action does something, and a Filter changes some data in transit. It’s not always quite as straight forward as that in the background, but you get the idea.
If you’re a non-technical person reading this blog post, skim over the code and don’t worry about the finer details. Simple see the type of customisations that can be added to your WordPress blog posts to target your key target markets and generate leads.
Adding Lead Generation Content to the_content()
As mentioned above, there are many Hooks throughout the WordPress codebase. One of these is called the_content() which provides, you guessed it, the content on the page. In this specific example, the blog post content. And because this Hook exists, it is possible to manipulate the data, for example by adding additional information at the start or the end of the blog post content.
What is interesting too though is that every blog post belongs to a specific Category, which again can be used to show different information at the bottom of blog posts that belong to different categories. For example, if you wanted to share different information with people reading technical information VS non-technical information or share different information to people within your different target markets, this is all possible and this is exactly what we’ve done on our website.
So, let’s jump straight in and look at the code and I’ll explain everything in a moment.
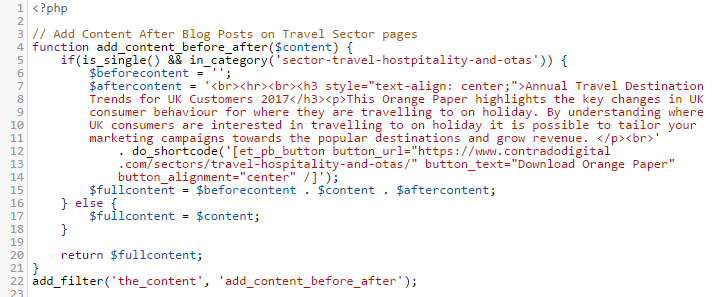
The above code is contained within the functions.php file within our Child Theme. In essence what the code is doing is listening out for whenever the_content() Hook is triggered by WordPress, i.e. when someone is looking to read a blog post, then before this information is sent to the user, it is being altered slightly. As the_content() Hook is triggered for both Posts and Pages, the if(is_single()) part is saying that only apply this lead generation content on Blog Posts, not Pages. And likewise, the in_category() part is saying only display this information within this specific category which is the URL slug of the category, not the name of the category.
The $content variable is where all the information for the content is stored. So we want to add data to the start and end of this. In this example, we’ve only added data to the end, although both have been contained to show you the logic of how to add content either before or after the_content() part. Reading through the code should be relatively self-explanatory when you compare with what you can see on the main image at the top for how this is displaying. The only thing to point out specifically is the additional do_shortcode() function which is also called which allows us to output shortcodes from here too rather than just plain text. This can be really handy if you want to add things like buttons and forms before or after the content. When you do this, note the single VS double quotes. Make sure you don’t get these in the wrong order or it won’t work.
And it really is as simple as that. Turn your blog posts and content marketing activities into lead generating machines without manually adding this information at the bottom of every blog post you write, which is extremely time consuming to change in the future as you fine tune your marketing campaigns.
by Michael Cropper | Apr 7, 2017 | Developer, Technical |
By default MySQL FULLTEXT search will not search for words that are less than 4 characters in length. For many things this can be great as many words less than 4 characters are generally stop words such and often aren’t valuable, for example words such as, the, and, if, on, etc. Although this isn’t always the case and in certain circumstances small words are actually really important. For example, let’s say you’re looking for a new developer job using any of the following technologies, ios, php, C#, .Net, ASP, etc. In these cases, the default MySQL FULLTEXT search default minimum characters actually prohibit results being found, which isn’t a great user experience. As such, you may want to update your MySQL FULLTEXT search functionality to enable smaller words to be searched for while quality results are being identified.
Edit My.cnf File
The my.cnf file on your web server generally sits under /etc/my.cnf and allows you to customise your MySQL configuration. You can edit this file by logging into your web server using SSH, navigate to the correct folder and run the command pico my.cnf which will allow you to edit the file.
Now you need to add the following line of code at the bottom of the fie which will allow MySQL FULLTEXT search to search for words with a minimum word length of 2 characters, ft_min_word_len=2
Once you have completed this, save the file.
Restart MySQL
Next you need to restart the MySQL service using the following command, service mysql restart which will ensure that the MySQL service will use the new configuration data once it has restarted. Should you experience a problem restarting MySQL, then remove the code you just added in the my.cnf file or comment out the code with a # at the start of the line. If you’re not aware, the following commands also exist which can come in handy should the MySQL service not restart smoothly, service mysql stop and service mysql start.
Rebuild All MySQL FULLTEXT Indexes
Finally you need to rebuild all your MySQL FULLTEXT indexes that you are using on your database. If you only need the smaller words to be searched on specific tables, then you clearly don’t need to rebuild the ones that aren’t relevant, although it can be handy as this could save you hours of debugging further down the line if different tables are using different minimum word lengths. Login to your phpMyAdmin if you’re running this on your web server to access the MySQL database then run the following command on which ever table you want to update, REPAIR TABLE <TableName> QUICK;
All done! Now your MySQL FULLTEXT Search will be able to search on smaller words than previously.
Some additional resources that can come in handy include official documentation about how to fine tune MySQL FULLTEXT searches.
by Michael Cropper | Dec 3, 2016 | Developer |
This can be a fun one to deal with, particularly when working with scalable web applications. To keep things simple, remember that according to the W3C standards, the ID attribute on any element on a page should always be unique. This enables you to refer to this specific element whenever you want which is handy. This is perfect on simple web applications as you can just name everything as you wish. When working with scalable web applications, this becomes a little more challenging. Let’s keep things simple and use Twitter as an example. At any one point in time when a user searches for “Show me Twitter Accounts Matching ‘Michael'” for example. This will return an unknown number of results and the front end will loop through each of these accordingly. As part of this process, you are going to want to add relevant actions to each of the user accounts, such as Follow Account or Unfollow Account etc. Most scalable web applications these days will use jQuery to perform these kinds of actions on the front end which is perfect as within jQuery you can update the page content when a user does something such as clicking a button. And here’s the snag, the way all of this works is on the ID attribute for the relevant element.
So we need to implement a bit of clever technology to deal with unknown IDs to firstly identify the relevant ID that has been clicked, for example, and then use that ID to update something based on what the user has done. Let’s break this code down and provide a working example for how to do this;
$(document).ready(function () {
       //This line of code is telling jQuery to handle any actions when a user Clicks on an element
       //that has an ID attribute which starts with 'api-follow-button', i.e. 'api-follow-button-user-account-id-123'

       $(document).on('click', '[id^="api-follow-button"]', function followButton(e) {

                //This line of code prevents the element performing its default action, such as a link being clicked for example
                e.preventDefault();

                //This line below ensures that you can then use the ID selector to update the relevant part of the HTML as needed
                //This code is identifying the full ID attribute for the element that has been clicked
                var buttonID = $(this).attr("id");

                var buttonText = "Unfollow";
                var currentState = "Following";

                //Update Links
                //This line of code is allowing you to use a Variable in JavaScript to update the element using jQuery
                $("button[id=" + buttonID + "]")
                        .html(buttonText)
                        .attr("currentState", currentState);
       });
});