Yesterday marked the start of the 7th year of Google Code-in (GCI), our pre-university contest introducing students to open source development. GCI takes place entirely online and is open to students between the ages of 13 and 17 around the globe.
Open source software makes up the backbone of the internet, from servers and routers to the phone in your pocket, but it’s a community-driven effort. Google Code-in serves a dual purpose of encouraging young developers and ensuring that open source communities continue to grow.
The concept is simple: students complete bite-sized tasks created by 17 participating
Source:: Calling all teens: join the latest round of Google Code-in
by Michael Cropper | Sep 10, 2018 | Developer |
If you’re reading this blog post then you’re probably in the realms of playing with hardware and building a mini server, media server, web server or something along those lines. Great! So now you’ve got your hardware pieced together, it’s now time to start installing software on it. For the purposes of this blog post, I’m not going to go into the details of what/why/when/who/how for the vast array of choices and options available for configuring software on your server. Instead, I’m just going to look specifically about how to create a bootable USB for installing Ubuntu Server. Simple and straight to the point.
Step 1: Install Universal USB Installer
Download here, https://www.pendrivelinux.com/universal-usb-installer-easy-as-1-2-3/
This software will turn a .iso file into a bootable partition on a USB drive.
Step 2: Download Ubuntu Server
Download the relevant version here, https://www.ubuntu.com/download/alternative-downloads#alternate-ubuntu-server-installer
Note, make sure you’re downloading the correct version for what you require, there are quite a few different versions!
This step will download the .iso file to your computer. You’ll need this file in the next step.
Step 3: Create the Bootable USB
Follow the instructions here, https://www.pendrivelinux.com/universal-usb-installer-easy-as-1-2-3/
In essence, you’re installing the .iso file you downloaded in the previous step onto your USB Pen Drive. Note, make sure you install on the correct drive on your computer or you can really really really mess things up!
When you are creating the bootable USB for Ubuntu Server, make sure you actually select Ubuntu Server from the dropdown list, as there is also an option for installing Ubuntu (desktop) version too, which you don’t want.
Complete!
That’s it! You’re done. You’ve just created yourself a bootable USB that can be used for installing Ubuntu Server. Simply plug this device into your server, make sure that it has priority boot settings so your installer can then run and you’re on your way!
Note for Ubuntu Server 18.04
The above software doesn’t seem to like Ubuntu Server 18.04, so you’ll probably need to use the Rufus software instead – https://rufus.akeo.ie/
by Michael Cropper | Aug 12, 2018 | Developer |
Quick info for reference.
Loop through a Map and output the Key and Value data using;
<c:forEach items="${map}" var="entry">
  Key: <c:out value="${entry.key}"/>
  Value: <c:out value="${entry.value}"/>
</c:forEach>
If you have an object within the Key:Value pair, such as within an object Map(), you can get this data as follows;
${map.key}
Then you can iterate over the above list using the code to get the Attribute data within the CustomerInformation object a follows;
<c:forEach items="${map.value}" var="customerInformation">
  <tr>
    <td>${customerInformation.firstName}</td>
  </tr>
</c:forEach>
by Michael Cropper | Jun 16, 2018 | Developer |
The maximum number of connections that Apache Tomcat can handle is defined within the Tomcat settings. In essence, this setting determines the number of concurrent connections that can be handled by Apache Tomcat.
Out of the box, Apache Tomcat is configured to handle around 200 simultaneous connections (kind of…), which for most web servers and projects is more than adequate. But when you get into the realms of millions of monthly active users and concurrent connections, you’ll soon need to optimise Tomcat to suit your needs accordingly.
Ultimately though, the number of simultaneous connections that the Apache Tomcat software on your web server is capable is handling is determined by the physical limitations of your web server. The bigger your hardware, the bigger the number of connections that Apache Tomcat is capable of handling. This being said, the 200 maximum connections as a default is merely an arbitrary number, so you’ll need to assess this in relation to the hardware you are running on. The bigger the server hardware you’re running on, the higher the number of maximum connections on Apache Tomcat your server will be able to handle. As always, this can change depending on what you are doing. For example, if you have a process on your really fast server that is calling a third party dog slow server, then this soon becomes the limiting factor in the chain.
Max connections from an Apache Tomcat perspective is calculated based on a number of factors such as the number of simultaneous connections multiplied by the maximum execution time that each thread is capable of handling. Under normal circumstances this can appear to be behaving correctly, so keep in mind exceptional circumstances when things don’t quite perform as you wish. What you’ll soon spot (via the Tomcat Manager) is that the Max Connections soon starts to creep up and eat up all the resources on your server. This can be caused by many factors, from long running processes on your own server, or code on that is calling third party servers which may be running slow and causing problems.
With all this in mind, let’s take a look at how to increase the maximum connections on Apache Tomcat. It’s actually quite simple to do.
Run the command;
sudo nano /usr/share/tomcat8/conf/server.xml
This command will open the editor to edit the file Server.xml which controls many of the settings required for configuring Apache Tomcat. You’ll note that it is Apache Tomcat 8 that is being used in this example, so edit this accordingly for the version of Apache Tomcat that you are using. Again, depending on your individual configuration of your server, this file may live in a different file path. So to easily find the file if the above command doesn’t work, then run the command below;
find / -type f -name server.xml
The above command will search for a File (f) called “server.xml”
What you’re looking for within this file is the setting for “maxConnections” which will have a value set. You may not have this variable set so look out for the core settings for the port that your Tomcat instance is listening on, for example;
<Connector port=”8080” protocol=”HTTP/1.1” maxConnections=”200”/>
The maximum number of connections that the server will accept and process at any given time. When this number has been reached, the server will accept, but not process, one further connection. This additional connection be blocked until the number of connections being processed falls below maxConnections at which point the server will start accepting and processing new connections again.
Depending on your specific requirements, you may also need to increase the maxThreads setting too. Hope that helps getting you started with tuning Apache Tomcat for your specific needs.
by Michael Cropper | May 12, 2018 | Developer |
If you’re looking for a quick answer and you’re running a common version of Linux, just type this when you are SSH’d into your server;
sudo chkconfig httpd on
Now for a bit more technical details about what this all does.
What is chkconfig?
The Chkconfig command in Linux is used to setup, view, or change services that are configured to start automatically during the system startup which abstracts some of the underlying settings that are stored within the /etc/rc.d/init.d/ directory. Chkconfig basically helps you to easily make service start or not when your system reboots.
Some handy chkconfig commands that you’ll find handy;
- chkconfig –list (dash dash)
- This will list the details of all services that are running on startup
- chkconfig –list httpd (dash dash)
- This allows you to list specifically the details of the service you care about, to avoid you having to trawl through the entire list. Simply change ‘httpd’ to whatever service name you are interested in looking at.
When you start to look through the outputs from the above commands, it may be a little confusing seeing 7 levels, some with a status of on and some with a status of off, but what do they all mean? The different levels are what is known as Linux Runlevels. Generally speaking, you probably don’t need to worry about those at all. But if you do need some fine grain control over what happens and when, when that may be covered in a future blog post.
by Michael Cropper | Feb 26, 2018 | Security |
Phew! You can relax now.
We’ve started to see a report in spikes in porn blackmail emails come through from various people over the last few days. These emails have been coming through on corporate email addresses generally and with corporate email addresses often being added onto personal mobile phones that often younger members of the family use, this has had a few people concerned. But it’s ok, don’t worry. This is a scam.
When I investigated one of the emails it was clear that the scanners were playing on people’s sense of fear with the demand often being along the lines of;
“Tiсket Details: ECW-209-57819
Email: [REDACTED]
Camera ready,Notification: 21.02.2018 06:08:59
Status: Waiting for Reply 20xuVaAy8A0f64wMnKmJkL1FrF5Ky39Fu1_Priority: Normal
****************************************************************************
hi.
If you were more careful while playing with yourself, I wouldn’t worry you. I don’t think that playing with yourself is really awful, but when all colleagues, relatives and friends get video record of it- it is undoubtedly [bad for u.
I placed virus on a web-site for adults (with porn) which was visited by you. When the object press on a play button, device starts recording the screen and all cameras on your device begins working.
Moreover, my virus makes a dedicated desktop supplied with key logger function from ur device , so I was able to get all contacts from ya e-mail, messengers and other social networks. I’ve chosen this e-mail because It’s your corporate address, so you must read it.
I think that 330 usd is pretty enough for this little misstep. I made a split screen video(records from screen (interesting category ) and camera ooooooh… its awful AF)
So its your choice, if u want me to erase this сompromising evidence use my bitсoin wаllеt аddrеss: 1Lt4tLxQmZruKic23FYdAycB9a3GgTaacN
You have one day after opening my message, I put the special tracking pixel in it, so when you will open it I will know.If ya want me to show u the proofs, reply on this letter and I will send my creation to five contacts that I’ve got from ur device.
P.S. You can try to complain to cops, but I don’t think that they can solve ur problem, the inquisition will last for several months- I’m from Estonia – so I dgf LOL”
Sounds legit, right? Well, aside from the obvious spelling mistakes, grammatical errors and unsociable hour to be sending such a threatening email, sure.
Thankfully with a bit of investigation we can see that the IP address where this email is coming from is, 188.40.100.212, which is based in Germany with a German web hosting company, not Estonia. And while it is possible to send emails from different locations with relative ease, this one just doesn’t seem to stack up. As when you view the IP address in your web browser, you notice the default cPanel page which shows you that the website does not exist. Now for those of you who know cPanel well, you’ll also know that you can visit www.example.com/cpanel to get to the login page, and likewise, you can do the exact same from an IP address, so 188.40.100.212/cpanel also takes you to the login page.
Also from knowing cPanel very well, I also know how to secure cPanel, and I also know that many people who use cPanel do not secure it correctly and with minimal testing, it is clear that there is no brute force protection technology in place on this “hackers” web server – ironic. So with handy little scripts designed specifically to brute force your way into a cPanel account, should you decide to ‘research’, this is a relatively straight forward thing to do on insecure web servers.
You’ll also notice the Bitcoin wallet listed where you can deposit the “ransom”, yet when you check the transactions against that Bitcoin wallet, you’ll also notice that this wallet has never had any Bitcoins transferred in or out of the account. Another sign that this is clearly a fraudulent email – and that the people behind this scam aren’t that successful.
All in all, this looks to be what’s known as a ‘script kiddie’ in the industry, i.e. someone who clearly thinks they know more than they really do. Now as a non-teckie, this email still can be rather intimidating. Thankfully with a bit of know-how, you can start to spot these ever increasing range of tactics used by the scammers.
Something to bear in mind for all the script kiddies out there… It’s one phone call to the authorities and they’ll be speaking to your web hosting company to get your contact details. In this particular instance I investigated, this appeared to be from a hacked website, so as always – keep your website and web server secure before a hacker finds a vulnerability. It is so easy to find and exploit vulnerabilities when you know what you are looking for…
On a final note, web browsers are designed with security in mind. Web browsers simply cannot access the hardware of your device without your express permission, regardless of the content you are browsing. As a simple example, uploading an image to a website, you’ll notice that this brings up a popup for your standard operating system controlled dialogue box. What this means in layman’s terms is that control has been handed over to the underlying operating system to determine how to proceed with the request and the web browser is waiting for a response to know what to do next. The web browser simple cannot turn on your camera remotely without you agreeing to it.
As a sub-note though, if a hacker manages to find a way to install a program on your device, then they will likely have full access to everything. So keep that in mind too…
by Michael Cropper | Jan 27, 2018 | Developer |
I thought it was handy to do a bit of performance testing with MySQL Fulltext Search to quantify how much benefit a MySQL Index has while querying large data sets using MySQL Fulltext Search. The reason this came about was due to the performance of SQL queries running against the dataset powering the search engine behind https://www.tendojobs.com/. While there is a lot of complex technology behind the scenes powering the search functionality of Tendo Jobs, one piece of this technology mix is the MySQL Fulltext Search functionality. It was noticed that for certain queries the time to run the queries was sub-optimal. Hence, I decided to do a bit of performance testing on this.
MySQL Fulltext Indexes are essential when querying large datasets, although MySQL Fulltext Search doesn’t work on all data types, which is rather annoying. According to the official MySQL documentation on MySQL Fulltext Search, https://dev.mysql.com/doc/refman/5.7/en/fulltext-search.html, the only options for using MySQL Fulltext Search are on columns with the datatype of Char, Varchar, or Text. Which is kind of limiting as datatypes such as Blob can be extremely valuable for storing larger data sets, but hey. This the limit, so for MySQL Fulltext Search, that is what you’ve got to work with. So, onto the performance side.
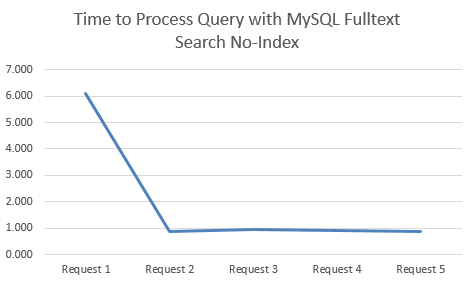
I started with the dataset of searches run by users of Tendo Jobs to gather some real search data. From this I tested the performance of the queries when using both Indexes and No-Indexes. What was clear on both approaches was that the first query always took significantly longer than the subsequent queries for the same search term, so to avoid any potential discrepancies, this is highlighted below.
Time to Process Query with MySQL Fulltext Search No-Index
This is when there is no MySQL Fulltext Search Index on the relevant column;
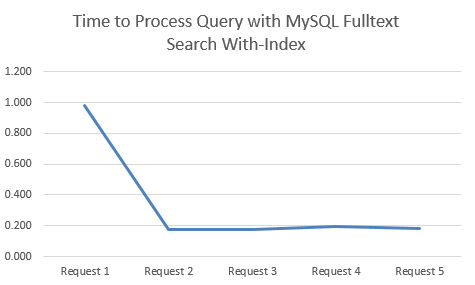
Time to Process Query with MySQL Fulltext Search With-Index
This is when there a MySQL Fulltext Search Index on the relevant columns;
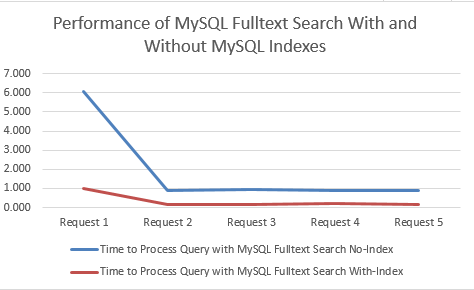
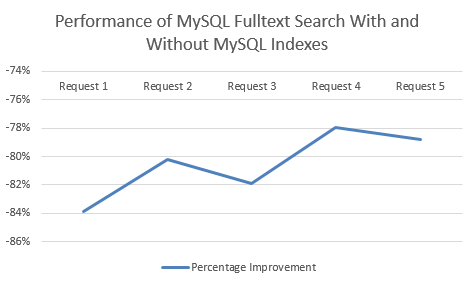
Comparison for Performance in Seconds
MySQL Fulltext Search with an Index clearly performs significantly better. Between 78% – 84% improvement by using an Index when querying datasets using MySQL Fulltext Search!
Summary
Just use Indexes, they are awesome. But it’s great to quantify this in terms of performance improvement on larger data sets, along with the limitations of MySQL Fulltext Search. As a final note, MySQL Fulltext Search is not designed to be a search engine, so bear this in mind. It is good up-until a point, so always keep an eye on performance when querying large datasets.
by Michael Cropper | Jan 25, 2018 | Developer |
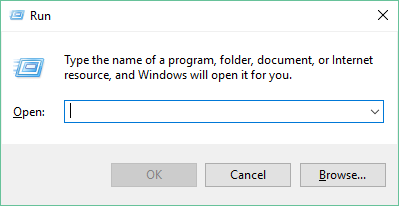
When developing through Netbeans in Java (my personal favourite) you may come across the annoying error now and again which is telling you that Tomcat cannot start due to the port being in use already. Often this is Port 8005 but it could be something else depending on how you have things configured. Either way, this ‘feature’ is rather annoying and requires a couple of steps to kill this off and get you back on track. Unfortunately the traditional IT solution doesn’t work in this scenario, turning Netbeans off and back on again, the issue persists.
This issue is caused when you are trying to run multiple applications simultaneously and something has got in a bit of a mess in the background.
Thankfully, the solution is rather simple when you know where to look on Windows, there are a few steps involved.
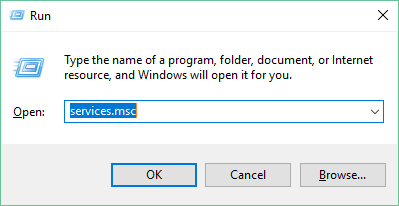
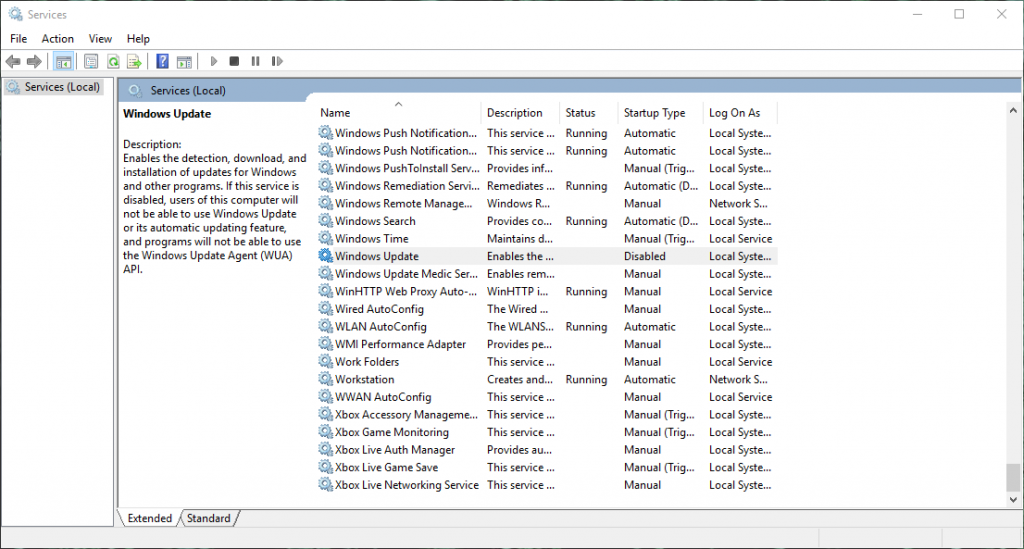
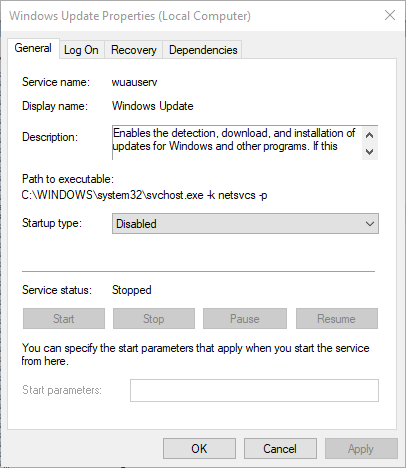
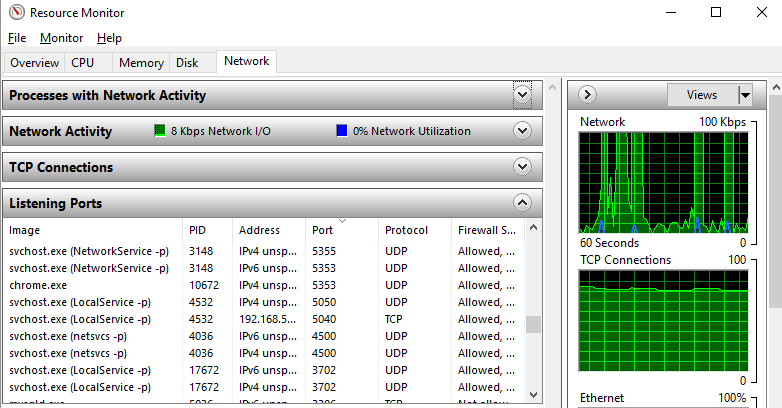
Find the PID (Process ID) that is hogging the Port 8005 that you need
To do this, either search for “Resource Monitor” in the Windows start menu, or, type at the command prompt, resmon.exe. Either way will open the resource monitor as you can see in the screenshot below. Look through the list of Ports and find the port that is being blocked, then look across to the PID column to find the Process ID, you’ll need this in the next step.
For those of you more familiar with the command line, just run the following command;
Netstat –a –o –n | findstr 8005
Netstat is a command-line tool for displaying network statistics including displaying connections using the TCP/IP protocol, i.e. your application.
The –a flag displays all connections and listening ports
The –o flag displays the owning process ID associated with each connection
The –n flag displays addresses and port numbers in numerical form
The | pipes the output of the first command to the next command, findstr
findstr is the Windows equivalent of grep on Linux, a command line CTRL + F search facility.
Simple.
Next Force Kill the Process
To do this, you need to run Command Prompt as an Administrator. This will not work as a standard Windows user, you need to be an Administrator. Simply type;
Taskkill /F /PID 12345 (replace the process ID that you found earlier)
Done. You’re good to go again.