by Michael Cropper | May 27, 2019 | Developer |
Ok, so if you’re reading this, you’re probably a bit of a geek like myself. We’ve all seen the “Welcome Mr Stark” message that appears on Iron Man when Tony Stark logs into his private server. i.e. in other words, SSH’ing into his server.

So, how easy or difficult is it to get this set up? Well, it’s remarkably easy to configure this and it is all down to configuring your ‘Message of the Day’ on your server. So let’s have a play around.
Firstly, generate some text that you want to display, you could simple try the basis such as “Hello”, but that’s a bit boring. Instead, let’s look to replicate the same message that we can see on Tony Start’s private server. You’ll find many different ASCI Art Generators online if you search, so find one that you like the look of. Here are just a few examples that I’ve generated to give you an idea of the different styles you can use.

So once you’ve got the text that you want to configure, simply SSH into your server and run the command;
sudo -s
Which will switch your user over to the Sudo user, you’ll need to enter in the password to do this.
Next, run the command;
nano /etc/motd
Which will create a new file for you, if it doesn’t already exist, or edit the current file if it is already there. Feel free to use the editor of your choice here, personally I prefer the Nano editor as I find it more intuitive to use. Simply paste your text into here, and save the file.
Simple, you’re done. Then the next time you login to your server via SSH you’ll be greeted with the nice message that you entered;

by Michael Cropper | Feb 15, 2019 | SEO |
When it comes to technology, technology should work for you, you should not be a slave to your technology. And oh-my-god, Windows have got things SOOOOOO wrong with their automatic update system in Windows 10. For the average home user, you’ll probably be thankful that things are simply taken care of for you, and that’s great. Security is hugely important and this is where the Windows 10 automatic updates come in very handy. But Microsoft seem to have forgot one key thing with these updates and that is that not everyone is an average user and Windows is used by businesses that require stability and control.
The amount of times I have gone to make a brew (that’s a ‘Cup of Tea’ for the Southerners reading…), or turned by back for only a few minutes to come back to my machine and find that bloody Windows 10 has turned itself off, in the middle of the flipping day, in the middle of when I was doing something!!! Thankfully, I have a good habit of saving every 2 seconds so I’ve never lost anything, touch wood, but by god is this annoying.
What’s more annoying is the fact that when Windows 10 built the feature as part of this update to helpfully re-open all the things you had open, they forgot one thing…. not everything you use is a bloody Microsoft product! The amount of things that people use in the working day, particularly myself with the amount of techie things I have open at any one point, that simple turning things off and back on again causes more problems than it solves (ironic for an IT product!). Even on powerful machines, for users who have things on the go, it’s going to take you a good 10, 15, 30 minutes to get everything back up and running that you were working on. It’s such a time wasting activity that I’ve decided to outline the steps required to just turn everything off for Windows 10 automatic security updates…
Just do this;
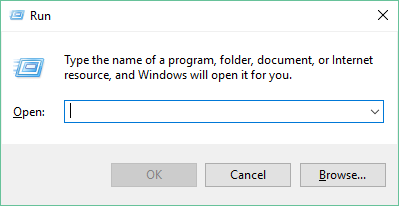
Open the Run Dialog
Press Windows Key + R – This will open the Windows Run window where you can type handy shortcuts to run programs
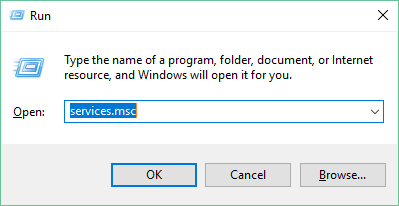
Open Windows Services
Type services.msc into the available field then click OK. This will open the Windows Services settings where you can control a lot of the background processes and tasks that run on your system.
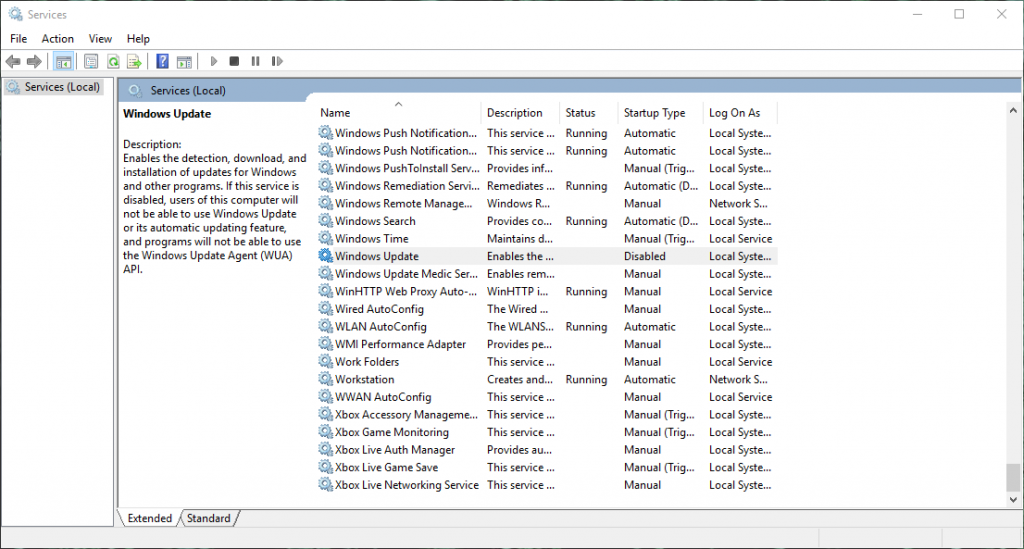
Find ‘Windows Update’
In the rather large list of services, find the ‘Name’ of ‘Windows Update’ and Select It. Then Right Click and select Properties
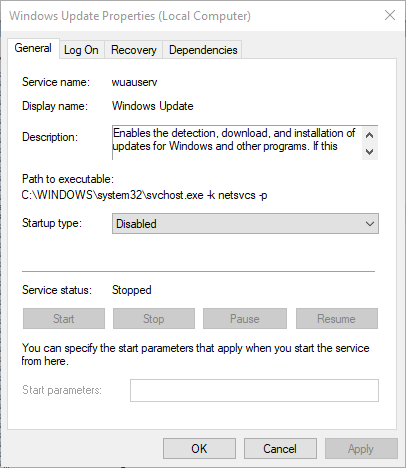
Stop the Service if it is Running and Disable it on Startup
Simple, job done. No more annoying, interrupting, ill-thought-out Windows 10 automatic updates at inconvenient times!
Word of Warning
Don’t do any of the above if you aren’t sure what you are doing. Changing things within your Services can really mess up things that you would want to work.
Clearly security and feature updates are important and you need to schedule time to do this. So don’t simply turn this off and never run security updates again, that would be bad. Schedule some time in, on a regular basis, at your convenience to run the security updates. Simple start the service and the rest will take care of itself.
Hope the above is some use to people going through the same pain…
by Michael Cropper | Nov 29, 2018 | Digital Pulse |

Yesterday marked the start of the 7th year of Google Code-in (GCI), our pre-university contest introducing students to open source development. GCI takes place entirely online and is open to students between the ages of 13 and 17 around the globe.
Open source software makes up the backbone of the internet, from servers and routers to the phone in your pocket, but it’s a community-driven effort. Google Code-in serves a dual purpose of encouraging young developers and ensuring that open source communities continue to grow.
The concept is simple: students complete bite-sized tasks created by 17 participating
Source:: Calling all teens: join the latest round of Google Code-in
by Michael Cropper | Sep 10, 2018 | Developer |
If you’re reading this blog post then you’re probably in the realms of playing with hardware and building a mini server, media server, web server or something along those lines. Great! So now you’ve got your hardware pieced together, it’s now time to start installing software on it. For the purposes of this blog post, I’m not going to go into the details of what/why/when/who/how for the vast array of choices and options available for configuring software on your server. Instead, I’m just going to look specifically about how to create a bootable USB for installing Ubuntu Server. Simple and straight to the point.
Step 1: Install Universal USB Installer
Download here, https://www.pendrivelinux.com/universal-usb-installer-easy-as-1-2-3/
This software will turn a .iso file into a bootable partition on a USB drive.
Step 2: Download Ubuntu Server
Download the relevant version here, https://www.ubuntu.com/download/alternative-downloads#alternate-ubuntu-server-installer
Note, make sure you’re downloading the correct version for what you require, there are quite a few different versions!
This step will download the .iso file to your computer. You’ll need this file in the next step.
Step 3: Create the Bootable USB
Follow the instructions here, https://www.pendrivelinux.com/universal-usb-installer-easy-as-1-2-3/
In essence, you’re installing the .iso file you downloaded in the previous step onto your USB Pen Drive. Note, make sure you install on the correct drive on your computer or you can really really really mess things up!
When you are creating the bootable USB for Ubuntu Server, make sure you actually select Ubuntu Server from the dropdown list, as there is also an option for installing Ubuntu (desktop) version too, which you don’t want.
Complete!
That’s it! You’re done. You’ve just created yourself a bootable USB that can be used for installing Ubuntu Server. Simply plug this device into your server, make sure that it has priority boot settings so your installer can then run and you’re on your way!
Note for Ubuntu Server 18.04
The above software doesn’t seem to like Ubuntu Server 18.04, so you’ll probably need to use the Rufus software instead – https://rufus.akeo.ie/
by Michael Cropper | Aug 12, 2018 | Developer |
Quick info for reference.
Loop through a Map and output the Key and Value data using;
<c:forEach items="${map}" var="entry">
  Key: <c:out value="${entry.key}"/>
  Value: <c:out value="${entry.value}"/>
</c:forEach>
If you have an object within the Key:Value pair, such as within an object Map(), you can get this data as follows;
${map.key}
Then you can iterate over the above list using the code to get the Attribute data within the CustomerInformation object a follows;
<c:forEach items="${map.value}" var="customerInformation">
  <tr>
    <td>${customerInformation.firstName}</td>
  </tr>
</c:forEach>