This is quite a complex topic, and one that all depends on your specific setup. So we’re going to take a look at some of the options for how to get this set up with ease. Is what we’re going to talk through the best practice? Not sure. But I’ve not found any useful information online for a better approach, so to quote Admiral Adama from Battlestar Galactica when asked the question “So what’s your plan here?” he answers “Personally, I tend to go with what you know. ‘Til something better turns up”. So if the readers of this blog post have any better ways of doing this, please do share in the comments.
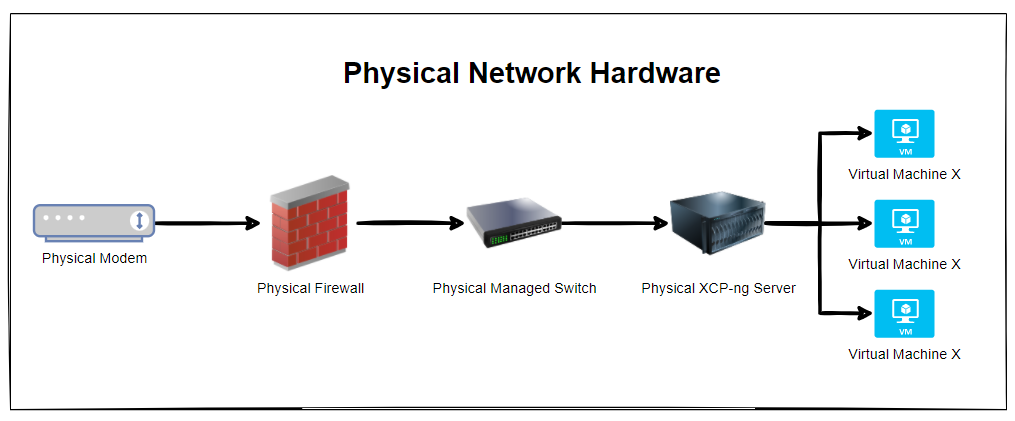
Physical Network Hardware
So let’s get some basics documented. The reality is that every single physical network hardware is going to be different for every organisation. But fundamentally and at the most basic level everyone has at a minimum: Modem –> Firewall –> Managed Switch –> XCP-NG Server –> Virtual Machine(s)
The reality is that in most home setups when people are getting started, most people start off with a single device supplied by the ISP (Internet Service Provider). Often these devices act as everything and nothing, so they perform the absolute basic requirements of a modem, a firewall and a switch, but fail on most things as they can’t handle VLANS, they can’t handle complex firewall rules and they can’t effectively manage complex networks. Typical jack of all trades, master of none.
Ultimately if you are in this home lab setup and wondering why things don’t work. It’s highly likely because you simply don’t have the physical hardware that you need to achieve what you want. Consumer grade hardware simply doesn’t cut it, even the high end consumer grade hardware as this is often designed to visually look powerful through curves/edges and more antennas in design rather than actually being powerful under the hood. Unfortunately in the UK we don’t particularly have the equivalent of an ecommerce store for this kind of stuff to make life easy, the way things work is often behind complex business to business commercial relationships and ‘special’ pricing etc. It’s an absolute nightmare. Perhaps I need to get around to building a business model to help to simplify the supply chain for these things, when I get the time. But hey, I digress. Back to the topic at hand.
Now things get a little more complex than the above as there are physical cables that are connecting the different physical devices, so let’s expand the above architectural diagram to understand the next level of detail. Here we have the setup whereby the firewall has 3x physical ports on the device and we have configured the firewall to have a simple setup of one port = one VLAN.
In reality, many VLANs often share a single physical port on the physical device, but let’s leave that for another blog post to cover off. So then we have the managed switch with the basic setup of 3x inbound connections and 3x outbound connections, each matching a one to one relationship to keep things simple. Again, the reality of any real world implementation is that we use things called Trunk Ports which is just a term that means a physical port that allows traffic to flow to the next physical device for every VLAN and untagged (aka. non-VLAN traffic).
What this ultimately leaves us with is the setup as follows;
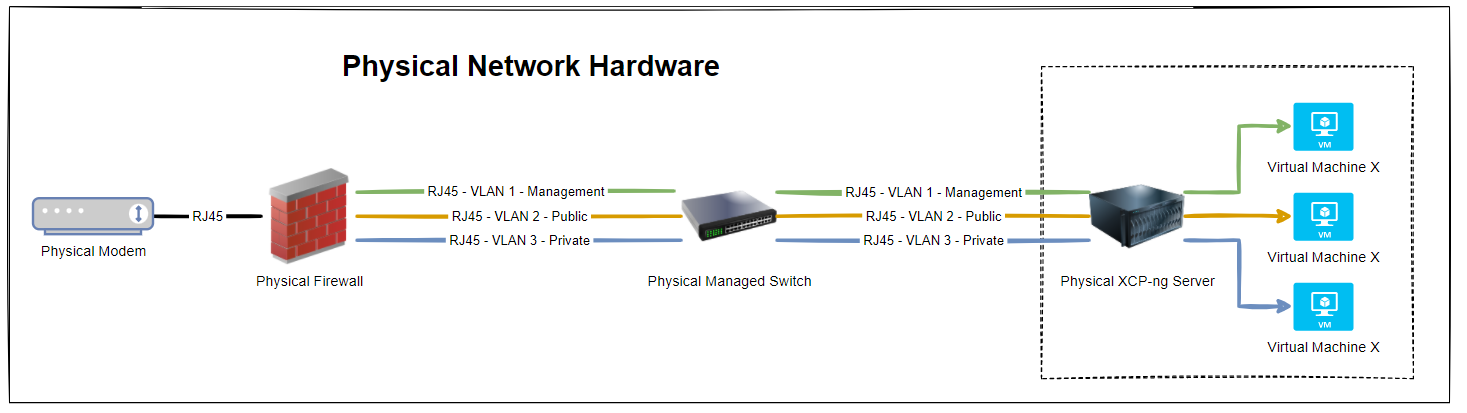
So we have 3x physical RJ45 cables connected between the physical firewall and the physical managed switch, and then another 3x physical RJ45 cables connected between the physical managed switch and the physical type-1 bare metal hypervisor XCP-ng Server. Everyone’s setup is going to be different, but if you’re working with Ubiquiti/UniFi then this guide on how to setup a UniFi managed switch is going to be handy.
But, we’ve jumped ahead a little. You’ll notice in the above diagram that the virtual machines are magically attached to the correct VLANS. But how? You may ask.
How to Configure XCP-ng Centre Networks on First Setup
When you first get XCP-ng Server setup and XCP-ng Centre setup, you’ll notice that when you plug in all the Ethernet cables that you are simply presented with a bunch of un-identified networks that you need to figure out what to do with;
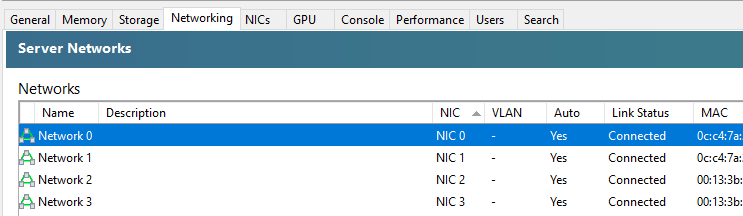
The networks that are listed here within XCP-ng Centre are directly related to the physical ports that you have available on your XCP-ng Server. So you’re probably thinking, awesome, let’s get started and get a virtual machine spun up and get cracking. But it’s not so straight forward. How do you know which network to attach the virtual machine to? After all, your choice here can have security implications depending on your use case. You don’t want a publicly accessible virtual machine to have access to your management network.
So we need to get into the topic of how to identify what networks in XCP-ng Centre map to what VLANs so that you can label them correctly and ultimately use them properly within your configuration. As with everything important, naming conventions and terminology is extremely important so make sure you agree this within your own organisations as appropriately.
The best way I’ve found to easily get this mapped in the first instance is actually quite simple, while not obvious, and it also feels quite rudimentary, it does work. Simply create multiple virtual machines, each one dedicated to a single network, then see what IP address it gets assigned from your DHCP server (likely managed on your firewall and enforced through VLAN configuration in the firewall and managed switch).
This is assuming you’ve already got your XCP-ng Centre configured to connect to your ISO Storage Repository for loading operating systems.
This step certainly feels a bit like using a sledgehammer to crack a nut, but it works. But I’ve yet to find a simpler way to achieve this. Once you’ve gone through this process and run the equivalent of “what’s my IP” (aka. ipconfig or ifconfig etc.) on the virtual machines once you’ve set them up and SSH’d into them, you’ll know definitively which network they are configured against.
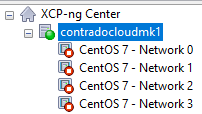
So now you need to rename your networks within XCP-ng Centre.
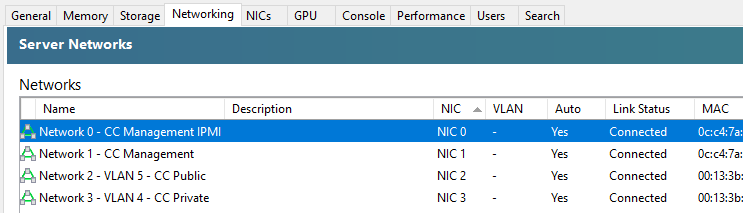
You’ll notice in the above screenshot that we don’t have the VLAN column populated, and that is purely because there are pending internal decisions to be made around the above setup on this specific use case, but you get the idea of how you can make sure the Network Interface Cards (NICs) map through to the XCP-ng Centre networks.
As with everything in IT “It depends” 😀
Summary
The reality is that what we have gone through in this blog post is an extremely basic setup in the real world. What I hope has been conveyed throughout this blog post is one practical way of mapping when things are physically plugged-in to different network ports and how we can determine which actual networks they belong to before we start deploying different virtual machines for different use cases.
Michael Cropper
Latest posts by Michael Cropper (see all)
- How to fix “Error establishing a database connection” on WordPress - May 19, 2026
- General Scheme of the Regulation of Artificial Intelligence Bill 2026 - February 4, 2026
- WGET for Windows - April 10, 2025