by Michael Cropper | Nov 6, 2015 | SEO |
What is the Yoast SEO Plugin
Before we get started, let’s first just look at what the Yoast SEO plugin actually is. This is the leading free plugin available in the WordPress space which is designed to allow you to customise the basic on-site technical SEO items on your website. This helps Google to crawl and index your website easier which in turn can help to increase visibility in the search engines. The Yoast SEO plugin powers over 22,000,000 websites to put its popularity into context. Quite simply, you would never use anything else, Yoast is awesome.
Installing the plugin is one thing. Knowing how to use the Yoast SEO plugin once installed is another. For many newbie webmasters, the Yoast SEO plugin can feel a little daunting at first yet it needn’t be when you know what you’re doing.
One important point to note about Yoast SEO though, and this is a big one, installing the Yoast SEO plugin on your WordPress website does not mean that you have taken care of your SEO. SEO is a little more complex than that… The Yoast SEO plugin simply means that your website isn’t technically bad and is not making life difficult for Google to crawl and understand the basic content on your website. If installing a single plugin on your website meant that you had “done SEO” then everyone would be doing it, right? Exactly. There is a lot more to SEO than just installing a plugin and making the options go green.
The Yoast SEO plugin is great, although it can mislead, not intentionally, newbies to SEO by thinking that if the page traffic light system is green then all is good and you can sleep easy at night. Green simply means that you have at least got the very basics in place. Red means that Google is not going to look too kindly on your website.
Ok, so now we’ve got that caveat out of the way, let’s take a look at how to get the most out of the Yoast SEO plugin and how you can work with this on a day to day basis. This type of work is not something we generally get involved with as it is simply too time consuming and hence costly for businesses. Instead, by us helping you help yourself, we can focus on the strategic side of your digital marketing.
General Settings Page
Your Information Tab
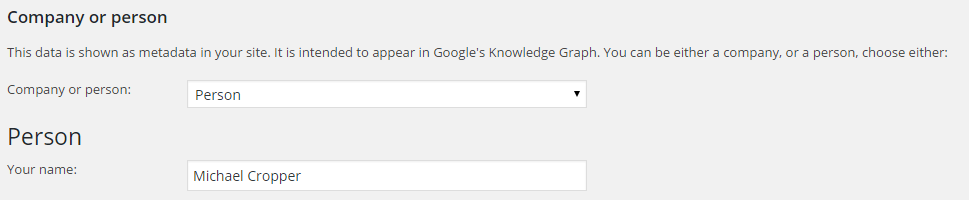
Website Name
The website name settings allow you to inform Google what your website is called. This is generally set to either your brand name as a business or if this is a personal blog, then your own personal name;

Company or Person
Self-explanatory, the company or person details allow you to specify this information to help Google understand who is behind the website. This information is often used to pull in various information from your website into the search results;
Webmaster Tools Tab
If you’re not using Google Webmaster Tools yet, what are you waiting for, get signed up at www.google.com/webmasters/tools/. This free tool will help you to understand how Google is viewing your business website. There are many ways for which you can verify your Google Webmaster Tools account, personally I prefer to use the Google Analytics option although if this is not possible for you then you can always use the meta tag verification option where you can place your code into this box here.
Security Tab
These settings allow authors and editors to redirect posts, noindex them and do other things which you might not want if you don’t trust your authors. Specifically these settings are really only relevant for websites with a large number of authors writing content on the website.
Titles & Metas Page
General Settings tab
You probably don’t need to change anything here so it would be recommended to leave these settings as they are out of the box unless you know what you are doing.
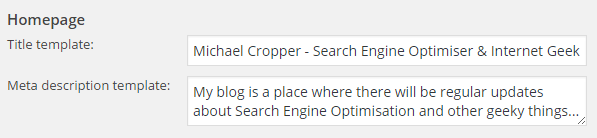
Homepage tab
These settings tell Google how your website should be displayed within their search results pages. It is important to fill this information out accurately so that Google understands what your website is about. It is important to note that you should keep your Meta Title set to around 65 characters and your Meta Description to around the 165 characters limit. Any more than this and your content will be snipped to fit within the standardised listings on Google. In the screenshot below, the Meta Title is the blue bit that you see on Google which is counted as a ranking signal and the Meta Description is the grey bit which is not counted as a ranking signal. This being said the Meta Description can allow you to entice potential customers to click through to your website when they see your listing alongside competitors.

Post Types tab
Unless you are an advanced user and know what you are doing, then you should probably leave these settings as they are by default. Changing settings within here could result in your accidentally telling Google not to include your website in their search results which means that you will not receive any traffic from Google. Which is probably not something that you want to happen. For reference, here are what some of the settings mean;
- Noindex: Ticking this option will tell Google to not include these set of pages within their index. This can be used for certain Post Types which may include low quality content in the eyes of Google or duplicated content. There are valid reasons to use this, although in most cases this should be left unticked.
- Follow: This means that Google will follow the links that are included on this set of pages and pass authority to the pages that are being linked to. Generally speaking, there is no reason why you would ever nofollow any links on your own website.
- Show date in snippet preview: This option provides additional information to Google when they crawl your website which indicates to them when the blog post or page was published. This can be useful for certain Page Types such as blog posts although can be problematic for static content such as ecommerce products or service pages on your website.
Taxonomies tab
As above, it’s probably best you leave these settings as they come for all of the same reasons outlined above in the Post Types section. Taxonomies within WordPress are ways of categorising the content on your website.
Archives tab
As above, it’s probably best you leave these settings as they come. Most business websites do not need to do anything with these settings unless concerned about being penalised for duplicate content.
Other tab
There is very little that really needs customising here for the majority of WordPress websites. If you are thinking about customising any of these settings, it’s best you seek the advice of an expert. To understand some of the phrases listed within these settings, here is what they mean;
- Meta Keywords tag: This is a piece of code that is used within HTML which was originally designed to help to categorise pages by including keywords for what the page is about. Do not bother about this tab, Google and all major search engines completely ignore this information so you will be wasting your time filling this out.
Social Page
Accounts tab
For all of the social media channels you are active on, list your information in here. This helps Google to understand which social channels belong to your business.
Facebook tab
Open Graph tags help Facebook to generate key pieces of information about the page on your website that is being shared on Facebook which is then presented in an ideal way for your audience. For example, when you see an image and title nicely listed on Facebook when you have shared some content, this is due to these tags being used.
For websites with a high number of social shares then it is recommended to implement these settings as this will make any content that is shared on Facebook from your website look better than if this information wasn’t present.
Most of the settings are self-explanatory which helps, the one point which you may not have come across before relates to the Facebook Insights and Admins. Within your Facebook business page, you will have a specific App ID which can be used to input into this section which helps to gather data about content that is shared on Facebook throughout the Facebook network. For example, whenever someone shares content from your website onto Facebook, when this setting is configured then you can see the reach of your content within the Facebook Insights reports which can help to gather data about how your digital strategy is performing and most importantly which pages on your website are most popular on Facebook. This is a more advanced setting, so if you aren’t sure what you are doing here then it is best to seek the advice of an expert.
Twitter tab
The Twitter Cards tags do essentially the same thing as the Facebook Open Graph tags. They are designed to help Twitter understand what the content is about on the page that is being shared which can then be automatically used for generating the social media update and making this look good. Again, configure these settings accordingly if your website has a good amount of social shares.
Pinterest tab
This information is self-explanatory, configure these settings if you have a Pinterest account. Pinterest also uses the Open Graph tags which Facebook uses, so if you configure this information, make sure your setting within the Facebook tab are also configured correctly.
Google+ tab
This information again is self-explanatory, so configure the settings accordingly if your business is active on Google+, while it is still around.
XML Sitemaps page
An XML Sitemap is designed to help Google understand what content is on your website and easily identify all of the pages that they should be aware of. XML is a structured format which allows Google to understand specific information that relates to a specific page on your website. For example, some of this information includes the date the page was last changed which can help inform Google if they should re-crawl that specific page or not.
XML Sitemaps are essential for websites and it is important that your website has an automatically updating XML Sitemap so that whenever you make a change on your website then this is automatically reflected in your sitemap. Thankfully, WordPress handles this all automatically for you. For non-WordPress websites, there are free services such as Simple Sitemap Generator which allow you to quickly create a temporary XML sitemap while you work on building a more robust system and framework for your website to update all of this dynamically.
For the average business, you probably don’t need to configure any settings within here. Just make sure that you submit your XML Sitemap to Google via Google Webmaster Tools so that Google is aware of all of your content. There is a link provided to your sitemap for ease which is likely to sit at www.example.com/sitemap_index.xml
Advanced page
Breadcrumbs
The breadcrumbs settings within the Yoast SEO plugin is a little more advanced and requires a developer to set this up correctly. When this setting is turned on, and it is generally recommended that breadcrumbs are used as this helps massively with SEO, then you need to configure some PHP code and add a snippet to your WordPress theme. If this is a little beyond your level of expertise, then speak to an expert who can implement this for you.
Permalinks
Permalinks in WordPress are the URLs such as www.example.com/product-x/ for example. There are a lot of different types of permalinks throughout WordPress which are designed to show different content on your website.
RSS
Your RSS feed for your website can generally be found at www.example.com/feed which lists all of the recent blog posts on your website. This is useful for other systems to be able to pull in the content from your website onto theirs if needed.
For most users, customising the RSS feed is something that likely isn’t relevant as the default settings within Yoast SEO are more than sufficient.
Tools Page
There are a couple of handy tools within Yoast SEO, primarily the Bulk Editor and the File Editor. The Bulk Editor tool allows you to quickly change the meta titles and meta descriptions on your website in bulk without needing to go into each page to edit these individually.
The File Editor tool allows you to change important files such as your .htaccess file and robots.txt file from within the WordPress interface. These are for more advanced users, so if you aren’t sure what to do with these, then don’t use them and seek the advice of an expert.
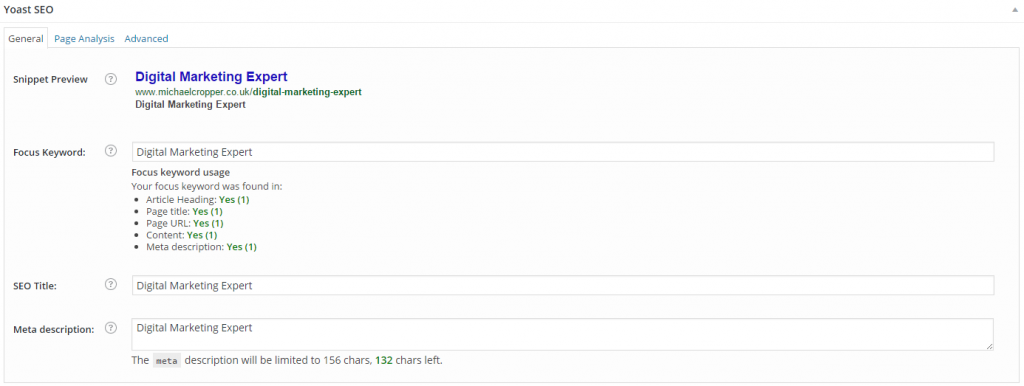
Page SEO Settings
In addition to the default settings within Yoast SEO there are additional page and blog post specific settings which need checking over once you publish any page or blog post on your website. This information allows you to target specific keywords that are of interest for each of the individual pages on your website. It is important to note that these settings are the very basics to SEO, and simply turning these settings green does not mean that you now have a successful SEO strategy in place that is going to work for your business.
For the general settings tab on your new blog post or page, this allows you to focus on making sure the keywords you are targeting are within the key elements on the page. To do this, enter in the main keyword within your Focus Keyword settings tab then look to make sure that everything at least includes this target keyword as outlined on the page.
The next tab allows you to go into a bit more depth to make sure the content on the page is targeting this main keyword. The Page Analysis tab allows you to go into more detail to make sure the content you are producing is as good as it can be, with tips provided throughout;
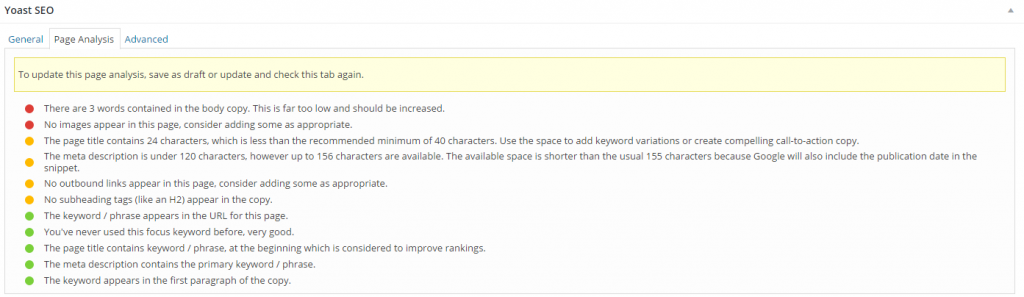
Again, it is important to note that this is simply a guide for what can be produced and should not be seen as a strict rule to follow. Use your intuition here to avoid overly focusing on SEO when you should be focusing on the user experience instead.
The Advanced settings tab on the page should not be touched unless you know what you are doing. These settings can quite easily tell Google to not crawl and index the new content that you have just creased which you probably don’t want to accidentally trigger.
Summary of Yoast SEO for WordPress
In summary, it is important to configure all of the settings within Yoast SEO which are relevant for your business. There are no one set of rules that apply to every single website as this can vary hugely from website to website. As such, review which settings are most appropriate to use for your own website and do not change any settings unless you are confident that you know what you are doing.
The settings and configuration options within Yoast SEO are the real basics for SEO. Implementing all of these basic settings is going to allow Google to at least understand the content on your website currently. The next step for SEO, and the work that is going to generate you some real results is focused around content marketing and promotion which is a much bigger topic to cover.
As always, if there are any questions specific to your business where you could use a bit of advice on the topic then get in touch and we’ll be happy to guide you through the process and show you where improvements can be made.
by Michael Cropper | Oct 22, 2015 | SEO |
Well, what an awesome day WordCamp Manchester 2015 was! With over 150 attendees, digital experts travelling from as far away as Brighton and gallons of coffee drunk. The conference was a roaring success with many people commenting on the day about how well-organised the event was and how valuable the content from all the speakers was. All of this wouldn’t have been possible without the team of volunteers behind the scenes organising the conference over the last 6 months, it was great to be involved with this. And let’s not forget the wonderful sponsors who financially made this happen, WordCamp Manchester 2015 wouldn’t have been such a success without the support from sponsors.
Photos
We all love a good photo or two!
Tracking your Content Marketing Results Accurately
I was presenting at the conference about how businesses can track their content marketing results accurately. While the video presentations are being collated and edited together to appear on WordPress.tv, here are the sliders for reference;
Summary
Awesome day! Same time again next year? 🙂
by Michael Cropper | Sep 20, 2015 | SEO |
Slides from our talk at Manchester WordPress User Group in September 2015;
Additional Notes
In addition to the slides, additional comments & resources mentioned;
- Use UTM Tracking Parameters on everything
- Google has a UTM URL Builder which can be found here, https://support.google.com/analytics/answer/1033867?hl=en, but we prefer ours here, https://www.contradodigital.com/resources/social-media-tracking-tool/
- Use Event Tracking on everything that someone does on the website that isn’t a page view. This will provide awesome insights into how your website visitors are behaving. Things like social media links, clicking to download, using Yoast SEO Plugin to track outbound links once the setup is configured correctly. Likewise for any mailto: and tel: links to track when customers are using click-to-email and click-to-call technologies.
- Set up goal tracking for everything!
- Set up Goal Funnels, particularly if you are an ecommerce website
- Set up Site Search within the Google Analytics settings, for WordPress the default query string parameter is ‘s’ for search URLs. Try here, http://search.contrado.digital/utm for an example.
- The tracking pixel technology which can be used on all normal emails is Sidekick from Hubspot, really cool technology.
- Use the Network report at Audience > Technology > Network to see which companies have been looking at your website. Most importantly, seeing which companies are looking at your website along with a quick Google search for “{Company Name} Contact Details” means you never have to pay for some of the extortionate service that are available offering this data at a premium
- If your website still isn’t responsive, then compare the conversion rates for mobile visitors with non-mobile visitors. Imagine a world when mobile customers are converting at the same level as desktop visitors and you can calculate the value it brings to have your website responsive and mobile friendly.
- Track offline activities using smart redirects such as contradodigital.com/offer1 which 301 redirects to a UTM’d URL such as www.contradodigital.com/?utm_source=something&utm_medium=something-else&utm_campaign=something-else. Allowing you to track the return on your investment from a print based campaign all the way through to website traffic and ultimately sales or enquiries. All of this data will show within the Acquisition > Campaigns > All Campaigns report within Google Analytics
- Google Analytics uses Last Click Attribution by default. Understand the full conversion funnel and user journey with Assisted Conversions.
- Use Intelligence Events to set up alerts for when significant events happen within your Google Analytics data. This can help to identify problems on your website before they become an enormous issue.
- Use Real Time Data to see what is happening on your website right now. This is seriously cool for data geeks like myself.
- Use Advanced Segments to filter your Google Analytics data while you are browsing the different reports.
- Always have a Raw Data profile and Filtered Data profile within your Google Analytics setup for accurate reporting.
- Use Filtered Profiles if you want to permanently filter out the data from your Google Analytics reports. Use Advanced Segments if you only want to filter the data temporarily.
- When you are using Google AdWords, make sure you link your Google AdWords & Google Analytics accounts together to avoid your paid search traffic appearing as organic search traffic within Google Analytics.
- Referral spam is an enormous problem in Google Analytics at the minute so use these handy filters to remove future referral spam for good, https://www.contradodigital.com/resources/block-referrer-spam-google-analytics/. Generally speaking, any .htaccess or plugin based solution to referral spam doesn’t work that good as most Google Analytics spam is currently sent directly to Google Analytics and the bots never even visit your website.
- Use Virtual Page View tracking if using AJAX or redirect the user to a thank you page after they have submitted a form so you can track the full conversion funnel within the Funnel Visualisation report. This is possible within Contact Form 7 or Gravity Forms plugins for WordPress.
- Handy plugin for debugging your Google Analytics setup is Google Analytics Debugger for Google Chrome which can be found here, https://chrome.google.com/webstore/detail/google-analytics-debugger/jnkmfdileelhofjcijamephohjechhna?hl=en
- Mailchimp can cause a few problems within your Google Analytics data if you don’t set this up right. Keep an eye on this and configure the settings to suit your needs.
- When two links on a page point to the same location, use Enhanced Link Attribution to separate out which link users are clicking on. To do this, view the Property Settings within the Administration area and turn on Enhanced Link Attribution. Once this is turned on, when you view your In-Page Analytics report, you will be able to see which links people are clicking on.
With thanks to Andreas Andrews for making such meticulous notes of my ramblings J
Any questions, leave a comment or drop me an email.
by Michael Cropper | Sep 19, 2015 | SEO |
To put things into perspective, let’s look at the handy tools we have on our personal computers for monitoring computer resource usage. If you’re on a PC then you can easily view the Performance data within your Task Manager and I’m sure there is something similar for you Mac users out there;
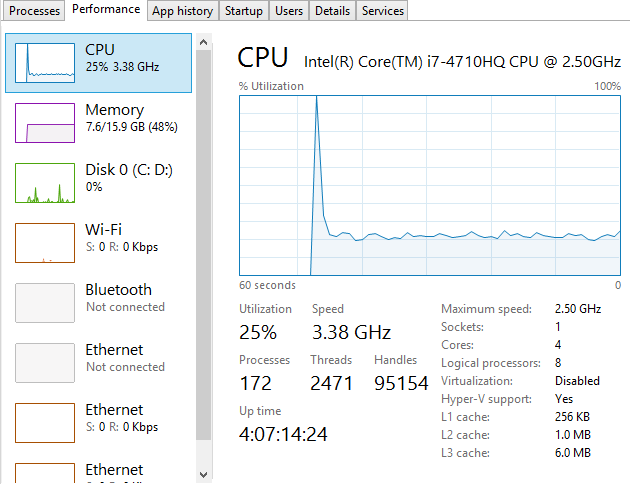
This is a very handy little tool which clearly shows you how your personal computer is performing and how things perform when you start to open new applications such as Microsoft Word or the memory eating Google Chrome browser. Here’s what happens when you kill Google Chrome after you have closed the application;

Interesting to say the least…
Anyhow, the point here is that monitoring the performance of your personal computer is relatively simple if you know where to look. Now we’re going to look at how to monitor your web server resources accurately using a suite of tools and also look at the significant differences between how different tools report on how many resources have been used and how many are free to use. The differences are what we are going to be focusing on as they are huge and can lead you to believe that you actually have more resources available than you really do.
Web Server Resources
Before we jump into monitoring your web server resources, let’s just define this. Essentially the key resources related to your web server include;
- CPU – The quantity of CPUs and their processing power in total.
- RAM – The quantity of memory currently in use and free for other things. Plus the quantity of RAM reserved for buffering and caching.
- Hard Disk Drive Space – The number of GBs of data you are using compared to the size of your disk.
- Disk I/O Utilisation – The number of input/output connections to the hard drive per minute which again has a limit
- Network I/O Utilisation – The amount of traffic on your physical network infrastructure
Behind all of these key metrics includes an enormous amount of information about the software that is running on the hardware and which processes are hogging these physical resources. This is where web server monitoring software comes in to its own as this can provide you with some extremely powerful data about how your web server is performing and most importantly, when you need to look at upgrading your web server to cope with the demands of the website or websites that are hosted on the web server.
Just as with your personal computer, web servers have a limit which needs to be managed effectively. If you tried to open 1000 Google Chrome browser tabs, your computer would probably grind to a halt as the physical hardware resources would be pushed over their limit. To the point where you would probably have to reboot your computer to resolve the problem. Your web server is no different, it’s just a little more complex, doesn’t have a physical button you can turn it on/off with (or kick!) and is sat in a huge data centre somewhere, ours are in Manchester & London.
When running a web server, it is clearly a little more important than your personal computer as this contains your website, the digital front of your business which is why it is essential to do everything physically possible to work towards a near 100% up-time. I’ll not cover today about why a 100% up-time is impossible to achieve and any guarantees of this are a flight of fancy, instead today we’re going to look at how to monitor your web server resources accurately using a suite of tools, specifically New Relic and Munin.
New Relic
We use New Relic on our web servers because it is extremely user friendly (well it is for someone of a technical nature compared to the other tools we have to work with). Being able to easily graph server resource usage to the n’th degree.
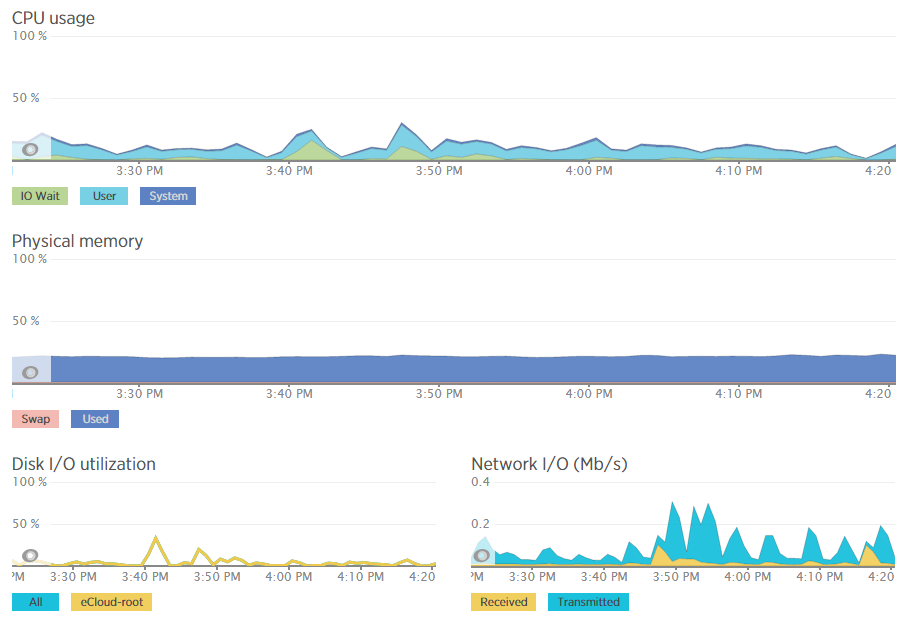
Which then further breaks this data down into the different processes that are using the resources, which websites hosted on the server are using the resources and also which user accounts are using the most resources and so on. Going beyond this, New Relic also allows us to monitor the up-time of our servers which is extremely useful for us to continually improve the performance of our servers over time;

As mentioned previously, a 100% up-time is almost impossible to achieve due to various reasons which we’ll cover in another blog post. As you can see in August and September, the server has been performing exceptionally well overall but has had a couple of blips which we’ve worked to improve performance following this. The important aspect here is that we are tracking this data which means that we are capable of acting on these insights we have to continually improve the service to our customers. We already use industry leading server technology which can always be improved further by actively monitoring performance and improving areas which need attention.
What is interesting with the New Relic data though is that the memory usage data isn’t quite as accurate as it seems on first glance which is due to the way Linux organises data at the operating system level to improve performance. By default, Linux see’s RAM as wasted space if it isn’t used so it looks to utilise the available RAM to speed up performance. This is great in theory, although can cause a few issues if not carefully managed. Accessing data from RAM is up to 1000 times faster than accessing the same data from a hard drive which is why RAM is such a powerful way to increase the performance of technologies and hence make your website load faster. It’s a shame that it’s so expensive to purchase in comparison. I guess we’ll just have to wait for the next wave of hardware innovations to break through this barrier. Specifically related to server management and New Relic, the underlying way Linux classifies available RAM compared to how New Relic reports on this data isn’t quite accurate which can be misleading.
For example, when analysing one of the blips we had recently, at either side of the troublesome time, server resources within New Relic were being reported at well below 30% usage for CPU and well below 40% usage for RAM;

Although the blip happened for a specific reason which we needed to get to the bottom of this so we could prevent this happening again. Thankfully we have multiple tools at our disposal which allowed us to fully investigate the issue and take the necessary steps.
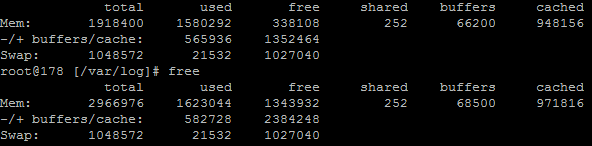
Using external tools is a great way of reporting on performance although they are external from the system and they may be reporting on data in a slightly different way. So we investigated this going back to the command line interface and logging into the server via SSH & PuTTY to query the server directly to get some more accurate information. What we found was rather interesting. When querying the server directly to see how much memory was being used this highlighted that the performance data within New Relic was actually quite a way off when it comes to its accuracy;

Here we see that there is only 300MB of RAM free out of 2GB opposed to the 60% free which equates to around 4x this figure at 1.2GB which is being reported in New Relic. Quite a difference here. The difference relates to the Buffer / Cache data which is being used by Linux to speed up the web server yet isn’t being taken into account by New Relic. While this is a nice setup to have, this does have its own performance issues when spikes occur which can lead to problems as outlined earlier.
Doing a one-off report for server resource usage via the command line is nice, but it is only a snapshot so doesn’t report on the true performance of the server over time. Thankfully we use another web server monitoring tool called Munin which essentially does a similar thing and much more then graphs all of this data over time.
Munin
Here is where the open source technology Munin comes in. Good old open source projects providing more insight than enterprise level software yet again. This is not a dig at New Relic as this software is really good, more of another stripe on the open source community for being so awesome.
Munin is designed to report on how your web server is performing in a similar (but not as pretty) way as New Relic. When looking at the same data within Munin as what we were looking at within New Relic the data was clear to identify what caused the issue;
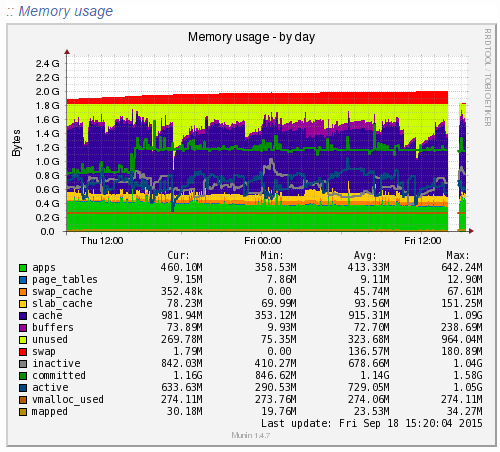
Ok, clear to me… What the above graph is showing can be summarised as;
- Red: This is the memory swap data which is outlined in more detail below. Importantly, this memory swap data is also highlighted on the New Relic graphs.
- Yellow: This is the available RAM
- Purple: This is the cached data sitting within the RAM. From New Relic’s point, this is available RAM, although from a physical hardware point, if we want to access this space we first have to clean something out, retrieve the data from the hard drive then add the data back in to RAM which consumes a large amount of processing power on the CPU
- Green: This is the memory taken from the applications in use on the web server
Note on the Red data in the graph above, the Memory Swap. What is actually happening here is that Linux is deciding what files to move in and out of memory based on what it thinks are the most important files. This work takes up valuable resources which is why the CPU levels and the Disk I/O levels on the New Relic graphs above spike right when this hits its peak. This is essentially the web server scrambling to optimise the performance at the detriment of its overall health. It’s the same as when you push yourself physically too much and then become ill from the process and need a rest. It’s the web server doing the same thing. When you start to see an increase or a significant amount of memory swap data within your New Relic graphs, I’d recommend checking to see what is really happening at the server level as this essentially highlights that your web server needs a bit more RAM or that you need to optimise the way Linux utilises the memory;
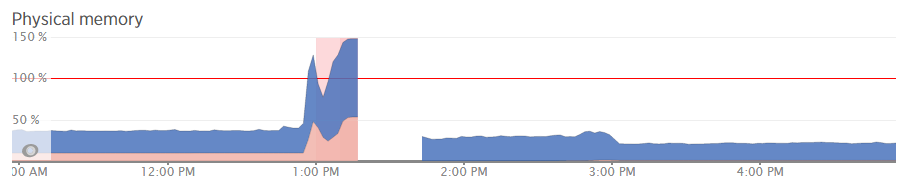
What all of this highlighted is that we needed to notch up the RAM on this server a bit. The aim was to increase the available RAM to allow for a greater amount of unused RAM meaning that the CPU nor the hard drive wouldn’t have to work as hard to access the information needed. As you can see, when we increased the RAM around 3pm in the above graph, the memory usage percentage went down within New Relic. As we know though, the New Relic data isn’t 100% accurate, so looking at the Munin data this highlights how we are now in a situation with this web server which means that the resource intensive memory swapping (the red bit on the graph) is minimal, there is more available RAM (yellow) and Linux has decided it wants to increase the cache so the websites load even faster than before;

Likewise when looking at the memory usage via SSH;
This again echoes the Munin data. The above data is in kBs, showing around 1.3GB of free RAM opposed to 300MB previously.
Summary
What is extremely simple to achieve on your personal computer is a little more challenging to setup, implement and report on for your web server. Web server management is an extremely specialised field which is why we only use the best technology with a dedicated team of server engineers behind the scenes to ensure that we are continually improving the performance of our web servers. All of this is to work towards the constant goal of 100% up-time for your business websites.
Not all web hosting is the same and not all web hosting companies work in the same way. Speaking for ourselves, we take web hosting seriously. A web server is not just a computer that sits in the corner somewhere which hosts your website. A web server is the cornerstone of your digital storefront which is why we invest heavily by utilising leading technologies allowing us to continually improve our services for all our web hosting customers.
As a take away from this post. If you’re a non-technical person looking for web hosting, you can guarantee that we’re ‘on it’ when it comes to hosting. If you’re a technical person reading this, then the top tip is to use multiple web server resource monitoring packages to provide a full insight into performance as some tools aren’t as accurate as they may seem on first glance.
by Michael Cropper | Aug 29, 2015 | SEO |
You may recall a while ago how we covered how to migrate a web server seamlessly with zero downtime. This was great in that specific example as there were no ecommerce websites hosted on that specific web server. Things get a little more complex when with ecommerce websites for several reasons including;
- You won’t want customers placing orders on the website which is still hosted on your old web server as you may not actually pick this up and this would be a very bad experience for the customer and potentially lost revenue
- Your payment gateway technology may actually inform the website on your old server that a payment has been made, but not the website on your new web server due to the way the backbone of the internet works, the DNS.
- Any downtime during an ecommerce website migration between web servers is likely to result in a lot of lost revenue
You simply cannot afford any mistakes when working with an ecommerce website as any mistakes could result in a real mess. All of this is due to the way the Domain Name System, the DNS, works which we’ll go into in a little bit more detail.

In the previous example outlined in the other blog post referenced earlier, we simply updated the name servers and off we went. For ecommerce sites though, this is a problem. Updating the name servers at your registrar (the people you bought your domain name from) can take up to 24-48 hours to fully propagate the whole Domain Name System. Meaning that during this time, some website visitors would see the website that is hosted on your old web server and some customers would see the website that is hosted on your new web server. For many businesses, this is not a problem as the two sites would be identical anyway. For ecommerce websites though, this actively creates problems which then need to be cleaned up later which can be a nightmare. So we need a different approach here.
How to Migrate an Ecommerce Website between Servers with Zero Downtime
A note before we get started, this setup is not a definitive guide to the topic as every single setup is different so please check your own settings before jumping in with changing things unless you are fully sure what you are doing. Making changes with the settings below can result in a lot of problems if you don’t get things right. If you need any support with migrating your ecommerce website, then get in touch and we can help you with this process. . Anyhow, let’s just jump straight into how to do this and we’ll look at the explanations along the way;
- Identify the current DNS Authority: You need to be working with a system which gives you full control over the DNS management, so that you can add A Records to your DNS specifically. The DNS Management is currently sitting with whoever your name servers are pointing at. For example, our name servers, ns1.contradodigital.com and ns2.contradodigital.com mean that our DNS is being managed by contradodigital.com. If your name servers are set to your registrar then this is who the authority is for your DNS settings.
- Migrate your DNS Settings: Generally speaking, when you are migrating your ecommerce website you are also wanting to migrate your DNS management from your old supplier to your new supplier. Assuming this, then you’ll need to migrate your DNS settings first. Firstly you need to look at all of your current DNS settings that are in place and migrate all of these settings, except the name server settings, over to your new DNS Authority.
- Keep the A Record in the DNS Settings at your new DNS Authority the same for now: As part of the DNS settings migration you just did, you will have copied over an A Record which is specifically used to tell the Domain Name System what the IP address of the server is when someone types in http://example.com or http://www.example.com into their browser. For now, keep this record pointing at your old web server so that everything continues to work as normal.
- Sit back and wait 24 hours: As the Domain Name System can take a while to update all the records everywhere, just go and do something else for a while until you are confident that the systems have updated. Most systems are much faster than this, and we can actually customer the Time To Live (TTL) with our DNS Management which means we can specifically set the amount of time other computers should store certain information they have about the DNS settings before requesting the information again from the authoritative source. This comes in extremely useful later on which is why we can migrate an ecommerce website with zero downtime (almost).
- Update your Name Servers: The name servers at your registrar will currently be pointing to your old DNS Authority, likely the same company who managed your old web server. You need to update your name servers to point to the correct location for the company who is managing your DNS from now. For example, when companies are migrating their web hosting to us, this means that they would update their name servers to ns3.contradodigital.com and ns4.contradodigital.com.
- Sit back and wait 24 hours: As before, we now need to wait a while for the Domain Name System to update all of the data so that the new authority for the DNS management is your new company. During this time, as people visit http://www.example.com, some people will see the old name server settings, which means they will view the website on your old server, and some people will see the new name server settings, which means they will also view the website on your old server as we kept the A Record the same so that the website continues to work.
- Migrate the Website: This is very specific to each website, technology and other server settings that need to be migrated so we won’t touch on the topic a great deal here. Suffice to say that whatever technologies you are using, you need to copy across the files, databases, plugins, extensions, well basically everything. If you miss anything during this point you will be picking up the pieces afterwards. When migrating your database specifically, you may find that you need to do a bit of intermediate work to update the table names potentially based on how the old and new servers automatically generate the table names for any website technologies you are using so bear this in mind.
- Add a Holding Page on the Website: This is extremely important to do this during the migration to avoid any activities happening on the website on the old server as we would need to comb through the differences and manually migrate anything that happened during the time from migrating the website to updating the A Records later on. Depending on your technical setup, websites purpose and other factors, you may choose to do this before Step 7 which would mean the website would be offline for a short period of time but would mean that you don’t need to implement Step 9 below.
- Migrate the Database Again: For ecommerce websites, the majority of the activities are database driven from users, such as purchasing a product or commenting on a blog post. There is often very little files that are uploaded to the website which means that you should be OK to just migrate the database one last time. Your website may be different though, so if in doubt, get in touch and we can guide you through the process. It is essential that your holding page throws a 503 Error in the header or your Google website rankings will fall off a cliff, meaning your website traffic and revenue will follow and could take a few weeks to recover. Google’s guidelines on dealing with planned maintenance is useful to read over.
- Update the A Records to Point to the new Web Server: Now you have migrated the database again, the website on your new web server is ready to go live. So pop back into your DNS settings and update the A Record to point to the IP address of your new web server instead of your old web server. As mentioned earlier, you are better off if you can manage the Time To Live (TTL) settings directly so that you can speed up the time it takes for the new settings to spread throughout the Domain Name System.
- Deactivate the Holding Page: Your website on the new web server is ready to go, so let your customers come flooding back in!
The entire process above means that your website should be offline for no longer than 5-10 minutes (virtually Zero downtime!). If you get anything wrong within this process of you don’t have the ability to manage certain settings then this clearly may take longer, which is why we always recommend you use a reputable web hosting company and that you are working with the right digital agency who has the skills, knowledge and expertise to manage this effectively for you.
For Windows users, several of the steps above require changes to your hosts file so that you are sure you are looking at the right web server when making changes. Make sure you double check your hosts file settings throughout the entire process to make sure you are doing what you think you are doing on the right server as it could cause you problems if you do the wrong thing. Particularly if it is database related and you accidentally overwrite your database with a blank database. That would not be good.
Considerations during the Migration
Any business has many moving parts, all of which touch on the website in one way or another. For larger businesses you need to really plan the timelines involved with this process and communicate this with everyone in your organisation. The last thing you want to see is customers calling you about a problem and your staff not being able to access your website for further information or have no idea about what is going on;
- SEO: From an SEO point, you need to make sure your website is throwing a 503 Error in the header to avoid you losing your website rankings, traffic and sales during the migration. Getting this wrong can result in a situation taking a good few weeks to resolve itself. Google’s guidelines on dealing with planned downtime are useful to read over.
- PPC: Are you running any pay per click advertising campaigns currently that need to be paused during the migration? If Google AdWords picks up that they are seeing 503 Error messages on your website, they will start to flag problems within your Google AdWords account. So it’s always best to pause these if your planned downtime may not quite go according to plan. Alternatively for high volume websites you may decide to continue running AdWords campaigns to maximise revenue during the process and simply mop up and messages that have been flagged within your AdWords account afterwards.
- Email marketing campaigns: Communicating with your entire business means that you aren’t going to be sending out any email marketing campaigns during your planned website migration. Sending out an email marketing campaign resulting in hundreds of thousands of extra visitors trying to access the website only to find it is not available for those few minutes can damage your branding.
- Social media activities: As above, it’s best not to plan any significant social media campaign during this time which encourages customers to visit your website for the same reasons as outlined earlier.
- Offline activities: Are there any offline activities within your business that could be impacted by a short period of time with the website migration?
- Server settings: Are there any other server settings that you need to be aware of during the migration such as SSL certificates, redirects that have been implemented in a server control panel, email accounts or mail forwarders that have been set up on the server instead of on Microsoft Exchange? Double & triple check everything because in our experience, it is that one setting that everyone forgot about or never knew was implemented on the old server which causes the biggest problems.
Migrating an ecommerce website with (virtually) zero downtime requires a lot of planning, the right systems, technology and people in place to get things right. If you are in any doubt about migrating your ecommerce website then get in touch and we can guide you through the process.
by Michael Cropper | Aug 29, 2015 | SEO |
You may think this is a strange title for a blog post, particularly when we are always talking about integrated online marketing and how it’s essential to join the dots within your organisation. Well this is true and we aren’t having a disagreement with ourselves here. What we’re talking about when it comes to decoupling your digital services is specifically technology related and how it is important to keep control of your systems and decrease dependencies.

Having a technical background myself, I naturally like to see technical aspects and website development design patters in real life. I’m a geek, get over it 🙂 But seriously, applying the same methodologies to your business can have significant benefits just as it can within the digital world of programming and website development.
In the Programming World
I’m not going to bore you with the finer details about the technical requirements behind website design and development, I’ll leave that for another blog post. Instead, and to keep things simple, let’s look at two options. Repeating yourself or referring to what you said.
Repeating yourself
Whatever you do in business you often end up repeating yourself quite a lot. Whether this is related to staff training, staff development, internal communications, describing processes, as part of the sales process and more. This is certainly one way to do things. But what if you didn’t have to keep repeating yourself. Let’s ignore the real world for a minute and how people like people and all that. Let’s just look at the task of saying the same thing over and over again. There must be a more efficient way of working.
Referring to what you said
So as an alternative. Imagine that every time someone asked you a question, you could simply point them in the direction of the answer. Saving you valuable time and money within your business. Since you have invested you time and money, it is important to secure you data and resources with multi-factor authentication.You would naturally get asked the same questions again and again over a period of time which can soon add up into significant time savings for your personal time and throughout your business as a whole. This is where systems, design patters and processes come into play.
Object Orientated Programming
The above example about referring to what you said is called Object Orientated Programming in the website development world. It basically means that you don’t have to keep repeating yourself when writing code. Instead you can simply refer to the piece of code you need and pull in this information as and when needed.
This is extremely important as this decouples your functionality within the code and makes it significantly easier to develop and maintain over time. And this is the lesson about how you can use the same design patterns within your business by decoupling your digital services.
Decoupling your Digital Services
Following on with this same example, imagine if your entire business was run from a single computer. This computer was used to handle customer enquiries, send invoices, do accounts, manage your website, handle your customer relationship management system and more. It would be quite a challenge for many people to use the same computer doing different tasks at the same time.
Now bringing this towards key digital services that you have, let’s look at a common setup for businesses within the SME bracket, they generally have;
- A domain name
- A web server
- Email technologies
- Website technologies
- Email marketing technologies
- Social media management tools
- Integrated systems
- Stock control systems
- Accountancy systems
- Project management systems
- And many more items
Looking at a few of these, picture this scenario (which we’ve seen happen on numerous occasions). All of the following services are purchased from a single provider which is either a software company, a digital agency or some specialist system;
- Your domain name
- Your web server
- Your email technologies live on the web server
- Your website is a custom built content management system
- Your email marketing campaigns are managed through your website
- Your social media updates are automatically posted based on the content of your website
- Your project management system lives on your web server
Now, what happens when your web server dies? An unbelievable amount of businesses do not have an automated backup solution in place for their web server which is shocking and highly risky. Taking this one step further, which again is based on what we’ve seen on numerous occasions, what if your web server was managed completely by a 3rd party such as your web designer. What then happens when they go AWOL? Quite simply, you’re screwed. And this is the importance of decoupling your digital services to protect your business and make your life much simpler.
How to decouple your digital services
Think strategically and plan for the worst case scenario. Firstly, it is absolutely essential that you own all of your digital assets. Once you’ve read over that, let’s look at how you actually go about decoupling your digital services. Before we do though, it’s important to say here that there are always trade-offs based on the skill set within your business and the skills you require from 3rd parties like ourselves. At Contrado Digital, we always work in a structured way to ensure the businesses we work with have complete ownership over their digital assets. We work in a way whereby we simply manage businesses digital assets on their behalf. It’s no good us owning your website, what good is this to us, really?
Starting from the top;
- A domain name: Make sure this is registered with an actual registrar. We could sell you a domain name if we wanted, but we choose not to. Just go direct to a registrar such as 123-Reg.co.uk or GoDaddy. Keeping this under your full control will make your life so much easier if you decide to switch providers for your website. Believe it or not, some companies will actually hold you to ransom by keeping your domain name if you decide to stop using their services. Reputable providers such as 123-Reg.co.uk and GoDaddy clearly don’t do this.
- A web server: Again, make sure this is suitable for your needs and is decoupled from your registrar. Many businesses when they first start buy a domain name they then buy the addon web hosting package available too. You really need to stop and think about this because if you are purchasing a web hosting package that is unsuitable (or doesn’t have automated backups in place) then you are going to run into problems sooner rather than later. Particularly when many web hosting packages will tie you in for a minimum of 12 months, this can be a costly decision to make.
- Email technologies: Many smaller businesses around the sub £500,000 turnover mark use email technologies that are sitting on their web server. Quite simply, stop doing this. Read over our Really Simple Guide to Business Email Addresses to understand why and just get Microsoft Exchange in place throughout your business. Again, decoupling your email technologies from your domain name and from your web server. It will save you a heap of time and effort in the long run.
- Website technologies: If you have purchased your domain name from one of the many website builder type companies around, you will likely have purchased a website builder package from them too. You don’t own this and this is an extremely risky strategy as you cannot simply take your website elsewhere, you are well and truly tied into their services for life unless you start everything from scratch and rebuild your website. Start thinking about decoupling your digital services at the start. And whenever you hear the words of a a company wanting to build you a bespoke website or bespoke content management system, run for the hills.
- Email marketing technologies: We’ve seen email marketing technologies run by many companies under a form of white label system, whereby it appears that the email marketing system is being provided by an individual company when in fact this is actually being run by a much larger company in the background. In our experience, many of the basic white label email marketing technologies aren’t that good, particularly when you compare them to the extremely affordable services from companies such as MailChimp. Not only do companies like MailChimp provide a better service based on their underlying technology, they are also another step to decouple your digital services from a single company.
- And many more items….you get the point
For any set of systems, if you are dependent on a single point of failure not failing then you increase the risk of running into problems at some point down the line. Start to decouple your digital services and think more strategically about what technologies you really need in place and how you can orchestrate your digital assets in a way that works for your business.
Integration
Before we finish the details about the importance of decoupling your digital services, we need to look seriously at integration. It is essential that systems integrate together. A decoupled system that stands in complete isolation is going to be even worse for you than a coupled system. Many older systems (as in +2 years old) don’t integrate that well on the whole. Technology moves on at such a pace that it is essential to keep up to date.
As a prime example, the accountancy system Xero which is taking the world by storm allows you to integrate your website ecommerce systems directly with your accountancy package to make your life easier managing your accounts. Whether this is you personally, an internal book keeper, an internal accounts team or an external accountancy practice. Integrating website technologies directly with your accountancy system will save your business a significant amount of time in the long run. Or, of course, you could carry on doing things the old way.
Systems that integrate well together are the systems that are going to be around for years to come. Systems that work in complete isolation are going to be replaced by better, smarter and faster systems that automate work, save your business money and allow you to focus on the things that matter.
Get in touch if you would like to discuss your digital systems, their suitability and how they are going to help or hinder your business growth.