So, you’ve just got MySQL Workbench installed and you’ve tried to run some of the handy commands that you’ve picked up from W3Schools (seriously, if you haven’t been through this before, you should!), specifically you’re trying to run a simple UPDATE command in MySQL against a table. Great. But… you’ve noticed that this doesn’t quite work out of the box with MySQL Workbench and it’s likely telling you that you cannot update due to MySQL Workbench being in SAFE MODE. But what is this?
Safe Mode in MySQL Workbench is designed to save you from yourself. Basically it stops you running update commands against anything but a Primary Key. So when you run an update command, you need to specify a Primary Key against the table to ensure you are only updating a single row, rather than wiping out your entire database. While this is great for newbies, it is a little annoying for those more advanced users. When Safe Mode is enabled in MySQL is makes sure rookie mistakes can’t be made, i.e. `UPDATE my_table SET column_name = 123` (whoops…. No ‘WHERE’ command….). #DataGone.
So… It’s time to…. DISABLE SAFE MODE! (at your own peril…aka. You break it….. you fix it!). But thankfully, you’re a little more experienced than the average rookie. You are READY to DISABLE SAFE MODE!
So, now we’ve got past the #BeCareful section, let’s look at how you exactly disable Safe Updates in MySQL Workbench so you can run all the updates you like and as you see fit.
Disable Safe Updates in MySQL Workbench
It’s actually really simple. Follow the steps below within MySQL Workbench;
Select from the main menu: Home > Edit > Preferences
Click the ‘SQL Editor’ menu item
Uncheck the option for ‘Safe Updates (rejects UPDATEs and DELETEs with no restrictions)’
Click ‘OK’
Now ‘Disconnect’ and ‘Reconnect’ to the server and you’re good to go! Simple!
And just for re-iteration, disabling this can really break things – so be careful! If you aren’t sure what you are doing you can easily overwrite data for column(s) in your entire database by missing a simple command. Triple check every command before running it while Safe Updates are disabled.
INSERT INTO `new table` (`column z`) VALUES ( SELECT `column a` FROM `old table` )
Detailed Answer
Ok, so for those of you looking for a little more information about how/why the above MySQL query works, let’s get into the details. Firstly you likely want to move data from one column in one table in a MySQL database and move this data to another column in another table as part of a refactoring exercise on your database, data and database schema. This is never a simple process and this blog post isn’t going to go into all the considerations you’ll need to make as part of this process, so bear that in mind, instead we’re simply going to look into how to do this basic part of the process and what the details mean.
Prepare Your New Table and Column
Get prepared to store your data in a new location by making sure your database table has a new column of the exact same data type as the column you are moving the data from. Any discrepancies here will cause issues, you need to prepare in much more detail if you are migrating data types, which is beyond the scope of this blog post.
Migrate Your Data
Now you’ve got your new table and column prepared, it’s time to copy the data from the old table to the new table by running the MySQL command outlined at the start of this blog post. Let’s get into the details of what this means though;
INSERT INTO `new table` (`column z`)
The above part of the MySQL query is a basic INSERT statement, specifically inserting data into a specific column. Then the next part of the query is telling MySQL what data to insert into this column.
VALUES ( SELECT `column a` FROM `old table` )
Since the sub-select query returns multiple records, and due to the fact that this sub-select is part of an INSERT statement, MySQL is smart enough to realise that you want to copy the data across.
Now the above isn’t going to work in every scenario and to be fair it really only works perfectly when you don’t have to take into account NOT NULL fields and non-AUTO_INCREMENT fields. Things get significantly more complex when you start to add in these types of…. Complexities, but hey.
Hopefully this is a good starting point to get you thinking along the right lines for migrating data from one table and column in a MySQL database and over to another new table and column with ease as part of your database and data migration processes. Leave a comment with your nuances that you’ve had to deal with along the way – it’s great to share!
Ever needed to share a folder from your Windows 10 machine so that it is accessible to other computers on the same network? Well, if you do need to do this you’ll soon start learning about CIFS and NFS. For clarity;
NFS stands for Network File Share and is used by Linux (so we’re not going to be covering this within this blog post)
CIFS stands for Common Internet File System and it is basically the Windows version of Network File Share. More specifically CIFS is actually the public version of SMB, the Server Message Block protocol. The core difference is that CIFS is actually much broader than NFS in the sense that CIFS can support the sharing of printers and serial ports.
So, now we’ve got the definitions out of the way the common use case for setting up CIFS is for easily sharing your files to other computers on a network, for example in an office space you may have a shared file system on a physical server in the corner of the office for example. You’ve got to remember, CIFS was about way before everything moved to the cloud.
How to Turn on CIFS on Windows 10
By default, CIFS is disabled on Windows 10 since the vast majority of normal users will never need to use this feature. And as such, since opening up access to your computer so that another computer can access it opens a potential security threat, it is a good thing that this feature is disabled by default. For example, imagine if anyone on your network could just place a virus on your computer, that wouldn’t be good now would it.
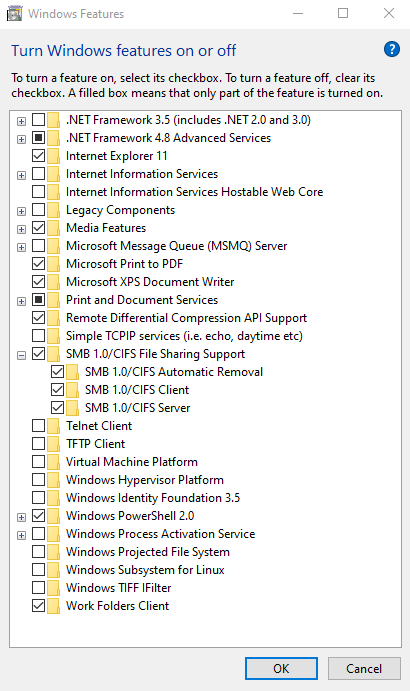
So to turn on CIFS, first open up Control Panel then Programs and Features then click on the Turn Windows features on or off. Once opened, select all of the options for SMB 1.0/CIFS File Sharing Support as can be seen below;
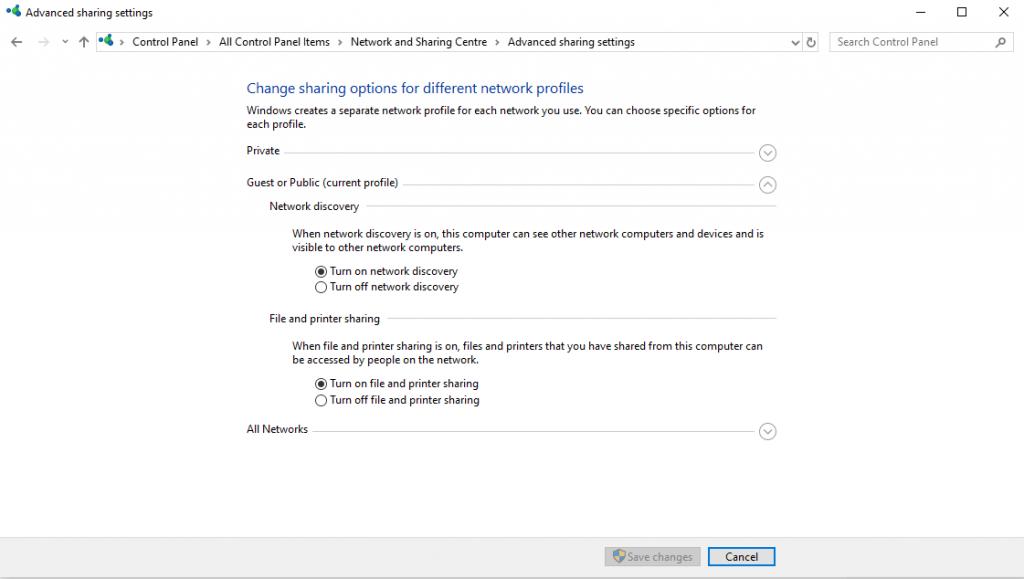
This turns things on, next we need to configure the network settings within your Windows 10 machine for the network you are currently connected to. Go to Control Panel then Network and Sharing Center then click on Change advanced sharing settings then select Turn on network discovery and Turn on file and printer sharing. Save the changes and you’re done.
How to Setup CIFS on a Folder
Let’s take a look at an example for how to share a folder. First, let’s create a folder within your main C:\ drive, for example, C:\Your Folder That You Want To Share On The Network\.
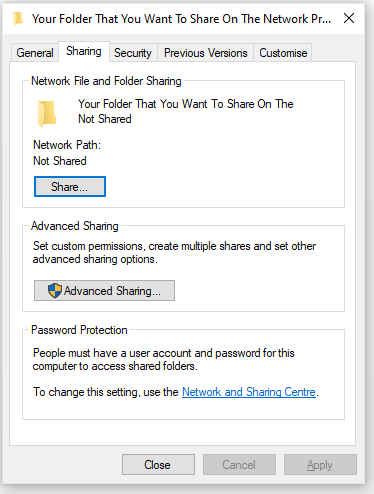
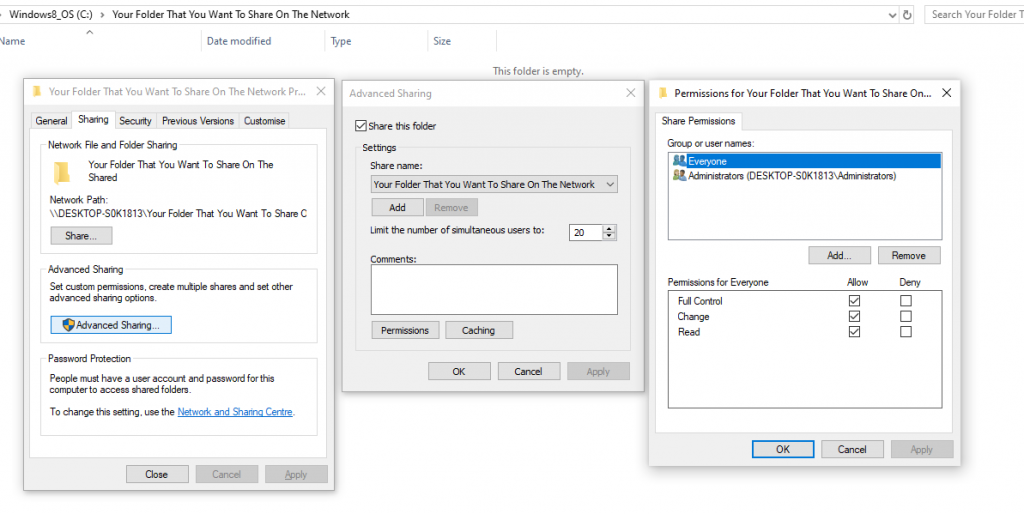
Next, simply Right Click and select Properties, then click on the Sharing tab, then on the Share button.
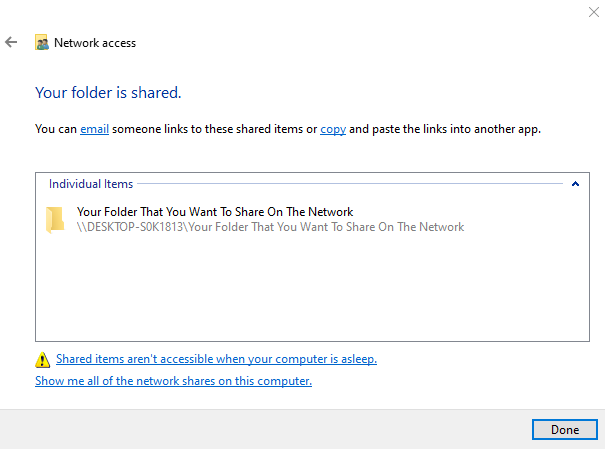
Then select the user who you want to Share this file with and click on Share. Note, that the list of users here are those who are currently setup on your Windows 10 machine. Don’t think of this like modern cloud based applications work in the sense that you share something with someone by sending it to them, this isn’t how this works. Instead, think of this type of sharing as making something accessible to someone else – they still have to configure things at their end to actually view this information. Once complete you’ll see this confirmation;
Depending on your use case, you may want to restrict what people can/can’t do with the content you are sharing. If you go back to the Sharing tab in the Properties popup, then click on the Advanced Sharing options you can see in here that you can configure additional options to secure your data in the way you see fit. You can customise the permissions on the content, such as to allow or deny Read or Write access and you can even limit the number of simultaneous connections.
It’s that simple to do for a very basic setup. You may want to go to lengths to secure user accounts further for example setting up additional users Windows with different levels of access.
How to Access a Shared Folder that has Been Setup Using CIFS on Windows 10 – From Another Computer on the Network
The next step is to access this shared folder from another computer on the same network. This is going to be very dependent on how you want to access this information, for example, are you wanting to access this information from within Windows itself or via an application on the other computer? As such, I’m not going to go into too much detail here other than to let you know that when you are configuring the other computer you are likely going to need to enter in one of the following options;
\\DESKTOP-S0K1813\Your Folder That You Want To Share On The Network
\\192.168.0.101\Your Folder That You Want To Share On The Network (i.e. the Static IP Address for the computer that is sharing the file)
And you’ll also likely need to specify the username and password for the computer that is sharing the file.
Note: It’s not always blindingly obvious what your username is on Windows 10 these days with how connected everything is to the cloud. i.e. is it ‘{First Name} {Last Name}’ like what shows on the login screen? Is it the name of your folder in My Documents (which is sometimes different than your name)? Is it your email address? Then what is your password, particularly if you login using a Pin now? Then is your computer managed independently, or via Active Directory etc. The point being, just make sure you’re using the right username and password. In a recent example, on a Windows 10 computer with local admin only (i.e. not a managed device), it was the email address what was the username and because the email address was set up as a personal account, it was the password used to login to outlook.com with that email address. It was this magic combo that got it working on this occasion.
Hope that helps to get you going in the right direction.
Note: Read this entire set of information multiple times before actually doing anything – you can really do some damage if you don’t know what you’re doing. If in doubt, speak to an expert.
Well, this isn’t something you have to do on a regular basis (thankfully!) but you’ll probably need to do this at some point when things go a little wrong.
So, a bit of setting the scene, for myself using Windows 10 for a development machine, all of a sudden something odd happened which looked like either a temporary hard drive failure / blip and / or an automatic Windows Update that didn’t quite work as expected (more than likely…). After not being able to boot onto the machine at all, this resulted in me having to completely re-install Windows 10 from a bootable USB. Thankfully when you do this, Microsoft copies all of your data to a ‘Windows.old’ folder so at least you still have access to everything on your machine. I mean, you’ve got everything backed up in the cloud anyway, so it doesn’t really matter… right?
Anyhow, you now have to task of getting your local MySQL Server back up and running in the exact state they were in before everything went into meltdown. And this is where things get a little interesting.
Step 1 – Find Your Old MySQL Server Information
Firstly you need to understand what version of MySQL Server you were running previously as you’ll need to download and install that exact version to avoid any version mismatches. To find this out, open the folder C:\Program Files\MySQL\MySQL Server X.X. Note, this is the original file path where it likely lives. If you had a similar issue to myself, then this will now be within C:\Windows.old\Program Files\MySQL\MySQL Server X.X.
Step 2 – Re-Install MySQL Server X.X
Now you know what version of MySQL Server you need to re-install, head over to Microsoft and download that. There is an archive page where you can download different versions of the MySQL installer which may come in handy, https://downloads.mysql.com/archives/installer/.
Step 3 – Find your Old Databases and Data
For localhost development, you’ve likely build this up with both genuine, temporary, test and junk databases and data over a period of time. And while you’ll have the schema creation files somewhere as you’ve been building genuine things, along with and migration files – the reality is that to go from nothing then through a number of migrations (for every database) over a period of time – this is going to be a nightmare to do and it highly unlikely to work 100%. Hey, if you have handy full database backup scripts that you run on your local machine on a nightly basis – you’re awesome – but let’s be honest – most people don’t have this (no-matter what they say…). So you’re back to restoring your databases by manipulating the core underlying files that MySQL Server runs from – yay!
So, before we get started, let’s first understand how MySQL Server works and actually stores the data on a Windows 10 machine. There are a few bits of information that you need to understand;
C:\Program Files\MySQL\MySQL Server X.X: This is where all of the files live that MySQL Server requires to run. Your actual databases and data aren’t stored within here.
C:\.Program Data\MySQL\MySQL Server X.X\data: This is a hidden file and this is where all of your databases and data are stored. It is these files that we’ll be using to restore your entire MySQL Server databases and data.
C:\.Program Data\MySQL\MySQL Server X.X\data\{your_database};
{your_database}.frm: FRM is a file extension for formatting used with MySQL. FRM stands for FoRMat. FRM files are used to define the format of a table used with MySQL. MySQL is a cross-platform relational database.
{your_database}.ibd: The IBD file type is primarily associated with MySQL – InnoDB by Sun Microsystems, Inc. InnoDB tables and indexes can be stored in their own file (a feature called “multiple tablespaces” since in this way each table uses its own tablespace).
{your_database}.opt: opt is just overall database options file. They contain no data.
Step 4 – Stop the MySQL Server Windows Background Service
If you’ve just installed MySQL Server again, it has likely automatically started and/or been configured to start as part of the Windows startup process. Since you’ll be changing one of the files and importing the old ones, this step just stops things failing along the way.
To do this, type;
CTRL + R (to open the Run box)
msc (to open the Windows Services)
Find ‘MySQL Server X.X
Right Click
Select: Stop
The service will now be stopped.
Step 5 – Rename your New ‘Data’ File
Remember I said that your databases are stored in C:\.Program Data\MySQL\MySQL Server X.X\data? Well, since you’ve just done a fresh install, it’s likely that you’ll have one of these folders created already. So go ahead and rename that to ‘data-old’ – You know, just in case anything goes wrong with the next step.
Step 6 – Move All Your Old Databases and Data
Next, simply move the entire /data/ folder that you want to restore and place it in C:\.Program Data\MySQL\MySQL Server X.X\data. Simple.
Step 7 – Start the MySQL Server Windows Background Service
Now you’ve copied all of your old databases and data over into the current installed folders, then you’re good to start the Windows service again now.
Step 8 – Verify the Restored Databases and Data in MySQL Workbench
Now you’ve restored the databases and data, let’s just double check that everything is there as you’re expecting. Open up MySQL Workbench, connect to your MySQL Server and verify the databases are listed and there is data in the tables where you would expect to see them.
Depending on how you installed MySQL Workbench, it is likely that you also installed the newest version of MySQL Server – so make sure you’re connecting to the correct version of MySQL Server that is running on your system as you may have multiple versions.
You can download older versions of MySQL Workbench from here and use the installer to set it all up, https://downloads.mysql.com/archives/workbench/, although if you’ve installed the latest version of MySQL Server already and likely the latest version of MySQL Workbench too, then before you install an older version of MySQL Workbench, I’d just try connecting to the older version of MySQL Server on your machine – just put it on a different port than the standard 3306, put it on 3307 or something like that if you aren’t using that port for anything else.
Notes
The above steps clearly aren’t going to work for everyone – but hopefully this is a starter for 10 if you’ve come across this problem and are in the process of trying to resolve.
There is also MySQL Utilities which may come in handy for more challenging restorations, https://downloads.mysql.com/archives/utilities/, you’ll need to have Python 2.6 installed (it doesn’t work on newer versions of Python), so download that from here if you need to, https://www.python.org/download/releases/2.6/. And you’ll also need Microsoft Visual C++ 2005 Redistributable Package (x64) installed too if you’re using MySQL Utilities, so download that here, https://www.microsoft.com/en-us/download/confirmation.aspx?id=21254. If you try to run MySQL Utilities once it’s installed without having Python 2.6 and the C++ package mentioned, then you’ll likely get the error “The command line MySQL Utilities could not be located. To use them, you must download and install the utilities package for your system from www.mysql.com. Click on the Download button to proceed.”
Good luck and feel free to comment with any tips / pointers you’ve found helpful along the way.
So, you’re probably reading this blog post after lots of searching online about how to do this, likely after lots of reading of hardware manufacturer’s documentation about how to upgrade firmware or similar. And you’ll probably also realise that we live in 2019 (at the time of writing….), so when a hardware manufacturer recommends you install some software on a ‘floppy disk drive’ you realise that the hardware world is stuck in the stone age. But hey. It is what it is, and we have to deal with this nonsense.
So, let’s figure out how to get this firmware upgrade onto a ‘floppy disk drive” aka a USB Drive!
A bit of background before we do though. It used to be pretty easy to boot into a DOS environment when Windows owned the world back in 1995. But things have changed a little since then and we have things like non-Microsoft software and other hardware made by many manufacturers around the world. This is great, but does complicate things a little.
DOS is an operating system that runs from a hard disk (aka. Disk Operating System) – but typically refers to MS-DOS, i.e. Microsoft Disk Operating System.
Ultimately if you need to upgrade the firmware on a piece of hardware on a machine, then you need to Boot the Machine to your DOS USB (i.e. configure the Boot Priority in your motherboard BIOS to boot from your USB, not Floppy…., Disk Drive).
What this means in simple terms is that you need to have on your UBS Drive is the Bootable USB Operating System (more on how to do this shortly…) PLUS the Firmware upgrade files (likely a Shell or Bash or Executable file).
Create a DOS Bootable USB
If you’ve simply tried to move the firmware upgrade files to the USB and boot directly to the USB drive with these files present you’ll be sorely disappointed as you’ll probably have received an error along the lines of “firmware upgrade shell load.exe is not recognised as an internal or external command”
What this basically means is that you cannot simply run the USB from Shell, but you must run the command from DOS instead. Semantics, but you’re working with underlying hardware here so you must be specific, so let’s create a DOS Bootable USB.
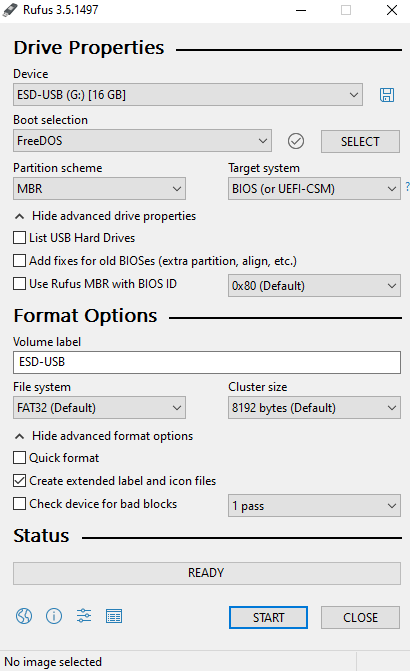
Firstly, download Rufus here, https://rufus.ie/, it’s pretty awesome, and more importantly allows you to create a bootable USB. Once you’ve opened Rufus, fill out the details as follows;
Prepare the Firmware Upgrade and Upgrade It
Basically, once you’ve created your DOS Bootable USB above, copy whatever files over to the same USB Drive as you’ll need to work with these once you’ve booted into the system.
Next, once you’ve booted into your DOS, simply run whatever commands your firmware upgrade tells you to.
Ok, so if you’re reading this, you’re probably a bit of a geek like myself. We’ve all seen the “Welcome Mr Stark” message that appears on Iron Man when Tony Stark logs into his private server. i.e. in other words, SSH’ing into his server.
So, how easy or difficult is it to get this set up? Well, it’s remarkably easy to configure this and it is all down to configuring your ‘Message of the Day’ on your server. So let’s have a play around.
Firstly, generate some text that you want to display, you could simple try the basis such as “Hello”, but that’s a bit boring. Instead, let’s look to replicate the same message that we can see on Tony Start’s private server. You’ll find many different ASCI Art Generators online if you search, so find one that you like the look of. Here are just a few examples that I’ve generated to give you an idea of the different styles you can use.
So once you’ve got the text that you want to configure, simply SSH into your server and run the command;
sudo -s
Which will switch your user over to the Sudo user, you’ll need to enter in the password to do this.
Next, run the command;
nano /etc/motd
Which will create a new file for you, if it doesn’t already exist, or edit the current file if it is already there. Feel free to use the editor of your choice here, personally I prefer the Nano editor as I find it more intuitive to use. Simply paste your text into here, and save the file.
Simple, you’re done. Then the next time you login to your server via SSH you’ll be greeted with the nice message that you entered;