I do this so infrequently, this blog post is mainly as a reminder to myself as a lot of content online around this topic isn’t quite as good as it could be. Anyhow. It’s important to remember how to easily mount a disk in a Linux environment so that it’s possible to control how and where you manage your data storage for your specific use case.
Context and Background
Firstly, understand your own infrastructure you’re working with – in depth. This specific blog post is based on a lab setup to provide guidance, not concrete solutions for production challenges.
The setup in this physical scenario is;
- Type 1 Hypervisor – XCP-ng
- HostOS HDDs/SSDs
- GuestOS HDDs/SSDs
- Virtual Machine running Ubuntu
- Default HDD/SSD Configured
- Virtual Machine running Ubuntu
And the scenario that we’re aiming to achieve is an additional disk mount against the ‘Virtual Machine running Ubuntu’. The reason being is that gives us a physically different location to store data against.
In this specific example, we have;
- RAID {X} Array for Type 1 Hypervisor HostOS
- RAID {X} Array for GuestOS Virtual Machines
- RAID {X} Array for Backups
All the above being on the same physical machine.
Partitioning and Formatting
Ensure your disks are partitioned and formatted so they are ready to be used if they are band new. Obviously don’t do this if you have data on the disk that you need. Again, this all comes down to your individual setup, but for ease, make sure your physical disks have been partitioned in the way that you require and have been formatted accordingly.
Attach the Disk to the Virtual Machine
Within XCP-ng Centre, make sure the virtual machine has the disk attached. Interestingly when you do this, this doesn’t mean that it is automatically available to be used interestingly so you can’t navigate to the new disk via the Linux command line, since that is installed on the disk where you installed Linux.
So next, we have to mount the new disk to the Linux installation on the main disk so that it can access that additional storage location.
Find Disk that can be Mounted
Firstly you need to SSH into your Linux virtual machine. To find the available disks, run the command;
fdisk -l
The fdisk utility is designed to manage partitions on hard drives which allows you to create, delete and partition disks for your specific use case. The L flag is for Listing the drives and their partitions. This command is extremely valuable to check if the disk has partitions or not. As you can see below, on the disk in question it has no partitions.
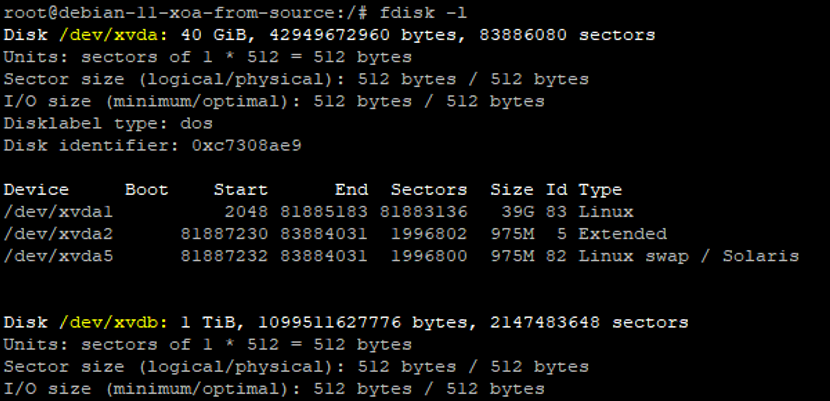
You’ll notice that the top disk in the above screenshot has a lot more information than the second disk which is showing there are no partitions on the disk. So next, we need to get those created.
Create Partition on Disk
As we can see in the previous image, the disk is at /dev/xcdb. So we need to use the fdisk command again to create a partition.
fdisk /dev/xcdb
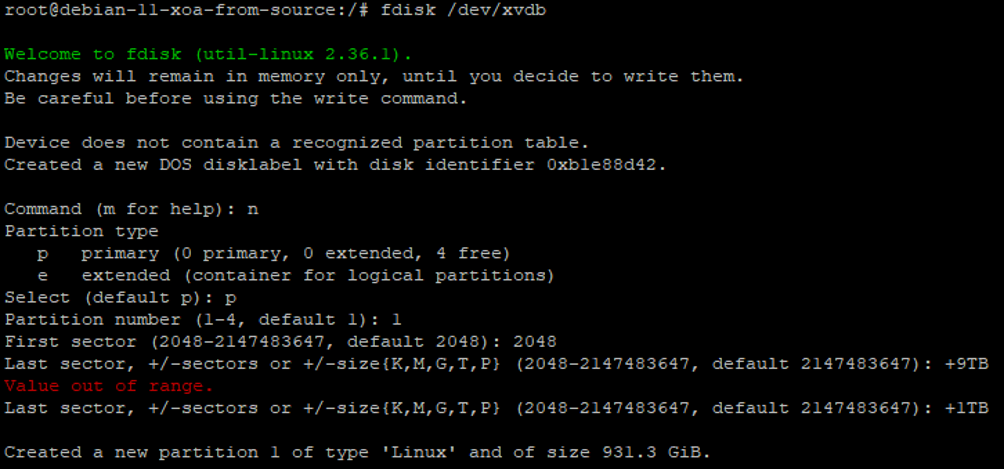
Here we can see we’ve used a couple of commands and configuration options when doing this which are primarily;
- n = New Partition
- p = Primary Partition
- 1 = Partition Number
- +1TB = Size of Partition
After following this through, we’ve now got a partition successfully created.
Next we need to write the changes to the partition table, aka. save changes, so that it is ready to be used with the w command;
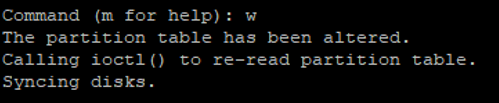
If you run the command fdisk –l again, you’ll see the partition that has been created which is setup as /dev/xvdb1.
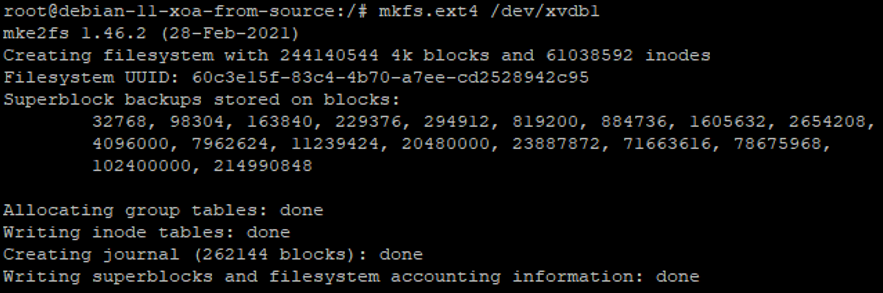
Next we need to create the file system using the command;
mkfs .ext4 /dev/xvdb1
Mount the Disk to Linux
Now we’ve got the disk partitioned and with a file system on, it’s time to mount the disk to Linux so that we can then use it. This part is straight forward now that the ground work has been done to the disk. So run the command;
mount /dev/xvdb1 /mnt/backups
Obviously change the disk name and the location folder to your specific use case.
Ensure the Mount Persists after Reboot
Finally, make sure the mount persists on reboot. To do this we use the fstab utility. To configure this, run the command nano /etc/fstab then edit the file as follows;
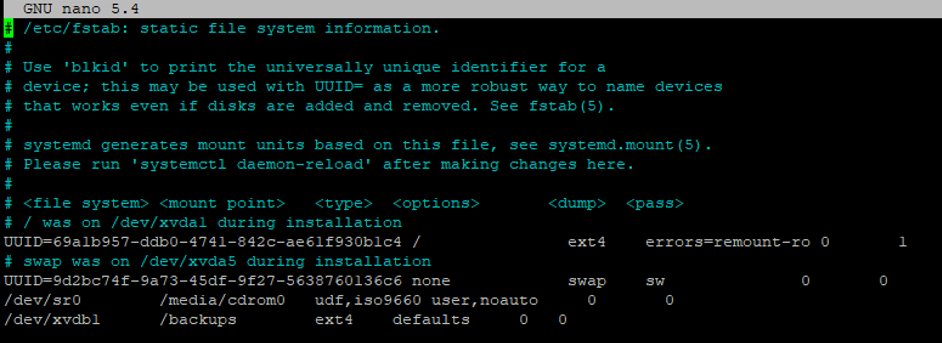
Save and exit the file. Job done. You can now use that new file system however you want as it is now accessible.
Michael Cropper
Latest posts by Michael Cropper (see all)
- How to fix “Error establishing a database connection” on WordPress - May 19, 2026
- General Scheme of the Regulation of Artificial Intelligence Bill 2026 - February 4, 2026
- WGET for Windows - April 10, 2025