by Michael Cropper | Jun 14, 2020 | Developer |
At some point in time you’re going to need to migrate a WordPress website from one web server to another web server. Whether that is because you’re moving your own website to another web server, or if you are moving your WordPress website from WordPress.com over to your own self-hosted WordPress setup on your web server.
Thankfully there is a really handy plugin available which allows you to easily migrate your WordPress website with relative ease, and that plugin is called All-in-One WP Migration. But, the WordPress migration is just one part of the process and you need to make sure you’ve got your activities in line to avoid any disruption to your website. We’ve already covered topics such as How to Migrate a Web Server Seamlessly with Zero Downtime and How to Migrate an Ecommerce Website between Servers with Zero Downtime previously, so to avoid repeating a lot of the other considerations you need to take into account we’ll be omitting them from this blog post. So we’ll be purely focusing on how to use the All-in-One WP Migration plugin.
Step 1 – Download your Website
Firstly, download and install the All-in-One WP Migration plugin via the usual route on the website you are looking to migrate elsewhere. Once installed go to, WordPress Admin > All-in-One WP Migration > Export and select where you would like to export the website to. I’d recommend exporting to File as this will download the website to the computer you are doing this work on. Exporting to File will make your life a little easier in the next step which is to import the website into a new installation.
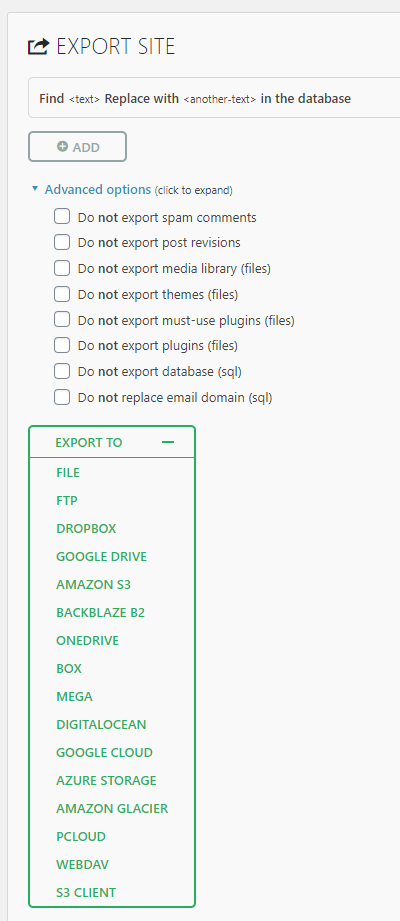
This option will download your entire website including files and database content.
Step 2 – Install WordPress on the New Web Server
Now you need to prepare the new web server. Ideally you’d do this before so you have time to iron out any kinks. You need to install WordPress via the usual mechanism you do this. This can vary between servers and web hosts or using the famous WordPress one-click-install option.
Once you’ve installed WordPress on the new web server you’ll need to install the All-in-One WP Migration plugin again.
Step 3 – Upload your Backup File
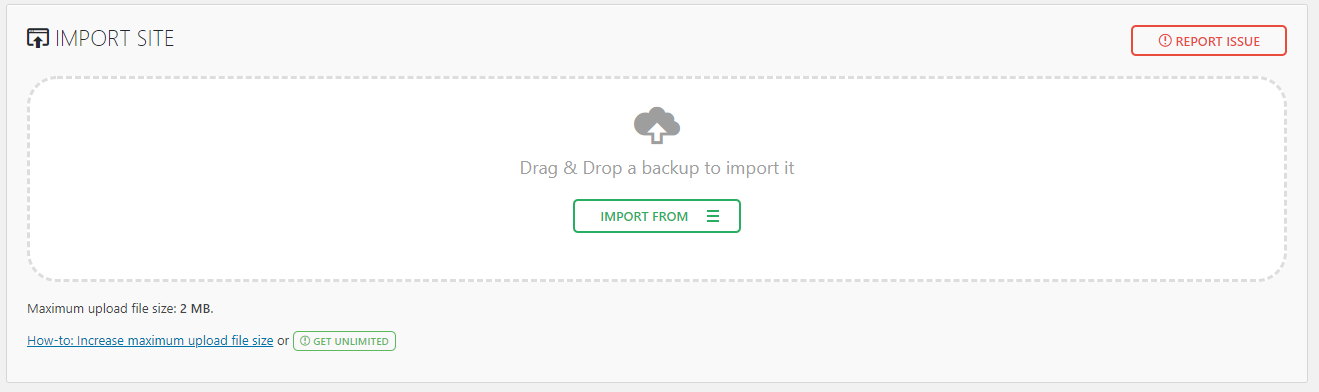
Now it’s time to upload the backup file from Step 1 to your WordPress installation on the new web server as outlined in Step 2. Important to note that many web servers out of the box limit the file upload size to around 2mb, so it’s likely you’ll need to temporarily increase the max_file_size and max_post_size settings within your php.ini file to make sure it is large enough to handle the upload.
To import your backup file simple navigate to, WordPress Admin > All-in-One WP Migration > Import, and you can import your backup file easily;
Once this has complete you’ll need to login to the website again as the default username and password you created in Step 2 will have been overwritten by the username and password that you used on the website when it was hosted on the old web server.
Summary
And it really is that simple to migrate a WordPress website between web servers or from WordPress.com over to a self-hosted version of WordPress. Naturally there are a lot of nuances along the way when working with web servers, DNS and file transfers so if you haven’t done this before make sure you give this a go on a test website initially. For low traffic websites the risk is extremely low. But for high traffic websites, ecommerce websites or heavily integrated websites then you need to plan these activities in a lot more detail to ensure its clear what the steps are to complete this successfully in the first run. There are often a lot more things to think about along the way, for example you may have a Mail Server or FTP server or non-WordPress databases also running on the old web server – you need to consider how you’re going to migrate these things as part of the process too if you’re using those. Some setups are simpler than others, but always consider as much as you can to minimise any issues during a migration.
by Michael Cropper | May 18, 2020 | Developer |
If you can remember all the cryptic commands within the Vi text editor on Linux then you are some kind of genius. For us mere mortals, the quickest way to edit files on Linux is to bin off Vi and move over to Nano. There, I said it, get over it. Nano is better than Vi hands down.
But in the unfortunate event you need to do a bit of Vi work before you can move over to Nano, for example to configure a network configuration file or to configure a Yum repositories configuration file for example, then you need to know how to work with Vi so you can get through that painful process as quick as possible.
Here are some handy Vi commands;
- Open a file: vi filename.txt
- Edit the file – aka. go into ‘insert mode’: Press the letter ‘i’ once you have opened the file
- Change what ever you need to do as usual
- Exit from Insert Mode: Press ESC
- Prepare to exit the file: Press colon :
- Now save and exit the file: Press, wq, then enter
- Whoops I messed up: Within Vi there are so many commands that seem to just utterly break the editor unless you know what they do that is can be difficult to exit out of the thing. If in doubt press ESC or CTRL + Q or CTRL + C and you should get back to where you need. Then exit the file without saving by pressing, :, q!, enter
I mean, simple, right?!?! Anyhow, that’s how you quickly edit the files you need and recover from when Vi has gone a bit crazy.
by Michael Cropper | May 18, 2020 | Developer |
Out of the box on CentOS 7 the default file editor is Vi, not Nano. And for any humans around, using Vi is beyond the reach of the mere mortals. Hey, if you can use Vi, then great, you can be on your merry way. But for the average user (like me!) then Nano is by far the easier option when it comes to working with editing files on Linux and CentOS 7.
Thankfully CentOS 7 also comes with Yum installed out of the box which is quite handy. Although if you’re playing with a complete fresh install, make sure your CentOS 7 box can connect to the internet as Ethernet is disabled out of the box too. I mean, who needs to access the internet, right…? So, assuming your all good to go based on the above, simply run the following command to get Nano installed on your system;
yum install nano
And that’s it, your download will start and you’ll be good to use Nano in no time at all.
by Michael Cropper | Apr 2, 2020 | Developer |
A common requirement for any project is to track the created and updated date/time stamp information. Thankfully with MySQL this is a relatively straight forward task… well, at least at the pure database level.
It is always recommended to track when your records were created and updated within all tables in your database as you can guarantee that at the point when you need it most, if you don’t have it you’ll regret not having it. Particularly when debugging problems and investigating issues.
Databases rarely live in isolation these days and there are many ways of logging the created and updated times. For example, you could within your web application actually generate the timestamp for all of your Insert and Update statements throughout your codebase and that is one perfectly good way of doing it. But let’s be honest, who has time for that. This approach comes with a lot of overhead for basic requirements although it is often essential to go down this approach for more complex requirements. But for now, let’s keep things simple.
MySQL is extremely powerful when it comes to managing your data. The two commands we’re going to take a look at for this are;
DETAULT Command
As you can probably imagine, this defines the default value for a column in your table. This allows you to assign a default value of your choosing based on the data type. In this case, a TIMESTAMP field which tracks the date and time. For this you can set the default to be the CURRENT_TIMESTAMP which will automatically populate your column created_date_time with the current timestamp whenever a new row is inserted.
ON UPDATE Command
And you can probably guess what this command does too…. It does something whenever a row of data is updated. You can only have one column per table that uses the ON UPDATE command so use it wisely. Again, you simply say what you want to do ON UPDATE, in this case you again want to store the CURRENT_TIMESTAMP against the field updated_date_time.
Example Alteration to a Table
Below you can see an example of how you can alter one of your database tables to have the created_date_time and updated_date_time columns with the handy MySQL features turned on so that you never have to worry about when the record was created or updated.
ALTER TABLE your_table_name ADD COLUMN created_date_time TIMESTAMP NOT NULL DEFAULT CURRENT_TIMESTAMP;
ALTER TABLE your_table_name ADD COLUMN updated_date_time TIMESTAMP NOT NULL DEFAULT CURRENT_TIMESTAMP ON UPDATE CURRENT_TIMESTAMP;
by Michael Cropper | Apr 2, 2020 | Developer |
For those core Java developers you will be very comfortable utilising the power of the Tomcat Manager to deploy your applications to your servers. But what happens when you’re working on a server that doesn’t have the usual Tomcat Manager available for you to use, just how do you go about deploying your application easily?
Thankfully, it is fairly straight forward to do, it just requires a couple more steps to get this working.
Ultimately your .war file for your Java web application is just a fancy .zip file and as such we can treat it as so. So follow the simple steps outlined below and you’ll have your Java WAR file deployed on cPanel in no time, all without using the Tomcat Manager.
- Within your IDE, Clean and Build your project to compile and package the war file so you’ll end up with a file here: /{IDE_FOLDER}/ExampleProject/dist/ExampleProject.war
- Rename this file to .zip
- Login to your cPanel account and go to the File Manager
- Navigate to /public_html
- Create a folder called: Backup_yyyy_mm_dd (you know…. Just in case)
- Move all of your current files into the backup folder you just created (excluding any files that aren’t part of your project i.e. .htaccess file, cgi-bin, .well-known (SSL certificates with Let’s Encrypt) and any application live data files such as images or document uploads that only sit within your live system due to user usage etc.
- Upload your ExampleProject.zip file
- Unzip the file
- Done
Note, you shouldn’t need to restart Tomcat as all your new files should get automatically loaded into memory by Tomcat, but if you do notice that some files aren’t showing the latest version then you may need to restart Tomcat to ensure the files are all uploaded. To do this the handy command on the latest version of cPanel (at the time of writing!) is as follows. Simple SSH into your server or use the Terminal functionality that exists within cPanel and run the command;
ubic restart ea-tomcat85
This will restart the running Tomcat instance for your user only. Simple!
And if all has failed and you need to restore the backup files you backed up at the start, jump into your FTP Client software such as FileZilla where you can easily move all files within your backup folder back to the parent level. Unfortunately this part isn’t out of the box functionality with cPanel, so I’d make sure you can access your server using FileZilla before you attempt this process as you may need to quickly jump back on there and fix it.