How to Grant Someone Access to a Google Analytics Account
Quick guide to sharing your Google Analytics account data without sharing your login detailsSharing data with those invested in the success of your website helps leads to a transparent data driven way of working. Your login details are your login details, no-one else’s, which is why it is important to retain control of your Google Analytics account and share data with people in the correct way.
This guide assumes that you have retained ownership of your digital asset, Google Analytics and that your login credentials are the main login details for the account. If you aren’t the original creator of the Google Analytics account then this guide may not be that useful for you, unless you have Administrator access.
The Correct Way
You could quite easily share your Google Analytics login details with anyone you feel needs them, although this isn’t a very secure way of working as login details can be easily passed around without you knowing. The people you share login details with may also be able to access other services such as Gmail or Google AdWords, depending on how you have set everything up. Your data is sensitive which is why it is important that you grant people access to your Google Analytics account the correct way, without sharing your personal login information.
Google Analytics has been designed to allow multiple people to access a single account which means that many people can view the data to see what is working and what isn’t working in relation to digital marketing campaigns or website performance in general. As such, it is always recommended to use this functionality, opposed to sharing your login details.
How to Grant Someone Access to Your Google Analytics Account
Follow the steps below to grant someone access to your Google Analytics account without having to share your login details.
Step 1 – Login to Google Analytics
Firstly, login to your Google Analytics account at www.google.com/analytics by clicking on the “Access Google Analytics” button in the top right;

Step 2 – Select the Account you wish to Grant Access to
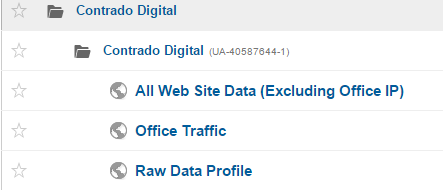
Once you are logged in to Google Analytics, you need to select which account you want to grant someone access to. Below shows the “Contrado Digital” Account, which contains the “Contrado Digital” Profile with 3x Views. The number of Views that you see may differ as these can be configured in many different ways. For now though, just select the main view that contains the data you want someone else to see, whatever this is called within your Google Analytics account;
Step 3 – Navigate to the Administration Area
Next, click on the “Admin” button in the main navigation. As soon as you have selected an account that you want to give access to someone, you are presented with the Audience Overview report by default. So clicking through to the administration area will allow you to control the settings related to this account;

Step 4 – Select User Management
Once you are within the administration area, you are presented with a whole host of options related to your Google Analytics account, profiles and views. The one we are interested in now is the “User Management” settings;
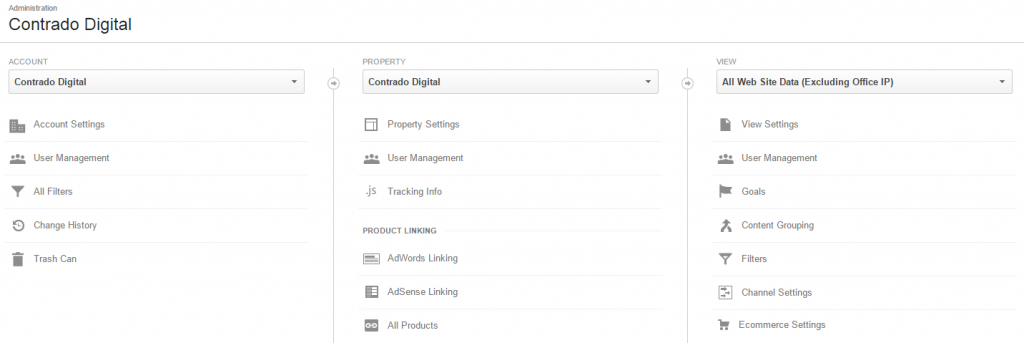
You will notice that there are three user management options, one at the Account level, another at the Property level and a further at the View level. If someone at Contrado Digital has sent you this guide, we need access at the Account level so we can see all of the data, so click on the “User Management” option beneath the Account column.
The different levels of user management allow you to control exactly who sees what. For example, for more advanced users, you can grant access to just a smaller section of your data for what they will be working on. This can be useful when your Account has multiple Properties for different websites you own and you may not want to share all of the data with everyone. For example, you may have a separate Property for your company intranet which is tracking how your staff are using the site and you may not want to share that information with everyone. In this instance, you could simply grant someone access using the “User Management” at the Property level instead for the website they are working on.
This level of granularity can be particularly useful as more staff within your organisation are accessing Google Analytics data to check how the website is performing. For example, you may prefer to give junior members of staff access to data at the View level, so that they don’t get confused by all of the different accounts. As you can create Views based on many different factors, we’ve also seen this same approach work well when certain departments can only see data about part of the website that they are responsible for. It tends to be much larger organisations who implement this level of granularity, although it is possible if you like.
Step 5 – View Current Users
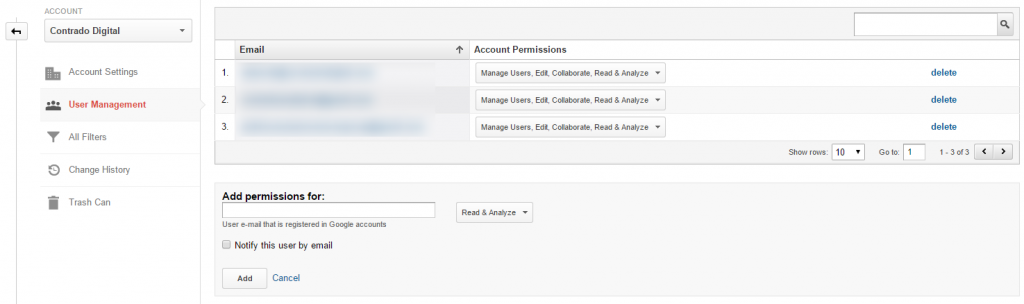
Now you are viewing the User Management settings. Here you can clearly see the current users who have access to your data and what permissions they have. We’ll come onto the permissions shortly;
Step 6 – Add New User
Now you can add a new user to view your Google Analytics data by completing the “Add Permissions For” box below;
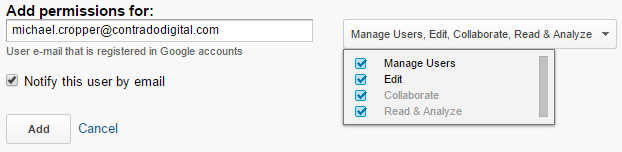
Here you simply enter the user’s email address, check the box to notify the new user that they have been granted access (it saves you emailing them to tell them…) then you have the option to select what access rights they have which is the box on the right hand side. There are several options here which include;
- Manage users: This means that this person can add or delete users from the account along with editing the permissions those user have.
- Edit: This means that users can perform administrative and report-related functions such as adding/editing/deleting accounts, properties, views, filters, goals etc. But they cannot manage users. This option allows people to view all of the data in reports too.
- Collaborate: This means that this new user can create personal assets and share them for example creating customised dashboards or adding annotations etc.
- Read & Analyse: This means that the user can see all the report data and can manipulate data within the reports using all of the standard Google Analytics features and functionality.
If you are granting us access, please select all of these options.
If you are granting staff access to the account, it is recommended that people who don’t need full access don’t have full access. If people haven’t been fully trained on Google Analytics then the last thing you would want is to give them the ability to accidentally delete an account or a profile etc. Once something has been deleted within Google Analytics, it is often impossible to get back, so only grant people access to a low level unless they clearly need full access.
Once you are done, simply click on the “Add” button and the new user will be able to access the Google Analytics account using their own credentials. It is important to note that the email address that has been entered here needs to have already been registered with Google Analytics as a service. If not, then you cannot grant access to that email address until they create their own Google Analytics account using their email address.
Google Analytics is an extremely powerful tool which is not easy for many people to get their head around at first. For this reason, we run Google Analytics Training workshops which can either be 1-2-1 or on a group basis if you would like us to visit your offices and run through the training for a group of your staff.