For those of you using cPanel and WHM as a system, you’ll be as glad as I am to hear about the latest release of AutoSSL which enables SSL certificates to be set up across accounts much easier than ever before. In summary, it’s possible to generate and install SSL certificates for individual cPanel accounts all via the WHM interface which is super useful when managing web servers with multiple accounts and domains hosted. All of which is powered by Let’s Encrypt which traditionally would have required quite a bit of command line set up via SSH.
To get this up and running is actually relatively straight forward.
Set up Let’s Encrypt for AutoSSL via SSH
This is the only part that you need to do via SSH and it is only required once. Simply login to SSH and run the following command;
/scripts/install_lets_encrypt_autossl_provider
Let everything install and configure, all automatically.
Configure AutoSSL in WHM to Use Let’s Encrypt
Navigate to the following page within WHM, Home > SSL/TSL > Manage AutoSSL. Now update the settings to use Let’s Encrypt instead of any other providers that you may have installed as can be seen below.
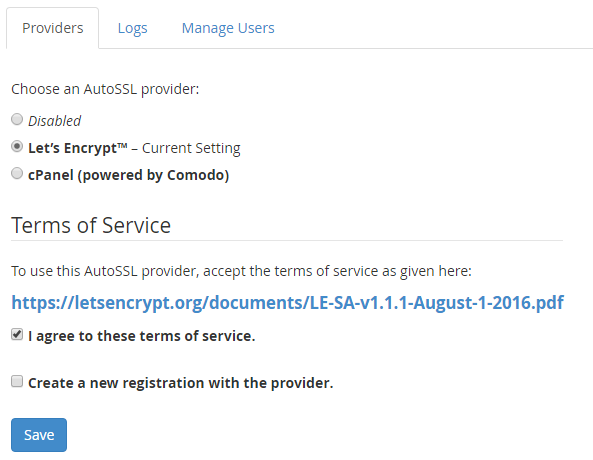

Once this is set up, when you use the AutoSSL feature Let’s Encrypt will be the certificate authority which manages this.
Run AutoSSL for cPanel Accounts
Now everything is set up to run AutoSSL, it’s time to start running it. While you can simply run this for all domains, it is recommended to take a more structured approach so you can be sure that you are updating everything correctly. Particularly when migrating WordPress websites from HTTP to HTTPS, there are a lot of additional tweaks to make to ensure everything works correctly.
To run AutoSSL on a specific cPanel account, simply click on the “Check” button next to the account you want to run this for. This will run AutoSSL for all Addon Domains associated within this cPanel account. There are a few restrictions currently for what will work here, so be sure to check the official cPanel documentation.


SSH Now Setup
Now access the HTTPS version of your website and everything should be set up and working. As mentioned previously, there will likely be other items to clean up to ensure the green padlock shows in your browser bar. From an AutoSSL standpoint, everything is complete. Simple.
Check within the individual cPanel account you have just updated and you should see that the certificate has been installed on the domains that are listed. This is super useful and saves a lot of time manually generating and implementing SSL certificates.
![]()

Caveats
If this doesn’t work for some reason then check the error logs for AutoSSL within WHM. This will provide you a lot of information about what has gone wrong. Particularly if you are using cloud based CDNs or firewalls such as Sucuri, then you’ll need to disable this to get AutoSSL working correctly. Be sure to check your .htaccess files too as sometimes you may have restrictions in here which only allows traffic to the website from the cloud based CDNs or firewalls such as Sucuri.
As with everything, make sure you know what you are doing before playing around with these types of things and make sure you fully understand your technical stack and setup. Just because this works for us, does not mean that this will be as seamless for you. Get in touch should you have any support requirements for getting this set up on your websites and web servers.


Michael Cropper
Latest posts by Michael Cropper (see all)
- How to fix “Error establishing a database connection” on WordPress - May 19, 2026
- General Scheme of the Regulation of Artificial Intelligence Bill 2026 - February 4, 2026
- WGET for Windows - April 10, 2025